
Modern visual media pipelines are a mess of glue code: upload webhooks, moderation, resizing, metadata updates, AI captioning, notifications… and a pile of one-off scripts to hold it all together. Cloudinary MediaFlows bundles everything together with a visual, production-ready workflow engine. Pair that with the MediaFlows MCP server and you can generate and iterate on flows straight from your editor (Windsurf/Cursor) using natural-language prompts, then refine them in the UI with full logs and guardrails.
In this tutorial, we’ll build a demo that will automate an end-to-end image workflow to:
-
Trigger on upload to a specific folder.
-
Analyze dimensions (flag low-res).
-
Transform to a 960px web-ready variant.
-
Use an LLM to generate alt text.
-
Write metadata (
description). -
Move the original to an approved folder.
-
Notify a human via email.
-
Log everything for observability.
You’ll scaffold the flow from your editor via the MCP server (fast path), then enable and test it in the MediaFlows UI.
-
Devs who want a reproducible visual media pipeline with minimal glue code.
-
Teams exploring AI-assisted workflows (alt text, captions, summarization).
-
Anyone who prefers building from their editor but deploying with UI controls and logs.
-
A Cloudinary account with MediaFlows enabled (pick a target product environment).
-
Cloud name, API key, API secret for that environment.
-
Windsurf (or Cursor) with MCP support.
-
Two folders in your Cloudinary environment:
incoming/andproducts/approved/. -
(Optional) A structured metadata text field named
descriptionfor alt text.
-
PowerFlows only (EasyFlows aren’t supported by the MCP tools).
-
New flows are created inactive, so you must enable them in the UI.
-
MCP doesn’t modify existing automations. Create a new one when you need changes.
-
Prompts can be nondeterministic. Clear, explicit steps produce better results.
-
Use the most advanced LLM model in your editor for best outcomes.
By the end, you’ll have a working, demo-ready flow you can trigger by uploading an image, plus a clear pattern for adding analysis, AI, and downstream actions.
First, we’ll need Windsurf talking to the MediaFlows MCP server so we can create flows directly from the editor.
Open your MCP configuration in Windsurf and add one of the following:
Option A: URL and headers
"mediaflows": {
  "url": "https://mediaflows.mcp.cloudinary.com/v2/mcp",
  "headers": {
    "cld-cloud-name": "YOUR_CLOUD_NAME",
    "cld-api-key": "YOUR_API_KEY",
    "cld-secret": "YOUR_API_SECRET"
  }
}
Code language: JavaScript (javascript)
Option B: Command style
"mediaflows": {
  "command": "npx",
  "args": [
    "-y",
    "mcp-remote",
    "https://mediaflows.mcp.cloudinary.com/v2/mcp",
    "--header", "cld-cloud-name: ${CLD_CLOUD_NAME}",
    "--header", "cld-api-key: ${CLD_API_KEY}",
    "--header", "cld-secret: ${CLD_SECRET}"
  ],
  "env": {
    "CLD_CLOUD_NAME": "YOUR_CLOUD_NAME",
    "CLD_API_KEY": "YOUR_API_KEY",
    "CLD_SECRET": "YOUR_API_SECRET"
  }
}

Code language: JavaScript (javascript)
Replace the placeholders with your Cloudinary environment details. Save the file and restart Windsurf.
In Windsurf, go to Manage MCP servers. You should see mediaflows with eight tools available:
-
list-blocks
-
list-flows
-
get-flow-definition
-
create-flow
-
get-flow-creation-rules
-
search-environment-folders
-
get-environment-structured-metadata
-
get-environment-info

Once confirmed, we’re ready to generate the flow.
With the MediaFlows MCP server connected, we can create our PowerFlow directly from Windsurf using a single detailed prompt.
In Windsurf open a chat panel, select the mediaflows MCP server, and paste this prompt:
Create a MediaFlows flow named "Upload_QA_AltText".
Trigger: on Cloudinary Upload for images in folder incoming/.
Steps:
1) Get asset info and check if width < 1200px. If true, add tag low_res.
2) Create a 960px wide JPG variant and return the public URL.
3) Use LLM to generate alt text and save it to metadata field description.
4) Move the original asset to folder products/approved/.
5) Send an email to moderation@company.com with the asset URL and generated description.
Return the flow external_id.
The MCP server will return:
-
Confirmation that the flow was created.
-
The
external_id. -
A description of the flow’s blocks.
-
A reminder that it’s inactive and must be enabled in MediaFlows.

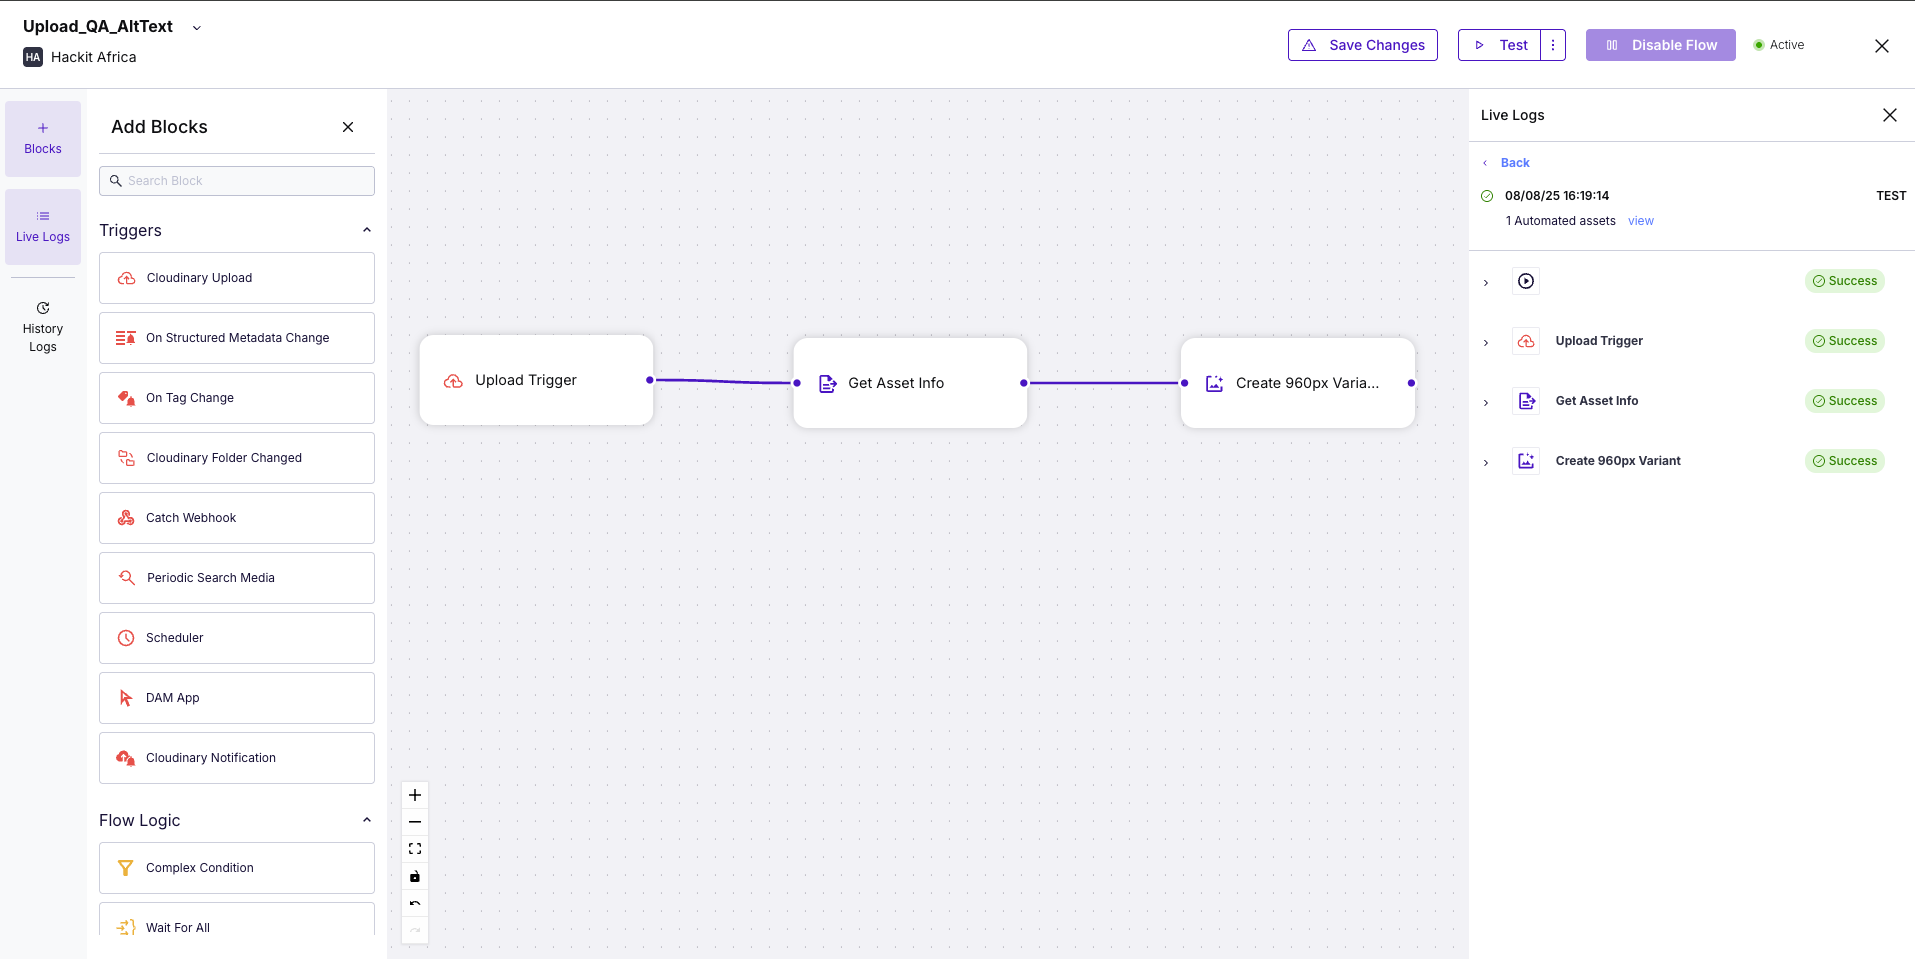
Open Cloudinary > MediaFlows. The new Upload_QA_AltText PowerFlow should appear in the list.
Click it to view the generated structure. It will likely include the starting blocks:
-
Cloudinary Upload Trigger
-
Get Asset Info
-
Create 960px Variant
We’ll add any missing blocks manually if the MCP did not include them.
The flow created by the MCP server is inactive by default. We need to enable it and run a test to make sure everything works.
-
In Cloudinary, open MediaFlows.
-
Select the
Upload_QA_AltTextPowerFlow. -
Click Enable Flow at the top right.
-
Upload an image into the
incoming/folder in your Cloudinary environment. -
Open the Live Logs panel in MediaFlows.
-
Confirm the steps run successfully:
-
Upload Trigger
-
Get Asset Info
-
Create 960px Variant
-
(And any extra steps we added manually)
Your final result should look like :
{
  "result": {
    "public_id": "blog-Developer_Media_Workflow_Automation_in_MediaFlows_With_Cloudinary_s_MCP_Server_and_Windsurf-4",
    "url": "https://cloudinary-marketing-res.cloudinary.com/image/upload/v1764445272/blog-Developer_Media_Workflow_Automation_in_MediaFlows_With_Cloudinary_s_MCP_Server_and_Windsurf-4.jpg"
  }
}

Code language: JSON / JSON with Comments (json)-
The 960px JPG variant should exist in the Media Library.
-
If the image is under 1200px wide, it should have the
low_restag. -
If the LLM and metadata steps were added,
descriptionshould contain generated alt text. -
The original should be in
products/approved/. -
An email should arrive in the moderation inbox.
Once confirmed, the basic automation is running and we can extend it with additional logic if needed.
By the way, once you have the basic flow working you can extend it in MediaFlows to make it more powerful. Here are a few ideas, plus example MCP prompts you could run in Windsurf to add them as new flows. We will not go step-by-step for these.
Watermark detection and routing
Prompt:
Create a MediaFlows flow named "Upload_Watermark_Check".
Trigger: on Cloudinary Upload for images in folder incoming/.
Steps:
1) Detect if the image has a watermark.
2) If watermarked, add tag needs_review and move to folder products/review/.
3) If clean, move to folder products/approved/.
Prompt:
Create a MediaFlows flow named "Upload_Content_Moderation".
Trigger: on Cloudinary Upload for images in folder incoming/.
Steps:
1) Run AI content moderation to detect NSFW content.
2) If NSFW, tag flagged and move to products/review/.
3) If safe, move to products/approved/.
Multi-size transformations
Prompt:
Create a MediaFlows flow named "Upload_Multi_Size".
Trigger: on Cloudinary Upload for images in folder incoming/.
Steps:
1) Create variants at widths 400px, 800px, and 1200px in JPG format.
2) Store their URLs in metadata fields size_400, size_800, size_1200.
Slack notifications
Prompt:
Create a MediaFlows flow named "Upload_Slack_Notify".
Trigger: on Cloudinary Upload for images in folder incoming/.
Steps:
1) Get asset info.
2) Send a message to a Slack webhook URL with asset name, folder, and public URL.
You can paste any of these into the Windsurf chat targeted at mediaflows, let MCP create the base flow, then enable and tweak in the MediaFlows UI.
Once the PowerFlow is enabled and tested, it can be used in different ways inside your Cloudinary environment.
This is the default we set up. Any time an image is uploaded into the incoming/ folder, the flow runs automatically. This is ideal for hands-off processing pipelines where assets are dropped in by apps, uploads widgets, or API calls.
If you want to run the flow on demand:
-
Go to the Cloudinary Media Library.
-
Right-click an asset.
-
Choose Run MediaFlows.
-
Pick your flow and confirm.
This is useful for moderation or reprocessing a single asset without moving it to the trigger folder.
Because the trigger is just a Cloudinary event, you can plug this into:
-
Your CMS media uploads.
-
E-commerce product image workflows.
-
Marketing campaign asset pipelines.
The output of this flow (metadata, folder placement, tags) can trigger other flows in MediaFlows or be consumed by external systems listening for asset updates.
When set up this way, the same flow you generated in Windsurf becomes part of your everyday asset lifecycle.
We’ve built and tested a complete visual media automation using Cloudinary MediaFlows and the MediaFlows MCP server inside Windsurf.
Starting from a single prompt, we created a PowerFlow that:
-
Triggers automatically on image upload.
-
Analyzes and tags low resolution images.
-
Generates a 960px web-ready variant.
-
Uses an LLM to create alt text.
-
Saves metadata for accessibility.
-
Moves approved assets to the right folder.
-
Sends a notification email.
-
Logs every step for transparency.
The MCP server allowed us to work quickly from the editor while MediaFlows provided a visual, reliable execution layer with full logging and controls.
Need some ideas on what to do with your server? Try experimenting with more AI-powered analysis or moderation steps. Connect your flows to Slack, Trello, or your CMS, and share templates with your team so they can build on top of your patterns.
Ready to build a powerful, reusable visual media workflows in minutes and adapt them to real production needs without leaving your preferred development environment? Contact us today to learn more about Cloudinary’s MediaFlows, or sign up for a free account to get started.


