
If you’ve ever uploaded an image for a blog post or static site, you know the drill. Open Cloudinary, drag a file, copy a URL, jump back to your editor, and paste it into your markdown. Doing this manually can break focus fast.
What if, instead, you could stay in VS Code, type a prompt in GitHub Copilot Chat, and have your image uploaded, optimized, and inserted into your post automatically?
This tutorial shows you how to set up Cloudinary’s MCP Server inside VS Code and use it with GitHub Copilot to:
- Upload images from your local project.
- Generate transformed formats (WebP, AVIF, JPG).
- Insert clean, documented URLs into your markdown.
Let’s say you’re building a markdown-driven blog and want to include optimized images without leaving your IDE. With this setup, you’ll:
- Add an image to your project’s
/public/imagesfolder. - Tell Copilot what to do in plain English.
- Watch it upload the file to Cloudinary.
- Get back multiple image formats with a markdown-ready media report.
This flow is perfect for:
- Technical writers working in MDX or Markdown.
- Static site developers (Next.js, Astro, Hugo).
- Teams managing documentation and changelogs.
By the end of this tutorial, you’ll have a production-ready system for managing and delivering images fully automated, fully in-editor. Cloudinary provides the media infrastructure, while Copilot provides the intelligence and MCP the context.
Let’s get started!
In this section, you’ll scaffold a minimal project folder directly in VS Code, with a markdown file and a directory for image uploads.
In the VS Code terminal:
mkdir cloudinary-mcp-blog && cd cloudinary-mcp-blog
Still in the terminal:
mkdir -p public/images
Code language: PHP (php)In the terminal:
touch blog-post.md
Code language: CSS (css)
Then open blog-post.md in the VS Code editor and paste in:
# Welcome to My Blog
This is a sample post with an image.

Drag an image (example: banner.png) into the public/images folder using the VS Code file explorer.
In this section, we’ll configure the Cloudinary Asset Management MCP server using the Copilot Chat integration in VS Code. This will allow us to run Cloudinary media commands directly from the terminal without leaving the editor.
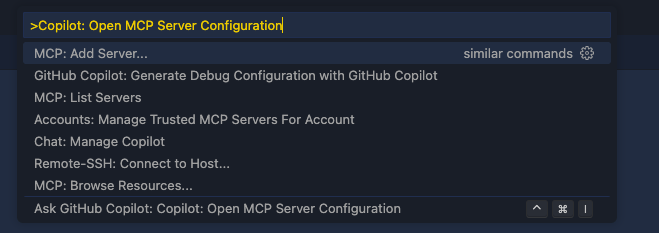
Open the Command Palette:
Cmd + Shift + P (Mac)

Ctrl + Shift + P (Windows/Linux)
Type:
Copilot: Open MCP Server Configuration
Code language: HTTP (http)
Select it to start the guided server setup.
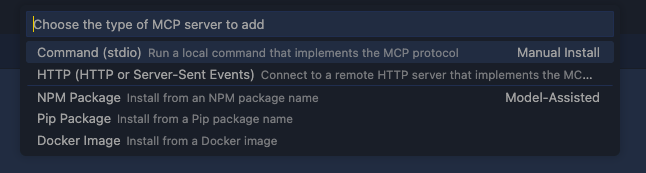
When prompted, choose:
Command (stdio)
This option tells VS Code to run the MCP server locally via the command line.
When prompted to enter the server ID, type:
cloudinary-asset-mgmt
This label acts as both the display name and internal identifier for the MCP server.

When prompted, paste:
npx --yes --package @cloudinary/asset-management -- cloudinary mcp
This tells VS Code to run the Cloudinary MCP CLI using npx.

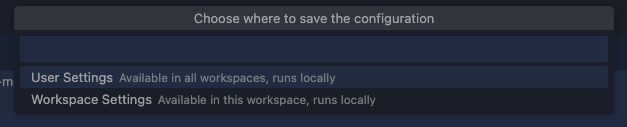
When asked where to save the configuration, choose:
User Settings
This stores the server configuration globally in your VS Code settings.json.
After saving the MCP server to User Settings, open your global settings file to add your Cloudinary credentials:
-
Open the Command Palette
-
Run:
Preferences: Open Settings (JSON)
Code language: JavaScript (javascript)
Locate the cloudinary-asset-mgmt server block and update it as follows:
"mcp.servers": {
  "cloudinary-asset-mgmt": {
    "type": "stdio",
    "command": "npx",
    "args": [
      "--yes",
      "--package",
      "@cloudinary/asset-management",
      "--",
      "cloudinary",
      "mcp"
    ],
    "env": {
      "CLOUDINARY_CLOUD_NAME": "your-cloud-name",
      "CLOUDINARY_API_KEY": "your-api-key",
      "CLOUDINARY_API_SECRET": "your-api-secret"
    }
  }
}
Code language: JavaScript (javascript)
Replace the placeholders with your actual values from the Cloudinary Console under Settings > API Keys.
Once saved, this MCP server will be globally available inside VS Code and ready to use with Copilot Chat or the terminal.
Now that the Cloudinary MCP server is set up, we’ll use GitHub Copilot Chat inside VS Code to automate media uploads and inject the returned image URLs directly into your markdown file.
- Click the Copilot icon in the top-right corner of VS Code.
- Select Open Chat from the dropdown.
- The Copilot Chat panel will appear at the bottom of your editor.

Click the Add Context button in the chat panel and select:
blog-post.md
This allows Copilot to read and modify that file.
In the Copilot Chat input box, type the following:
Upload public/images/banner.png to the mcp_server_test folder in Cloudinary and replace the placeholder image link in blog-post.md with the returned public URL.
Copilot will:
- Use the configured Cloudinary MCP server.
- Upload
banner.pngto themcp_server_testfolder. - Receive a Cloudinary public URL.
- Open
blog-post.mdand replace this placeholder:

With the actual public Cloudinary link:

If everything is configured correctly, the following will happen inside VS Code:
- The Copilot chat panel will display the executed
cloudinary mcp uploadcommand. - You’ll see the Cloudinary CLI output showing the public URL.
- Copilot will insert the URL into
blog-post.mdautomatically. - Your Cloudinary Media Library will show the uploaded image under
mcp_server_test/banner.png.
Here’s what this entire process looks like in action inside VS Code:

Instead of uploading and editing manually, you can instruct GitHub Copilot to handle uploading, transforming, and documenting your image in one step.
In Copilot Chat, with blog-post.md added as context, type:
Upload public/images/banner.png to the mcp_server_test folder in Cloudinary, generate optimized delivery URLs for WebP, JPG, and AVIF, and append a markdown media report table to the end of blog-post.md.
Copilot will upload the image; apply f_webp, f_jpg, and f_avif transformations; and then insert a media optimization report like this:
This gives you fast, optimized, format-aware media delivery, and clean markdown documentation from a single Copilot instruction.
The Cloudinary MCP server is a programmable bridge between your local development environment and Cloudinary’s intelligent visual media platform. By integrating directly with VS Code, it gives developers the ability to manage, optimize, and deliver media without leaving the editor.
Paired with GitHub Copilot, the possibilities multiply. You’re not just using AI to write code — you’re giving it real-world context. With the Cloudinary MCP server installed and configured, Copilot can:
- Understand your file system.
- Access specific media assets.
- Trigger uploads, transformations, and analysis.
- Modify project files based on real-time output.
This is the power of MCP servers in VS Code: They let AI agents (like Copilot) operate as if they’re part of your toolchain, not just passengers.
Build image-rich blogs, media dashboards, or developer documentation; this setup enables you to work smarter and ship faster with Cloudinary handling delivery and Copilot handling intent.
The future of AI development is building tools that understand your project, interact with your services, and act on your behalf safely and efficiently.
Cloudinary’s MCP server is one of the first real steps in that direction. Contact us today to learn more.


