
Storing files is necessary due to the ease with which pictures, videos, and other files can be generated. The smartphone era played a significant role in this; people want to save their memories so that they can always refer back to them in the future.
This blog post explains how to build a file storage application in Next.js, using Xata to provide the database service and Cloudinary to store the files.
- You should have a basic understanding of Javascript.
- You should have a basic knowledge of React.js and Next.js.
- Next.js is a React framework that builds on the functionality of React.js. It simplifies the creation of pages and API endpoints.
- Cloudinary is a cloud media platform that allows users to upload files easily.
- Xata is a serverless data platform that allows users to store, search for, and get insights into data.
To begin, we’ll create a new Next.js app, launch our terminal, create a new empty directory, and execute the following command:
npx create-next-app@latestCode language: CSS (css)Make sure you’re in the correct directory and install the dependencies using a package manager like npm, yarn, or pnpm:
npm i bcryptjs react-notifications We’ll create the necessary pages needed for the application with the code below.
- Index.js
- all.js
- files.js
- photos.js
- videos.js
- login.js
- signup.js
html {
  background-color: black;
}

body {
  margin: 0px;
  padding: 0px;
}

a {
  color: white;
}

.input {
  width: 90%;
  height: 64px;
  border: 1px solid white;
  border-radius: 8px;
  font-family: "Nunito Sans";
  font-style: normal;
  font-weight: 400;
  font-size: 16px;
  padding-left: 25px;
  color: #828282;
  background-color: transparent;
  margin-bottom: 30px;
  color: white;
}

.form {
  width: 50%;
  margin-left: auto;
  margin-right: auto;
  margin-top: 200px;
}

.but {
  width: 254px;
  height: 64px;
  margin-top: 50px;
  font-family: "Nunito Sans";
  font-style: normal;
  font-weight: 400;
  font-size: 24px;
  color: #001b1c;
  background: white;
  border: none;
}

.white {
  color: white;
  margin-bottom: 50px;
}Code language: CSS (css)
Global css for all the pages.
.homeflex {
  display: flex;
}

.home {
  margin-left: 50px;
  width: 80%;
}

.homehead {
  font-family: "Nunito Sans";
  font-style: normal;
  font-size: 30px;
  color: white;
}

.homehead2 {
  font-family: "Nunito Sans";
  font-style: normal;
  font-size: 20px;
  color: white;
}

.upload {
  width: 360px;
  height: 96px;
  display: block;
  margin-left: auto;
  margin-right: auto;
  border: none;
  /* Hotel/Hotel Button */
  background: white;
  margin-top: 100px;
  font-family: "Nunito Sans";
  font-style: normal;
  font-weight: 400;
  font-size: 32px;
  color: #001b1c;
}

.box1 {
  margin-top: 100px;
}

.file {
  border-radius: 4px;
  background-color: #fff;
  margin-bottom: 30px;
  font-family: "Nunito Sans";
  font-style: normal;
  font-weight: 400;
  font-size: 18px;
  padding: 20px;
  color: black;
}

.cloud {
  display: flex;
  justify-content: space-between;
}

.home_text {
  color: black;
}

.head {
  color: white;
  font-size: 30px;
  font-family: "Nunito Sans";
  font-style: normal;
}

.head2 {
  color: white;
  font-size: 30px;
  font-family: "Nunito Sans";
  font-style: normal;
  margin-top: 30px;
  margin-bottom: 30px;
  margin-top: 100px;
}Code language: CSS (css).sidebar {
font-size: 48px;
background: #00008c;
width: 200px;
height: auto;
min-height: 100vh;
font-family: "Nunito Sans";
font-style: normal;
padding-top: 100px;
}
.item {
font-family: "Nunito Sans";
font-style: normal;
font-size: 24px;
padding: 30px;
color: white;
cursor: pointer;
}
.rm {
text-decoration: none;
}
.log {
color: red;
font-family: "Nunito Sans";
font-style: normal;
font-size: 24px;
padding: 30px;
cursor: pointer;
}Code language: CSS (css)CSS for the sidebar components
pages/_document.js
import { Html, Head, Main, NextScript } from "next/document";

export default function Document() {
  return (
    <Html>
      <Head>
        <link rel="preconnect" href="https://fonts.googleapis.com" />
        <link rel="preconnect" href="https://fonts.gstatic.com" crossorigin />
        <link
          href="https://fonts.googleapis.com/css2?family=Nunito+Sans:ital,wght@0,200;0,300;0,400;0,600;0,700;0,800;0,900;1,200;1,300;1,400;1,600;1,700;1,800;1,900&family=Raleway:ital,wght@0,200;0,300;0,400;0,500;0,600;0,700;0,800;0,900;1,100;1,200;1,300;1,400;1,500;1,600;1,700;1,800;1,900&display=swap"
          rel="stylesheet"
        />
      </Head>
      <body>
        <Main />
        <NextScript />
      </body>
    </Html>
  );
}Code language: JavaScript (javascript)
We used the _document.js file to add font to our application.
components/Sidebar.js
import styles from "./Sidebar.module.css";
import Link from "next/link";

export default function Sidebar() {
  return (
    <div className={styles.sidebar}>
      <Link className={styles.rm} href="/">
        <div className={styles.item}>Home</div>
      </Link>

      <Link href="/all" className={styles.rm}>
        <div className={styles.item}>All</div>
      </Link>

      <Link href="/files" className={styles.rm}>
        <div className={styles.item}>Documents</div>
      </Link>

      <Link href="/videos" className={styles.rm}>
        <div className={styles.item}>Videos</div>
      </Link>

      <Link href="/photos" className={styles.rm}>
        <div className={styles.item}>Photos</div>
      </Link>

      <div className={styles.log}>
        Logout
      </div>
    </div>
  );
}Code language: JavaScript (javascript)
The Sidebar component is used for switching between pages, and it is used on all the pages.
pages/index.js
import Head from "next/head";
import styles from "../styles/Home.module.css";
import Sidebar from "../components/Sidebar";

export default function Home() {
  return (
    <div>
      <Head>
        <title>CloudDrop - Home</title>
        <meta name="description" content="Clouddrop" />
        {/*  eslint-disable-next-line @next/next/no-sync-scripts */}
        <script
          src="https://upload-widget.cloudinary.com/global/all.js"
          type="text/javascript"
        ></script>
      </Head>

      <div className={styles.homeflex}>
        <Sidebar />
        <div className={styles.home}>
          <div className={styles.cloud}>
            <h1 className={styles.homehead}>CloudDrop </h1>
            <h3 className={styles.homehead2}></h3>
          </div>

          <button type="button" className={styles.upload}>
            Upload File
          </button>
        </div>
      </div>
    </div>
  );
}Code language: JavaScript (javascript)
The index page allows users to upload their files and view recently uploaded files.
pages/all.js
import React, { useEffect, useState } from "react";
import Head from "next/head";
import styles from "../styles/Home.module.css";
import Sidebar from "../components/Sidebar";

export default function All() {
  return (
    <div>
      <Head>
        <title>CloudDrop</title>
        <meta name="description" content="Clouddrop" />
      </Head>
      <div className={styles.homeflex}>
        <Sidebar />
        <div className={styles.home}>
          <h1 className={styles.homehead}>CloudDrop</h1>

          <h2 className={styles.head2}>All</h2>
        </div>
      </div>
    </div>
  );
}Code language: JavaScript (javascript)
The all.js page is where users can view all their files.
pages/files.js
import React, { useEffect, useState } from "react";
import Head from "next/head";
import styles from "../styles/Home.module.css";
import Sidebar from "../components/Sidebar";

export default function Files() {
  return (
    <div>
      <Head>
        <title>CloudDrop - Files</title>
        <meta name="description" content="Clouddrop" />
      </Head>
      <div className={styles.homeflex}>
        <Sidebar />
        <div className={styles.home}>
          <h1 className={styles.homehead}>CloudDrop</h1>
          <h2 className={styles.head2}>Documents</h2>
        </div>
      </div>
    </div>
  );
}Code language: JavaScript (javascript)
The files.js page is where users can view their documents such as pdf, word document, excel documents and others.
pages/photos.js
import React, { useEffect, useState } from "react";
import Head from "next/head";
import Image from "next/image";
import styles from "../styles/Home.module.css";
import Sidebar from "../components/Sidebar";

export default function Photos() {
  return (
    <div>
      <Head>
        <title>CloudDrop</title>
        <meta name="description" content="Clouddrop" />
      </Head>
      <div className={styles.homeflex}>
        <Sidebar />
        <div className={styles.home}>
          <h1 className={styles.homehead}>CloudDrop</h1>
          <h2 className={styles.head2}>Images</h2>
        </div>
      </div>
    </div>
  );
}Code language: JavaScript (javascript)
The photos page is where users can view all their pictures.
pages/videos.js
import React, { useEffect, useState } from "react";
import Head from "next/head";
import Image from "next/image";
import styles from "../styles/Home.module.css";
import Sidebar from "../components/Sidebar";

export default function Video() {
  return (
    <div>
      <Head>
        <title>CloudDrop</title>
        <meta name="description" content="Clouddrop" />
      </Head>
      <div className={styles.homeflex}>
        <Sidebar />
        <div className={styles.home}>
          <h1 className={styles.homehead}>CloudDrop</h1>
          <h2 className={styles.head2}>Videos</h2>
        </div>
      </div>
    </div>
  );
}Code language: JavaScript (javascript)
The videos page is where users can view all their videos.
pages/login.js
import React, { useState, useRef } from "react";
import Link from "next/link";

export default function Login() {
  return (
    <div>
      <div className="form">
        <h2 className="white">Login</h2>
        <div>
          <input className="input" placeholder="Enter Email" />
        </div>

        <div>
          <input
            className="input"
            placeholder="Enter Password"
            type="password"
          />
        </div>

        <div>
          {/*  eslint-disable-next-line @next/next/no-html-link-for-pages */}
          <Link href="/signup">Signup</Link>
        </div>

        <button className="but">Login</button>
      </div>
    </div>
  );
}Code language: JavaScript (javascript)
The login page is the access page to the application, and only authenticated users can access the application.
pages/signup.js
import React, { useState, useRef } from "react";
import Link from "next/link";

export default function Signup({ data }) {
  return (
    <div>
      <div className="form">
        <h2 className="white">Signup</h2>
        <div>
          <input className="input" placeholder="Enter Email" />
        </div>

        <div>
          <input
            className="input"
            type="password"
            placeholder="Enter Password"
          />
        </div>

        <div>
          {/*   eslint-disable-next-line @next/next/no-html-link-for-pages */}
          <Link href="/login">Login</Link>
        </div>

        <button className="but">Signup</button>
      </div>
    </div>
  );
}Code language: JavaScript (javascript)
The signup page is where the users register to access the application.
We need to log in to xata.io to be able to create a database and add tables to the database. Sign in with GitHub or Google Mail or personal email.
Add a workspace. We can do this by entering the workspace name.
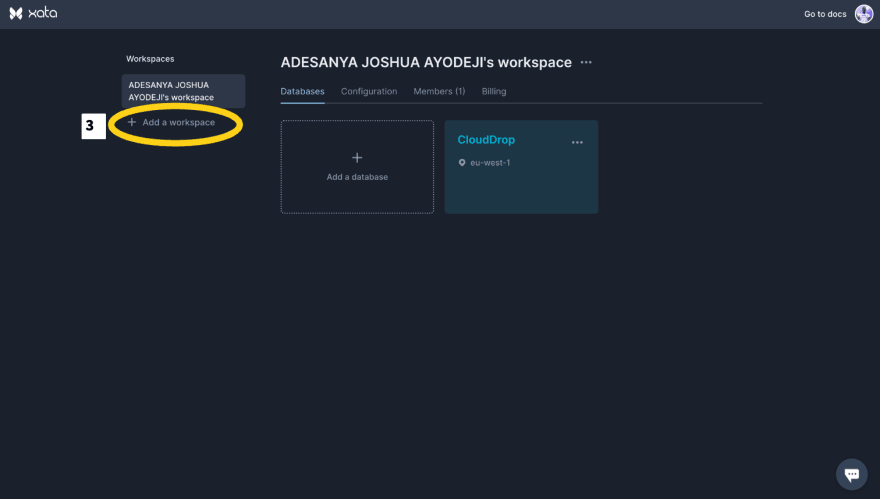
Add a Database. We can do this by entering the database name and selecting the preferred zone.

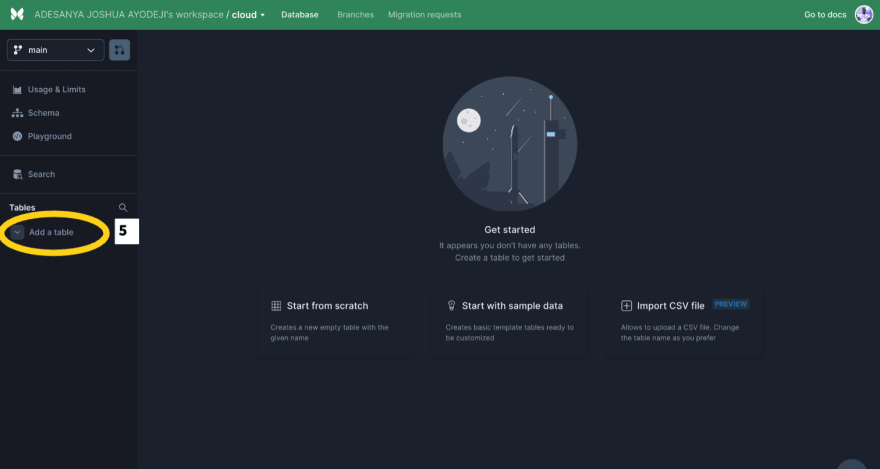
Next, let’s add a table. We can do this by selecting the database and clicking Add a table. Select an empty table and enter a table name. We can add a users table first.
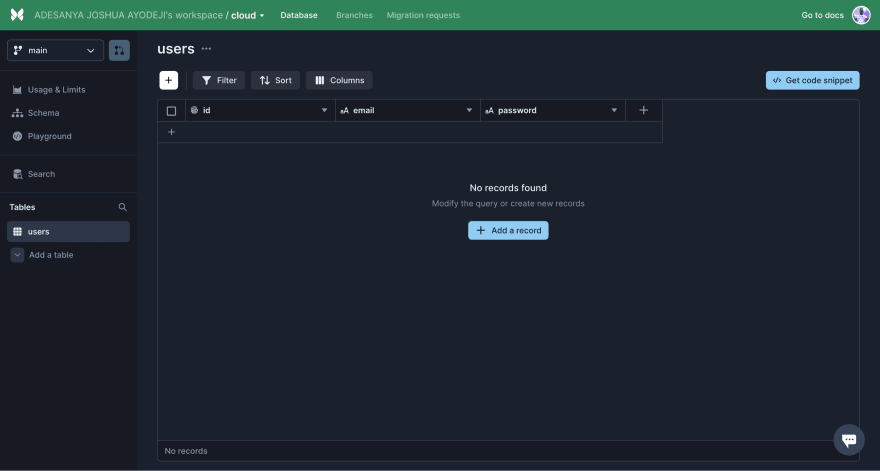
Let’s also add fields to the table. The users table needs an id, email, and password field, while the files table needs an id, name, type, date, url, and userid field. The id field is created by default and autogenerated. Click the highlighted icon and select the appropriate data type.

The datatypes for the Users fields are:
- Email – String
- Password – String
The datatypes for the Files fields are:
- Name – String
- Type – String
- Date – date
- Url – String
- Userid – String

Copy the workspace base API URL.

To generate the API key, go to your account settings, enter the name of the API key, and click o save.

Sign up for Cloudinary and log in to your account.
Get the cloudname on the dashboard and the presetname on the settings page.
We added the Cloudinary script to our index.js page during the page setup. Now, let’s add the necessary code to upload files to Cloudinary and get the URL link to our file.
import Head from "next/head";
import styles from "../styles/Home.module.css";
import Sidebar from "../components/Sidebar";

export default function Home() {
  //The showWidget pops up a cloudinary widget that we can use to upload any file and it returns an object that contains
  // the name, link to the url of the uploaded file and other information
  const showWidget = () => {
    const myWidget = window.cloudinary.createUploadWidget(
      {
        cloudName: "Insert your cloudName",
        uploadPreset: "Insert your uploadPreset",
      },
      (error, result) => {
        if (!error && result && result.event === "success") {
          console.log(result);
        }
      }
    );
    myWidget.open();
  };
  return (
    <div>
      <Head>
        <title>CloudDrop - Home</title>
        <meta name="description" content="Clouddrop" />
        {/*  eslint-disable-next-line @next/next/no-sync-scripts */}
        <script
          src="https://upload-widget.cloudinary.com/global/all.js"
          type="text/javascript"
        ></script>
      </Head>

      <div className={styles.homeflex}>
        <Sidebar />
        <div className={styles.home}>
          <div className={styles.cloud}>
            <h1 className={styles.homehead}>CloudDrop </h1>
            <h3 className={styles.homehead2}></h3>
          </div>
          {/* We added the showWidget function to the onClick handler */}
          <button onClick={showWidget} type="button" className={styles.upload}>
            Upload File
          </button>
        </div>
      </div>
    </div>
  );
}Code language: JavaScript (javascript)This application will do four significant actions on Xata: signup, log in, save, and retrieve files.
Before we set up our API routes, we need to add our ENV file.
ENV
XATA=Bearer <Insert your API KEY>
salt=<Insert anything>
database=<workspace base API URL>Code language: HTML, XML (xml)
api/signup.js
// Next.js API route support: https://nextjs.org/docs/api-routes/introduction

export default function handler(req, res) {
  if (req.method === "POST") {
    // parse incoming request
    const cred = JSON.parse(req.body);

    // option object for first request, filter checks if email already exists in the database
    const options1 = {
      method: "POST",
      headers: {
        Authorization: process.env.XATA,
        "Content-Type": "application/json",
      },
      body: `{"filter":{"email":{"$contains":"${cred.email}"}},"page":{"size":15}}`,
    };

    //option object for second request, body contains email and password to create a new user
    const options2 = {
      method: "POST",
      headers: {
        Authorization: process.env.XATA,
        "Content-Type": "application/json",
      },
      body: JSON.stringify(cred),
    };

    (async () => {
      try {
        // check if user already exists
        const response = await fetch(
          `${process.env.database}:main/tables/users/query`,
          options1
        );
        const data = await response.json();
        // returns error message if user exists
        if (data.records.length > 0) {
          return res.status(400).json({ message: "User already exists" });
        } else {
          // create a new user if user does not exist
          const response2 = await fetch(
            `${process.env.database}:main/tables/users/data?columns=id`,
            options2
          );
          const data2 = await response2.json();
          return res.status(200).json(data2);
        }
      } catch (err) {
        console.log(err);
        return res.status(500).json({ message: "An error occured" });
      }
    })();
  }
}Code language: JavaScript (javascript)
The signup API route expects a request body from the client, it is a POST request, and the first thing it does is check if the email already exists; if it does, it returns an error message, but if it does not, it creates a new user in the database.
api/login.js
// Next.js API route support: https://nextjs.org/docs/api-routes/introduction

export default function handler(req, res) {
  if (req.method === "POST") {
    // Parse incoming request body and get the email
    const email = JSON.parse(req.body).email;
    // option object, filter checks for email in the database
    const options = {
      method: "POST",
      headers: {
        Authorization: process.env.XATA,
        "Content-Type": "application/json",
      },
      body: `{"filter":{"email":{"$contains":"${email}"}},"page":{"size":15}}`,
    };

    (async () => {
      try {
        // get user data, if email exist in the database.
        const response = await fetch(
          `${process.env.database}:main/tables/users/query`,
          options
        );

        const data = await response.json();
        return res.status(200).json(data.records);
      } catch (err) {
        return res.status(500).json({ message: "An error occured" });
      }
    })();
  }
}Code language: JavaScript (javascript)
The login API route expects a request body, a POST request, and it gets the email needed to check if the user exists; if the user exists, the user object is sent to the client.
api/upload.js
// Next.js API route support: https://nextjs.org/docs/api-routes/introduction

export default function handler(req, res) {
  if (req.method === "POST") {
    // parse incoming request
    const cred = JSON.parse(req.body);
    //option object, body contains media file to be uploaded on xata database
    const options = {
      method: "POST",
      headers: {
        Authorization: process.env.XATA,
        "Content-Type": "application/json",
      },
      body: JSON.stringify(cred),
    };

    (async () => {
      try {
        // upload file to files table on xata
        const response = await fetch(
          `${process.env.database}:main/tables/files/data?columns=id`,
          options
        );

        const data = await response.json();
        return res.status(200).json(data);
      } catch (err) {
        return res.status(500).json({ message: "An error occured" });
      }
    })();
  }
}Code language: JavaScript (javascript)
The upload route API expects the request object, which contains the file name, file url, type, and other data; the upload API stores the file in the database. It is a POST request.
api/files
// Next.js API route support: https://nextjs.org/docs/api-routes/introduction

export default function handler(req, res) {
  if (req.method === "GET") {
    // retrieving the search query
    const search = req.query.search;
    //filter checks for search query
    const options = {
      method: "POST",
      headers: {
        Authorization: process.env.XATA,
        "Content-Type": "application/json",
      },
      body: `{"filter":{"userid":"${search}"},"page":{"size":15}}`,
    };

    (async () => {
      try {
        // queries the files table for the userId,and return all files attached to the userid if it exists
        const response = await fetch(
          `${process.env.database}:main/tables/files/query`,
          options
        );

        const data = await response.json();
        return res.status(200).json(data.records);
      } catch (err) {
        return res.status(500).json({ message: "An error occured" });
      }
    })();
  }
}Code language: JavaScript (javascript)
The files route API is a GET request. We need to retrieve the files we have stored in the database, which is what the files API route does. It uses the search query, which is the userid, to fetch all files associated with the user.
pages/signup.js
import React, { useState, useRef } from "react";
import bcrypt from "bcryptjs";
import { NotificationManager } from "react-notifications";
import Link from "next/link";

export default function Signup({ data }) {
  const emailRef = useRef();
  const passwordRef = useRef();

  const sign = async () => {
    if (emailRef.current.value === "" || passwordRef.current.value === "") {
      return NotificationManager.error("Please enter your email or password");
    }

    const hashedPassword = bcrypt.hashSync(
      passwordRef.current.value,
      process.env.salt
    );
    const cred = {
      email: emailRef.current.value,
      password: hashedPassword,
    };

    const options = {
      method: "POST",
      body: JSON.stringify(cred),
    };

    NotificationManager.info("Loading.......", "Info");

    try {
      const response = await fetch("/api/signup", options);
      const data = await response.json();
      if (data.id) {
        localStorage.setItem("cloud-user", data.id);
        localStorage.setItem("cloud-email", emailRef.current.value);
        NotificationManager.success("Signup was successfully", "Success");
        window.location.href = "/";
      } else if ((response.message = "User already exists")) {
        NotificationManager.error("User already exists", "Error");
      }
    } catch (err) {
      console.log(err);
    }
  };
  return (
    <div>
      <div className="form">
        <h2 className="white">Signup</h2>
        <div>
          <input className="input" ref={emailRef} placeholder="Enter Email" />
        </div>

        <div>
          <input
            className="input"
            type="password"
            ref={passwordRef}
            placeholder="Enter Password"
          />
        </div>

        <div>
          {/*   eslint-disable-next-line @next/next/no-html-link-for-pages */}
          <Link href="/login">Login</Link>
        </div>

        <button className="but" onClick={sign}>
          Signup
        </button>
      </div>
    </div>
  );
}Code language: JavaScript (javascript)
We have imported bcryptjs and react notifications to help with password hashing and the user experience. We made use of the useRef hook to get our input value.
The sign function is where the action is taking place; it checks if the email or password is empty and returns an error message if it is empty, then we use bcryptjs to hash the password, we send the credentials to our signup API route, and if the request is successful, we store the userid and email in the client using localStorage API, and redirect the user to the index page, if the user already exists, we display an error message.
pages/login.js
import React, { useState, useRef } from "react";
import Link from "next/link";

export default function Login() {
  return (
    <div>
      <div className="form">
        <h2 className="white">Login</h2>
        <div>
          <input className="input" placeholder="Enter Email" />
        </div>

        <div>
          <input
            className="input"
            placeholder="Enter Password"
            type="password"
          />
        </div>

        <div>
          {/*  eslint-disable-next-line @next/next/no-html-link-for-pages */}
          <Link href="/signup">Signup</Link>
        </div>

        <button className="but">Login</button>
      </div>
    </div>
  );
}Code language: JavaScript (javascript)
The log function checks if the email or password is empty and returns an error message If it is empty, we send the request to the login API route; then we use bcryptjs to compare the password; if the password is wrong, we display an error message, if the password is correct, we store the userid and email in the client using the localStorage API, and redirect the user to the index page.
pages/index.js
import Head from "next/head";
import styles from "../styles/Home.module.css";
import Sidebar from "../components/Sidebar";
import { NotificationManager } from "react-notifications";
import { useState, useEffect, useRef } from "react";

export default function Home() {
  const [images, setImages] = useState([]);
  const [documents, setDoc] = useState([]);
  const [videos, setVideos] = useState([]);
  const [audios, setAudio] = useState([]);
  const [others, setOthers] = useState([]);
  const [recent, setRecent] = useState([]);
  const [email, setEmail] = useState("");

  const wigRef = useRef();

  useEffect(() => {
    const user = localStorage.getItem("cloud-user");
    if (user === null) {
      window.location.href = "/login";
    }
  }, []);

  useEffect(() => {
    const user = localStorage.getItem("cloud-user");
    const email = localStorage.getItem("cloud-email");
    setEmail(email);

    (async () => {
      try {
        const response = await fetch(`/api/files?search=${user}`);
        const data = await response.json();

        let images = [];
        let documents = [];
        let videos = [];
        let audios = [];
        let others = [];

        data.map((item) => {
          if (item.type === "image") {
            images.push(item);
          }
          if (item.type === "video") {
            videos.push(item);
          }
          if (item.type === "audio") {
            audios.push(item);
          }
          if (item.type === "documents") {
            documents.push(item);
          }
          if (item.type === "others") {
            others.push(item);
          }
        });

        setAudio(audios);
        setVideos(videos);
        setDoc(documents);
        setOthers(others);
        setImages(images);
        const recent = data.slice(0, 5);
        setRecent(recent);
      } catch (err) {
        console.log(err);
      }
    })();
  }, []);

  const showWidget = () => {
    const myWidget = window.cloudinary.createUploadWidget(
      {
        cloudName: "josh4324",
        uploadPreset: "hq1e5jub",
      },
      (error, result) => {
        if (!error && result && result.event === "success") {
          const typelist = result.info.secure_url.split(".");
          const len = typelist.length - 1;
          let type;
          if (
            typelist[len] === "jpeg" ||
            typelist[len] === "jpg" ||
            typelist[len] === "png" ||
            typelist[len] === "svg"
          ) {
            type = "image";
          } else if (
            typelist[len] === "mp4" ||
            typelist[len] === "mov" ||
            typelist[len] === "webm"
          ) {
            type = "video";
          } else if (
            typelist[len] === "pdf" ||
            typelist[len] === "dox" ||
            typelist[len] === "docx" ||
            typelist[len] === "xlx" ||
            typelist[len] === "xlxs" ||
            typelist[len] === "txt" ||
            typelist[len] === "ppt" ||
            typelist[len] === "ppts"
          ) {
            type = "documents";
          } else if (
            typelist[len] === "mp3" ||
            typelist[len] === "ma4" ||
            typelist[len] === "wav"
          ) {
            type = "audio";
          } else {
            type = "others";
          }

          const cred = {
            userid: localStorage.getItem("cloud-user"),
            name: result.info.original_filename,
            url: result.info.secure_url,
            type,
            date: new Date(),
          };

          const options = {
            method: "POST",
            body: JSON.stringify(cred),
          };

          (async () => {
            try {
              const response = await fetch("/api/upload", options);
              if (response) {
                NotificationManager.success(
                  "File uploaded successfully",
                  "Success"
                );
                window.location.href = "/";
              }
            } catch (err) {
              console.log(err);
            }
          })();
        }
      }
    );
    myWidget.open();
  };

  return (
    <div>
      <Head>
        <title>CloudDrop - Home</title>
        <meta name="description" content="Clouddrop" />
        {/*  eslint-disable-next-line @next/next/no-sync-scripts */}
        <script
          src="https://upload-widget.cloudinary.com/global/all.js"
          type="text/javascript"
        ></script>
      </Head>

      <div className={styles.homeflex}>
        <Sidebar />
        <div className={styles.home}>
          <div className={styles.cloud}>
            <h1 className={styles.homehead}>CloudDrop </h1>
            <h3 className={styles.homehead2}>{email}</h3>
          </div>

          <button type="button" onClick={showWidget} className={styles.upload}>
            Upload File
          </button>

          {recent.length > 0 ? (
            <div className={styles.box1}>
              <h3 className={styles.head}>Recent</h3>
              {recent.map((item) => {
                return (
                  <div className={styles.file} key={item.name}>
                    <a className={styles.home_text} href={`${item.url}`}>
                      {item.name}
                    </a>
                  </div>
                );
              })}
            </div>
          ) : null}

          {images.length > 0 ? (
            <div className={styles.box1}>
              <h3 className={styles.head}>Images</h3>
              {images.map((item) => {
                return (
                  <div className={styles.file} key={item.name}>
                    <a className={styles.home_text} href={`${item.url}`}>
                      {item.name}
                    </a>
                  </div>
                );
              })}
            </div>
          ) : null}

          {audios.length > 0 ? (
            <div className={styles.box1}>
              <h3 className={styles.head}>Audios</h3>
              {audios.map((item) => {
                return (
                  <div className={styles.file} key={item.name}>
                    <a className={styles.home_text} href={`${item.url}`}>
                      {item.name}
                    </a>
                  </div>
                );
              })}
            </div>
          ) : null}

          {videos.length > 0 ? (
            <div className={styles.box1}>
              <h3 className={styles.head}>Videos</h3>
              {videos.map((item) => {
                return (
                  <div className={styles.file} key={item.name}>
                    <a className={styles.home_text} href={`${item.url}`}>
                      {item.name}
                    </a>
                  </div>
                );
              })}
            </div>
          ) : null}

          {documents.length > 0 ? (
            <div className={styles.box1}>
              <h3 className={styles.head}>Documents</h3>
              {documents.map((item) => {
                return (
                  <div className={styles.file} key={item.name}>
                    <a className={styles.home_text} href={`${item.url}`}>
                      {item.name}
                    </a>
                  </div>
                );
              })}
            </div>
          ) : null}

          {others.length > 0 ? (
            <div className={styles.box1}>
              <h3 className={styles.head}>Others</h3>
              {others.map((item) => {
                return (
                  <div className={styles.file} key={item.name}>
                    <a className={styles.home_text} href={`${item.url}`}>
                      {item.name}
                    </a>
                  </div>
                );
              })}
            </div>
          ) : null}
        </div>
      </div>
    </div>
  );
}Code language: JavaScript (javascript)
We set up our useState for the different types of files, and we also set up our useEffect to check if the user has been authenticated. We are doing this by checking the userid in the localStorage. We also get all the files when the page is refreshed, and we do this by calling the files API route inside the useEffect. We have also updated our showWidget function to store the url link and associated information we get when we upload our files to Cloudinary. We are using the upload API route for this inside the showWidget function. We are also getting the type of file by checking the extension of the files, which will help us classify the files into different categories. Finally, we use the different array categories for the file type to display the files on the page.
pages/all.js
import React, { useEffect, useState } from "react";
import Head from "next/head";
import styles from "../styles/Home.module.css";
import Sidebar from "../components/Sidebar";

export default function All() {
  const [all, setAll] = useState([]);
  useEffect(() => {
    const user = localStorage.getItem("cloud-user");
    if (user === null) {
      window.location.href = "/login";
    }
  }, []);

  useEffect(() => {
    const user = localStorage.getItem("cloud-user");

    (async () => {
      try {
        const response = await fetch(`/api/files?search=${user}`);
        const data = await response.json();
        setAll(data);
      } catch (err) {
        console.log(err);
      }
    })();
  }, []);
  return (
    <div>
      <Head>
        <title>CloudDrop</title>
        <meta name="description" content="Clouddrop" />
      </Head>
      <div className={styles.homeflex}>
        <Sidebar />
        <div className={styles.home}>
          <h1 className={styles.homehead}>CloudDrop</h1>

          <h2 className={styles.head2}>All</h2>

          {all.length > 0 ? (
            <div className={styles.box1}>
              {all.map((item) => {
                return (
                  <div className={styles.file} key={item.name}>
                    <a className={styles.home_text} href={`${item.url}`}>
                      {item.name}
                    </a>
                  </div>
                );
              })}
            </div>
          ) : null}
        </div>
      </div>
    </div>
  );
}Code language: JavaScript (javascript)
The all page uses the api/files endpoint to get all the uploaded files and displays them on the page.
pages/files.js
import React, { useEffect, useState } from "react";
import Head from "next/head";
import styles from "../styles/Home.module.css";
import Sidebar from "../components/Sidebar";

export default function Files() {
  const [documents, setDoc] = useState([]);

  useEffect(() => {
    const user = localStorage.getItem("cloud-user");
    if (user === null) {
      window.location.href = "/login";
    }

    (async () => {
      try {
        const response = await fetch(`/api/files?search=${user}`);
        const data = await response.json();
        let documents = [];
        data.map((item) => {
          if (item.type === "documents") {
            documents.push(item);
          }
          setDoc(documents);
        });
      } catch (err) {
        console.log(err);
      }
    })();
  }, []);

  return (
    <div>
      <Head>
        <title>CloudDrop - Files</title>
        <meta name="description" content="Clouddrop" />
      </Head>
      <div className={styles.homeflex}>
        <Sidebar />
        <div className={styles.home}>
          <h1 className={styles.homehead}>CloudDrop</h1>
          <h2 className={styles.head2}>Documents</h2>
          {documents.length > 0 ? (
            <div className={styles.box1}>
              {documents.map((item) => {
                return (
                  <div className={styles.file} key={item.name}>
                    <a className={styles.home_text} href={`${item.url}`}>
                      {item.name}
                    </a>
                  </div>
                );
              })}
            </div>
          ) : null}
        </div>
      </div>
    </div>
  );
}Code language: JavaScript (javascript)
The files page uses the api/files endpoint to get all the uploaded files, filters the result for documents like pdf and Microsoft word, and displays them on the page.
pages/photos.js
import React, { useEffect, useState } from "react";
import Head from "next/head";
import styles from "../styles/Home.module.css";
import Sidebar from "../components/Sidebar";

export default function Photos() {
  const [images, setImages] = useState([]);
  useEffect(() => {
    const user = localStorage.getItem("cloud-user");
    if (user === null) {
      window.location.href = "/login";
    }
  }, []);

  useEffect(() => {
    const user = localStorage.getItem("cloud-user");

    (async () => {
      try {
        const response = await fetch(`/api/files?search=${user}`);
        const data = await response.json();
        let images = [];
        data.map((item) => {
          if (item.type === "image") {
            images.push(item);
          }
          setImages(images);
        });
      } catch (err) {
        console.log(err);
      }
    })();
  }, []);
  return (
    <div>
      <Head>
        <title>CloudDrop</title>
        <meta name="description" content="Clouddrop" />
      </Head>
      <div className={styles.homeflex}>
        <Sidebar />
        <div className={styles.home}>
          <h1 className={styles.homehead}>CloudDrop</h1>
          <h2 className={styles.head2}>Images</h2>

          {images.length > 0 ? (
            <div className={styles.box1}>
              {images.map((item) => {
                return (
                  <div className={styles.file} key={item.name}>
                    <a className={styles.home_text} href={`${item.url}`}>
                      {item.name}
                    </a>
                  </div>
                );
              })}
            </div>
          ) : null}
        </div>
      </div>
    </div>
  );
}Code language: JavaScript (javascript)
The photos page uses the api/files endpoint to get all the uploaded files, filters the result for the images, and displays them on the page.
pages/videos.js
import React, { useEffect, useState } from "react";
import Head from "next/head";
import styles from "../styles/Home.module.css";
import Sidebar from "../components/Sidebar";

export default function Files() {
  const [videos, setVideos] = useState([]);
  useEffect(() => {
    const user = localStorage.getItem("cloud-user");
    if (user === null) {
      window.location.href = "/login";
    }
  }, []);

  useEffect(() => {
    const user = localStorage.getItem("cloud-user");

    (async () => {
      try {
        const response = await fetch(`/api/files?search=${user}`);
        const data = await response.json();
        let videos = [];
        data.map((item) => {
          if (item.type === "video") {
            videos.push(item);
          }
        });
        setVideos(videos);
      } catch (err) {
        console.log(err);
      }
    })();
  }, []);
  return (
    <div>
      <Head>
        <title>CloudDrop</title>
        <meta name="description" content="Clouddrop" />
      </Head>
      <div className={styles.homeflex}>
        <Sidebar />
        <div className={styles.home}>
          <h1 className={styles.homehead}>CloudDrop</h1>
          <h2 className={styles.head2}>Videos</h2>
          {videos.length > 0 ? (
            <div className={styles.box1}>
              {videos.map((item) => {
                return (
                  <div className={styles.file} key={item.name}>
                    <a className={styles.home_text} href={`${item.url}`}>
                      {item.name}
                    </a>
                  </div>
                );
              })}
            </div>
          ) : null}
        </div>
      </div>
    </div>
  );
}Code language: JavaScript (javascript)
The videos page uses the api/files endpoint to get all the uploaded files, and filters the results for videos, and displays them on the page.
For all the pages, we’re checking if the user is authenticated inside the useEffect, we are also calling the files API route to get the files associated with the user. We use the useState to keep track of our files and display them on the page.
We built a fully functional file storage application using Xata, Cloudinary, and Next.js, where users can upload images, videos, documents, and other files. Users can sign up and log in to the application to start using it. Users’ passwords are hashed for security, and only users can access the files they store in the application.
Link to the demo here.
This blog post was created for the Hackmamba Jamstack Content Hackathon with Xata and Cloudinary.