
Greeting cards are pieces of stiff paper or thin cardboard with text, illustrations, or photos, given on special occasions such as birthdays, anniversaries, holidays, e.t.c.
This post will discuss building a holiday card generator for the Harvest Month, Thanksgiving, and Diwali holidays using Cloudinary and Nuxt.js. At the end of this tutorial, we will learn how to create holiday cards from images we stored on Cloudinary.
Cloudinary is a platform on which you can quickly and easily upload, store, manage, transform, and deliver images and videos for websites and applications. The platform also offers a vast collection of software development kits (SDKs) for frontend frameworks and libraries.
Nuxt.js is a vue-based frontend development framework that enables functionalities like server-side rendering, static site generation, file-system routing, components auto-import, and API endpoints for backend features.
We completed this project in a CodeSandbox, and you can fork it to run the code.
GitHub: https://github.com/Mr-Malomz/holiday_card_nuxt
The following steps in this post require JavaScript and Vue.js experience. Experience with Nuxt.js isn’t a requirement, but it’s nice to have.
We also need a Cloudinary account to store the media files. Signup is completely free.
We need to create a Nuxt.js starter project by navigating to the desired directory and running the command below in our terminal.
npx create-nuxt-app holiday_card_nuxt && cd holiday_card_nuxt
This command will ask us some questions on how to configure our application. We can answer the questions as shown below:
    project name: <PRESS ENTER>
    programming langauge: <JAVASCRIPT>
    package manager: <NPM>
    UI framework: <TAILWIND CSS>
    Nuxt.js modules: <AXIOS - PROMISE BASED HTTP CLIENT>
    Linting tools: <ESLINT, PRETTIER>
    Testing framework: <NONE>
    Rendering mode: <UNIVERSAL (SSR/STATIC)
    Deployment target: <STATIC/JAMSTACK HOSTING>
    Deployment tools: <JSCONFIG.JSON>
    Continous integration: <NONE>
    Version control system: <GIT>
Code language: PHP (php)
The command creates a Next.js project with TailwindCSS called holiday_card_nuxt, and navigates into the project directory.
TailwindCSS is a utility-first CSS framework packed with classes to help us style our web page.
We proceed to install the @nuxtjs/cloudinary dependency with:
    npm install @nuxtjs/cloudinary
Code language: CSS (css)
Configuring Cloudinary in Nuxt.js
First, we need to modify the nuxt.config.js file by adding @nuxtjs/cloudinary as a module in the modules section:
    modules: [
        '@nuxtjs/cloudinary', //add this
      ],
Code language: JavaScript (javascript)
Next, we need to configure Cloudinary by adding a cloudinary section below the modules section as shown below:
    modules: [
        '@nuxtjs/cloudinary',
      ],

    //add this
    cloudinary: {
        cloudName: '<your-cloud-name>',
        useComponent: true,
      },
Code language: JavaScript (javascript)
useComponent flag set to true lets us use the built-in Cloudinary components. Our cloud name is obtained from our Cloudinary dashboard.
Next, we download sample images to create our holiday cards. We navigate to the URLs below and download the photos from Unsplash.
Harvest Month Photos
- https://unsplash.com/photos/fjyAh0NLowI
- https://unsplash.com/photos/yP19KADwhEI
- https://unsplash.com/photos/yuiJO6bvHi4
- https://unsplash.com/photos/6cC7WKiwcGs
- https://unsplash.com/photos/Nu4u9g7Sgdw
Thanksgiving Photos
Diwali Photos
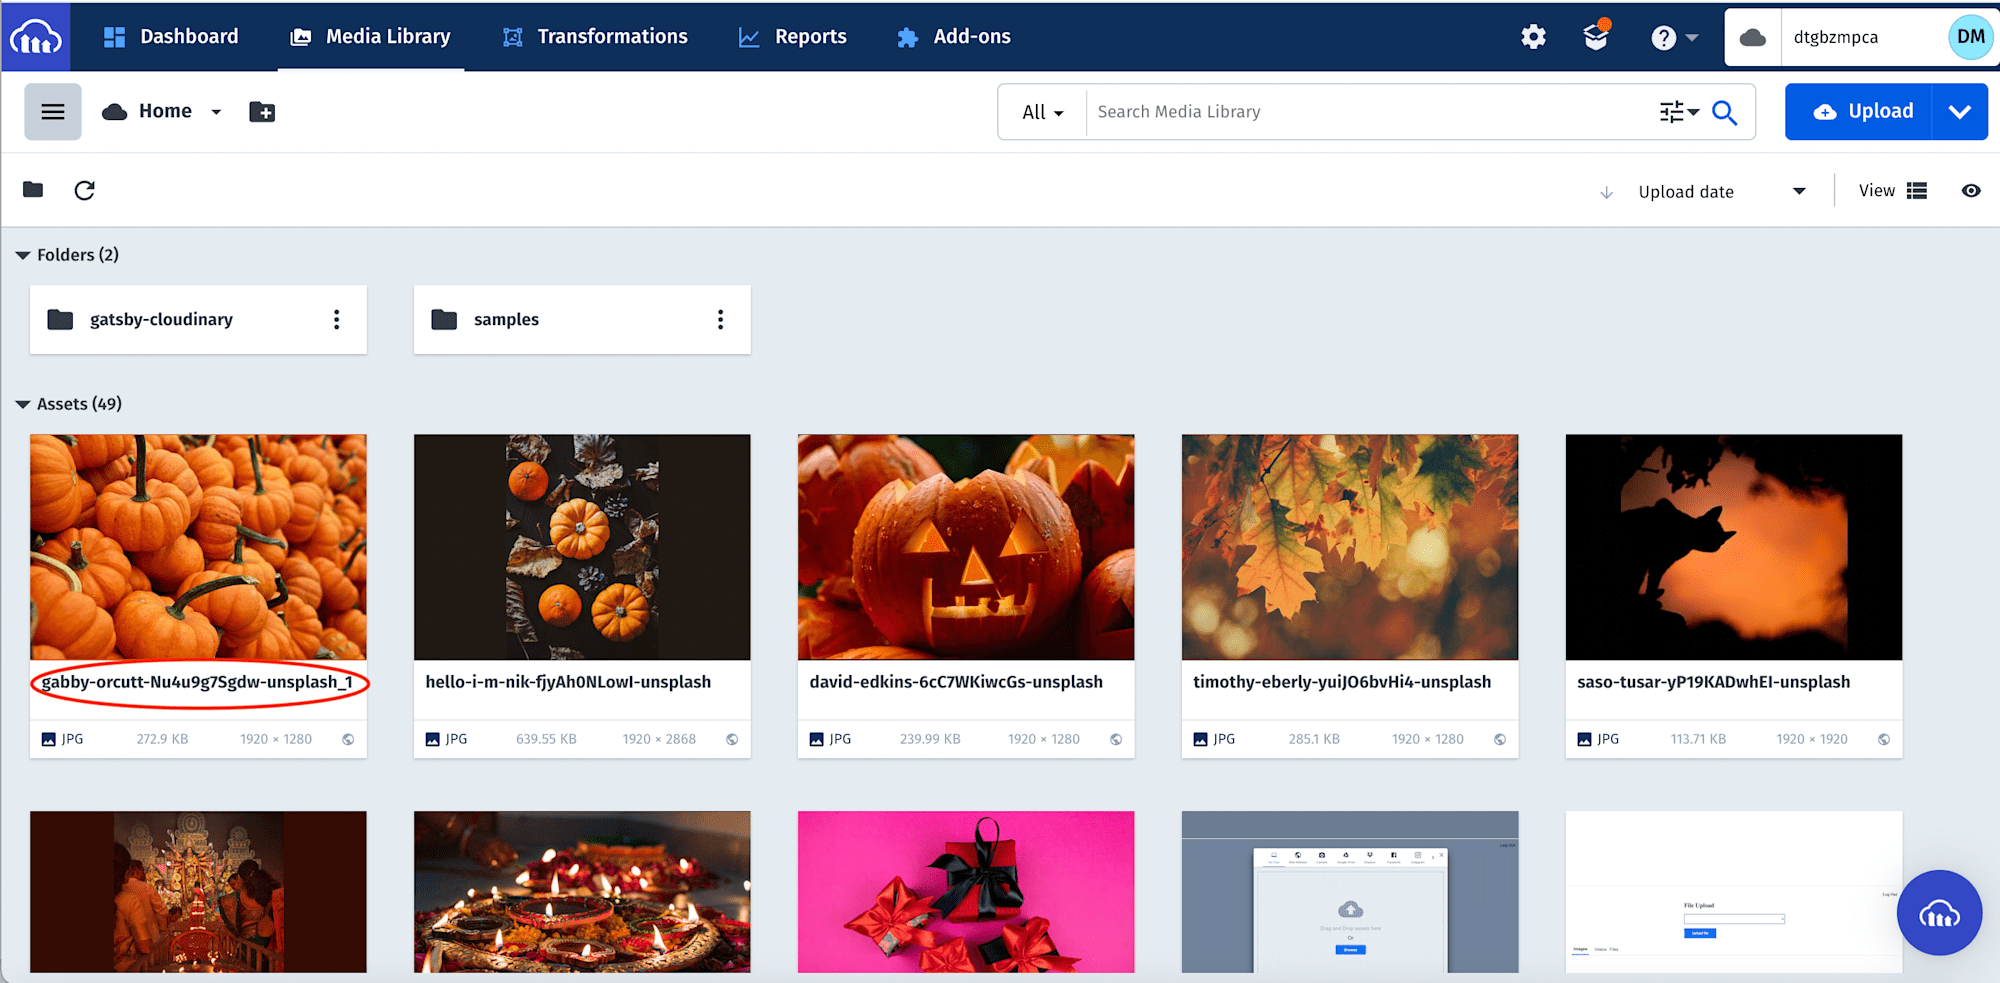
In our Cloudinary dashboard, we uploaded the images by, clicking on the Media Library tab, then drag and drop the downloaded images. Cloudinary also supports other upload formats.

After uploading all the images, we will see them displayed on the console with their publicId. The IDs will come in handy when generating holiday cards.
Next, we need to create a utils folder in the project root directory. In this folder, we create harvest.json, thanksgiving.json, and diwali.json files. These files contain image data for each type of card.
Here is the JSON data for each file.
harvest.json
    [
        {
            "id": 1,
            "publicId": "<REPLACE THIS WITH YOUR IMAGE PUBLICID>"
        },
        {
            "id": 2,
            "publicId": "<REPLACE THIS WITH YOUR IMAGE PUBLICID>"
        },
        {
            "id": 3,
            "publicId": "<REPLACE THIS WITH YOUR IMAGE PUBLICID>"
        },
        {
            "id": 4,
            "publicId": "<REPLACE THIS WITH YOUR IMAGE PUBLICID>"
        },
        {
            "id": 5,
            "publicId": "<REPLACE THIS WITH YOUR IMAGE PUBLICID>"
        }
    ]
Code language: JSON / JSON with Comments (json)
Thanksgiving.json
    [
        {
            "id": 1,
            "publicId": "<REPLACE THIS WITH YOUR IMAGE PUBLICID>"
        },
        {
            "id": 2,
            "publicId": "<REPLACE THIS WITH YOUR IMAGE PUBLICID>"
        }
    ]
Code language: JSON / JSON with Comments (json)
diwali.json
    [
        {
            "id": 1,
            "publicId": "<REPLACE THIS WITH YOUR IMAGE PUBLICID>"
        },
        {
            "id": 2,
            "publicId": "<REPLACE THIS WITH YOUR IMAGE PUBLICID>"
        }
    ]
Code language: JSON / JSON with Comments (json)Next, we modify the index.vue file in the pages folder to the following:
https://gist.github.com/Mr-Malomz/f89a9ad2664e7c722f27334c205445a7
https://gist.github.com/Mr-Malomz/f89a9ad2664e7c722f27334c205445a7
The snippet above does the following:
- Import the image collections
- Create
dataproperties to manage imported image collections, active tabs, selected Image ID, form data, and display the Holiday card. - Markup to conditionally display tabs
- Markup for form elements and conditionally render the list of Images using
@nuxtjs/cloudinary. The list of images also has aclickfunction that sets the current imageidto show the active image, the form object, and theshowCardproperty.
With that done, we can start a development server using the command below:
npm run dev


With our application up and running, we need to create a Card.vue component to render the generated Holiday card. To do this, we navigate to the components folder, and in this folder, create a Card.vue file containing the code snippet below:
    <template>
      <div>
        <cld-image :public-id="publicId" width="1000">
          <cld-transformation crop="fit" effect="blur:100" />
          <cld-transformation effect="brightness_hsb:-50" />
          <cld-transformation
            color="#FFFFFF"
            :overlay="{
              fontFamily: 'Neucha',
              fontSize: 100,
              fontWeight: 'bold',
              text: message,
              textAlign: 'center',
            }"
            width="1300"
            crop="fit"
          />
          <cld-transformation flags="layer_apply" />
          <cld-transformation
            color="#FFFFFF"
            :overlay="{
              fontFamily: 'Dancing Script',
              fontSize: 50,
              fontWeight: 'bold',
              text: `from ${name}`,
            }"
          />
          <cld-transformation flags="layer_apply" gravity="center" x="450" y="350" />
        </cld-image>
      </div>
    </template>
    <script>
    export default {
      props: {
        message: { type: String, required: true },
        name: { type: String, required: true },
        publicId: { type: String, required: true },
      },
    }
    </script>
Code language: HTML, XML (xml)
The snippet above does the following:
- Configures the component to accept
message,name, andpublicIdprops - Configure
cld-imageandcld-transformations to render the image, message, and name. We also leverage Cloudinary’s support for multiple transformations to transform the image. We added the following transformations, cropping, blurring, brightening, adding overlays for text, text position**,** text properties, and flags to alter the positioning of the text.
We proceed to update index.vue to conditionally render the Card.vue component as shown below:
    <template>
      <div class="p-10">
        <h1 class="text-3xl">Holiday Card Generator</h1>
        <header class="flex border-b-2 mt-7 mb-7">
          <!-- Header contents comes here -->
        </header>
        <form class="lg:w-2/5" @submit.prevent="handleSubmit"> <!-- add handleSubmit -->
          <!-- Form contents comes here -->
        </form>

        <!-- Conditionally render card component -->
        <div v-if="showCard" class="mt-10">
          <Card
            :message="formData.message"
            :name="formData.name"
            :publicId="formData.publicId"
          />
        </div>
      </div>
    </template>
    <script>
    //imports here

    export default {
      data() {
        return {
          //data code here
        }
      },
      methods: {
        setTab(tabName) {
          //code here
        },

        handleSelectedImg(imgId, publicId) {
          //code here
        },

        //add
        handleSubmit() {
          if (this.imageId) {
            this.showCard = true
          } else {
            this.formData.error = true
          }
        },
      },
    }
    </script>
Code language: HTML, XML (xml)
In the snippet above, we created an handleSubmit function that checks if an image is selected, and then conditionally renders the Card component with necessary props.
Complete index.vue
https://gist.github.com/Mr-Malomz/38877df09d38fff7c323bc7d29f825eb
https://gist.github.com/Mr-Malomz/38877df09d38fff7c323bc7d29f825eb
We can test our application by starting the development server and creating different holiday cards.

Our card is incomplete if we can’t share it with friends and family. To do this, we need to modify the Card.vue file to include a button to copy the generated image’s URL.
    <template>
      <div>
        <cld-image ref="ref" :public-id="publicId" width="1000"> <!-- add ref -->
          <!-- Transformation codes goes here -->
        </cld-image>

        <!-- add -->
        <div class="mt-10">
          <h5>Shareable link</h5>
          <input
            disabled
            :value="url"
            class="w-full lg:w-2/5 h-10 border-[#B7B3B3] border rounded-sm p-2 mr-4"
          />
          <button
            class="bg-gray-600 py-2 px-6 rounded-sm text-white font-semibold"
            @click="handleCopyToClip"
          >
            {{ copy }}
          </button>
        </div>
      </div>
    </template>
    <script>
    export default {
      props: {
        //props goes here
      },

      //add
      data() {
        return {
          url: '',
          copy: 'Copy File',
        }
      },

      methods: {
        handleCopyToClip() {
          navigator.clipboard
            .writeText(this.url)
            .then(() => (this.copy = 'Copied!'))
            .catch((err) => console.log('error copying to clipboard', err))
        },
      },

      mounted() {
        this.$nextTick(function () {
          this.url = this.$refs.ref.$el.src
        })
      },
    }
    </script>
Code language: HTML, XML (xml)
The snippet above does the following:
- Create data properties and
refto access the Image DOM element. -
handleCopyToClipfunction that uses Clipboard API to copy the returned URL on our device clipboard. - Update the
urlby accessing thesrcproperty Cloudinary passed to thecld-imagecomponent when it mounts. - Add
refto thecld-imagecomponent and markups for sharing links.
Complete Card.vue
https://gist.github.com/Mr-Malomz/17c4ba7f313c9dce33b9ce76016e8471
https://gist.github.com/Mr-Malomz/17c4ba7f313c9dce33b9ce76016e8471
The final output of our application should look like this:

This post discussed how to build a holiday card generator using Cloudinary’s image transformations and Nuxt.js.
You may find these resources helpful: