
In the early days of the web, the only thing that mattered was getting that content out to users no matter how long it took or what resources it consumed. As a matter of fact, users seemed to understand and were ready to wait till whenever their browser’s loading spinner stops and the contents displayed.
Today, though, users’ patience has run out. They are no longer willing to wait because they know we – the engineers – can afford to give them a better experience.
While web content comes in different forms, today we will focus on video. Video optimization and delivery of a good viewing experience to users doesn’t come easy. Yes, flash is gone and HTML5 is here to stay; but don’t expect that you can just drop the video tag in your HTML and you’re done.
Let’s take a look at a common approach to delivering videos, popularly known as buffering.
Most videos on the web do something that looks like a pre-fetch. You may notice the progress bar showing another indicator that is greater than or equal to the current play time. This is what Youtube’s streaming looks like:
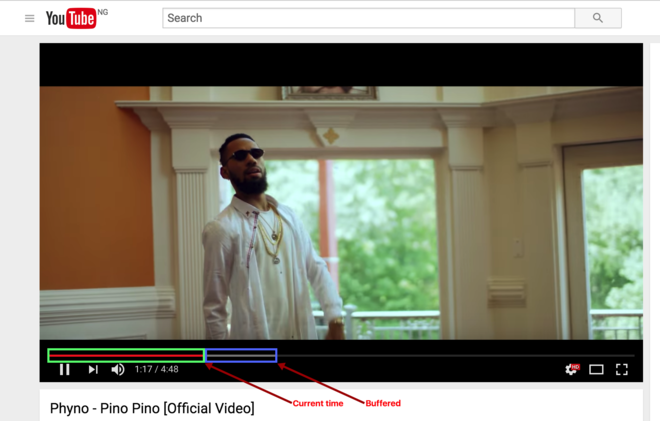
The light gray portion of the progress bar indicates the buffered content.
YouTube dynamically adjusts the quality of that portion depending on the bandwidth and CPU capacity it detects. For example, if the bandwidth is poor, YouTube will pre-fetch the low-quality version of the above video. On the other hand, if the bandwidth is great, it would pre-fetch the high-quality version for rendering.
Put this together and users have a great experience whether or not their connectivity is superb or poor.
The key thing to keep in mind is not the fact that the video is pre-fetched, but rather that the pre-fetching is achieved with an intelligent strategy.
Now that we have a basic understanding of what buffering is, let’s see how we can employ an intelligent strategy that entails buffering based on the bandwidth or CPU capacity conditions.
Cloudinary offers a game-changing concept known as adaptive bitrate streaming (ABS), which is a video delivery technique that adjusts the quality of a video stream in real time according to detected bandwidth and CPU capacity. This approach enables videos to start quicker, with fewer slow video buffering interruptions and at the best possible quality for the current device and network connection, to maximize user experience.
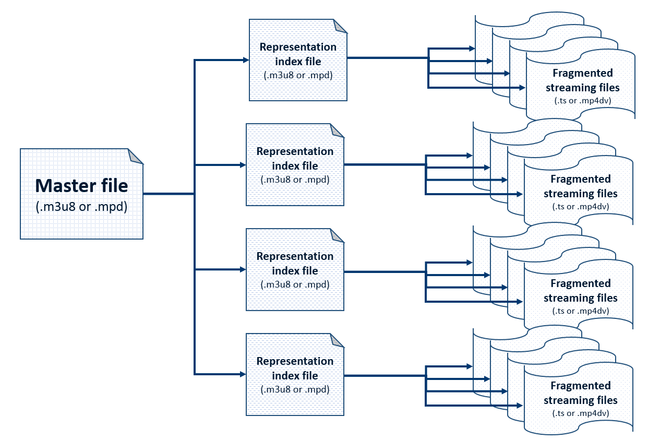
Videos provisioned using ABS are provided in versions known as representations, each with different quality and bitrates. Each video file must be accompanied by an index file that specifies predefined segments of the video. Additionally, there is a master playlist that points to the available representations with additional information about each one.
You can use this Cloudinary feature to deliver a better viewing experience for your users at no cost.
To deliver videos using adaptive streaming, Cloudinary generates multiple copies of your video prepared at different resolutions, qualities and data rates. The copies of the videos are then automatically generated and delivered from a single original video, transcoded to either or both of the following protocols:
- HTTP Live Streaming (HLS)
- Dynamic Adaptive Streaming over HTTP (MPEG-DASH)
Now that we’ve explained the concept, let’s write some code to put the pieces of these puzzles together.
Cloudinary comes fully loaded with interesting features to make managing your media files an awesome experience. These features range from being a CDN for your media files (which means you can upload and store files to Cloudinary server) to manipulating your media files (as we discussed above).
Let’s take a look at how we can upload images from our Node servers to Cloudinary. Cloudinary offers a Node SDK that facilitates image uploads so you do not have to memorize the API URLs for doing this.
SDKs for PHP, Python, Ruby and .Net are also available with the same API methods.
Install the SDK by running:
$ npm install cloudinary --save
Import cloudinary to your code base:
var cloudinary = require('cloudinary');
Code language: JavaScript (javascript)
Configure the SDK with your credentials (you can get one here):
cloudinary.config({
  cloud_name: '[CLOUD_NAME]',
  api_key: '[API_KEY]',
  api_secret: '[API_SECRET]'
});
Code language: CSS (css)
… then use the following few lines to upload to Cloudinary:
cloudinary.uploader.upload('dog.mp4', function(result) {
  // Upload handler
  console.log('result: ', result);
}, {
  public_id: 'my_dog',
  resource_type: 'video'
});
Code language: JavaScript (javascript)
We can request the video from Cloudinary using the public URL we specified:
cloudinary.video('my_dog');
Code language: JavaScript (javascript)
The output of the above will be:
<video poster='https://res.cloudinary.com/scotch.io/video/upload/my_dog.jpg'>
    <source src='https://res.cloudinary.com/scotch.io/video/upload/my_dog.webm' type='video/webm'>
    <source src='https://res.cloudinary.com/scotch.io/video/upload/my_dog.mp4' type='video/mp4'>
    <source src='https://res.cloudinary.com/scotch.io/video/upload/my_dog.ogv' type='video/ogg'>
</video>
Code language: HTML, XML (xml)
This is mind blowing! Cloudinary generates the HTML for the various formats suitable for any given browser so we do not have to worry about that. Awesome, right?
Cloudinary uses transformations to manipulate media files. Such manipulations include:
- Dimensions
- Quality
- Scaling
- Effects
- … and much more.
Transformations are provided as configuration options and applied either once during upload (eager) or each time a user needs the media to be delivered (per request).
Cloudinary also provides a collection of predefined streaming profiles, where each profile defines a set of representations according to suggested best practices.
For example, the 4K profile creates eight different representations in 16:9 aspect ratio, from extremely high quality to audio only. Alternatively, the SD profile creates only three representations, all in 4:3 aspect ratio. Other commonly used profiles include the HD and Full HD profiles.
We are going to apply the streaming profile as an eager transformation to our upload logic:
cloudinary.uploader.upload('dog.mp4',
        function(result) {console.log(result); },
        { resource_type: "video",
        eager: [
            { streaming_profile: "full_hd", format: "m3u8" }],
        eager_async: true,
        eager_notification_url: "https://scotch.io/upload_completed",
        public_id: "my_dog"});
Code language: JavaScript (javascript)- We initiate a usual upload process with the SDK specifying the URL of the image we want to send to our Cloudinary server
- An eager transformation is initiated. This transformation is an array that takes a streaming profile configuration. The
dog.mp4video is encoded into HLS format using a Full HD streaming profile. - This process could take a while so we ensure that the eager transformation is asynchronous by setting
eager_asynctotrue
You can deliver/embed your eagerly transformed videos using the .m3u8 (HLS) or .mpd (MPEG-DASH) file format (extension) and include the streaming_profile. You can as well provide other non-adaptive streaming-related transformation options.
For example:
cloudinary.video("my_dog.m3u8", {streaming_profile: "hd"});
Code language: CSS (css)Personally, I have avoided the responsibility of implementing such a responsive video feature in a website because of being held responsible for customer frustrations. Cloudinary made this so simple, and using the solutions was free for the amount of resources I needed.
Using the adaptive streaming strategy is a proven technique that enables you to deliver an optimal, smooth viewing experience. This feature is just a small part of what Cloudinary offers for video and image management. To learn more, look the documentation or get started here.
- Video Transcoding and Manipulation
- Top 10 Mistakes in Handling Website Videos and How to Solve Them
- How to Compress Video Size Automatically With One Line of Code
- ExoPlayer Android Tutorial: Easy Video Delivery and Editing
- Ultimate HTML5 Video Player Showdown: 10 Players Compared
- How to Generate Waveform Images From Audio Files
- Auto Generate Subtitles Based on Video Transcript
- Auto-Generate Video Previews with Great Results Every Time
- Adaptive HLS Streaming Using the HTML5 Video Tag
- Video Optimization With the HTML5 <\video> Player
- Converting Android Videos to Animated GIF Images With Cloudinary: A Tutorial