
Adobe Workfront is a work management platform for enterprises to centralize, streamline, and automate project lifecycles, from creative review applications, time tracking, and more. Digital assets go through an approval process on Workfront and then are pushed to Cloudinary Assets for storage and delivery. In this post, I’ll show you how to design and implement the integration.
Workfront helps teams plan, execute, and track their work. Each entity is an object that’s accessible through the REST APIs. Here are some common objects when working with Workfront:
| Object Name | Purpose | Object Code |
| Project | The top-level container for a body of work. | PROJ |
| Task | A unit of work assigned to a user or team. Has a status, assignee, and due dates. | TASK |
| Document | A file or attachment uploaded to a task or project. Each document has one or more versions. | DOCU |
| User | Represents an individual with access to Workfront. Includes profile info, roles, permissions, and assignments. | USER |
| Company | Logical grouping of users, often representing a client or internal department.* *I have seen this used for different brands and departments. | CMPY |
You can find details about the APIs on the Workfront API Explorer page, and more details on how to use the API explorer page here.
We’ll implement the following workflow:
- Scan Workfront tasks. Check if we have a task for uploading to Cloudinary.
- If yes, pull the task and document details. Use this to create the correct metadata fields for Cloudinary.
- Upload the documents to Cloudinary.
- Update the status on the Workfront task to indicate whether the step succeeds or fails.
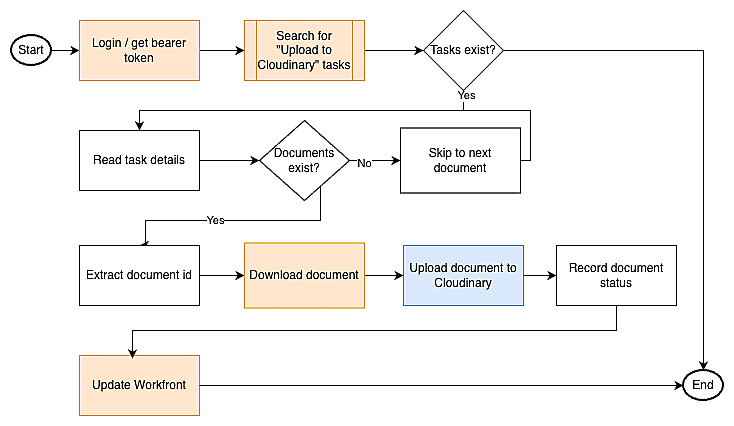
In this image, orange blocks use Workfront API while the blue block uses Cloudinary API.
The complete code is available at the git repository: https://github.com/akshay-ranganath/workfront-to-cloudinary-integration-tool.
Workfront allows the use of API Key/API Secret as well as OAuth2 authentication. Most operations can be performed using the API Key/API Secret. However, the process to download a document is a bit more involved. You’ll need to do the following:
- Use the OAuth credentials to receive a bearer token.
- Using the bearer token, receive a session id.
- Using the session id, download documents.
Here’s a short snippet to generate the bearer token.
CLIENT_ID = secrets["CLIENT_ID"]

CLIENT_SECRET = secrets["CLIENT_SECRET"]

CUSTOMER_ID = secrets["CUSTOMER_ID"]

USER_ID = secrets["USER_ID"]

private_key = secrets["PRIVATE_KEY"]

now = int(time.time())

payload = {

    "iss": CUSTOMER_ID,       # issuer

    "sub": USER_ID,           # subject

    "exp": now + 180          # 3 minutes is typical; keep it short

}

jwt_token = jwt.encode(payload, private_key, algorithm="RS256")

logging.info("Requesting Workfront OAuth session ID")

# Exchange JWT for access token (sessionID)

resp = requests.post(

    f"https://{BASE}.my.workfront.com/integrations/oauth2/api/v1/jwt/exchange",

    headers={"Content-Type": "application/x-www-form-urlencoded"},

    data={

        "client_id": CLIENT_ID,

        "client_secret": CLIENT_SECRET,

        "jwt_token": jwt_token

    },

    timeout=30

)

resp.raise_for_status()

session_id = resp.json()["access_token"] # this IS the sessionID Code language: PHP (php)Workfront has a clean API to retrieve objects. Each request expects the four-letter code for the object type. Each API also allows passing additional parameters for operations, like search, to include additional parameters within the result and pagination. In general, a function like this can support most API GET requests.
def get_object(

    uri_base: str,

    headers: dict,

    object_name: str,

    action: str,

    params: str

):

    result = None

    url = f"{uri_base}/{object_name}/{action}?{params}"

    print(url)

    response = requests.get(

        url,

        headers = headers

    )

    if response.status_code == 200:

        print("✅ GET Successful")

        result = response.json()

    else:

        print("❌ Failed to GET")

        print(response.text)

    return resultCode language: PHP (php)
For example, we can use this function to retrieve all the tasks that have a status of “UPL”. “UPL” is the status code for “Upload to Cloudinary”.
headers = {

        "Content-Type": "application/json",

        "apiKey": os.getenv('WORKFRONT_API_KEY')

    }

resp = get_object(

        uri_base=uri_base,

        headers=headers,

        object_name='TASK',

        action='search',

params='fields=*,documents&isComplete=false&$$LIMIT=100&status_Sort=desc&status=UPL)Code language: JavaScript (javascript)
In this case, I’m requesting the following:
- Give me the task object.
- I want to execute a search.
- In the result, I want all fields (
fields=*). - I want details about embedded documents (
,documents). - The task is incomplete and the status is set to UPL.
- Limit to the first 100 results.
Here’s how I can get details of a single document.
id = '6148c8aa00207c256e25d7d6a918f244'

# headers - same as above

resp = get_object(

    uri_base=uri_base,

    headers=headers,

    object_name='DOCU',

    action=id

)Code language: PHP (php)
In the action, we’ll just pass the document id.
For most API calls, we can pass the API Secret in a HTTP Header and get back a response. However, when trying to download a document, we’ll need to pass the session id. We already saw this code in the authentication section. We’ll require the document’s ID, so we can download the document from https://<<workfront url>/document/download and pass the session id as the header sessionID.
resp = requests.get(

        f"{os.getenv('WORKFRONT_BASE_URL')}/document/download",

        params = {

            "ID": document['ID']

        },

        headers = {

            "sessionID": session_id

        }

    )Code language: JavaScript (javascript)
We can use the response bytes directly for uploading to Cloudinary. For simplicity, I’ll save it as a temporary file and pass this information for the upload.
# Create a temporary file to store the downloaded document

temp_file = tempfile.NamedTemporaryFile(delete=False)

temp_file.write(resp.content)

temp_file.flush()

return temp_file.nameCode language: PHP (php)The final step is to upload this document to Cloudinary. We’ll pass the temporary file as the source.
resp = cloudinary.uploader.upload(

    local_path, # the temporary file with the path

    resource_type = 'auto',  # Auto-detect file type

    asset_folder = 'workfront',  # Organize files in workfront folder

    display_name = document['name'],  # Use document name as display name

    public_id = document['ID']  # Use Workfront document ID as public ID

)

return resp['secure_url']Code language: PHP (php)
Later on, we’ll use the secure_url and update Workfront’s Document object to hold this information.
In most applications, the integration will consist of an additional step. The payload from Workfront will contain various metadata items that will need to be carried over to Cloudinary. This will require specific business rules to map from the Workfront field names and values to Cloudinary metadata’s names and values.
If you have the flexibility, it will be simpler to retain the same name=value pairs on both systems. If that isn’t possible, you may consider various mechanisms to map the objects. I’d suggest using either of these approaches.
JQ is a CLI tool that handles various kinds of text manipulation. The advantage is its compatibility across programming languages. Libraries like jq offer support for the JQ-based manipulation.
Another alternative is to use pydantic objects. Such objects will offer multiple advantages.
- You can directly map from incoming JSON to python objects.
- It offers strict type-checking.
- Code is self-documenting, so you can extract JSON schema. This can help if you want to extend the ingestion to other systems.
Regardless of the approach used, we’ll finally arrive at an object that can be passed to the cloudinary.uploader.upload method. Once done, we can push metadata from Workfront to Cloudinary.
The final step in the process is to update Workfront. We need to do this for two reasons:
- Update the task status so we don’t process it again.
- Add the Cloudinary object information like
public_idandsecure_urlso users on Workfront can easily find the resource on Cloudinary.
In our case, we’ll update an existing task and document. So this is a PUT request.
After uploading each document, we can update the Document object in Workfront. As a simple step, we’ll update the “Description” to hold the Cloudinary URL.
status_code = api_request(

    uri_base=uri_base,

    headers=headers,

    object_name="document",

    object_id=document['ID'],

    method="PUT",

    data=update_data

)Code language: JavaScript (javascript)Once all the documents have been processed, we can update the task status. For this, we’ll need to track whether all the documents have been uploaded successfully. Even if one document fails, we’ll need to set the task as an error so that the user can check and try to upload again.
status_code = api_request(

    uri_base=uri_base,

    headers=headers,

    object_name="task",

    object_id=task_id,

    method="PUT",

    data=update_data

)Code language: JavaScript (javascript)We have now seen how to search and download documents from Workfront, upload them to Cloudinary, and update Workfront on the status. The next question is the trigger for this process.
Although Workfront exposes some notifications, they aren’t granular enough to help our use case. In most of the integrations, I’ve seen customers using a cron job. The simplest approach is to schedule the process to run at a frequency that matches the volume of document creation. Perhaps this can be two to three times per week, or more. Both Workfront and Cloudinary APIs can handle the API request volumes easily.
Workfront has a robust set of APIs that allows Cloudinary to easily integrate and pull the project and document information. By scheduling the process as a recurring job, customers can easily integrate Cloudinary and Workfront by deploying the solution on their own compute platforms like AWS Lambda.
To learn more about how to use Cloudinary to streamline your creative workflows, contact us today.


