
Video content is exploding across search, social media, and AI-generated answers, but few optimize for discoverability or accessibility.
When people think of SEO, the first things that come to mind might be text based: keywords, backlinks, page speed, etc., but Google search has changed. AI-powered answers, video-first social feeds, and platforms like LinkedIn are all prioritizing video.
To stand out, your videos need to be structured and accessible with captions, transcripts, metadata, and tags that machines can actually read. These not only give Google more to crawl, but they also help you reach wider audiences, boost engagement, and signal that you’re creating inclusive content.
This guide walks you through how to make video assets SEO-ready and accessible using Cloudinary.
Uploading videos is straightforward, but making them searchable, discoverable, and accessible to search engines is where most fall short.
Cloudinary can help automate many of these tasks, such as making it easy to add relevant tags to your video using the Google Video AI add-on. You can also add alt text and captions to your videos when uploading.
For this post, we’ll use the Cloudinary SDK to handle uploads. You can download it using the command below:
<code>npm install cloudinary</code>Code language: HTML, XML (xml)You’ll need a Cloudinary account to access your credentials, which allow you to interact with the Cloudinary SDK. If you don’t have an account yet, sign up at Cloudinary.
After signing in, go to your Cloudinary dashboard and copy the following details: Cloud Name, API Key, and API Secret.

You can store these details in environment variables and configure Cloudinary at the top of your script like this:
import cloudinary from 'cloudinary';

cloudinary.config({
  cloud_name: CLOUDINARY_CLOUD_NAME,
  api_key: CLOUDINARY_API_KEY,
  api_secret: CLOUDINARY_API_SECRET,
});Code language: JavaScript (javascript)
With all of this set up, let’s now see how to upload a video and add both contextual metadata and categorization tags.
To start, use the same cloudinary instance you configured earlier to upload a video and pass metadata using the context field. This allows you to add features such as alt text and captions.
cloudinary.uploader.upload('video.mp4', {
  resource_type: 'video',
  context: 'caption=This is a test video|alt=Test Video'
})Code language: JavaScript (javascript)
The example above adds the caption and alt text, separated by the | character, all in one string. Cloudinary will split this up and store it like this:
"context": {

        "custom": {

            "alt": "Test Video",

            "caption": "This is a test video"

        }

    },Code language: JavaScript (javascript)
You can also auto-generate tags using the Google Video Tagging Add-on. To use this add-on, search for the Google AI Video Transcription add-on on your Cloudinary dashboard:

Click the add-on and subscribe to the free plan:

Now, when you attach categorization: ‘google_video_tagging’ in your upload, Cloudinary will generate tags like this:
"info": {

    "categorization": {

      "google_video_tagging": {

        "data": [

          { "tag": "solar power", "confidence": 0.98 },

          { "tag": "cityscape", "confidence": 0.91 }

        ]

      }

    }

  },Code language: JavaScript (javascript)
These tags are useful for organizing your video library, enabling search filters, and improving semantic SEO.
Once your video is uploaded, Cloudinary stores everything. You (or your dev) can then grab this data by calling Cloudinary’s Admin API:
GET https://api.cloudinary.com/v1_1/<cloud_name>/resources/video/upload/<public_id>Code language: HTML, XML (xml)And you’ll get a detailed response that looks like this:
{

  "secure_url": "https://res.cloudinary.com/.../video.mp4",

  "context": {

    "custom": {

      "alt": "Test Video",

      "caption": "This is a test video"

    }

  },

  "info": {

    "categorization": {

      "google_video_tagging": {

        "data": [

          { "tag": "solar power", "confidence": 0.98 },

          { "tag": "cityscape", "confidence": 0.91 }

        ]

      }

    }

  },

  "duration": 196,

  "width": 1280,

  "height": 720

}Code language: JSON / JSON with Comments (json)
Now you’ve got everything you need to describe the video in a way search engines understand. The next step is to wrap it in structured data (JSON-LD).
Structured data is a special format that gives search engines extra context about what’s on your page. For video content specifically, there’s a dedicated format called VideoObject.
This schema markup is written in JSON-LD (JavaScript Object Notation for Linked Data). It sits inside a <script type="application/ld+json"> block in your HTML and provides structured data that search engines can read without rendering the page.
You wrap it all up in a <script> tag like this:
<script type="application/ld+json">

{

  "@context": "https://schema.org",

  "@type": "VideoObject",

  "name": "This is a test video",

  "description": "Test Video",

  "thumbnailUrl": "https://res.cloudinary.com/your_cloud/video/upload/thumbnail.jpg",

  "uploadDate": "2025-06-12",

  "contentUrl": "https://res.cloudinary.com/your_cloud/video/upload/video.mp4",

  "duration": "PT3M16S",

  "keywords": ["solar power", "cityscape"]

}

</script>Code language: HTML, XML (xml)
Let’s break it down:
@type: VideoObjecttells Google, “Hey, this is a video.”nameanddescriptionare pulled from your caption and alt text.contentUrlis the direct link to the video file.keywordsare those auto-generated tags from Google’s video AI.durationis how long the video is (formatted as ISO duration: PT3M16S = 3 min, 16 sec).
You can inject this block into the page using your CMS, a frontend framework like Next.js, or just by pasting it into the HTML manually.
In addition to adding metadata to your video, captions and transcripts are also very important. They make your video accessible for people watching on mute, users with hearing impairments, and search engines or AI tools trying to parse your content.
You may wonder what the difference is between captions and transcripts:
- Captions are time-synced text shown during playback.
- Transcripts are the full, unsynced audio in text form.
Transcripts are especially great for SEO, skimming, and summarization.
If you don’t already have a caption file, Cloudinary can generate one using the Google AI Video Transcription add-on. Search for it on the Add-ons page and subscribe to the free plan:

You can now modify your upload logic to request a subtitle file from Google’s Speech-to-Text API using the raw_convert parameter:
<script type="application/ld+json">

{

  "@context": "https://schema.org",

  "@type": "VideoObject",

  "name": "This is a test video",

  "description": "Test Video",

  "thumbnailUrl": "https://res.cloudinary.com/your_cloud/video/upload/thumbnail.jpg",

  "uploadDate": "2025-06-12",

  "contentUrl": "https://res.cloudinary.com/your_cloud/video/upload/video.mp4",

  "duration": "PT3M16S",

  "keywords": ["solar power", "cityscape"]

}

</script>Code language: HTML, XML (xml)
This tells Cloudinary to send the audio to Google Speech-to-Text and return a .vtt subtitle file you can use with any video player.
Once the .vtt file is ready, include it in your <video> element like so:
<video controls crossOrigin="anonymous" class="w-full max-w-md border-4 rounded">

  <source src="https://res.cloudinary.com/your_cloud/video/upload/solar_video_demo.mp4" type="video/mp4" />

  <track

    label="English"

    kind="subtitles"

    srcLang="en"

    src="https://res.cloudinary.com/your_cloud/raw/upload/solar_video_demo.vtt"

    default

  />

</video>Code language: HTML, XML (xml)
This gives you a video that plays normally, with toggleable subtitles for accessibility and UX, and better SEO, because now your video has a discoverable text layer.
To boost your SEO even more, don’t stop at captions. Drop the transcript right below your video as readable HTML:
<video controls crossOrigin="anonymous" class="w-full max-w-md border-4 rounded">

  <source src="https://res.cloudinary.com/your_cloud/video/upload/solar_video_demo.mp4" type="video/mp4" />

  <track

    label="English"

    kind="subtitles"

    srcLang="en"

    src="https://res.cloudinary.com/your_cloud/raw/upload/solar_video_demo.vtt"

    default

  />

</video>Code language: HTML, XML (xml)
This helps Google index content like blog text and lets users skim instead of watching the full video. If you used the google_speech add-on, you already have the text. Convert the .vtt file to plain text or display it in its original format.
Once all of this is in place, you want to make sure your setup actually meets SEO and accessibility standards.
Start with Google’s Rich Results Test tool. It checks whether your structured data (like VideoObject) is valid and eligible for enhanced search features.
To use it:
- Go to Google’s Rich Results Test.
- Paste the URL of your video page.
- Click the Test URL button.
If the video markup is valid, you’ll see a Videos section among the results. If anything is missing, like no contentUrl, missing duration, or invalid @context, the tool will point it out.

You can also use Lighthouse in Chrome DevTools to test for accessibility issues that affect real users (and sometimes SEO too).
To use it:
- Open your video page in Chrome.
- Right-click and choose Inspect.
- Click the Lighthouse tab.
- Click the Analyze page load button.

Lighthouse will scan everything. Your goal is to get the Accessibility score as close to 100 as possible. Here’s an example of what the results might look like:

You’ll see a breakdown of passed checks and any accessibility issues detected, like missing labels, insufficient contrast, or unsupported video elements. Fixing these not only improves SEO but also creates a better experience for everyone.
So far, we’ve covered the basics like adding captions, transcripts, structured data, and metadata. But what happens when you’re managing hundreds of videos?
You need a repeatable system. That means properly tagging every video uploaded to Cloudinary, storing metadata at upload, and automating as much of this as possible.
One way to do this is to use Cloudinary MediaFlows. This ensures that every uploaded video is automatically processed and enriched without manual intervention.
Cloudinary’s MediaFlows lets you automate your assets (images and videos) by creating workflows that handle these tasks behind the scenes:
- EasyFlows. A simple, no-code automation tool for predefined actions.
- PowerFlows. A more advanced, flexible builder that allows for custom logic.
To access MediaFlows, go to your Cloudinary console and click the MediaFlows logo as shown below:
The MediaFlows dashboard will open, where you can create workflows. Since you need something that dynamically triggers video processing on upload, choose PowerFlows.
Click the + Create New button, select PowerFlow, and the UI will open, where you can drag and configure blocks for your workflow.
On the left-hand side, you’ll see a list of blocks for actions, add-ons, APIs, and more. Search through this list to configure your flow visually.
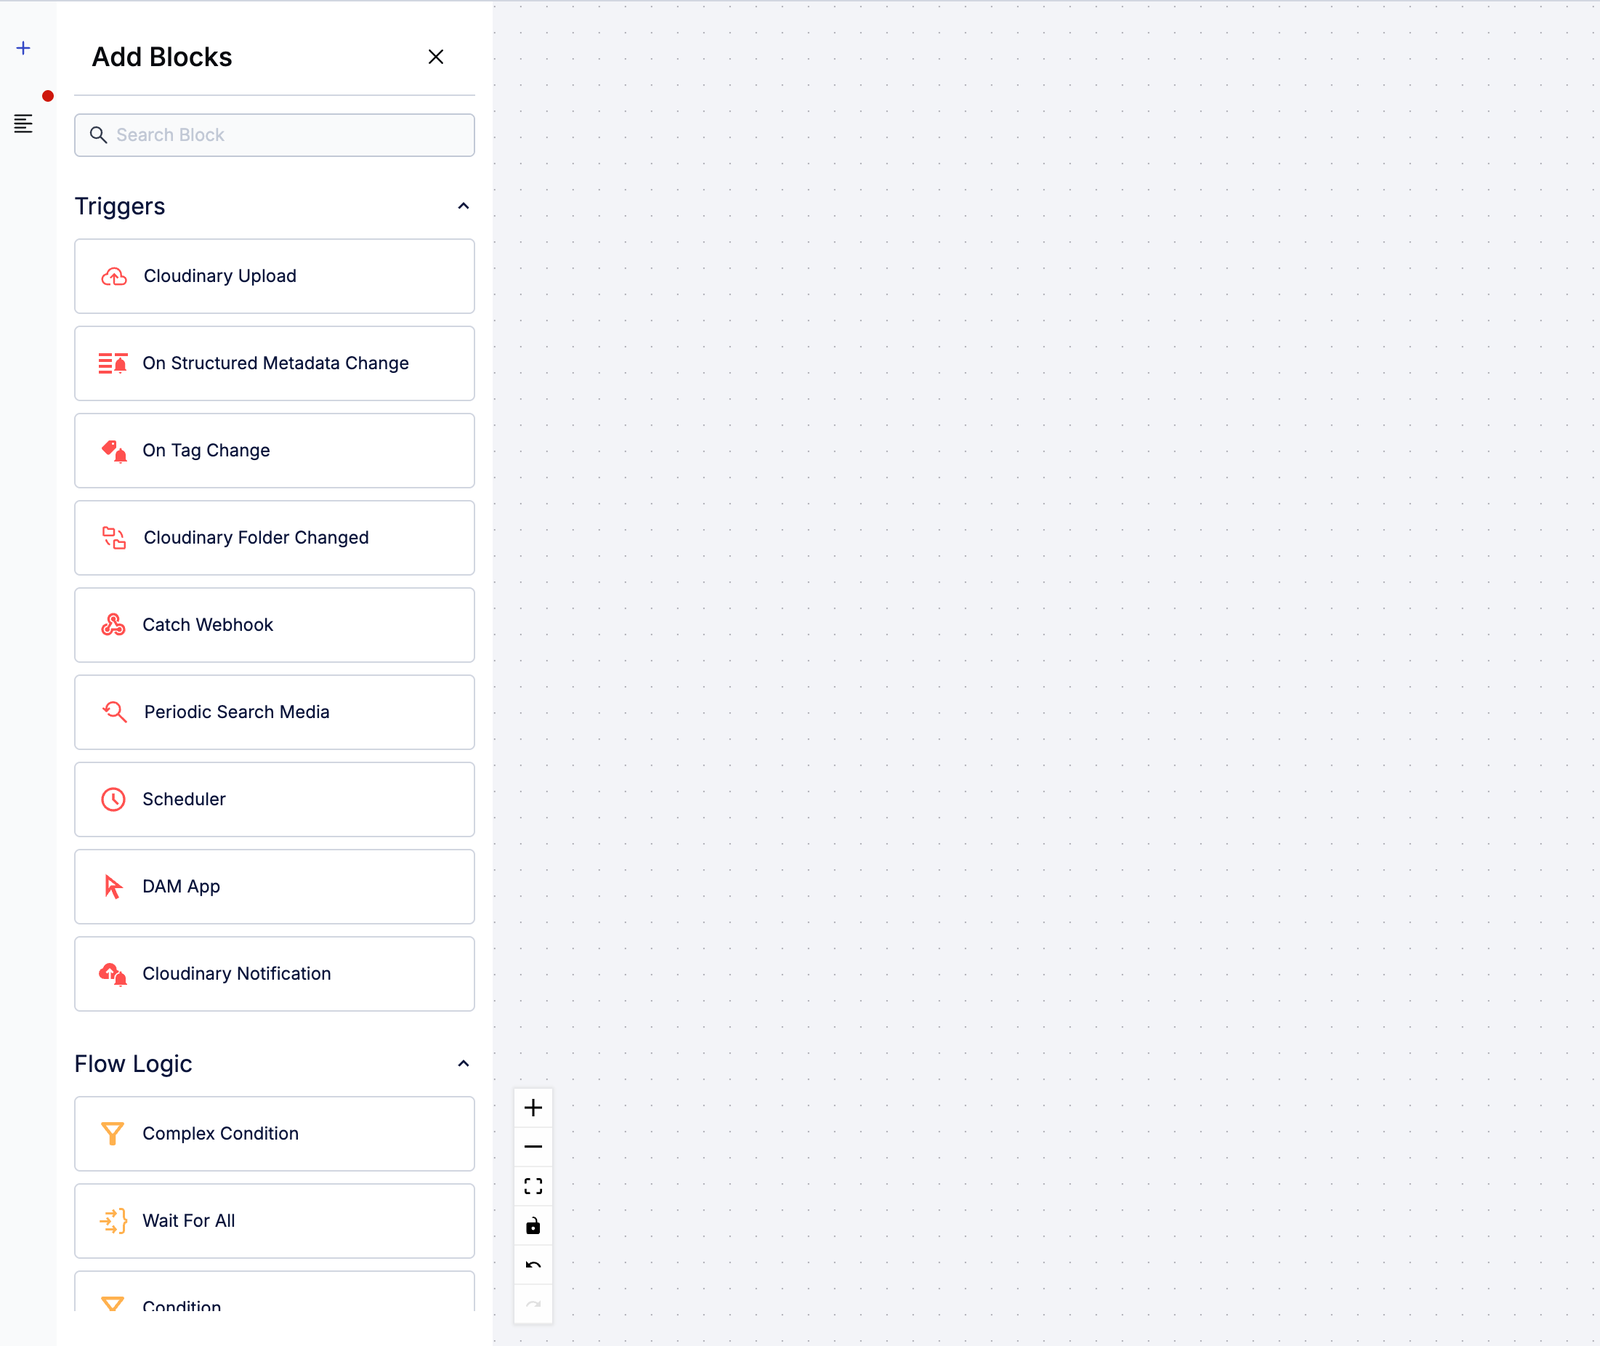
For this guide, you’ll use three blocks:
- Cloudinary Upload
- Update Contextual Metadata
- Google Video Tagging Add-on
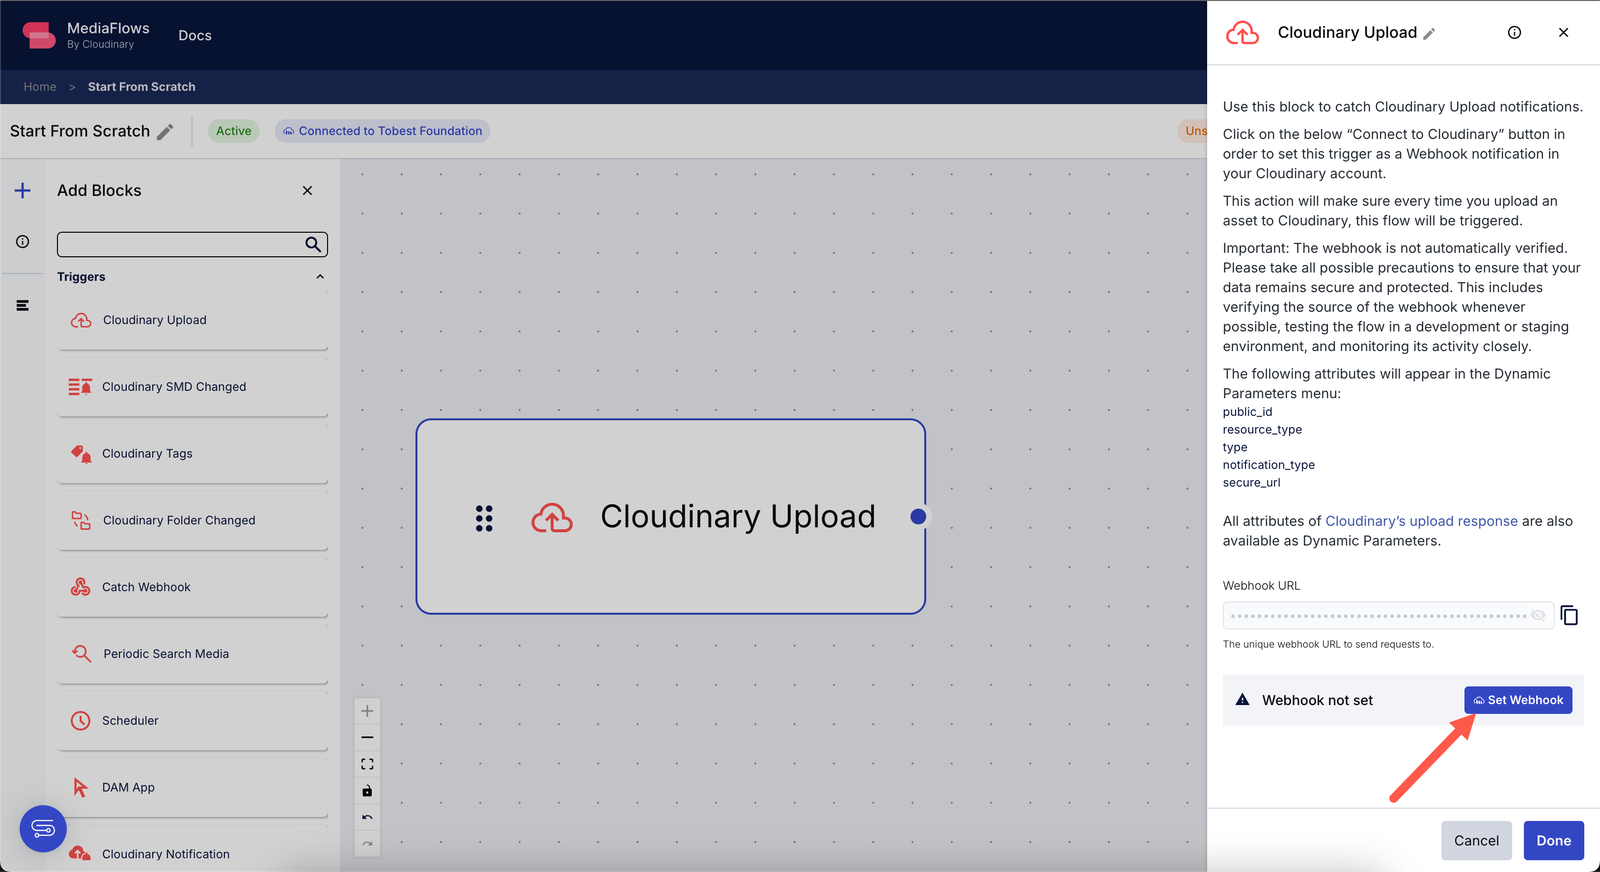
Drag the Cloudinary Upload block to the workspace. This block will listen for new uploads.
To make the workflow react to uploads, you need to set up a webhook. Click the Set Webhook button and enable it. Once done, any time a video is uploaded, the webhook will trigger this workflow.
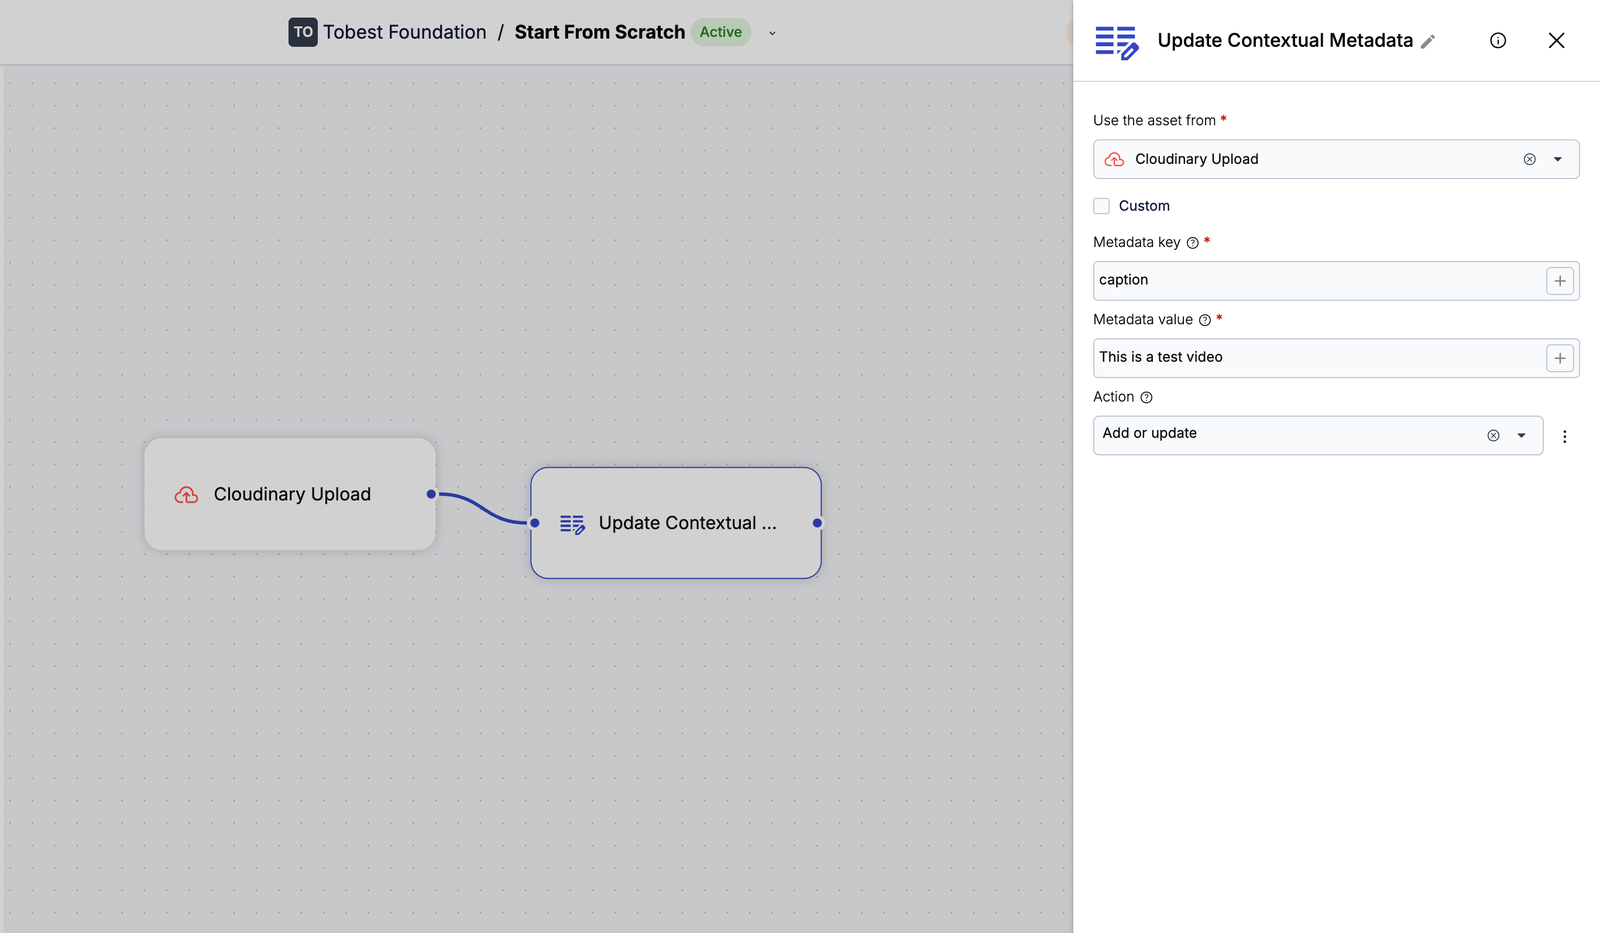
Next, drag the Update Contextual Metadata block into the workspace and connect it to the Cloudinary Upload block.
Click the Update Contextual Metadata block and set custom metadata fields like caption or alt. These fields will be added to the video as soon as it’s uploaded.
Now, scroll to the Add-ons section on the left. Drag the Google Video Tagging block to the canvas and connect it to the Update Contextual Metadata block.
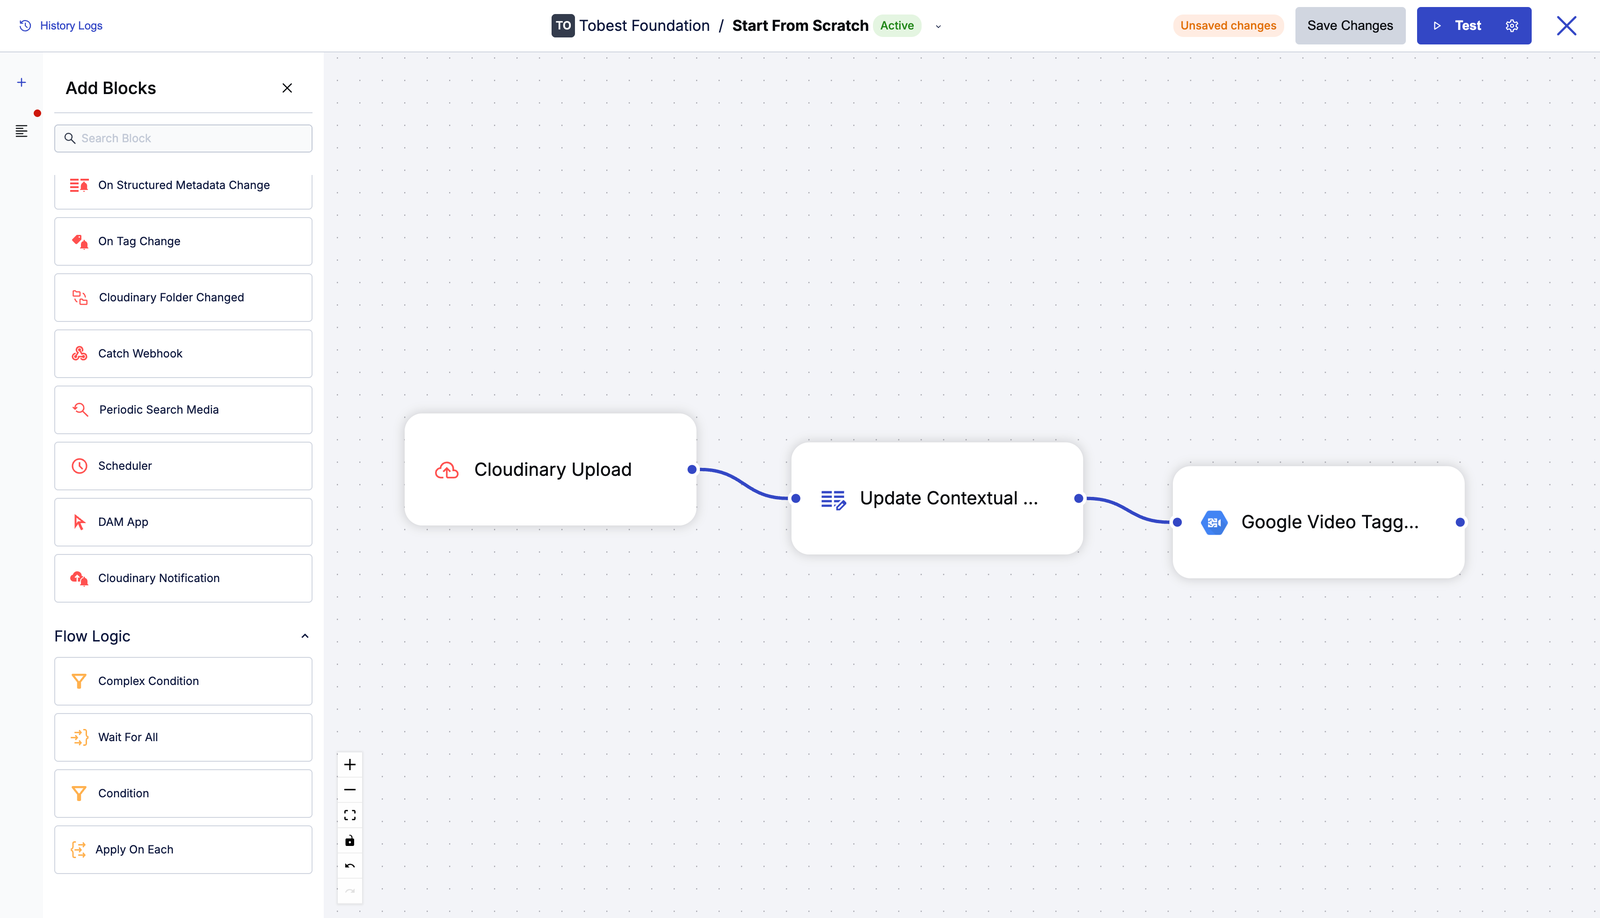
Once connected, the workflow will auto-tag every video using Google AI tagging as part of the upload process.
After setting up your blocks, click Save to store the workflow.
Now let’s test it. Click the Settings icon beside the Test button to configure which sample asset to upload. Use a video URL as your test asset.

Once the test video is set, click Test. This will trigger the full workflow using that video.

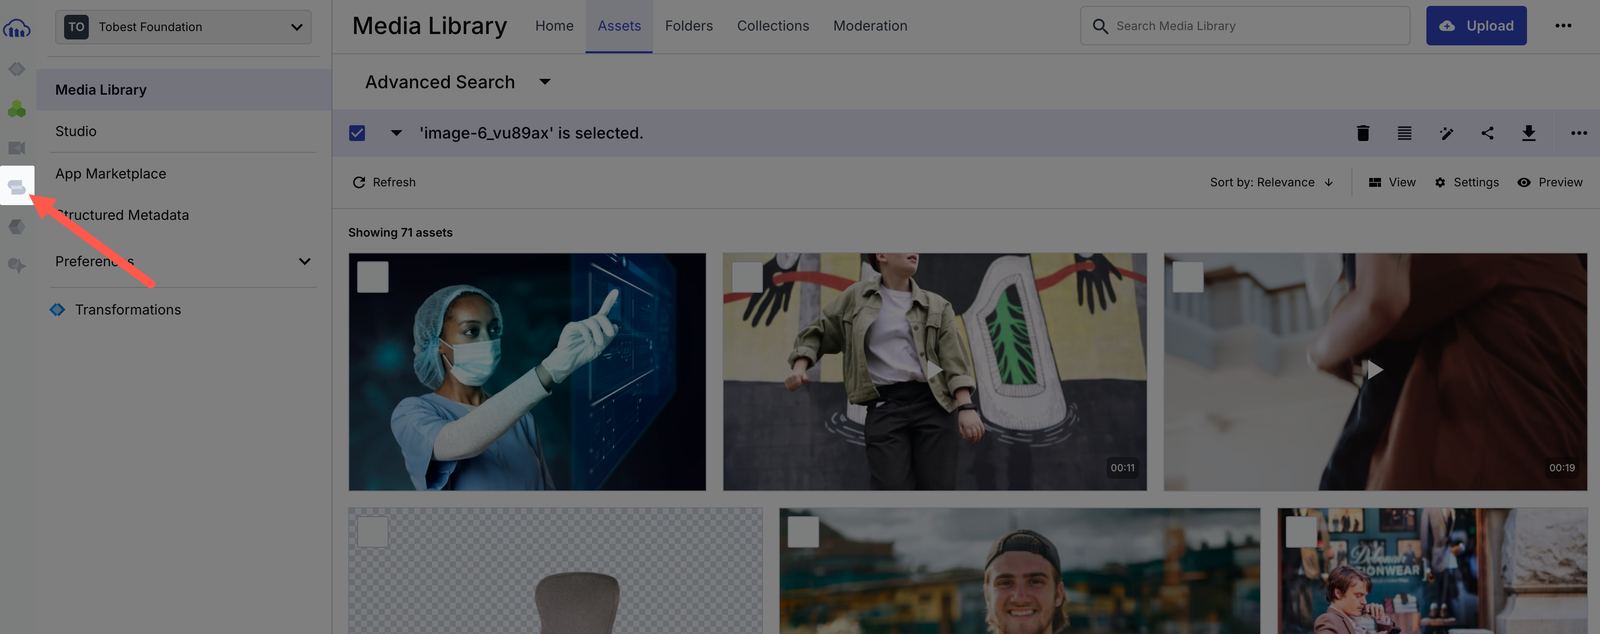
If everything’s working, you’ll see success messages like the one above. If you head to your Cloudinary Media Library, you’ll find the video uploaded, tagged automatically, and captioned with the metadata you specified.

Making your videos SEO-friendly and accessible isn’t just good practice, it’s essential if you want them to be seen, understood, and ranked. With Cloudinary, you can automate transcripts, captions, metadata, and tagging and then scale that across hundreds of assets using MediaFlows.
Sign up on Cloudinary to start structuring your video assets for accessibility and discoverability at scale.
Resources:


