
Cloudinary offers powerful tools for developers looking to integrate sophisticated media operations into their applications. One key aspect of this ecosystem is the Model Context Protocol (MCP) Server, designed specifically to empower developers and AI agents with programmatic access to Cloudinary’s robust functionalities.
The MCP server provides endpoints, both remote and local, that allow AI agents and developers to use Cloudinary’s rich media handling capabilities directly within their product environments. This means developers can automate and simplify the integration of Cloudinary operations through generated code, significantly accelerating development workflows.
Here’s an overview of the available MCP servers and their core capabilities:
- Upload and organize. Easily upload and manage images, videos, and raw files.
- Advanced search and filtering. Quickly locate specific assets using advanced search queries and filters.
- Efficient organization. Rename, delete, organize assets using folders, and apply tags for streamlined asset management.
- Centralized configuration. Manage upload presets, mappings, named transformations, webhook notifications, and streaming profiles.
- Streamlined workflows. Simplify environment setup and maintenance, ensuring consistency across product deployments.
- Dynamic metadata management. Define and control structured metadata fields, supported values, and conditional rules.
- Enhanced asset descriptions. Enable richer asset descriptions, facilitating precise asset management and retrieval.
- AI-powered insights. Leverage AI-driven content analysis for automatic asset tagging.
- Robust moderation tools. Implement content moderation, safety checks, and advanced object detection seamlessly within your apps.
- Automation simplified. Create and manage automated media processing workflows effortlessly.
- Dynamic media processing. Automate content transformations and delivery based on flexible workflows defined in MediaFlows.
We’ll focus on installing the MCP server locally in our AI Code editor, Cursor. If you don’t have Cursor yet, you can download it using this link.
The first thing you need to do is open Cursor > Settings > Cursor Settings.
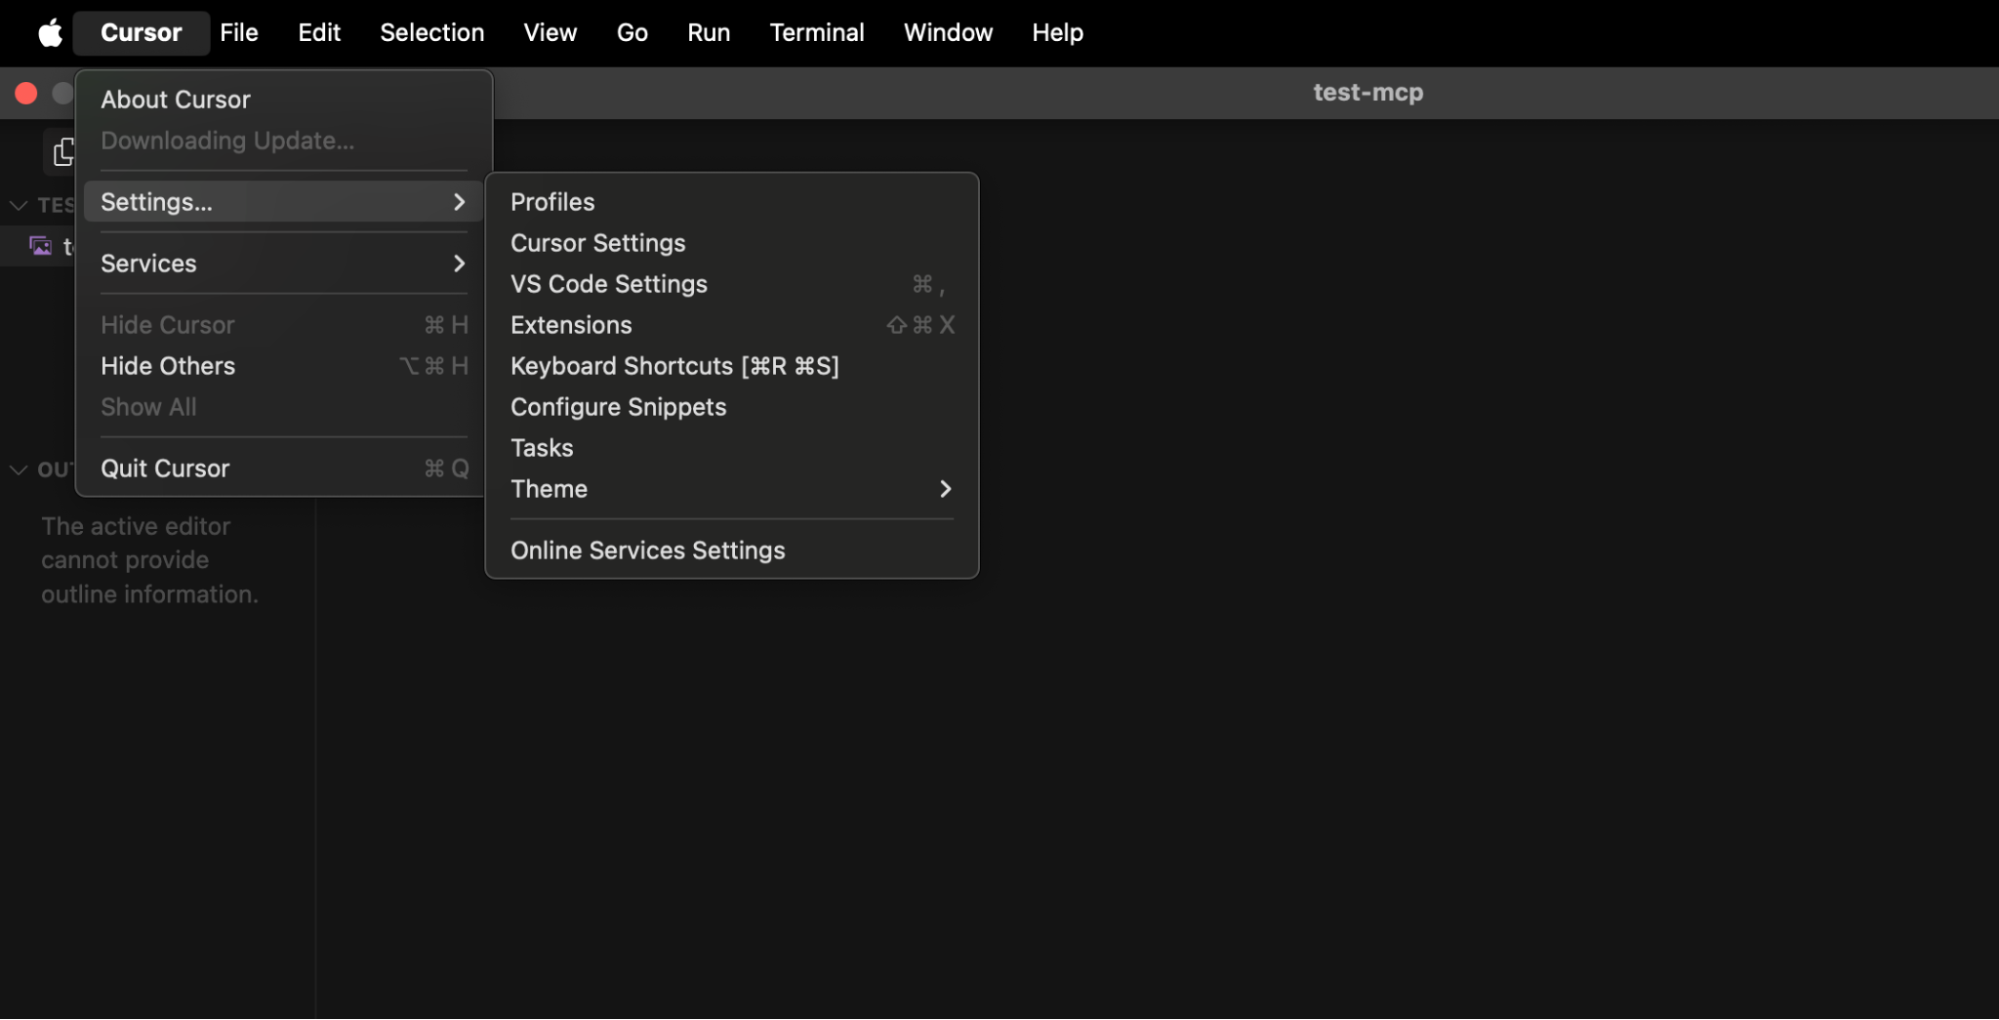
Then, on the left navigation bar, click MCP, then the blue button +Add New Global MCP Server.
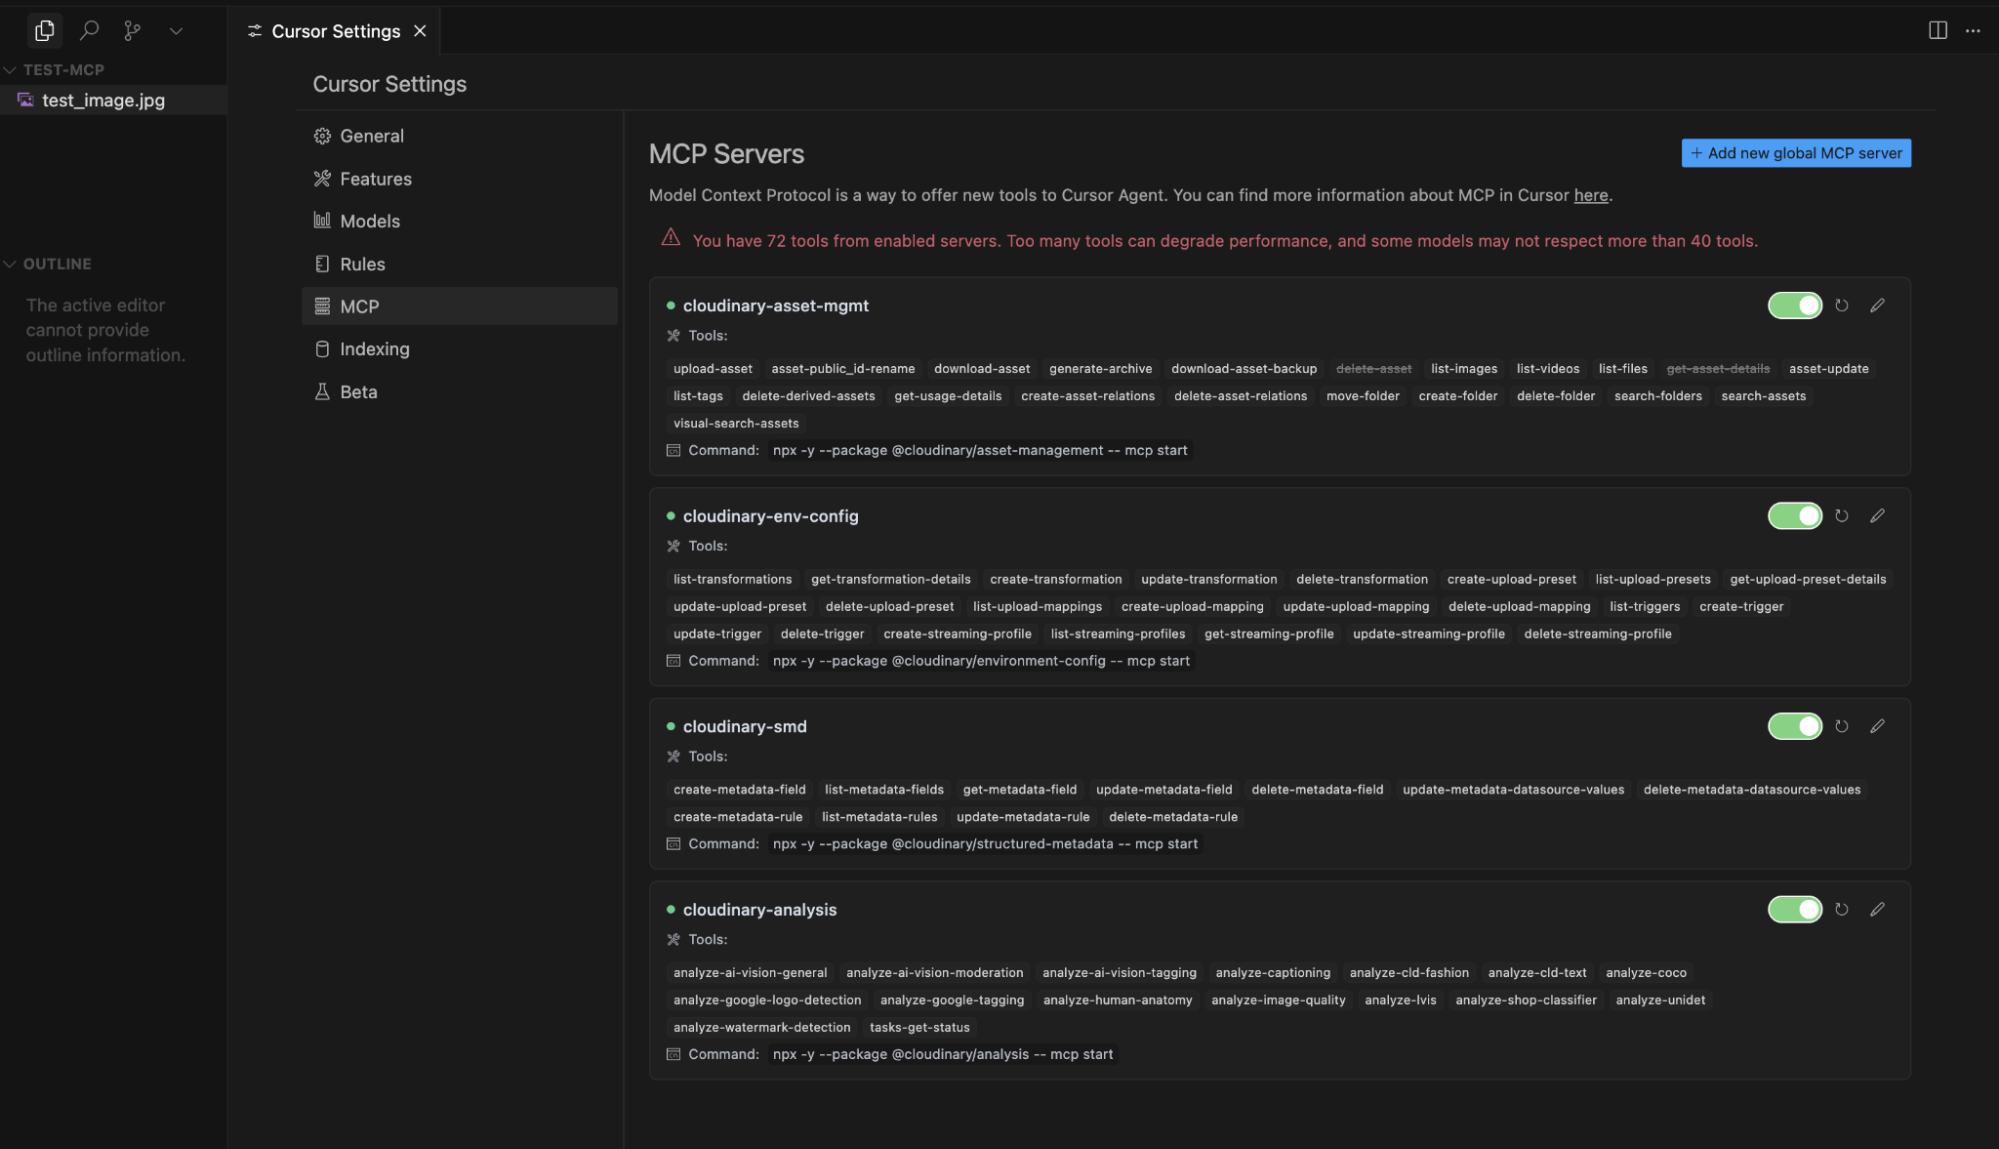
Copy and paste the following JSON object, which contains information from all the Cloudinary MCP servers we’ll add to Cursor.
{

   "mcpServers": {

     "cloudinary-asset-mgmt": {

         "command": "npx",

         "args": ["-y", "--package", "@cloudinary/asset-management", "--", "mcp", "start"],

         "env": {

           "CLOUDINARY_CLOUD_NAME": "YOUR-CLOUDE-NAME",

           "CLOUDINARY_API_KEY": "YOUR-API-KEY",

           "CLOUDINARY_API_SECRET": "YOUR-CLOUDINARY-SECRET"

         }

       },

       "cloudinary-env-config": {

         "command": "npx",

         "args": ["-y", "--package", "@cloudinary/environment-config", "--", "mcp", "start"],

         "env": {

           "CLOUDINARY_CLOUD_NAME": "YOUR-CLOUDE-NAME",

           "CLOUDINARY_API_KEY": "YOUR-API-KEY",

           "CLOUDINARY_API_SECRET": "YOUR-CLOUDINARY-SECRET"

         }

       },

       "cloudinary-smd": {

         "command": "npx",

         "args": ["-y", "--package", "@cloudinary/structured-metadata", "--", "mcp", "start"],

         "env": {

           "CLOUDINARY_CLOUD_NAME": "YOUR-CLOUDE-NAME",

           "CLOUDINARY_API_KEY": "YOUR-API-KEY",

           "CLOUDINARY_API_SECRET": "YOUR-CLOUDINARY-SECRET"

         }

       },

       "cloudinary-analysis": {

         "command": "npx",

         "args": ["-y", "--package", "@cloudinary/analysis", "--", "mcp", "start"],

         "env": {

           "CLOUDINARY_CLOUD_NAME": "YOUR-CLOUDE-NAME",

           "CLOUDINARY_API_KEY": "YOUR-API-KEY",

           "CLOUDINARY_API_SECRET": "YOUR-CLOUDINARY-SECRET"

         }

       }

   }

 }Code language: JSON / JSON with Comments (json)
Then, save the MCP configuration file.
Retrieve your Cloudinary cloud name, API key, and secret to make sure your MCP server configurations are connected to your Cloudinary application.
To begin, log in to your Cloudinary account or create a free account. If prompted with the question, “What’s your main interest?”, select Coding with APIs and SDKs or Skip.

In your account, select Settings > Product Environments. Here, you’ll see the cloud that you’ve created. Let’s click the three-dot menu to edit your Cloudinary cloud name.
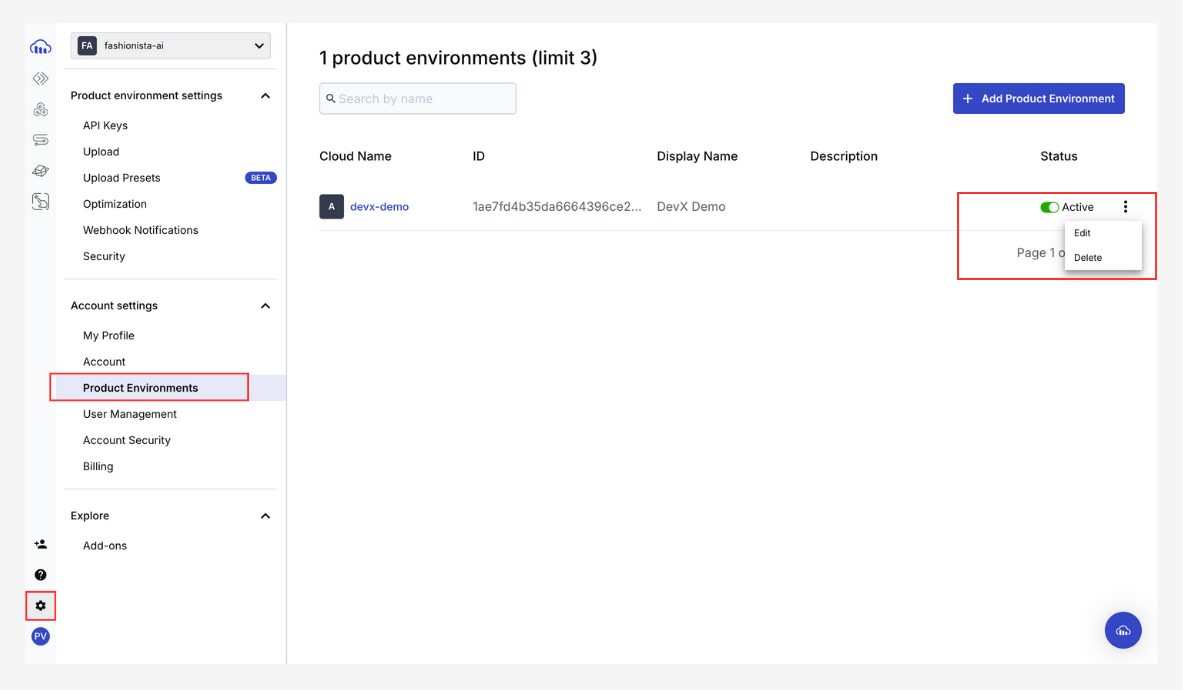
Edit the product environment and name your cloud, then click Save Changes.
It’s essential to maintain the same cloud name across different tools for consistency.

In your account, select Settings > Product Environments Setting > API Keys. Here, you can view the information that you need to use to populate the MCP Cloudinary JSON object with your credentials.

"CLOUDINARY_CLOUD_NAME": "YOUR-CLOUDE-NAME",

"CLOUDINARY_API_KEY": "YOUR-API-KEY",

"CLOUDINARY_API_SECRET": "YOUR-CLOUDINARY-SECRET"Code language: JavaScript (javascript)Now that we’ve configured our Cloudinary MCP server correctly into Cursor, it’s time to test it. We’ll show you how to run basic instructions to your AI agent, triggering the use of the MCP server, which will help you develop your applications using Cloudinary.
In Cursor, create a new folder for the new project we’ll work on. Inside this folder, add any image you want to work with for this tutorial. Then on the right-hand side, you’ll see a text box for you to tell our AI agent what to do.
In my case, as you can see in the image, I created a folder called TEST-MCP. This is where I added my image called test_image.jpg.
Now we’ll enter the following prompt:
<em>Upload the image file:///Users/devpato/Desktop/test-mcp/test_image.jpg to my Cloudinary account. Place it under an “uploads” folder.</em>Code language: HTML, XML (xml)Make sure to replace the path with the local path of your image on your computer.
What this prompt will do is to find the image you have specified in the local path and upload it to a folder called “uploads.” If the folder doesn’t exist, it will create one. Finally, the MCP server should give you a secure URL from where your image is located.
The next step is to tell our AI agent the following prompt to start with a basic image transformation using Cloudinary:
Now use the Cloudinary MCP server to make this exciting image in my Cloudinary account a 300×300 https://res.cloudinary.com/mcp-server-test/image/upload/v1752681002/uploads/szpshud6ttme2ojvriat.jpg
Make sure to pass in the prompt the secure URL provided in the previous prompt.
You’ve now learned how to start working with the Cloudinary MCP Server. Take a look at our documentation to start doing more transformations to your assets.
Cloudinary’s Model Context Protocol (MCP) servers offer a comprehensive, developer-friendly way to automate and enhance your visual media handling workflows. To stay updated with the latest product features, follow Cloudinary on Twitter and explore other sample apps.
Building an app with Cloudinary and need inspiration? Visit your App Gallery.


