
Product reviews are an integral aspect of an e-commerce store’s branding and marketing. They help build trust and loyalty among customers and help drive sales.
In this article, we’ll learn how to create a product review application with Next.js and Cloudinary’s Upload widget.
The completed project is on CodeSandbox. Fork it and run the code.
The source code is also available on GitHub.
To follow along with this article, we need to have:
- Knowledge of React and Next.js.
- A Cloudinary account.
- Understanding of Chakra UI, as the demo’s user interface is built with it.
Create a Next.js project by running the command below in our terminal.
npx create-next-app product-review-app
Next, navigate into the project directory.
cd product-review-app
Then, run the command below to start the application.
npm run dev
We will use react-hook-form later in the article, so install that also.
npm i react-hook-form
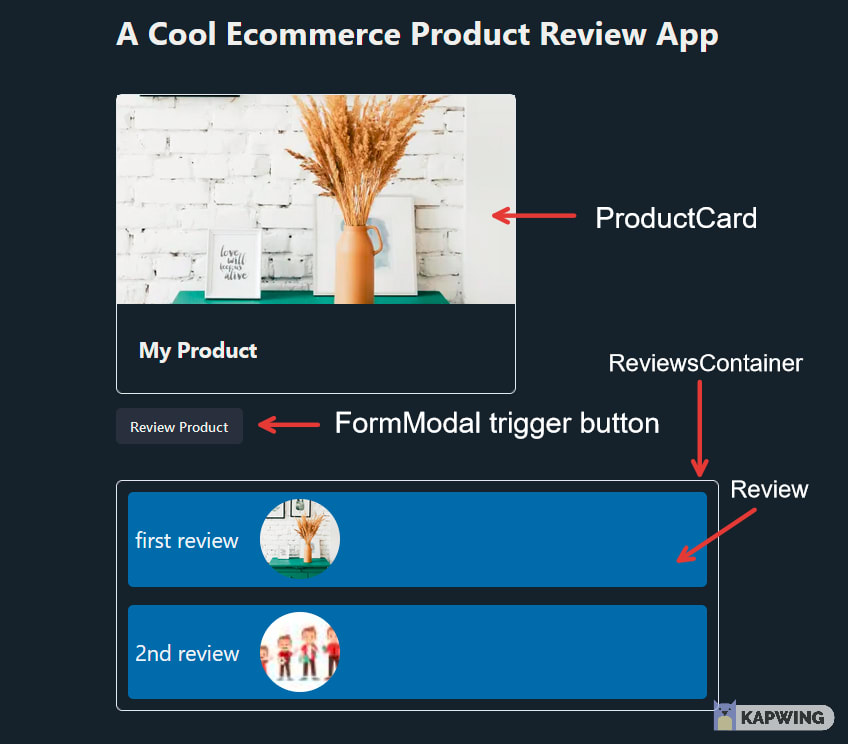
We will start by creating the user interface below:
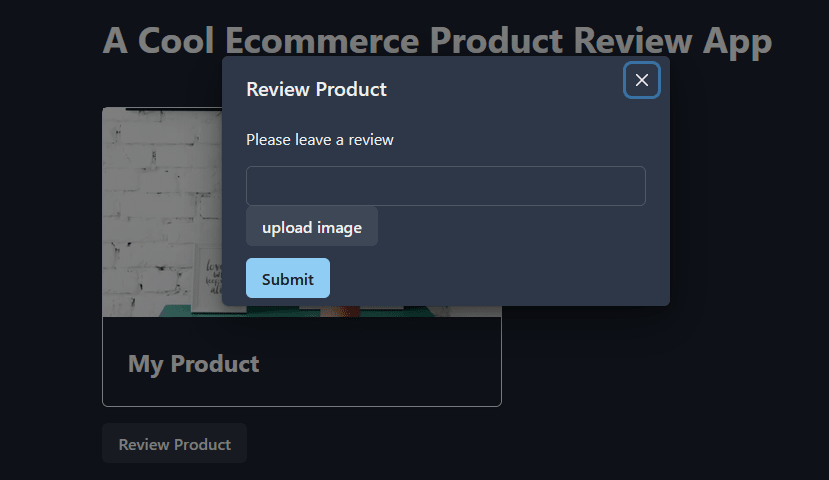
Clicking the ‘Review Product’ button will cause the modal containing the Form component to pop up:
To effectively manage changes in the application, we need to set up state management using the Context API. The application will have two contexts: ImageUploadContext and ReviewsContext.
The ImageUploadContext will hold the image the user uploads, whereas the ReviewsContext will contain the user’s comment and the uploaded image.
As stated earlier, this context will hold the url of the uploaded image.
ImageUploadContext.js
    import { createContext, useContext, useState } from "react";

    const ImageUploadContext = createContext("");
    export const useImageUploadContext = () => useContext(ImageUploadContext);

    export default function ImageUploadContextProvider({ children }) {
      const [uploadedImgUrl, setUploadedImgUrl] = useState(null);

      return (
        <ImageUploadContext.Provider value={{ uploadedImgUrl, setUploadedImgUrl }}>
          {children}
        </ImageUploadContext.Provider>
      );
    }
Code language: JavaScript (javascript)
Here, we do the following:
- Import the required dependencies from React.
- Create the
ImageUploadContextthat will hold the image URL. - Set up the
ImageUploadContextProviderthat will wrap the root of the application. - Set up the
uploadedImgUrlstate and pass it as the provider’s value along withsetUploadedImgUrl. - Create and export a custom hook,
useImageUploadContextfrom which we will access the data in theImageUploadContext.
Though similar in set up to the ImageUploadContext, ReviewsContext will hold the user’s comment and the uploaded image.
ReviewsContext.js
import { createContext, useContext, useState } from "react";

const ReviewsContext = createContext(null);
export const useReviewsContext = () => useContext(ReviewsContext);

export default function ReviewsContextProvider({ children }) {
  const [reviews, setReviews] = useState([
    { reviewText: "first review", reviewImage: "/product.webp" },
  ]);

  return (
    <ReviewsContext.Provider value={{ reviews, setReviews }}>
      {children}
    </ReviewsContext.Provider>
  );
}
Here, we do the following:
- Import
createContext,useContext, anduseStatefrom React. - Create the
ReviewsContextthat will hold the comment and image url. - Set up the
ReviewsContextProviderthat will wrap the root of the application. - Set up the
reviewsstate and pass it as the provider’s value along withsetReviews. Thereviewsstate will hold an array of objects, and the objects will have two properties:reviewTextandreviewImage.reviewTextis the user’s comment, andreviewImageis the uploaded image. - Create a custom hook,
useReviewsContext, from which we will access the data in theReviewsContext.
The ProductCard component will depict how an e-commerce product card looks in real-world applications.
ProductCard.js
    import { Box, Heading } from "@chakra-ui/react";
    import Image from "next/image";

    export default function ProductCard() {
      return (
        <Box>
          <Box position="relative" w="full" h="70%">
            <Image src="/product.webp" alt="an img" />
          </Box>
          <Box display="flex" alignItems="center" h="90px" pl={6}>
            <Heading>My Product</Heading>
          </Box>
        </Box>
      );
    }
Code language: JavaScript (javascript)
Here, we import Box and Heading from Chakra UI and Image from Next.js and use them to create the card.
The Review component will hold the user’s review comment and image.
Review.js
    import { Box, Text, Image } from "@chakra-ui/react";

    export default function Review({ review }) {
      return (
        <Box p={2}>
          <Text fontSize="2xl" mr={6}>
            {review.reviewText}
          </Text>
          <Image src={review.reviewImage} alt={review.reviewImage} />
        </Box>
      );
    }
Code language: JavaScript (javascript)
Let’s break down the code above:
- We import
Box, Heading, andImagefrom Chakra UI, and use them to create the comment’s interface. - The component receives a
reviewprop, which is an object containing thereviewTextandreviewImagewe set up earlier in theReviewsContext. - We import
Box,Heading, andImagefrom Chakra UI and use them to create the comment’s interface. - The component receives a review prop, an object containing the
reviewTextandreviewImagewe set up earlier in theReviewsContext.
The ReviewsContainer will contain the different reviews for a product.
ReviewsContainer.js
    import { Box, VStack } from "@chakra-ui/react";
    import Review from "@components/Review";

    import { useReviewsContext } from "context/ReviewsContext";

    export default function ReviewsContainer() {
      const { reviews } = useReviewsContext();

      return (
        <Box mt={10} rounded="md" border="1px" borderColor="gray.200" p={3}>
          <VStack spacing={5} align="flex-start">
            {reviews.map((review) => (
              <Review review={review} key={review.reviewText} />
            ))}
          </VStack>
        </Box>
      );
    }
Code language: JavaScript (javascript)
Let’s break down the code above:
- We import the
useReviewsContexthook fromReviewsContextand access thereviews. -
reviewsis an array of objects, so we map through it and pass eachreviewto theReviewcomponent we set up earlier.
The FormModal contains the Form component.
FormModal.js
    import {
      Modal,
      ModalOverlay,
      ModalContent,
      ModalHeader,
      ModalBody,
      ModalCloseButton,
      useDisclosure,
      Button,
      Box,
    } from "@chakra-ui/react";
    import Form from "./Form";

    export default function FormModal() {
      const { isOpen, onOpen, onClose } = useDisclosure();

      return (
        <Box mt={4}>
          <Button onClick={onOpen}>Review Product</Button>
          <Modal isOpen={isOpen} onClose={onClose}>
            <ModalOverlay />
            <ModalContent>
              <ModalHeader>Review Product</ModalHeader>
              <ModalCloseButton />
              <ModalBody>
                <Form closeModal={onClose} />
              </ModalBody>
            </ModalContent>
          </Modal>
        </Box>
      );
    }
Code language: JavaScript (javascript)
Here, we set up the modal and set the Form component as the modal’s content. We also pass the onClose method to Form. We will need onClose to close the modal after submitting the form.
The Form component will hold the input field where the user can enter their review, a button that will trigger Cloudinary’s Upload Widget, and another button to submit the form.
Form.js
    import { useForm } from "react-hook-form";
    import { FormControl, Input, Stack, Text, Button } from "@chakra-ui/react";

    export default function Form({ closeModal }) {
      const { handleSubmit, register } = useForm();

      function onSubmit(value) {
        console.log(value);
        //do something with form data then close the modal
        closeModal();
      }

      return (
        <Stack spacing={4}>
          <Text>Please leave a review</Text>
          <form onSubmit={handleSubmit(onSubmit)}>
            <FormControl>
              <Input type="text" {...register("reviewText")} />
              <Button>upload image</Button>
            </FormControl>
            <Button colorScheme="blue" mt={3} type="submit">
              Submit
            </Button>
          </form>
        </Stack>
      );
    }
Code language: JavaScript (javascript)
Here, we do the following:
- Initialize
react-hook-formand import itsuseFormhook. We will use react-hook-form to track the input field’s value and handle the form submission. - Import
handleSubmitandregisterfromuseForm. - Register the input field with react-hook-form.
- Create an
onSubmitfunction where we define how to process the form data; after submitting the form, we call thecloseModalmethod.
Having created the required components, let’s bring them into the index.js file.
    import { Heading } from "@chakra-ui/react";
    import ReviewsContainer from "@components/ReviewsContainer";
    import ProductCard from "@components/ProductCard";
    import FormModal from "@components/FormModal";

    export default function Home() {
      return (
        <div>
          <Heading as="h1" mb={12}>
            A Cool Ecommerce Product Review App
          </Heading>
          <ProductCard />
          <FormModal />
          <ReviewsContainer />
        </div>
      );
    }
Code language: JavaScript (javascript)We’ve created the app’s interface, so now let’s integrate Cloudinary’s Upload widget.
Next.js provides a Script component that we can use to load third-party scripts in our application. We need the Script component to load the upload widget’s script.
_app.js
import { ChakraProvider } from "@chakra-ui/react";
import LayoutWrapper from "@layout/index";
import Script from "next/script";
import ReviewsContextProvider from "@context/ReviewsContext";
import ImageUploadContextProvider from "@context/ImageUploadContext";
function MyApp({ Component, pageProps }) {
return (
<ReviewsContextProvider>
<ImageUploadContextProvider>
<ChakraProvider>
<Script
src="https://upload-widget.cloudinary.com/global/all.js"
type="text/javascript"
strategy="beforeInteractive"
/>
);
}
export default MyApp;
Code language: JavaScript (javascript)Here, we:
- Import
Scriptinto the_app.jsfile and load the widget’s script. - Wrap our application with the
ReviewsContextProviderandImageUploadContextProvider.
Having integrated the widget, let’s initialize it back in the Form component.
Form.js
    import { FormControl, Input, Stack, Text, Button } from "@chakra-ui/react";
    import { useForm } from "react-hook-form";
    import { useReviewsContext } from "context/ReviewsContext";
    import { useImageUploadContext } from "@context/ImageUploadContext";

    export default function Form({ closeModal }) {
      const { reviews, setReviews } = useReviewsContext();
      const { uploadedImgUrl, setUploadedImgUrl } = useImageUploadContext();

      //widget initializer
      function showWidget() {
        window.cloudinary
          .createUploadWidget(
            {
              cloudName: "OUR-ACCOUNT-CLOUD-NAME",
              uploadPreset: "ml_default",
            },
            (error, result) => {
              if (!error && result && result.event === "success") {
                setUploadedImgUrl(result.info.thumbnail_url);
              }
              if (error) {
                console.log(error);
              }
            }
          )
          .open();
      }
      const { handleSubmit, register } = useForm();

      //form submission handler
      function onSubmit(value) {
        setReviews([
          ...reviews,
          { reviewText: value.reviewText, reviewImage: uploadedImgUrl },
        ]);
        closeModal();
      }

      return (
        <Stack spacing={4}>
          <Text>Please leave a review</Text>
          <form onSubmit={handleSubmit(onSubmit)}>
            <FormControl>
              <Input type="text" {...register("reviewText")} />
              <Button onClick={showWidget}>upload image</Button>
            </FormControl>
            <Button colorScheme="blue" mt={3} type="submit">
              Submit
            </Button>
          </form>
        </Stack>
      );
    }
Code language: JavaScript (javascript)
Let’s break down the code above:
- We import
ReviewsContextandImageUploadContext. We accessreviewsandsetReviewsfromReviewsContext, anduploadedImgUrlandsetUploadedImgUrlfromImageUploadContext. - We create a
showWidgetfunction that initializes the widget. We passshowWidgetto the image button’sonClickhandler. - We update the
onSubmitfunction. Instead of logging the form data to the console, we pass that data to thereviewsstate. Upon form submission, we add a new object to the state. We get thereviewTextfrom the input field and thereviewImagefrom theuploadedImgUrlstate. After that, we close the modal.
With this, we have successfully created a product review application.

This article taught us to create a product review application with Next.js and Cloudinary’s Upload widget.