
Many teams are diligent about making websites and documents accessible, but video is often left out of the process entirely. A well-produced video might go public without captions, descriptive text, and a player that’s unusable without a mouse, which breaks accessibility. Digital accessibility ensures that everyone, regardless of ability, can access and understand online content.
With the enforcement of the European Accessibility Act (EAA) on June 28, 2025, making videos accessible for users in the EU is no longer just a best practice; it has become a legal requirement for businesses operating within or serving the European Union. But prioritizing accessible visual media isn’t just about legal compliance, but also creating inclusive, user-friendly experiences for everyone.
The EAA aligns with the Web Content Accessibility Guidelines (WCAG) 2.1, mandating that digital content and services be perceivable, operable, understandable, and robust for all users. This means essential video elements, such as accurate captions, audio descriptions for visual content, keyboard navigability for video players, and adequate color contrast in on-screen text.
In this guide, you’ll learn how to test your videos for accessibility issues and fix them using Cloudinary’s automation tools like AI Vision, including AI-generated captions, alt text, and accessible player controls. To follow along, you’ll need a free Cloudinary account.
First, you should know how accessible your video content currently is. If you don’t know what’s broken, you can’t fix it. Testing helps you identify specific gaps, such as missing captions, inaccessible player controls, or poor screen reader support, that could prevent people with disabilities from engaging with your content.
Here are ways to test your video for accessibility:
- Validate your screen reader. Use tools like NVDA (for Windows) or VoiceOver(for macOS) to test if your video player is announced correctly. Navigate to the player and confirm that controls like Play, Pause, Mute, and Fullscreen are announced properly. Ensure ARIA labels and semantic HTML are functioning as expected.
- Check your keyboard navigation. Attempt to navigate through the player controls using only the keyboard, without using a mouse. You should be able to reach each interactive element (play/pause, volume, captions toggle, etc.) in a logical order and activate them using Enter or Space. This verifies that the player is operable for people with motor disabilities.
- Test your captions. Confirm that captions display correctly,both when autoplay is enabled and when it’s off. Play through different sections to check if subtitles are synchronized and readable against the video background. It’s also a good idea to test with different player themes or backgrounds to verify that the color contrast remains WCAG-compliant.
- Add alt text for cover images. If your video includes a cover image or thumbnail, use screen readers or browser inspection tools to confirm that the alt textis included and descriptive.
- Test across browsers and devices.Your player must be accessible everywhere, which means it should work on major browsers(Chrome, Firefox, Safari) and devices(desktop, tablet, mobile).
- Watch your video on mute.Read only the captions, or watch with the screen turned off while using a screen reader. This simulates experiences for users who are deaf or blind, helping to catch any missing context or inaccessible controls.
After following these steps to test your video for accessibility, you should have a clear picture of how accessible your video truly is and where improvements are needed. You’ll be able to identify gaps in captions, keyboard operability, screen reader support, and visual clarity. From there, the next step is to establish a solid accessibility workflow that incorporates accessibility into your video production process from the outset.
To build a reliable, inclusive, and compliant accessibility workflow, let’s walk through a practical checklist to test and fix common video accessibility issues. The list will include the major accessibility factors to test in a video:
- Captions and subtitles. All speech and non-verbal audio are transcribed.
- Alt text. Video posters should have descriptive alt text.
- Playback controls. They must be operable via keyboard and screen reader.
- Color contrast. Text overlays, like subtitles, must meet contrast standards.
- Screen reader accessibility. Video elements and custom controls are labeled for screen readers.
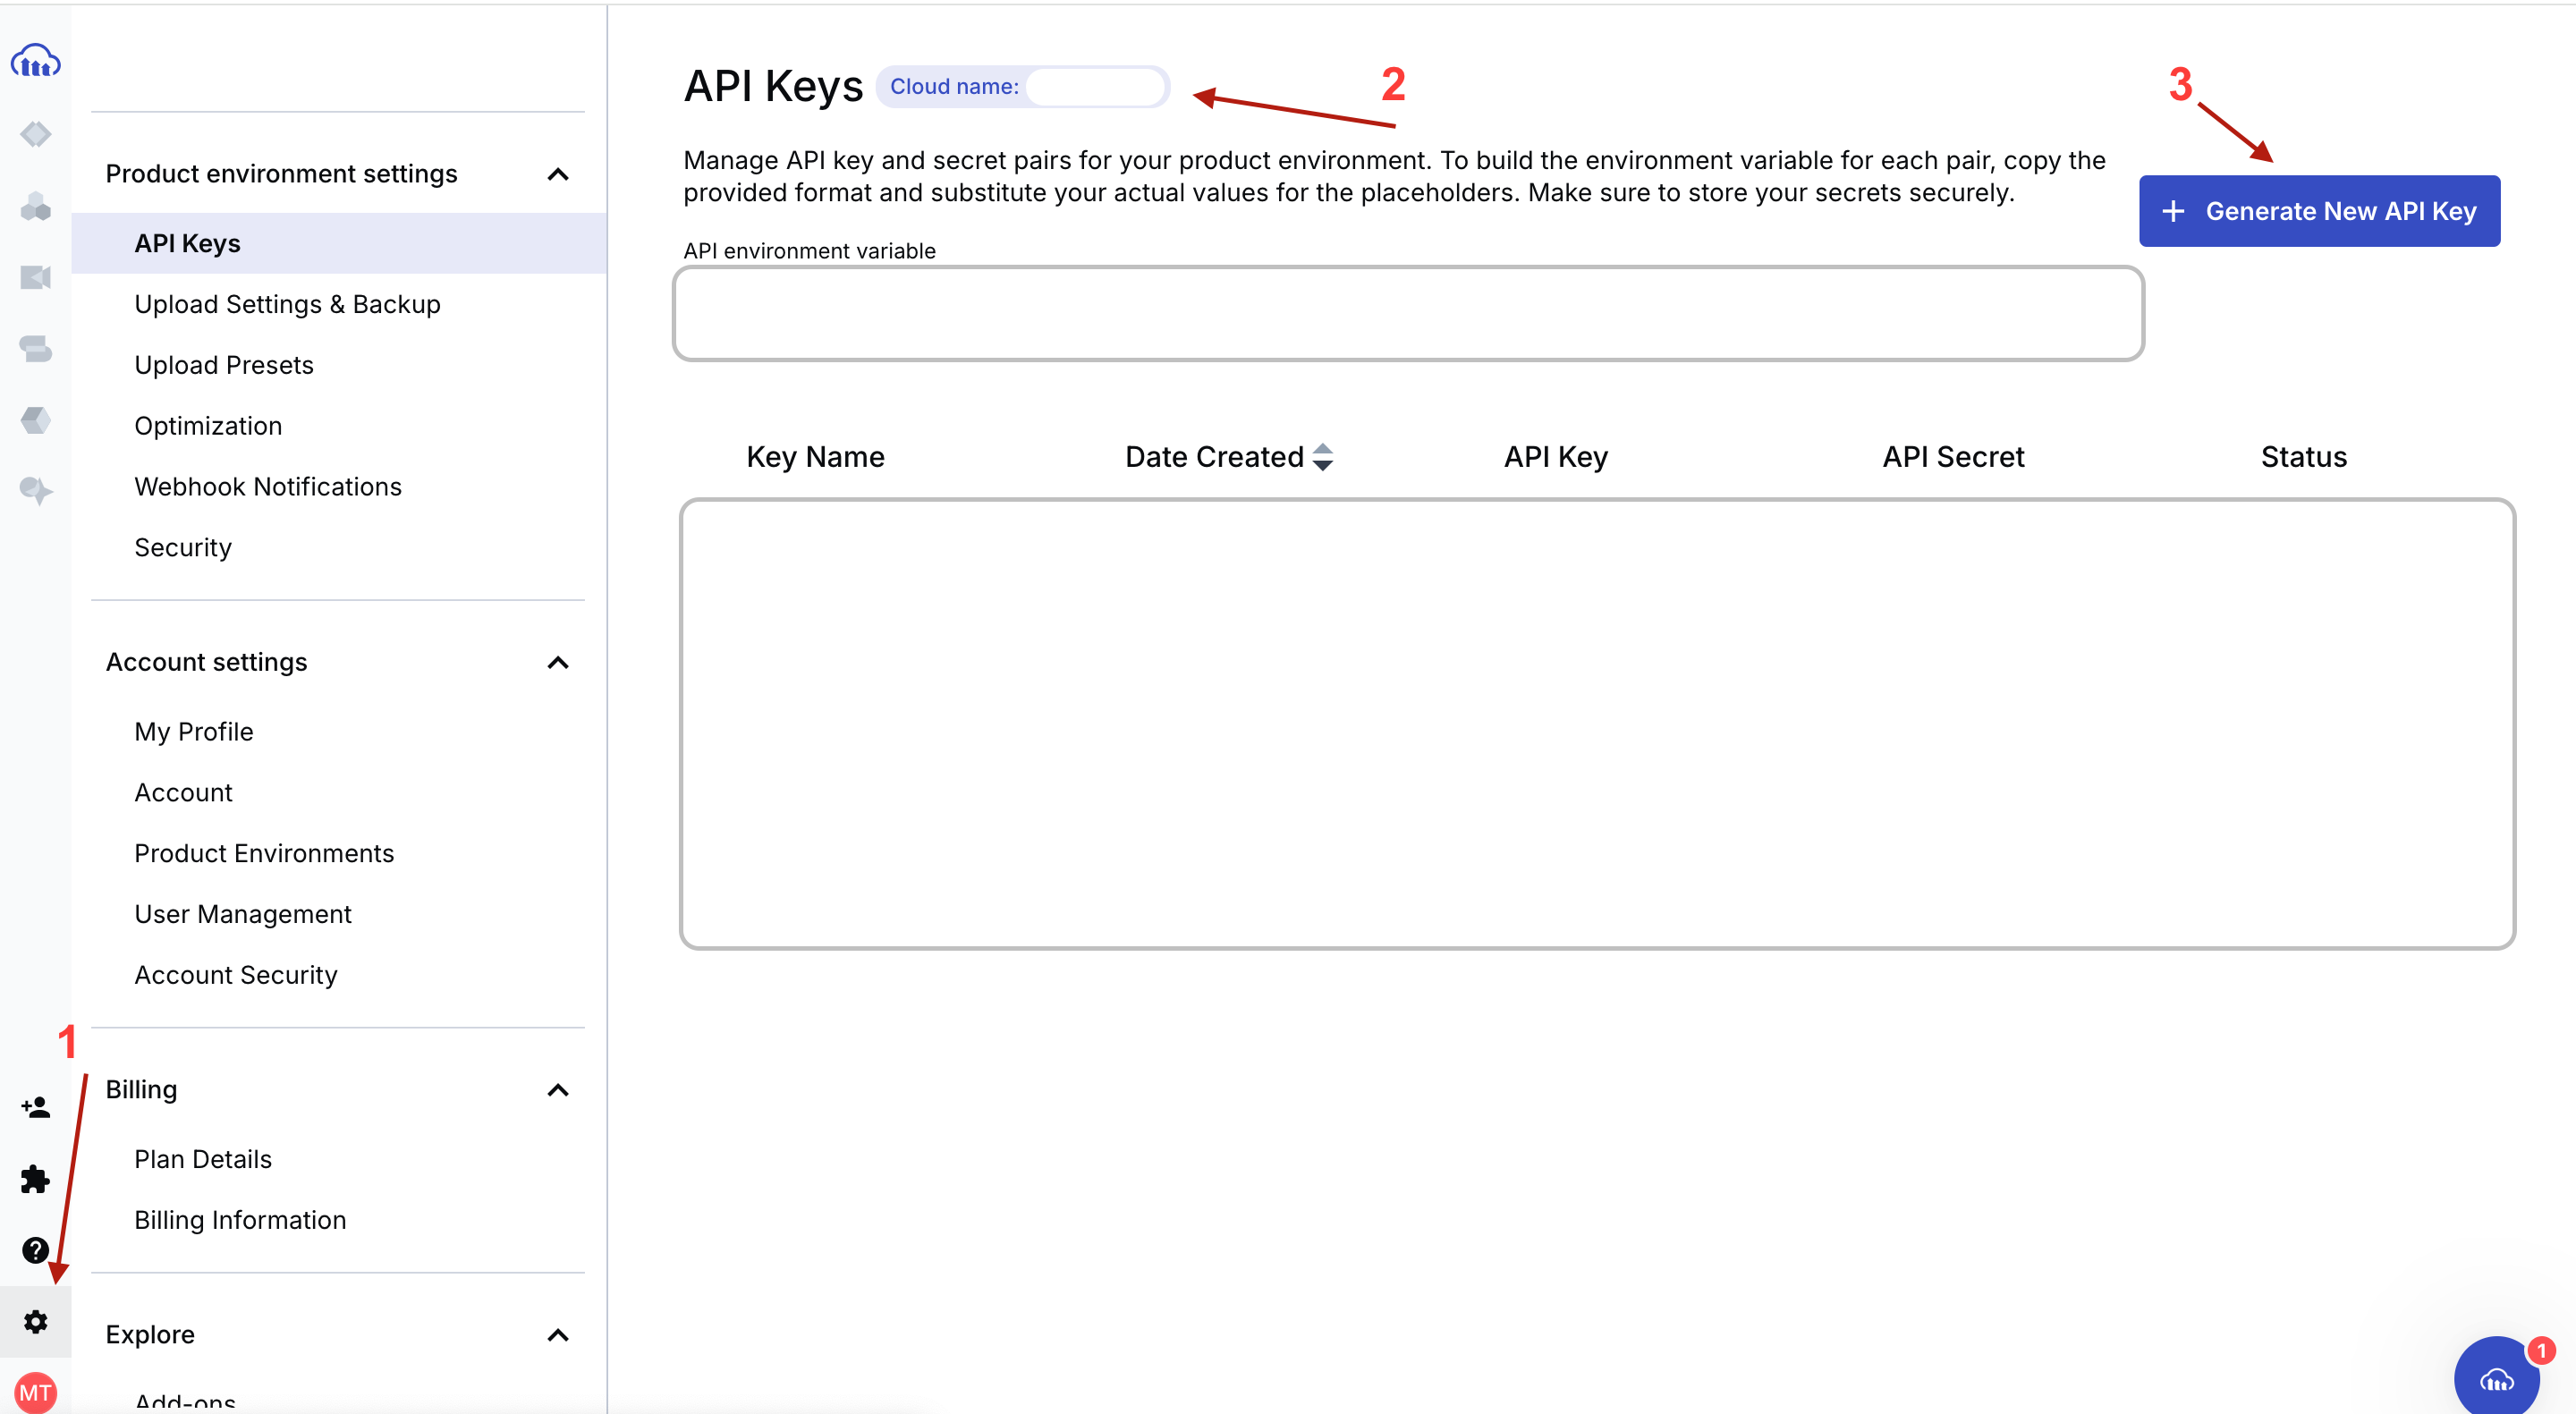
Using Cloudinary APIs and SDKs, you can simplify your video accessibility workflow and enforce best practices. Let’s start with authenticating requests using your Cloudinary account’s API key, secret key, and cloud name. You can retrieve these keys from your Cloudinary console by following these steps:
- Go to the Settings page in your Cloudinary console.
- Under the API Keys section, your cloud name should be listed beside the section title.
- Generate a new API key if you don’t already have one.
Captions and subtitles improve the accessibility and inclusivity of your video content. They help users easily engage with your video content, whether they’re deaf, hard of hearing, or are currently learning the language.
Generating captions and subtitles for your videos is simple with Cloudinary’s Google AI Transcription Add-on. Using Google’s machine learning models, this tool automatically generates accurate speech-to-text transcriptions for your video assets.
In a few steps, you can generate captions for your video, then refine and customize them using Cloudinary Studio or any third-party tool. This speeds up your accessibility workflow while also meeting WCAG and EAA standards.
Here’s how it works:
- Upload your video file to Cloudinary through the upload API or the Cloudinary SDK, using the
raw_convertparameter with the valuegoogle_speechto request transcription. To get the transcript for other languages, you can use a language code likegoogle_speech:fr-CAto request the transcription in French. The example below demonstrates how to utilize the Cloudinary JavaScript SDK to upload a video and request its transcript.
//node.js

cloudinary.v2.uploader.upload("lincoln.mp4",

  {

    resource_type: "video",

    raw_convert: "google_speech"

  }

).then(result=>console.log(result));Code language: JavaScript (javascript)- To generate subtitle files, include
srtand/orvttin theraw_convertstring (e.g.,google_speech:srt:vtt).
cloudinary.v2.uploader.upload("lincoln.mp4",

  {

    resource_type: "video",

    raw_convert: "google_speech:srt:vtt"

  }
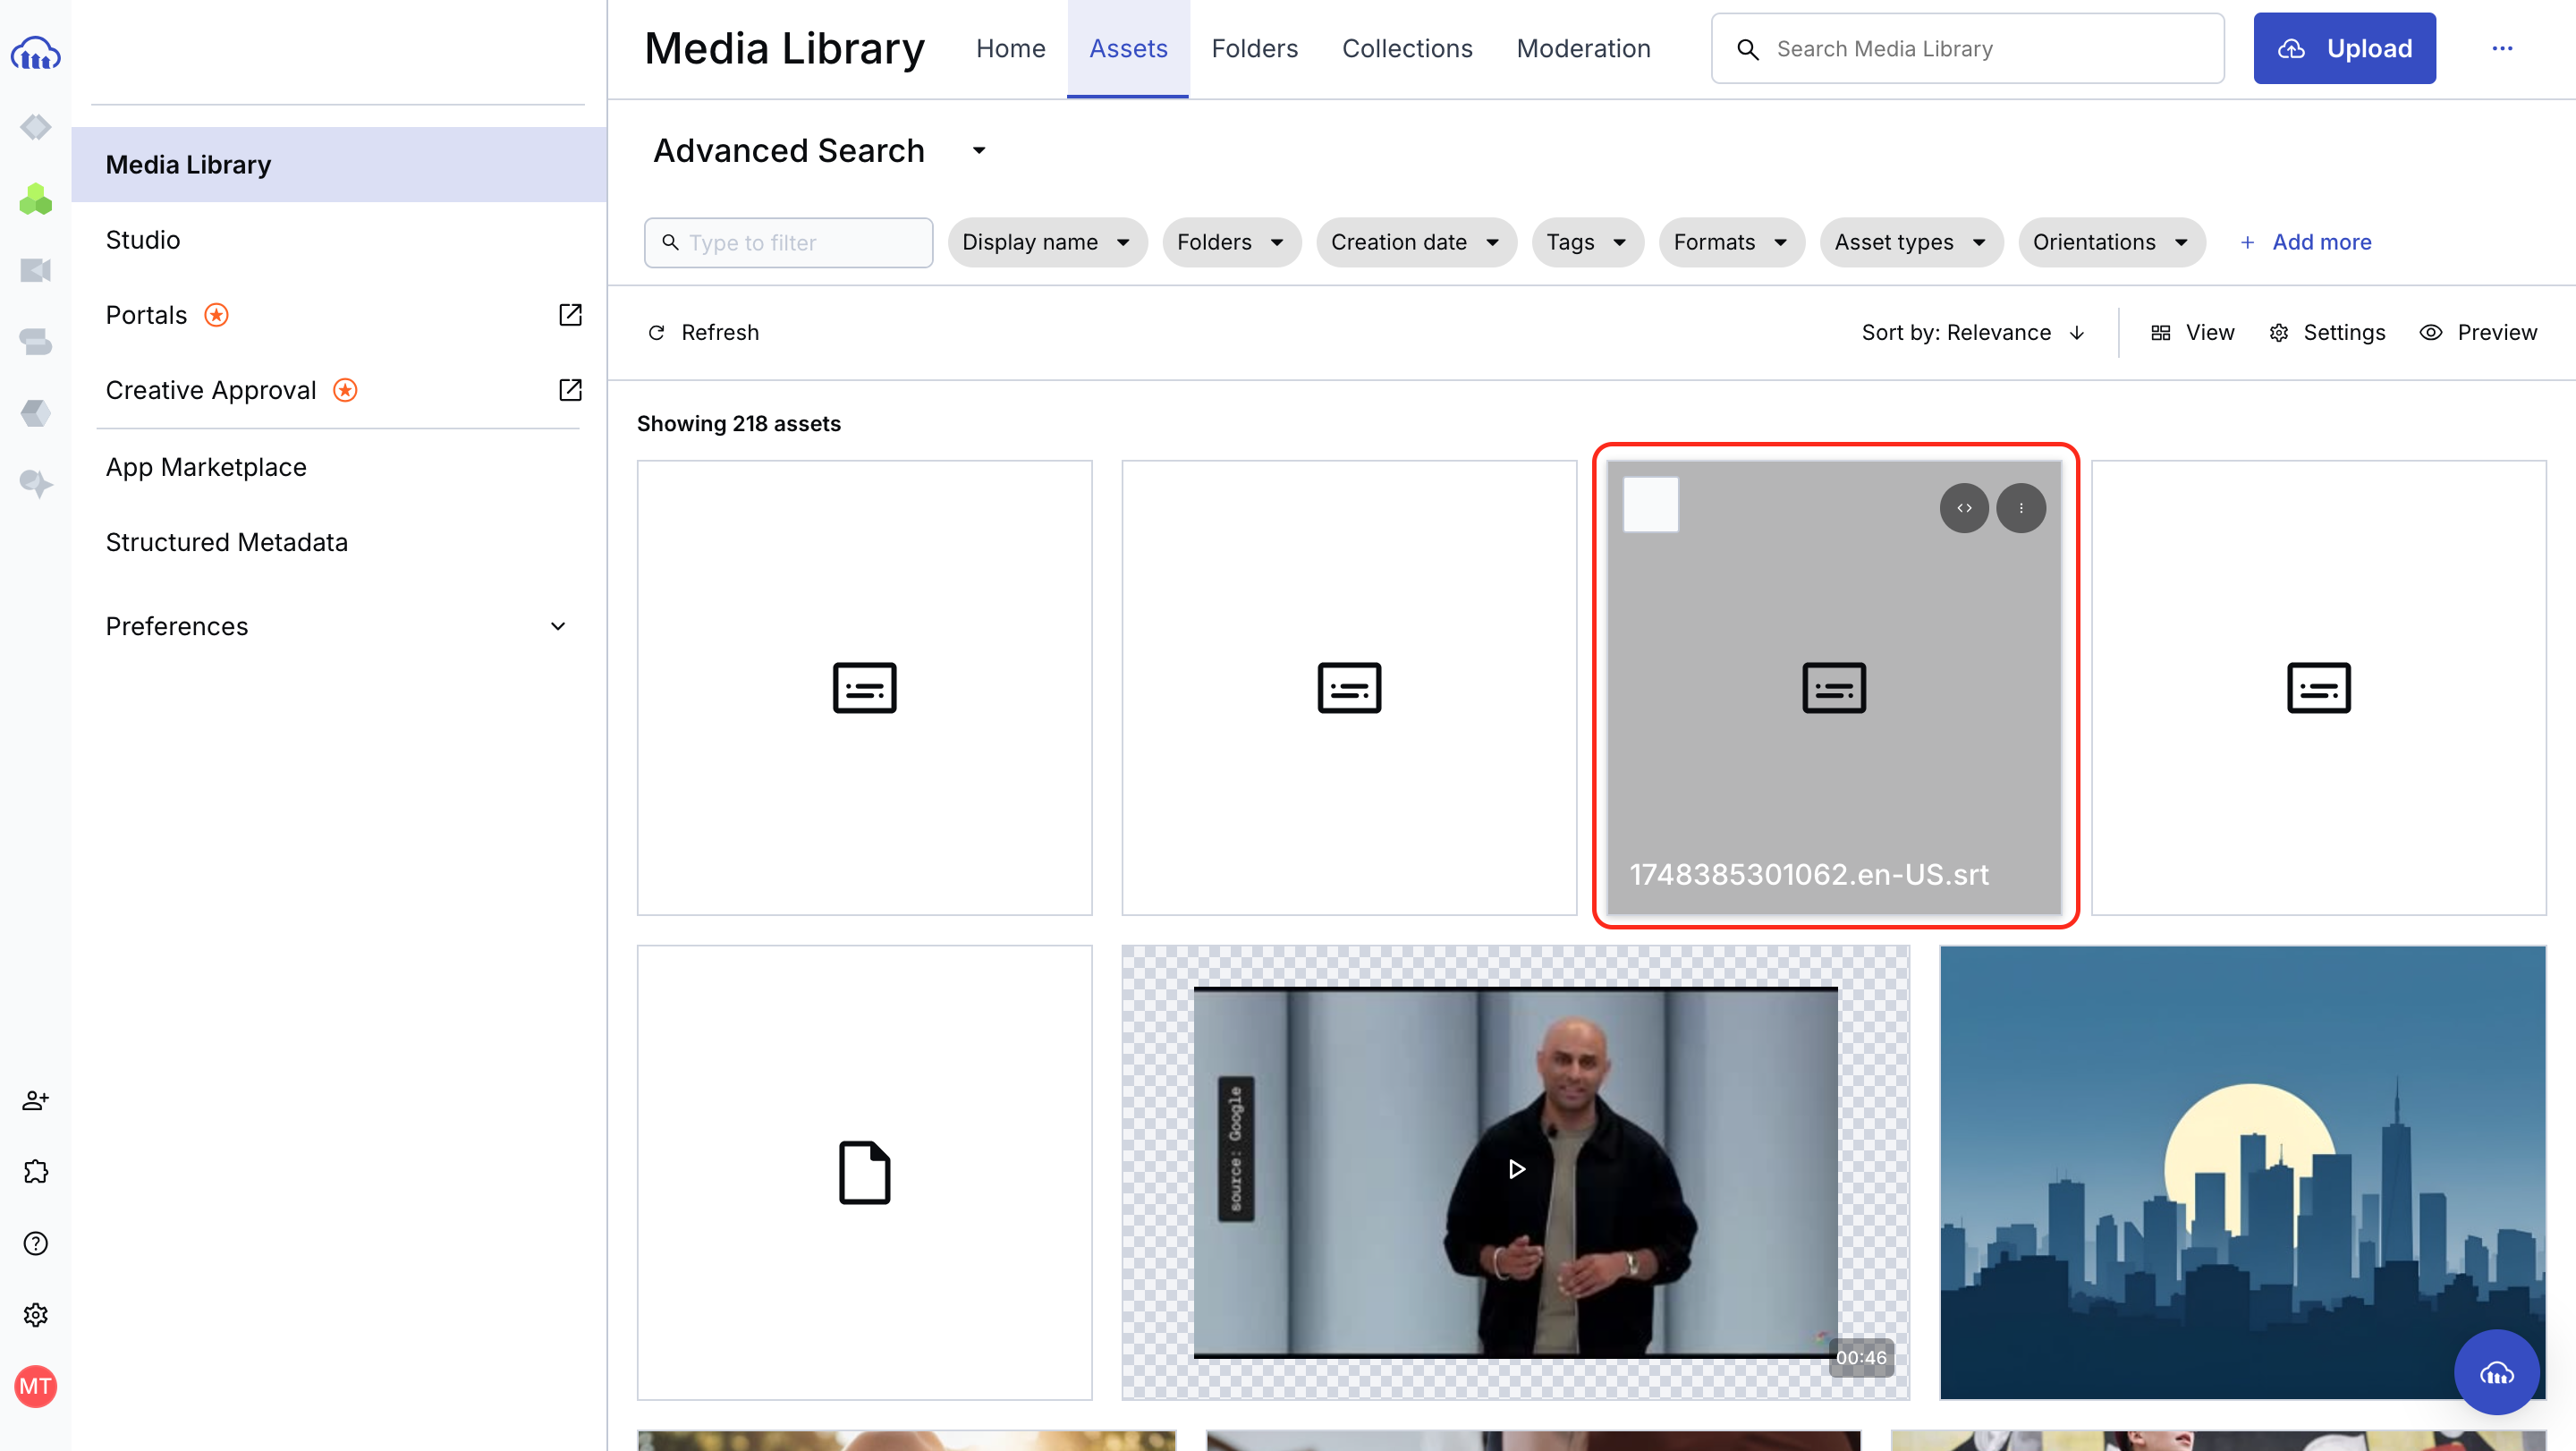
).then(result=>console.log(result));Code language: JavaScript (javascript)- Cloudinary triggers Google’s Cloud Speech API to transcribe the video. The response initially shows a pending status.
- Once complete, transcript, VTT, and SRT files are generated and saved to the folder in your Cloudinary library where the video was uploaded. The image below shows an example of the SRT file.
Now that you have your video’s transcript and subtitle files, the next step in the video accessibility workflow is to generate descriptive alt text for your video banners.
The next step in your accessibility workflow is to add descriptive alt text, which is crucial for people who use screen readers.
With Cloudinary’s AI Vision Add-on, you can automatically generate alt text for your video posters or any static image. This tool uses advanced image recognition to produce human-readable descriptions that convey the key visual elements of your content.
Cloudinary’s AI Vision add-on utilizes generative AI to analyze images and automatically generate useful metadata, including tags, captions, and structured information. This combination enables the service to understand and respond intelligently to user inquiries about images.
To use AI Vision:
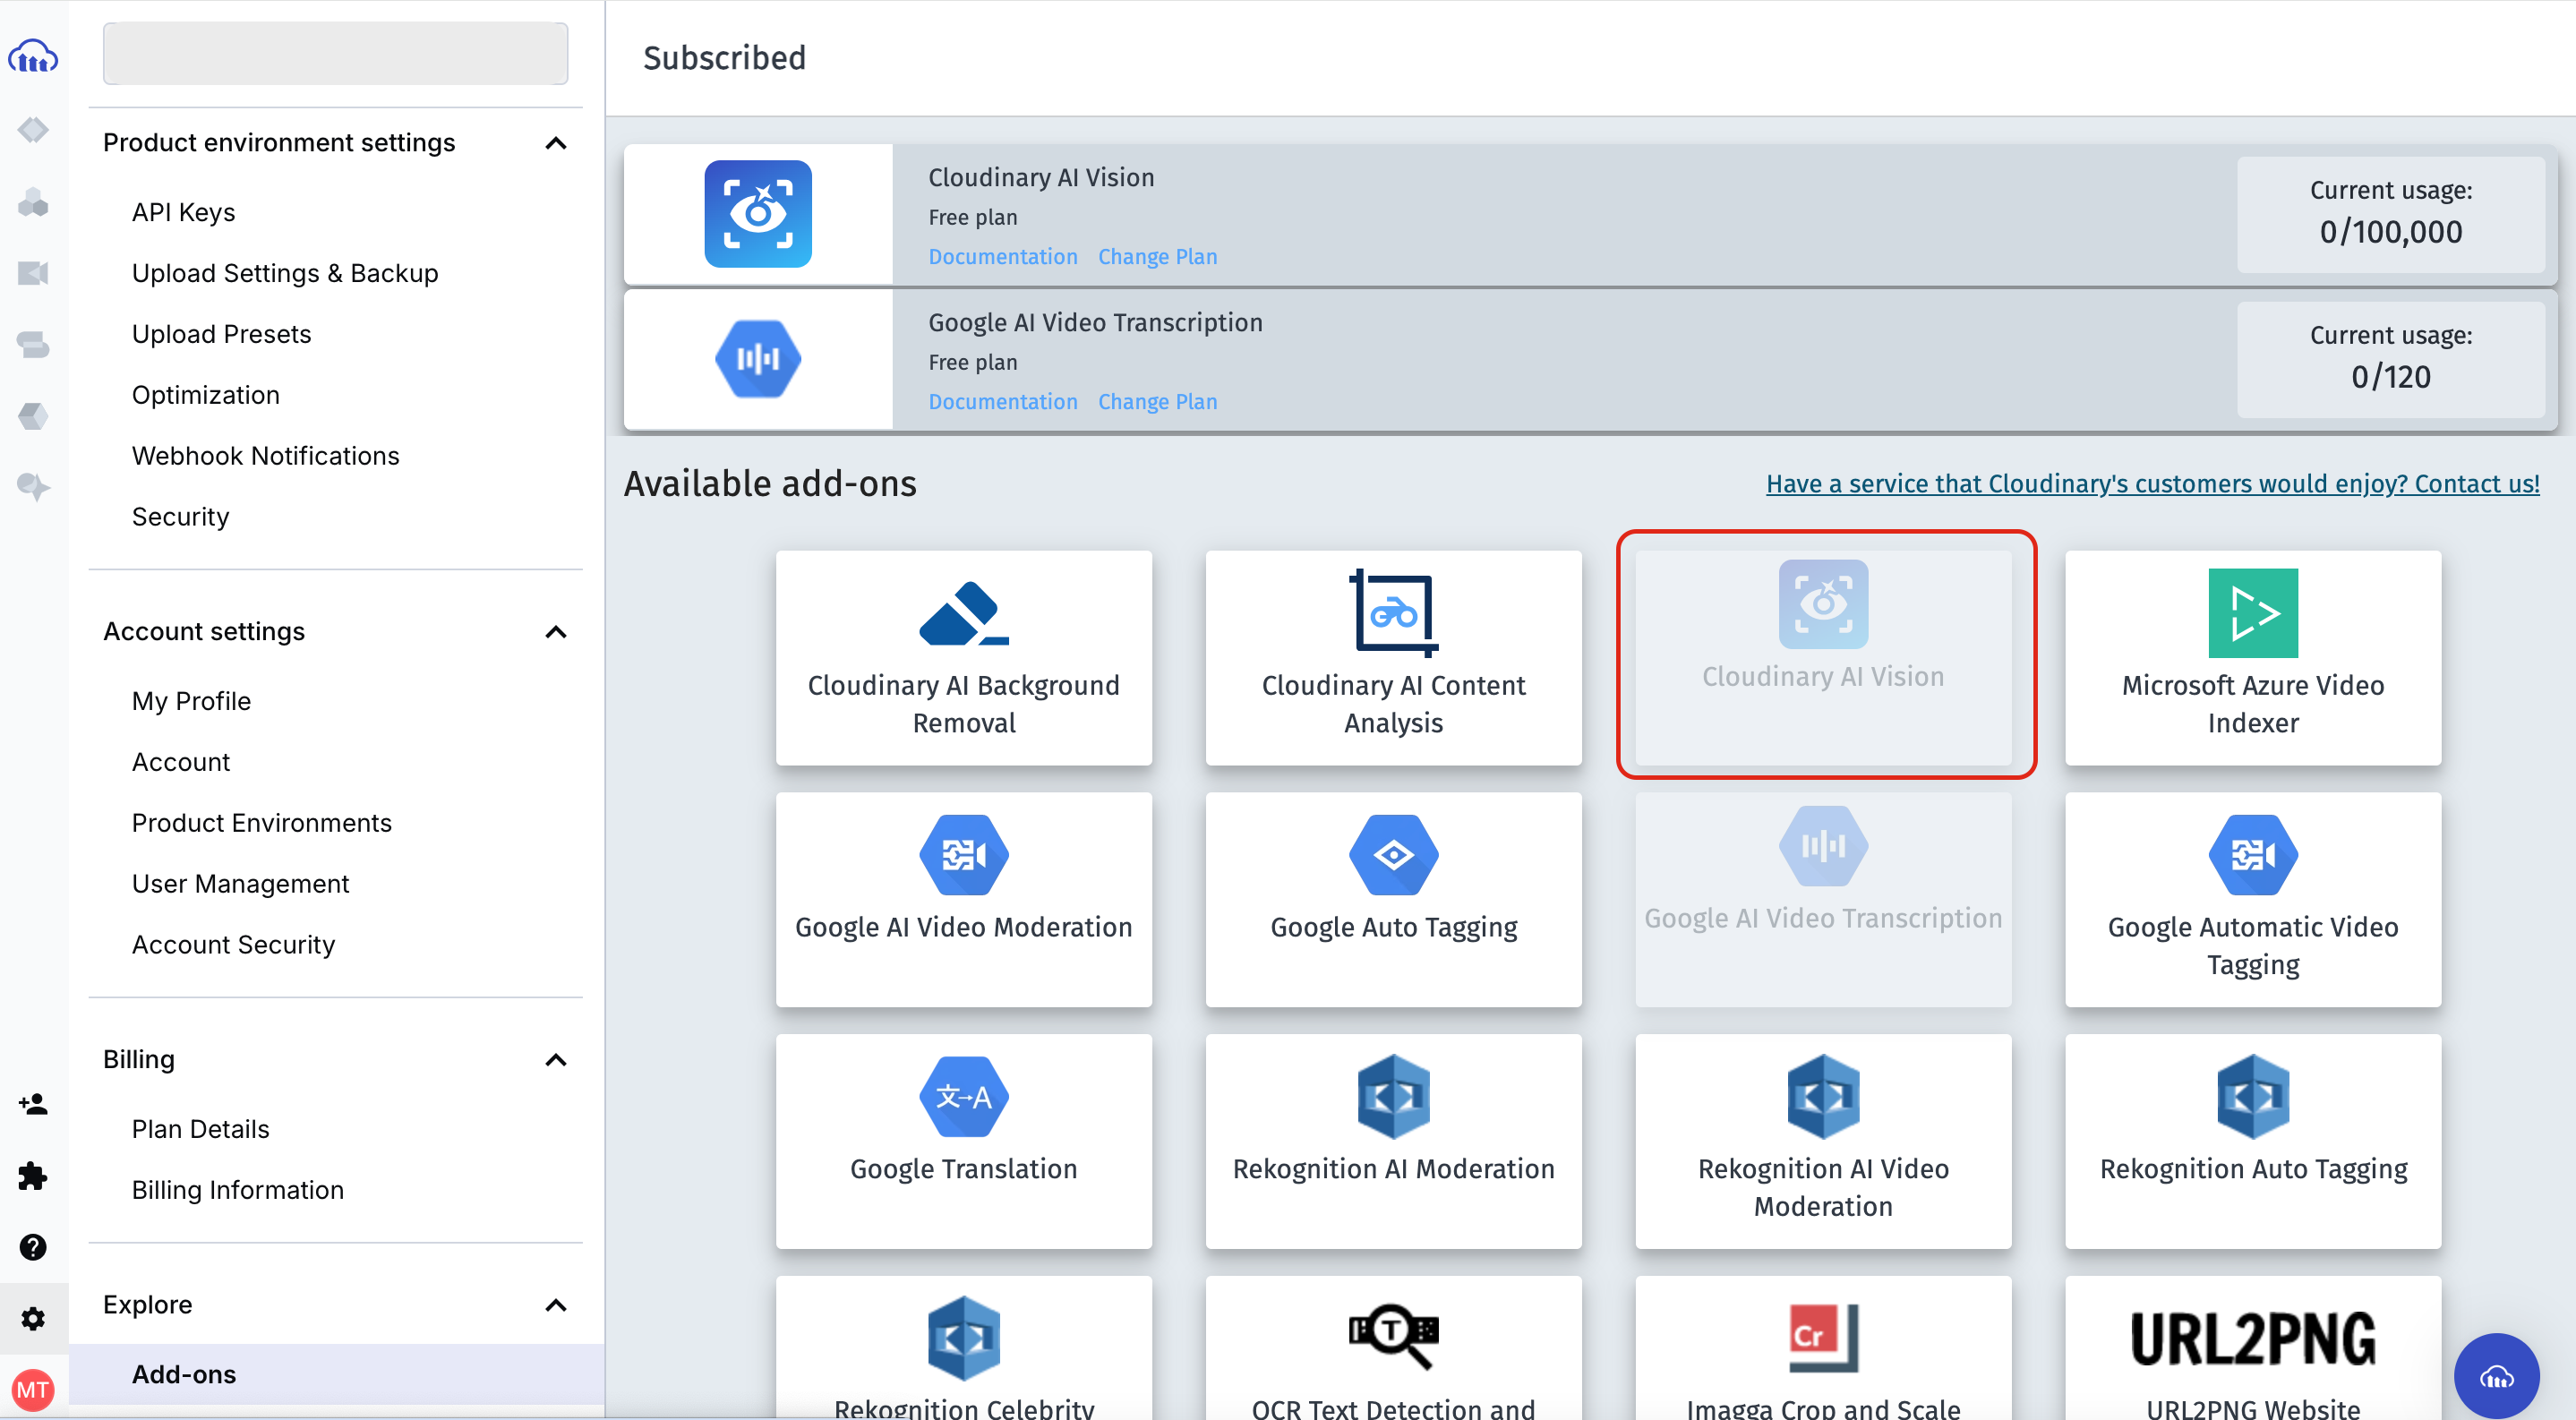
- Navigate to the Add-ons page in your Cloudinary console and search for Cloudinary AI Vision. Select the plan you’d like to subscribe to. Cloudinary offers a free plan that’s more than enough to use with this tutorial. If you need higher usage limits or advanced features in the future, paid plans are also available.
- Once you’ve subscribed to a plan, it will appear in your Cloudinary console. Now, you can make a request to the Cloudinary API to tell AI Vision to generate alt text for your cover image, supplying your keys in the API URL like this:
<code>// Cloudinary API</code>
https://<API_KEY>:<API_SECRET>@api.cloudinary.com/v2/analysis/<CLOUD_NAME>/analyze/ai_vision_generalCode language: HTML, XML (xml)- The request payload will contain the URL to your image asset on Cloudinary as the URI source. Then, you’ll supply the API with a prompt that’ll help it gain insights into the image and suggest alt text.
// Request Payload

{

    "source": {

        "uri": "https://res.cloudinary.com/<CLOUD_NAME>/image/upload/v1737657514/240_F_388436829_BnOIHPCqHWSoEMr5zhL82a04SBPPNPbO_zsbuse.jpg"

    },

    "prompts": [

        "Generate a descriptive alt text for the video's cover image. Focus on what the image visually represents, including key elements like people, actions, objects, and context. Avoid repeating the video title."

    ]

}Code language: JSON / JSON with Comments (json)
For example, this is the response AI Vision gave for the image above:
{

    "entity": "<CLOUDINARY-IMAGE>",

    "analysis": {

        "responses": [

            {

                "value": "This is an illustration of a city skyline silhouetted against a large full moon and blue sky. The image shows multiple skyscrapers and high-rise buildings of varying heights creating an urban landscape in shades of dark blue. The buildings appear as simple geometric shapes against the backdrop of a bright, cream-colored circular moon. The overall aesthetic is minimalist and creates a peaceful nighttime cityscape scene."

            }

        ],

        "model_version": 1

    }

}Code language: JSON / JSON with Comments (json)
Notice how detailed the generated description is; you can visualize the image just by hearing the alt text. This makes your content far more accessible for people relying on screen readers. You can also specify the maximum length of the AI-generated content to follow SEO best practices.
Another important part of making your video content accessible is ensuring the video player is easy to interact with. Basic actions, such as play, pause, rewind, and volume control, should be operable by everyone, regardless of whether they’re using a mouse, keyboard, or screen reader.
The Cloudinary Video Player features built-in accessibility options that enhance the viewing experience for all users. Cloudinary’s Video Player has keyboard-operable controls, built-in screen reader support, and customizable visual elements. Users can interact with the player using the keyboard alone, while screen readers announce control functions using the semantic HTML and ARIA labels. Additionally, overlay elements, such as captions and buttons, are styled for high visibility, and the player skin can be adjusted to maintain readability.
There are two ways to use the Cloudinary Video Player: You can either use the Cloudinary packages directly in your project for complete control and customization, or you can use Cloudinary Studio. This web-based interface enables you to configure and embed accessible video players without writing any code.
As mentioned earlier, Cloudinary Studio is a web-based interface that allows you to configure and embed accessible video players without writing code.
The Cloudinary Video Player Studio’s user-friendly interface enables you to visually configure and preview your video player without writing any code. You can choose your video source, set a custom poster frame, enable or disable autoplay and loop settings, toggle subtitles and captions, and supply the subtitle file you generated for your video. This makes it easy to customize the player’s behavior and turn on important accessibility features.
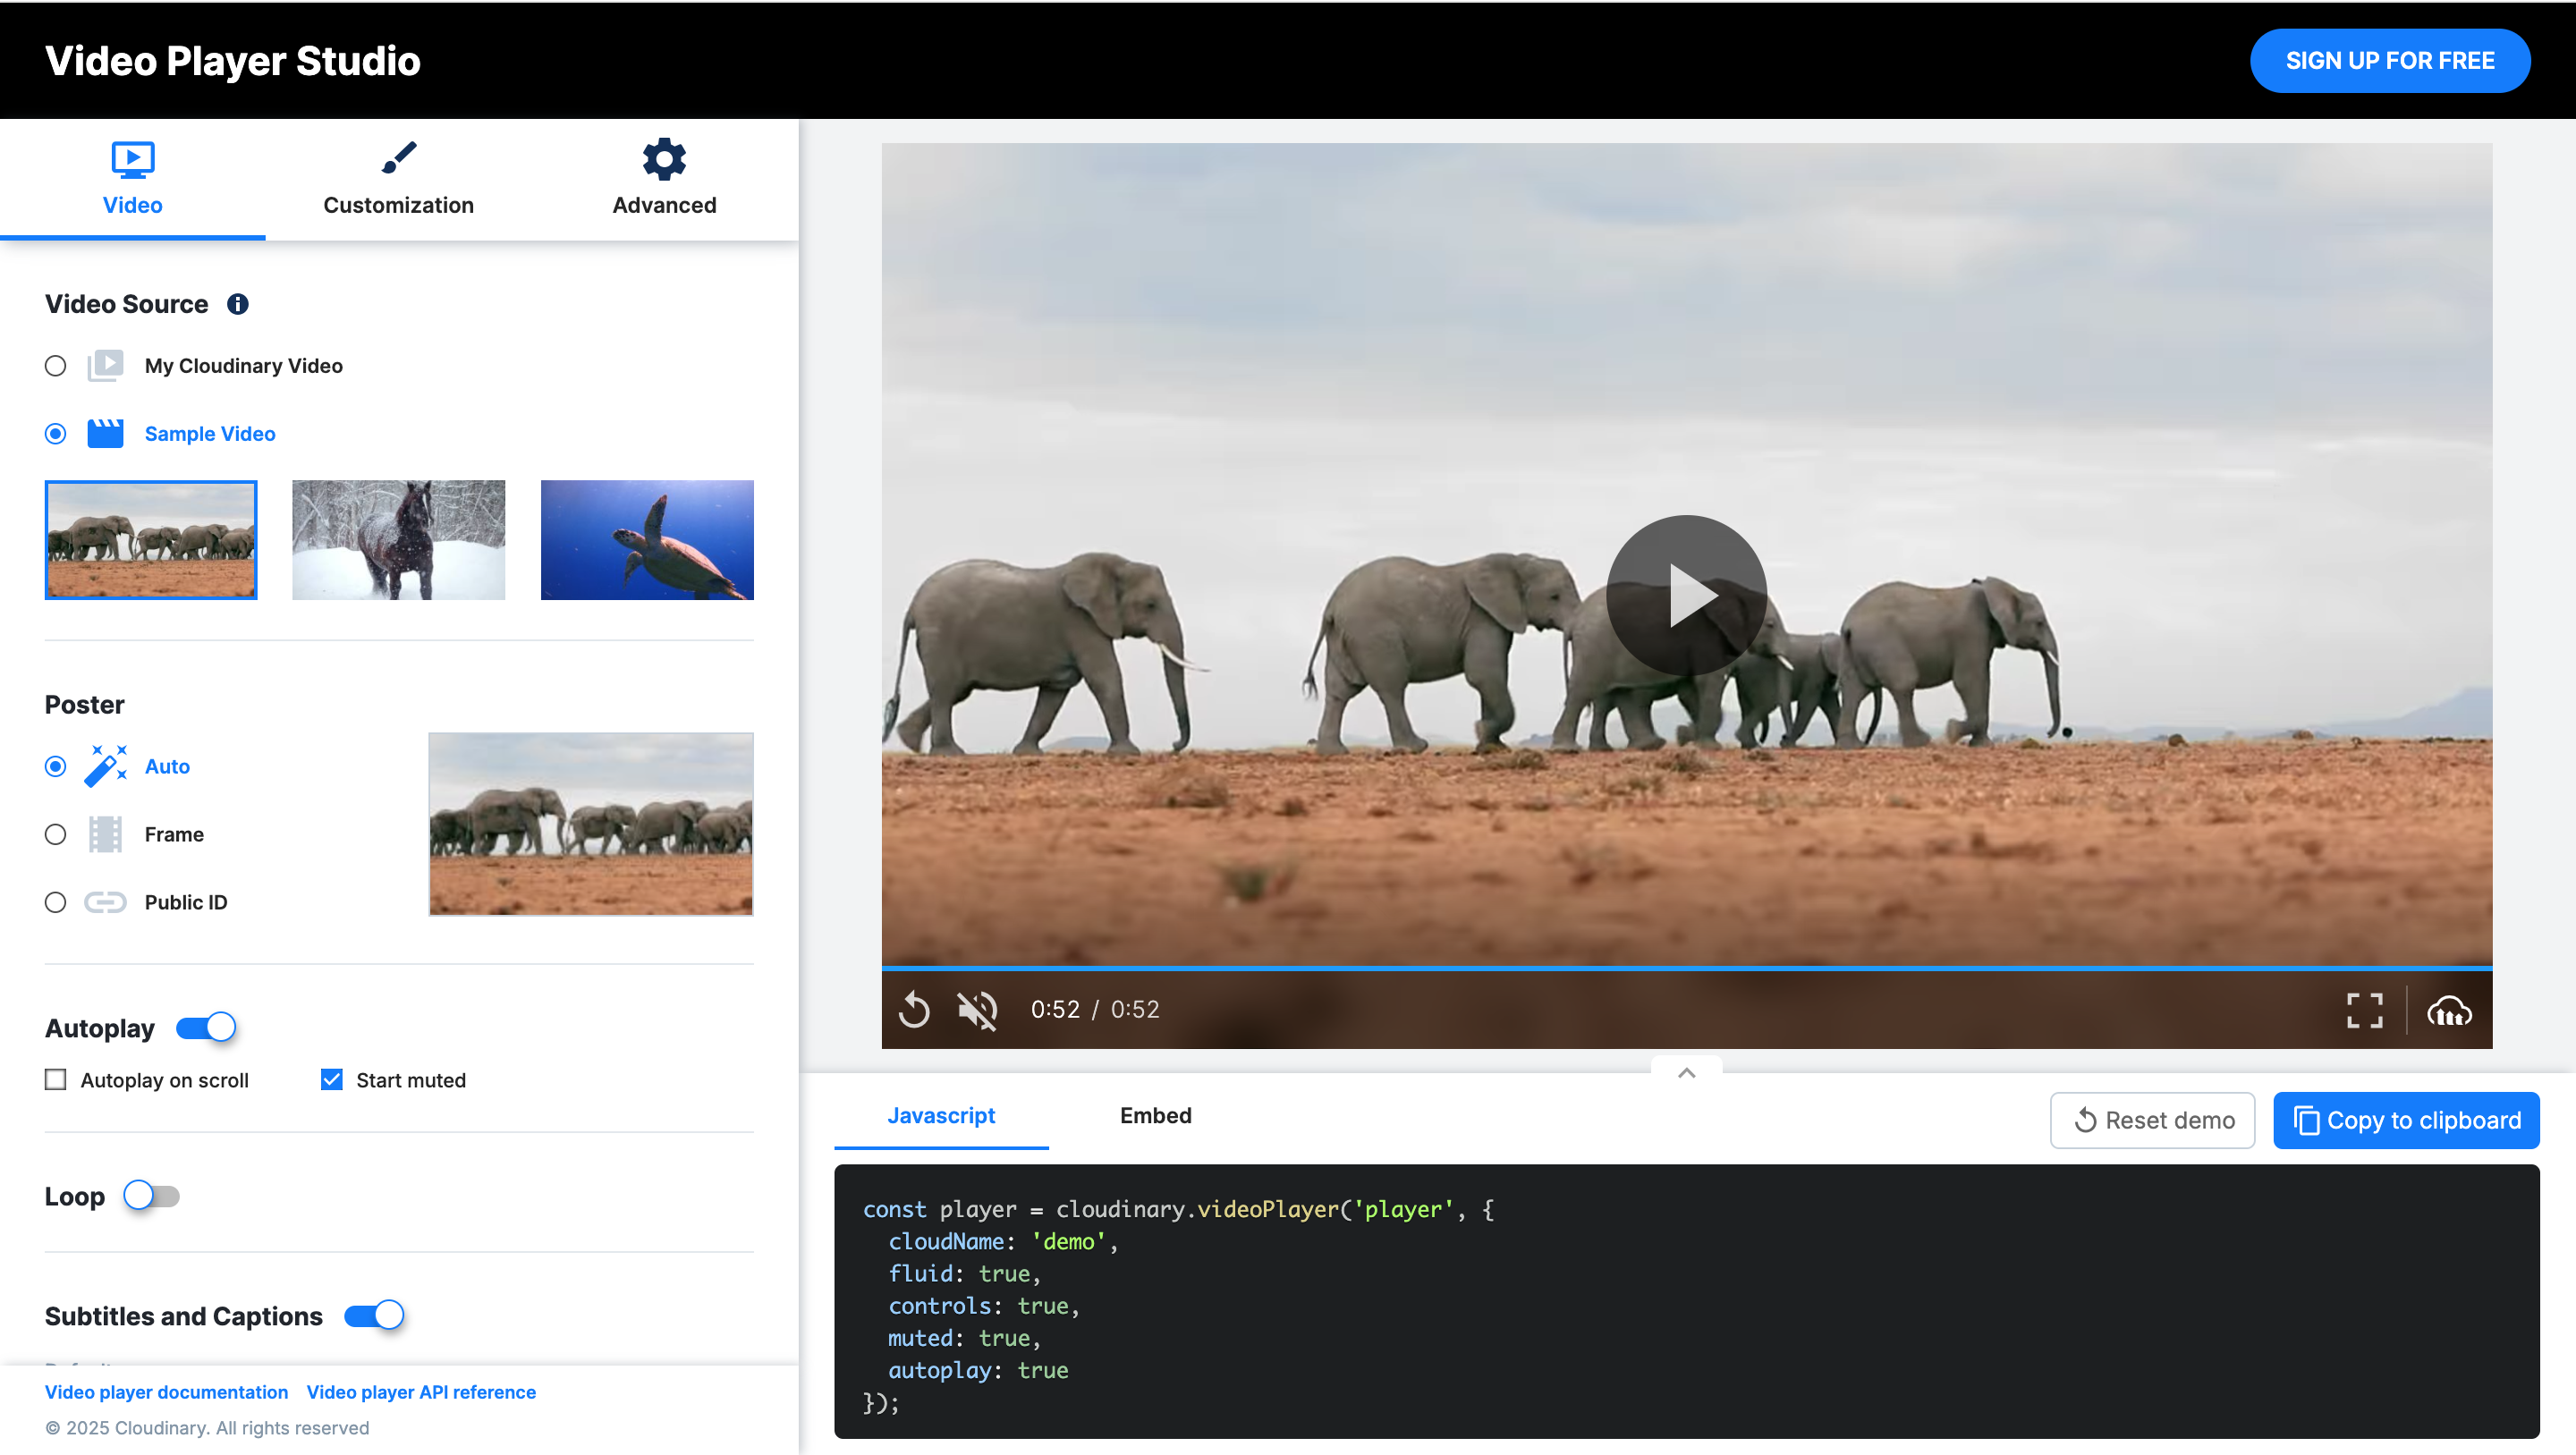
In addition to the visual controls, Studio also provides the corresponding JavaScript configuration snippet at the bottom of the interface. This snippet reflects your chosen settings — like enabling autoplay, muting audio, or showing player controls — so you can copy and embed it directly into your project. The Studio streamlines the setup process and incorporates accessibility best practices, such as captions and keyboard controls, by default.
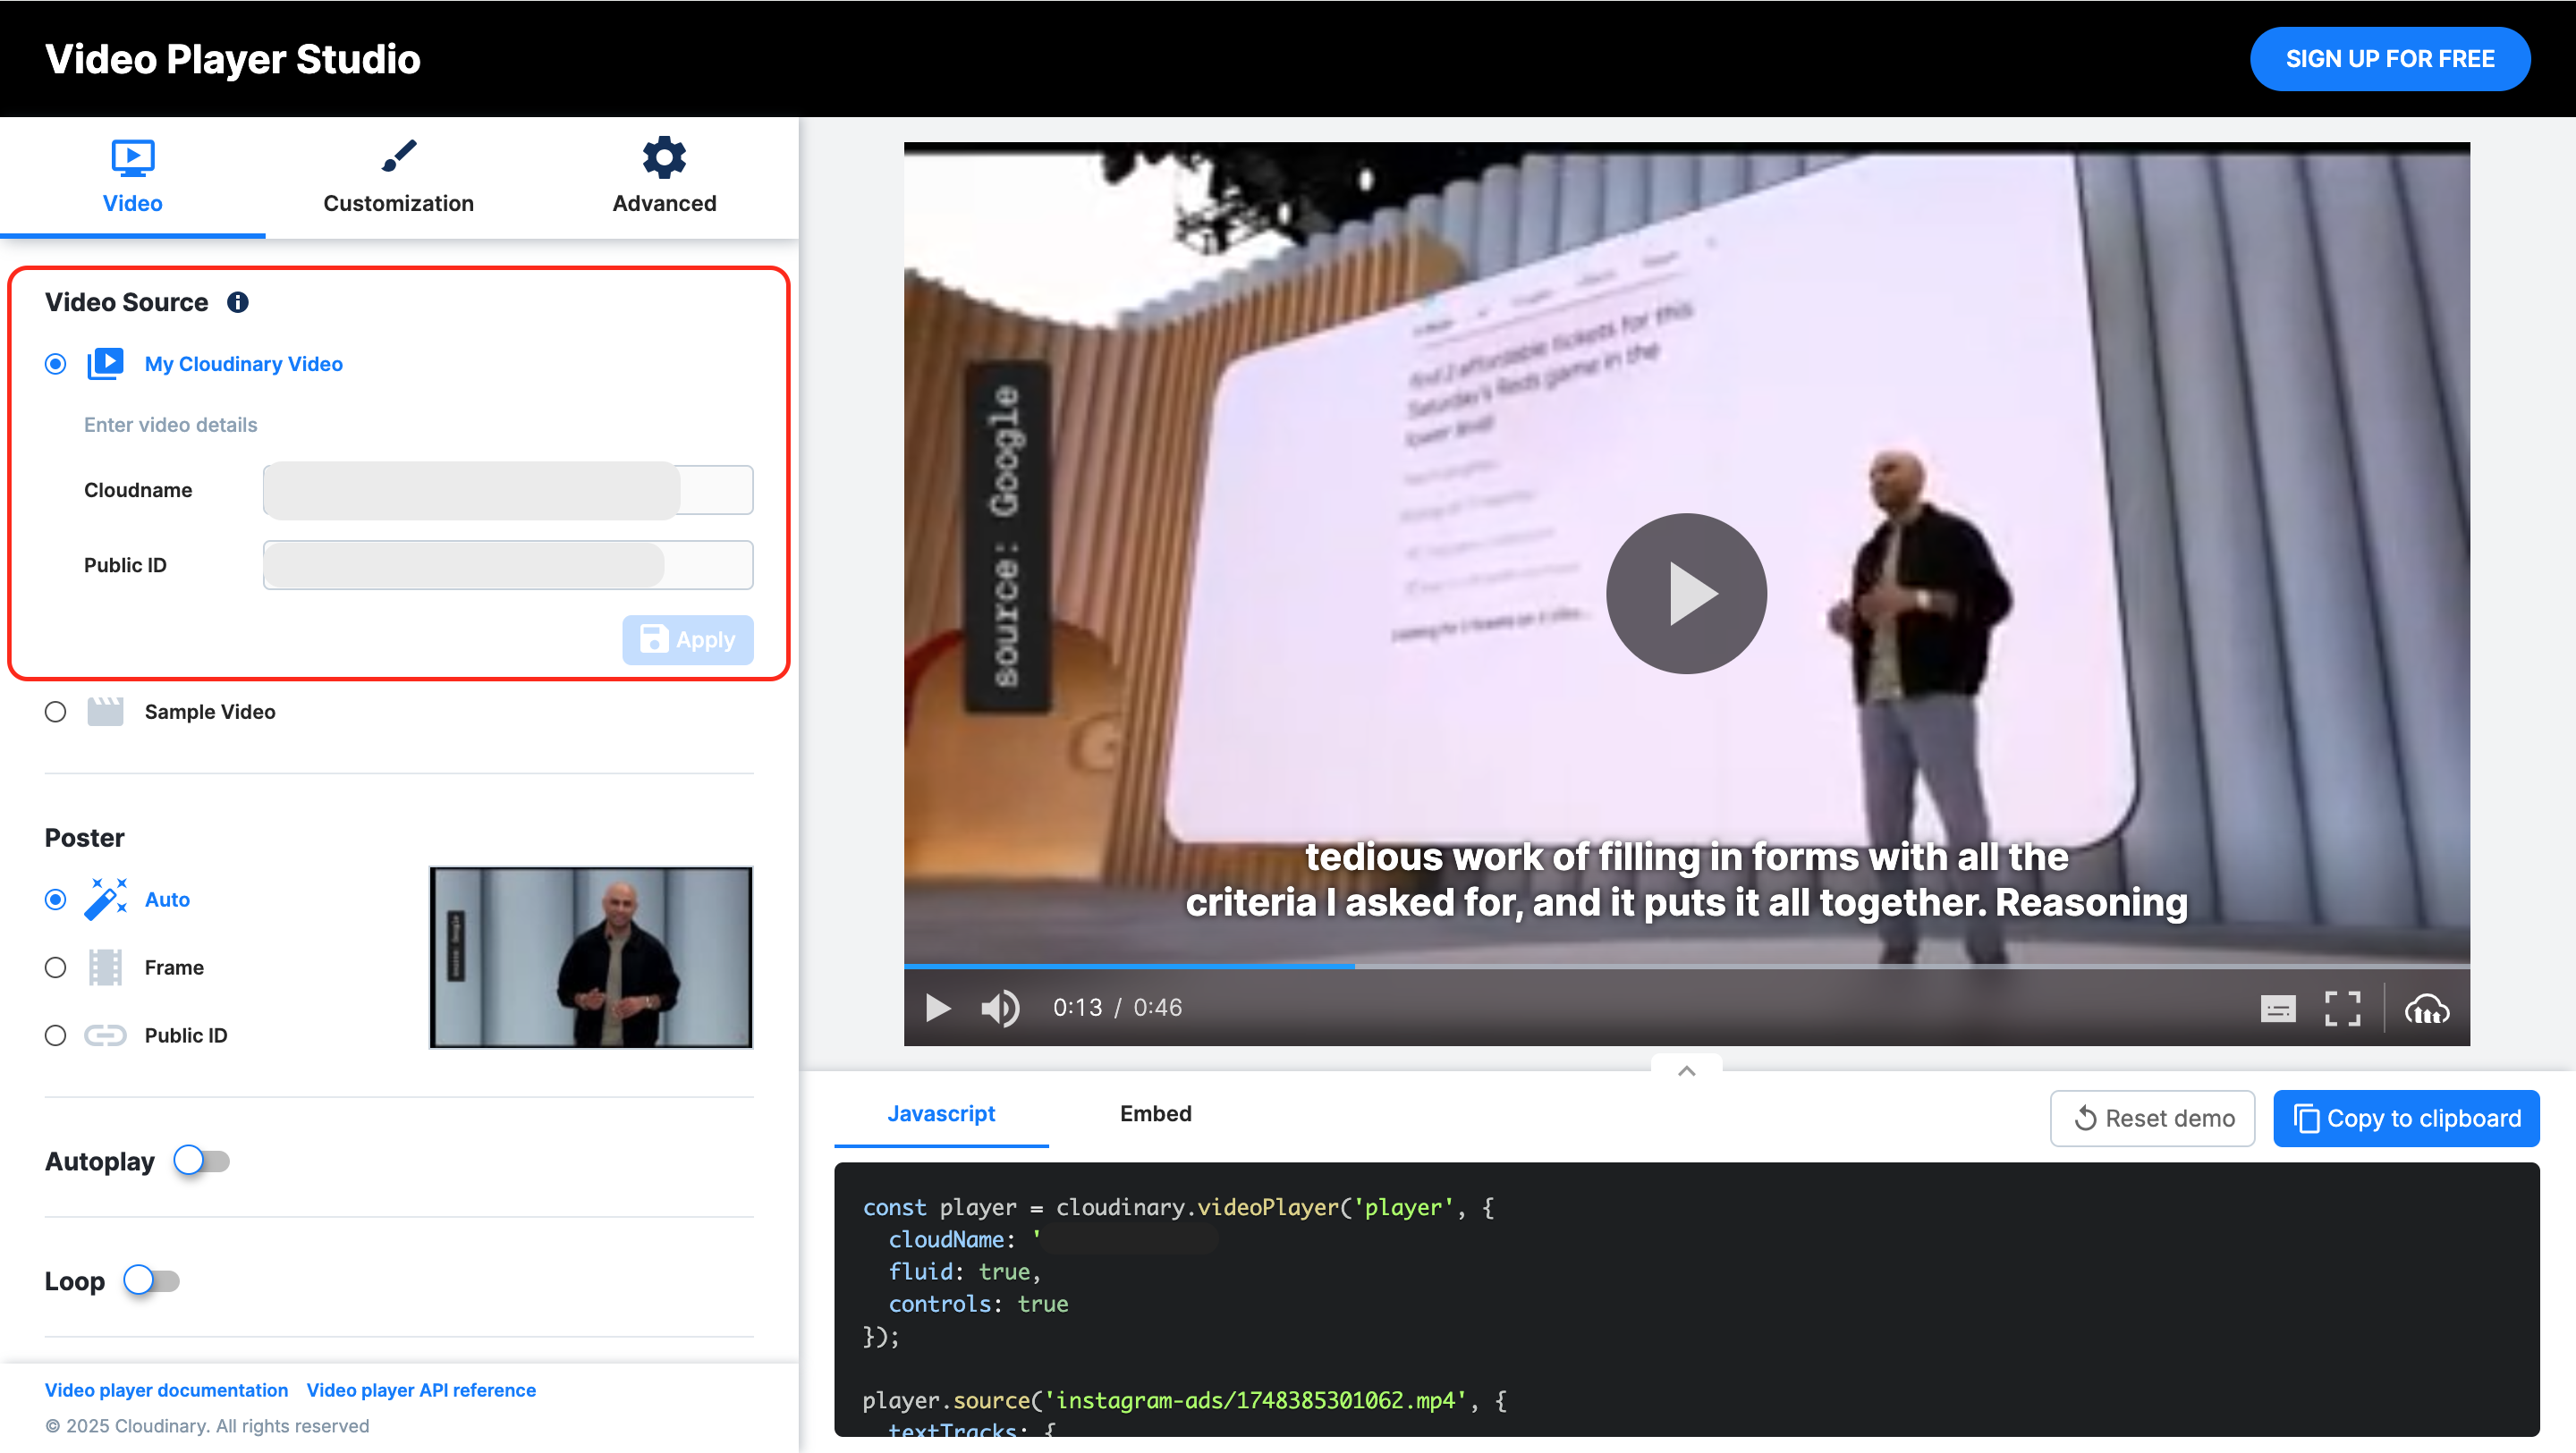
For example, you can attach the subtitle file generated for your uploaded video directly in Cloudinary Studio by following these steps:
- Under the Video Source section, select the My Cloudinary Video option.
- In the inputs provided, enter your Cloudinary cloud name and the video’s Public ID, and then click Apply. Your video should appear on the right side of the page.
- Scroll down to the Subtitles and Captions section, toggle it on, put in the URL to the SRT file generated, and select the subtitle language.
- Click Apply, and you should see the subtitle appear with the video on the right-hand side. You can play the video to see it work.
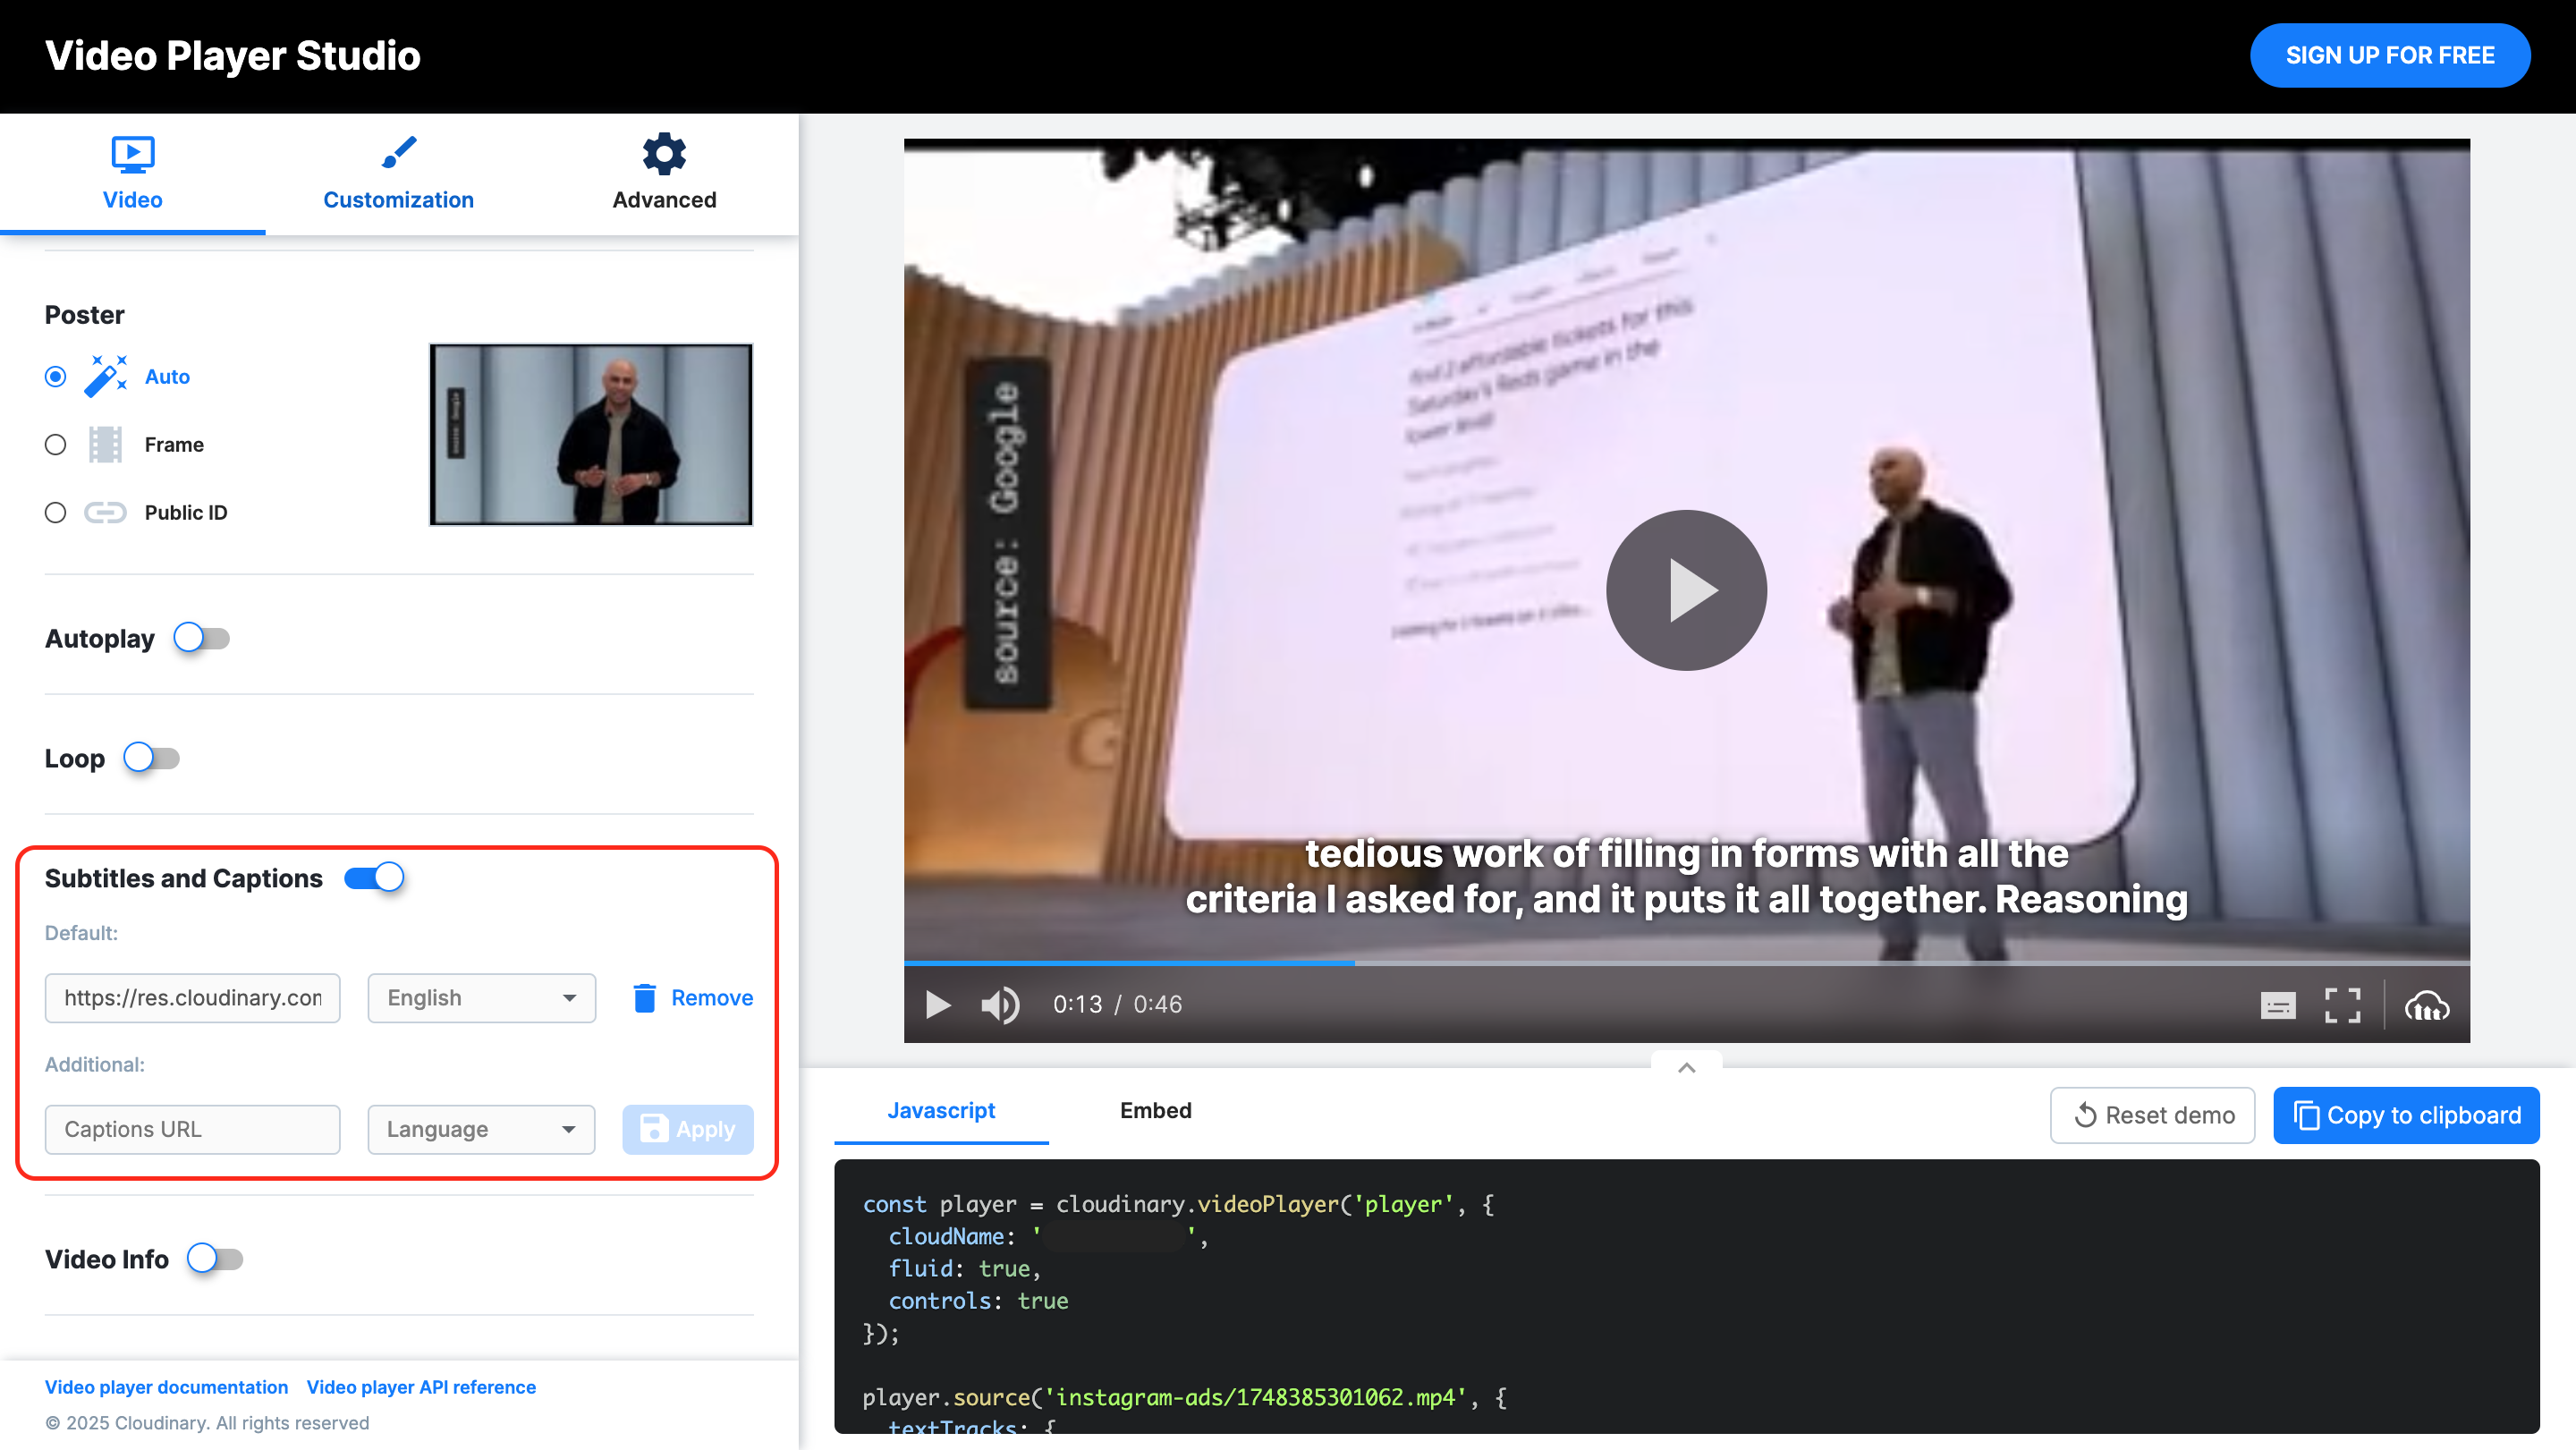
Once you’re satisfied with the video, you can copy the JavaScript snippet or HTML embed code provided and integrate it into your project.
With this, you’ve built a practical and straightforward accessibility checklist process that you can easily integrate into your video development workflow:
- Generate captions and subtitles using Cloudinary’s Google AI Transcription Add-on.
- Create alt text for video thumbnails with Cloudinary’s AI Vision.
- Deliver the video using Cloudinary’s accessible video player, ensuring keyboard operability, screen reader support, and WCAG-compliant design.
As the final step, you should:
- Audit your current video library for accessibility gaps using the steps listed in the section above.
- Generate captions and alt text for all new uploads. Use Cloudinary Studio or the video API to customize your player and attach subtitles visually.
- Test your implementation using screen readers and keyboard-only navigation to ensure it meets accessibility standards.
Sign up for a Cloudinary account to audit and fix accessibility issues in your video workflows.


