
Many teams assume their video players are accessible by default. However, most don’t meet Web Content Accessibility Guidelines (WCAG) 2.1 AA or European Accessibility Act (EAA) standards, especially when it comes to screen reader support, keyboard navigation, and flexible captions.
With these regulations already in effect, reviewing and configuring player settings is now a compliance requirement for any platform delivering video to a broad audience.
In this guide, we’ll walk through the player settings that are most critical for accessibility, how to configure them, and how to test your changes to make sure they work for everyone.
To make your videos accessible, you’ll need to adjust a few key player settings, such as captions, keyboard controls, and screen reader support. We’ll make those updates using Cloudinary Video Player, a lightweight, customizable HTML5 player built for optimized, accessible video playback across devices.
It supports adaptive streaming, branding controls, and full WCAG 2.1 AA compliance, making it compatible with screen readers, keyboard navigation, and other assistive tools.
You can embed the player via HTML or configure it with JavaScript. Either way, you’ll need a Cloudinary account and at least one uploaded video. Each video gets a unique public ID, which is how the player knows what to load.
Here’s a quick example showing how to load a video into the player using JavaScript:
const player = cloudinary.videoPlayer('my-player', {

  cloudName: 'your-cloud-name'

});

player.source('demo-video'); // 'demo-video' is the public ID of the uploaded videoCode language: JavaScript (javascript)
Note: To use cloudinary.videoPlayer, include the Cloudinary Video Player library via CDN or NPM. See the documentation for setup instructions.
In the example above, your-cloud-name is your Cloudinary cloud name, demo-video is the public ID of the uploaded video, and my-player is the ID of the <video> element.
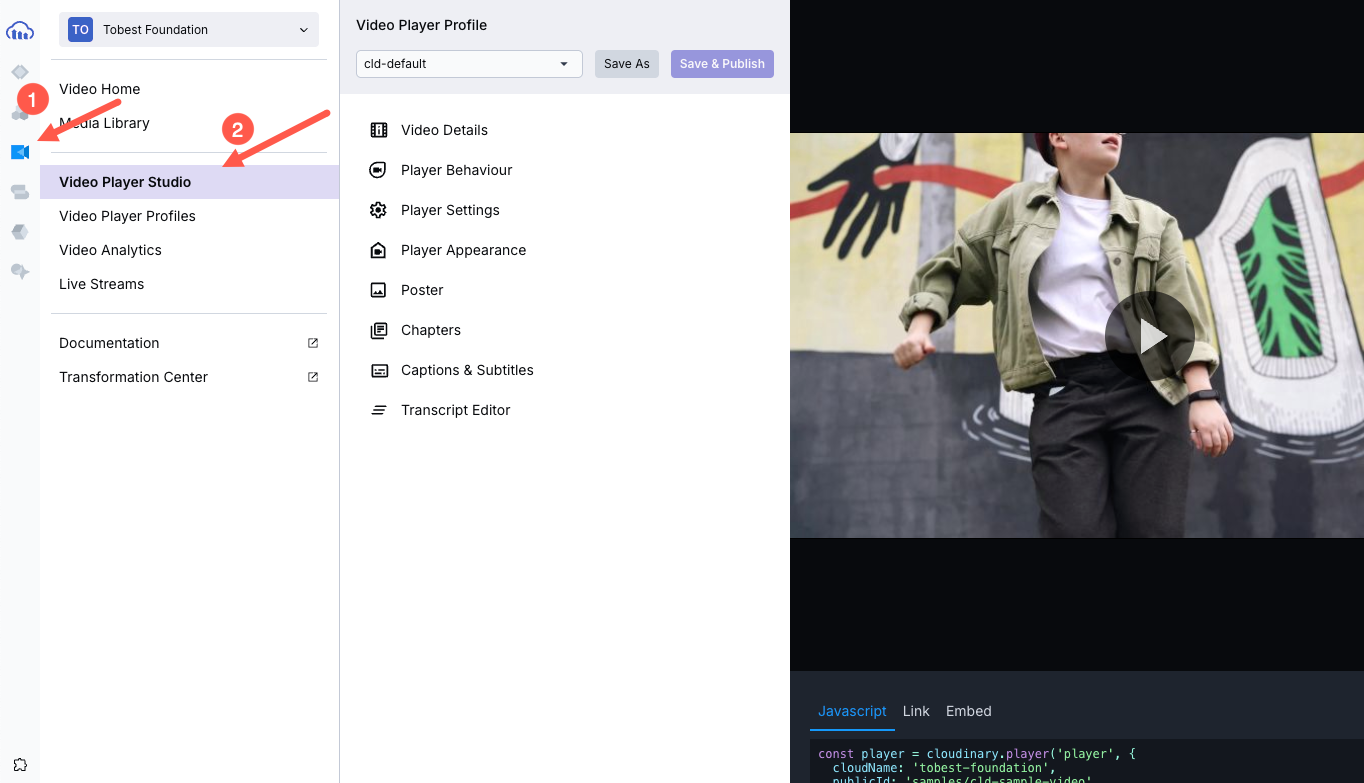
If you prefer not to write code, you can use Cloudinary’s Video Player Studio, a visual tool for configuring captions, subtitles, themes, and chapters. To access it, go to the Video section in your Cloudinary dashboard and click on Video Player Studio from the sidebar.
Now that you understand what the Cloudinary Video Player is and how to load a video, let’s look at the specific settings you should customize to make your video player accessible, starting with captions and subtitles.
Captions and subtitles are essential to improve video accessibility. Captions support users who are deaf or hard of hearing, as well as anyone watching in a sound-off environment, which is common on mobile and social platforms. Subtitles, by contrast, translate speech when viewers don’t understand the spoken language.
According to WCAG 2.1, all prerecorded video content must include captions that accurately reflect spoken dialogue and relevant sounds like music or speaker changes. Captions must also be customizable and available in multiple languages, where applicable.
Cloudinary allows you to define captions using textTracks. You can use either manually uploaded .vtt files or automatically generated .transcript files. Here’s a basic example:
player.source('marketing-video', {

  textTracks: {

    captions: {

      label: 'English (Captions)',

      default: true,

      url: 'https://res.cloudinary.com/demo/raw/upload/marketing-video.en.vtt'

    },

    subtitles: [

      {

        label: 'Spanish',

        language: 'es',

        url: 'https://res.cloudinary.com/demo/raw/upload/marketing-video.es.vtt'

      },

      {

        label: 'French',

        language: 'fr',

        url: 'https://res.cloudinary.com/demo/raw/upload/marketing-video.fr.vtt'

      }

    ]

  }

});Code language: PHP (php)
This setup makes sure that English captions load by default, users can toggle between Spanish and French subtitles in the player, and each track is properly labeled and accessible in the UI.
You can also do this in the Player Studio by adding the language and its file:

If you want to automate transcript and subtitle creation, Cloudinary integrates add-ons like the Google AI Video Transcription add-on or the Microsoft Azure Video Indexer add-on. This allows you to generate and translate subtitles during upload using the raw_convert parameter:
<code>raw_convert: 'azure_video_indexer:vtt:en-US:es-ES'</code>Code language: HTML, XML (xml)This would generate VTT subtitles in both English and Spanish and store them alongside your video asset.
To be considered accessible under WCAG 2.1 AA, a video player must be fully operable without the use of a mouse.
This includes being able to play, pause, adjust volume, toggle captions, and enter full screen mode using only a keyboard. Screen reader support is also critical, as elements must expose proper roles and labels so assistive technologies can interpret them accurately.
In Cloudinary’s Video Player, keyboard and screen reader support is already built in, but you should confirm the following:
- All interactive controls (play/pause, volume, fullscreen, etc.) are reachable via the Tab key.
- The player shows visible focus outlines when elements are selected via keyboard. You can use a screen reader (like NVDA, JAWS, or VoiceOver) to check if each control is announced correctly.
- ARIA (Accessible Rich Internet Applications) roles and attributes are applied to all controls (e.g., buttons, sliders). You can verify this in Chrome DevTools by going to the Accessibility tab to inspect ARIA labels, roles, and focus order.
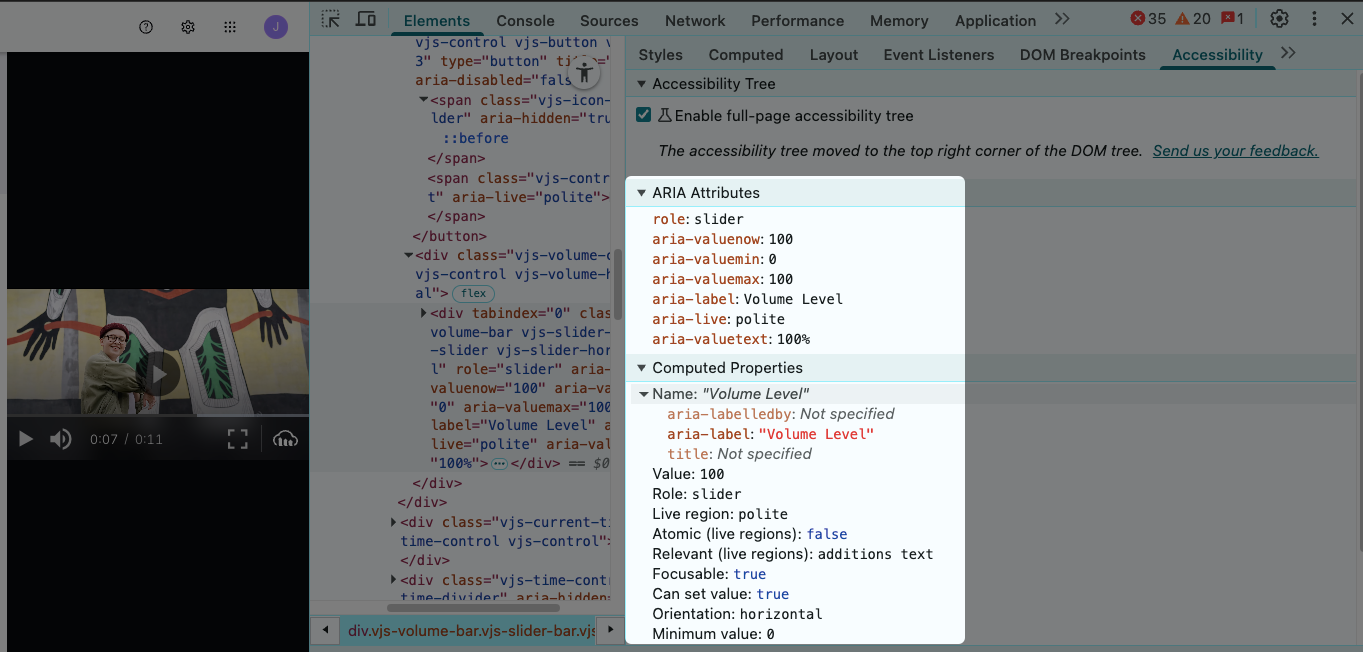
In the screenshot above, the volume slider is selected, and DevTools shows its ARIA attributes: a slider role, its current value (100%), and a lot more. These details give screen reader users clear, real-time feedback as they interact with volume controls, just like sighted users would by looking at the UI.
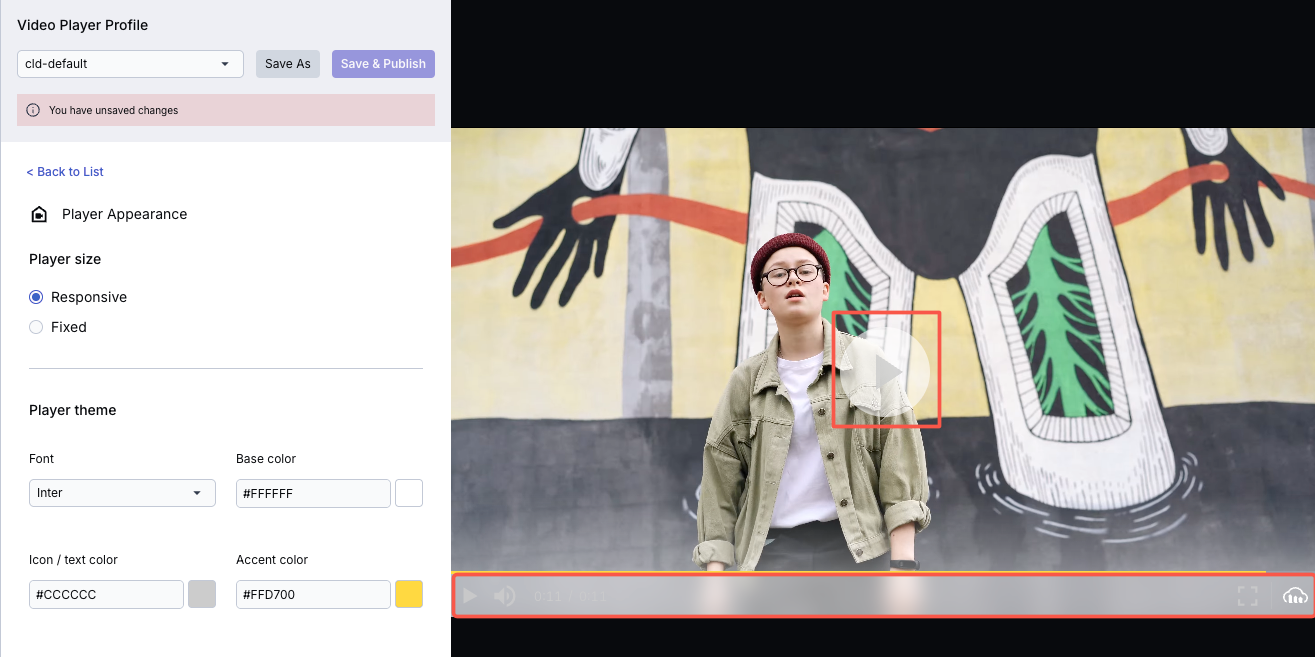
Poor contrast can make video controls unreadable for users with low vision, color blindness, or in bright environments. For example, if you set the icons as #CCCCCC on a white background #FFFFFF, you fail contrast checks and make controls nearly invisible, as shown in the image below:
WCAG 2.1 AA requires a minimum contrast ratio of 4.5:1 for normal text and 3:1 for large text or UI components like buttons and sliders.
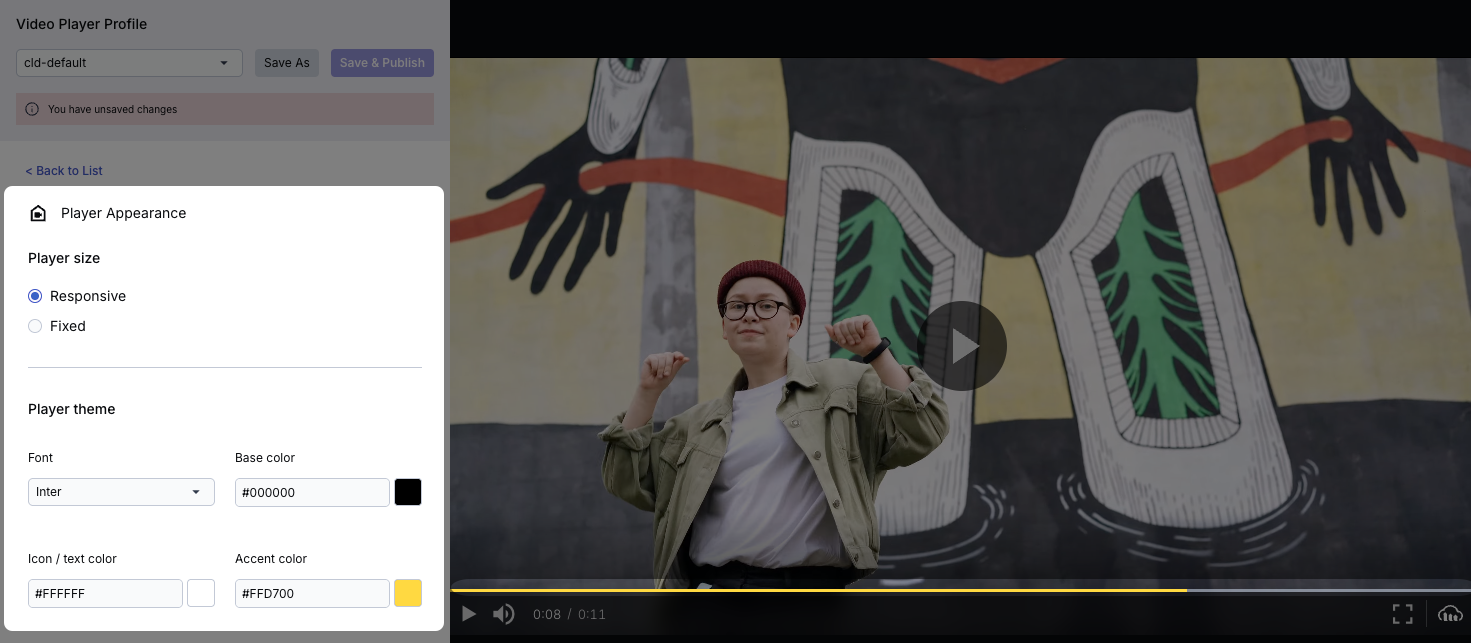
Cloudinary’s Video Player allows full control over the player’s color scheme through the colors parameter in JavaScript or the data-cld-colors attribute in HTML.
When customizing:
- Choose base, accent, and text colors that meet or exceed contrast ratios.
- Make sure text on buttons and labels remains legible on background colors.
- Avoid relying on color alone to convey meaning (e.g., red = error).
Here is how to set it up with Cloudinary:
const player = cloudinary.videoPlayer('my-player', {

  cloudName: 'your-cloud-name',

  colors: {

    base: '#000000',     // background of control bar

    accent: '#FFD700',   // highlight color (e.g. volume, seek bar)

    text: '#FFFFFF'      // icon and label color

  }

});Code language: JavaScript (javascript)
You can do this via the Video Studio using the Player Appearance option.
You can also apply these settings directly in HTML:
<video

  id="my-player"

  class="cld-video-player cld-video-player-skin-light"

  data-cld-colors='{ "base": "#000000", "accent": "#FFD700", "text": "#FFFFFF" }'

  controls

  data-cld-public-id="your-video-id">

</video>Code language: HTML, XML (xml)After customizing, run a contrast checker (e.g., WebAIM) or use Chrome DevTools via Lighthouse accessibility audit to flag any issues.
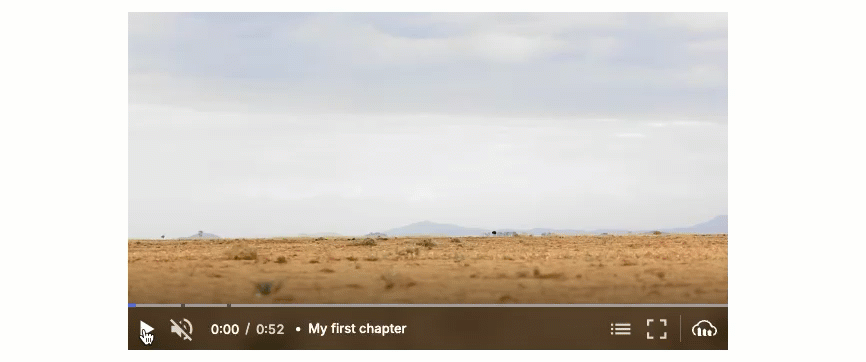
Chapters significantly improve accessibility and usability for longer videos, especially for users with cognitive disabilities or those using screen readers. They allow users to jump directly to meaningful sections without dragging through the timeline blindly.
In Cloudinary’s Video Player, you can add chapters by uploading a VTT file named using the convention <video-public-id>-chapters.vtt and reference it automatically by setting chapters: true:
const player = cloudinary.videoPlayer('player', {

  cloudName: 'demo',

});

player.source('old_camera', {

  chapters: true

});

Alternatively, specify the VTT file URL directly:

player.source('elephants', {

  chapters: {

    url: 'https://res.cloudinary.com/demo/raw/upload/docs/chapters_example.vtt'

  }

});Code language: JavaScript (javascript)
Your VTT file should follow standard WebVTT syntax:
WEBVTT

00:00:00.000 --> 00:01:00.000

Introduction

00:01:00.001 --> 00:02:30.000

Feature Walkthrough

00:02:30.001 --> 00:03:45.000

ConclusionCode language: CSS (css)
You can skip the VTT file and define chapters directly:
player.source('demo-video', {

  chapters: {

    0: 'Intro',

    60: 'Setup',

    150: 'Best Practices'

  }

});Code language: JavaScript (javascript)
To show the chapter list in the UI, pass chaptersButton: true when initializing the player.
If you’re importing the player as a module, don’t forget to include the chapters module: `
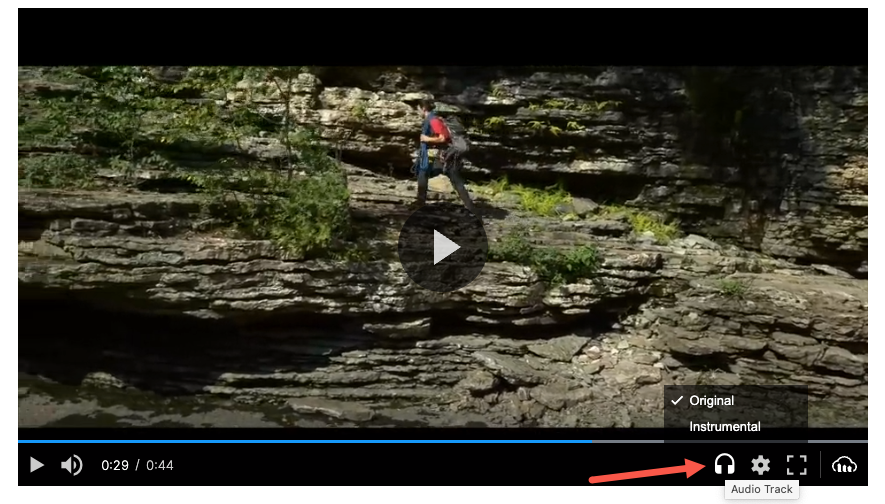
Alternate audio tracks allow you to serve multiple versions of a video’s audio, such as different languages or descriptive audio for visually impaired users. This is a core accessibility requirement, especially for educational, public, and international content.
When implemented correctly, users can switch between audio tracks from within the Cloudinary Video Player interface.
Alternate audio is defined using Cloudinary’s l_audio transformation in combination with the fl_alternate flag. Each audio track must be explicitly added as a separate layer, including the original audio, and delivered through a manifest (e.g., m3u8) compatible with adaptive streaming.
https://res.cloudinary.com/demo/video/upload/

fl_alternate:lang_en;name_Original,l_audio:outdoors/

fl_layer_apply/

fl_alternate:lang_en;name_Instrumental,l_audio:docs:instrumental-short/

fl_layer_apply/

sp_auto/outdoors.m3u8Code language: JavaScript (javascript)
This configuration adds the original audio track (outdoors) as “Original,” adds a second audio track (instrumental-short) as “Instrumental,” and applies adaptive streaming with sp_auto.
If both the manifest and player are properly set up, users will see a dropdown menu in the player, as shown above, to switch between tracks.
This must be configured manually via URL, since fl_alternate isn’t supported in SDKs. Remember to include the original audio track, or the first added layer will become the default.
Making your video player accessible isn’t just about ticking compliance boxes. It’s about making sure every viewer, regardless of ability, can fully engage with your content. Whether it’s screen reader support, subtitle flexibility, keyboard navigation, or visual contrast, the right player settings make a tangible difference.
Cloudinary’s Video Player gives you the tools to get this right, with customizable UI components, multilingual caption support, accessible navigation, and deep configuration through both code and UI.
Sign up for Cloudinary and start building video experiences that are accessible, flexible, and built for everyone.

