
User uploads help your platform grow, but they also bring risk. All it takes is a single inappropriate or off-brand imagery to damage trust within your community. You need a system that checks content the moment it enters your app.
In this guide, you’ll build a simple, real-time moderation flow with Cloudinary and Next.js. Every upload is scanned with AI moderation tools, labeled with a clear status, and pushed into a safe public feed. You control what gets blurred, flagged, or rejected on the backend, while your users see a safe space on the frontend.
- GitHub Project: https://github.com/musebe/safe-community-feed
- Live Demo: https://safe-community-feed.vercel.app/
A safe feed starts with smart checks at the moment of upload. Cloudinary can scan each image, score it, and send a clean result back to your app in seconds. This lets you protect your users without building a full AI pipeline yourself.
Below is everything you need to turn Cloudinary into your moderation engine.
Start by creating a Cloudinary account or logging in.
- Login: https://cloudinary.com/users/login
- Console: https://cloudinary.com/console
Your dashboard shows your Cloud Name, API Key, and API Secret.
You’ll use these to connect your Next.js app to Cloudinary. Keep them private.
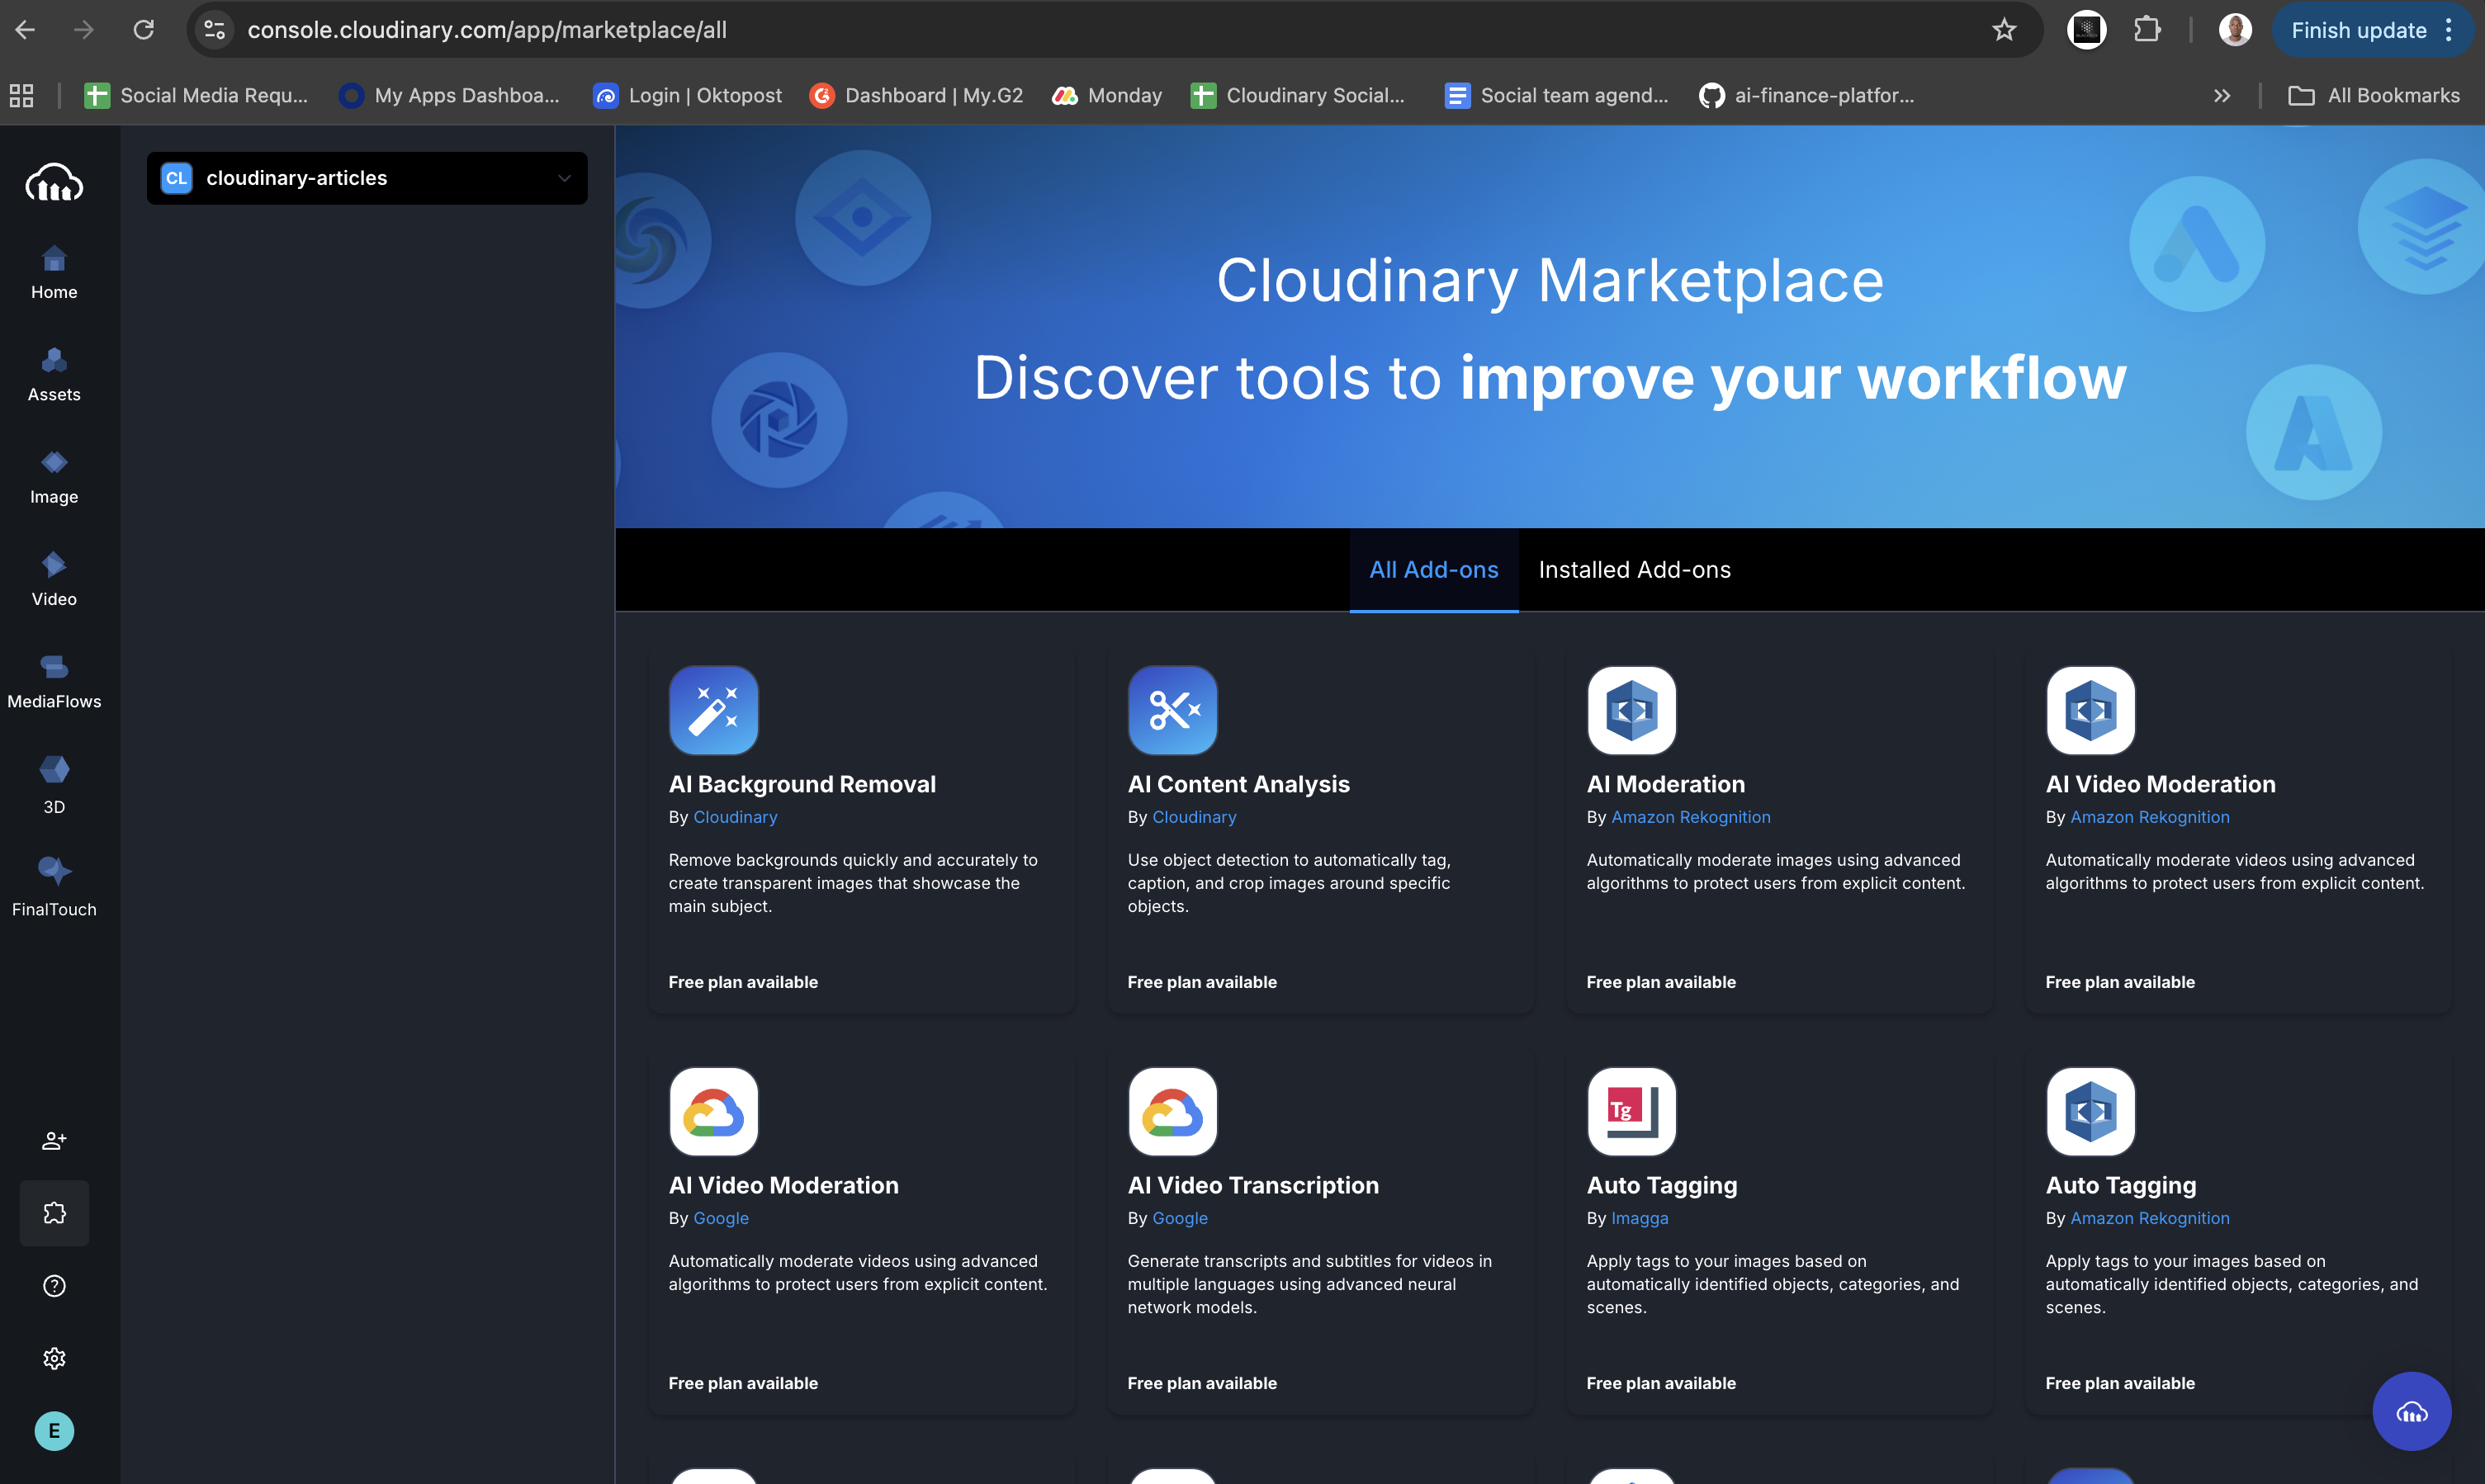
Cloudinary doesn’t scan content by default. You need to turn on a moderation add-on. These add-ons plug into powerful AI engines that detect unsafe content.
Two options:
- Amazon Rekognition AI Moderation. Great for general safety checks. It detects graphic content like nudity, violence, weapons, drugs, and more.
Docs: https://cloudinary.com/documentation/aws_rekognition_ai_moderation_addon
- WebPurify Image Moderation. Strong focus on detecting sexually explicit content.
Docs: https://cloudinary.com/documentation/webpurify_image_moderation_addon
Go to your Cloudinary console, open the Add ons page, and enable the one you want.
An upload preset is a saved rule set for every upload.
This is where you tell Cloudinary:
- Which moderation engine to use.
- When to run it.
- What to send back to your app.
- Where to send the webhook response.
Open:
Settings → Upload → Upload Presets
Create a new preset for your app. Turn on:
- Moderation set to Rekognition or WebPurify.
- Use notification_url so Cloudinary tells your app the result.
- Unsigned uploads if your client uploads directly.
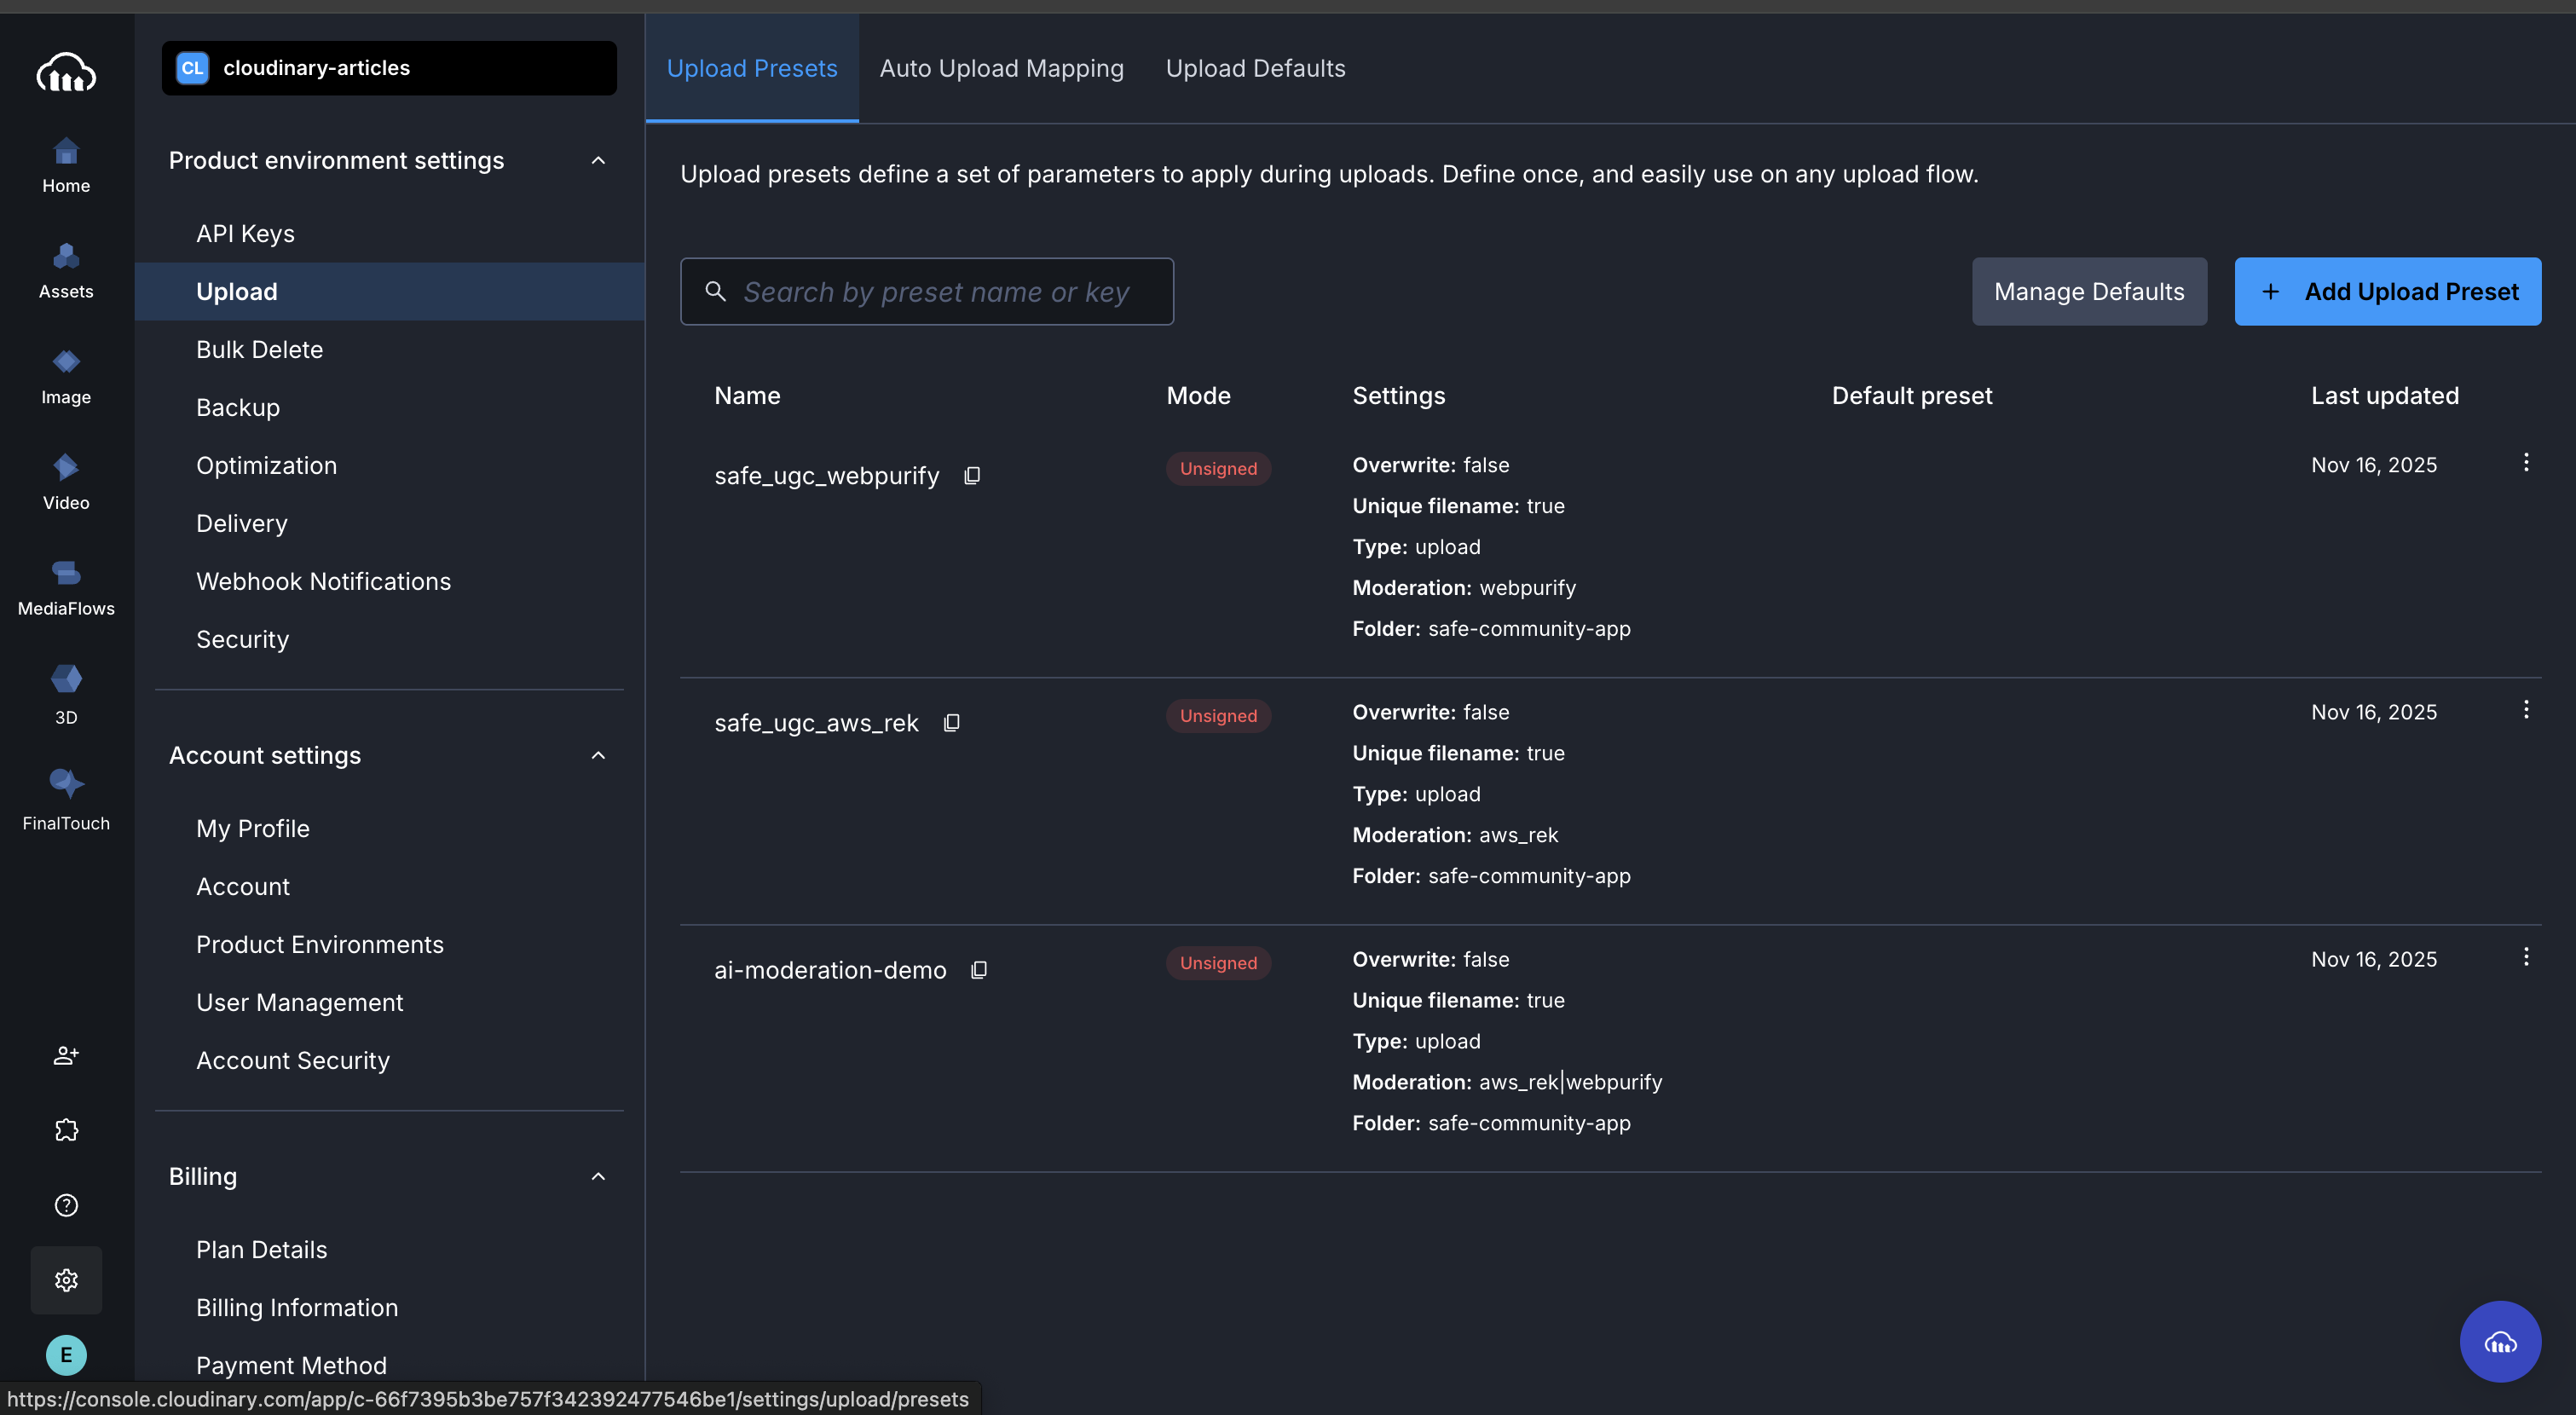
Every upload goes through this preset, which decides how Cloudinary checks and reports each image.
After choosing a service, Cloudinary shows extra settings. These include thresholds, strictness, and detection types. Use the defaults at first. Tune them later as you learn more about your community’s needs.
Cloudinary sends your app a webhook when a scan finishes.
This webhook includes:
- public_id
- Moderation decision
- Confidence scores
- Raw moderation results
Go to your upload preset and set the notification_url to your API route in Next.js.
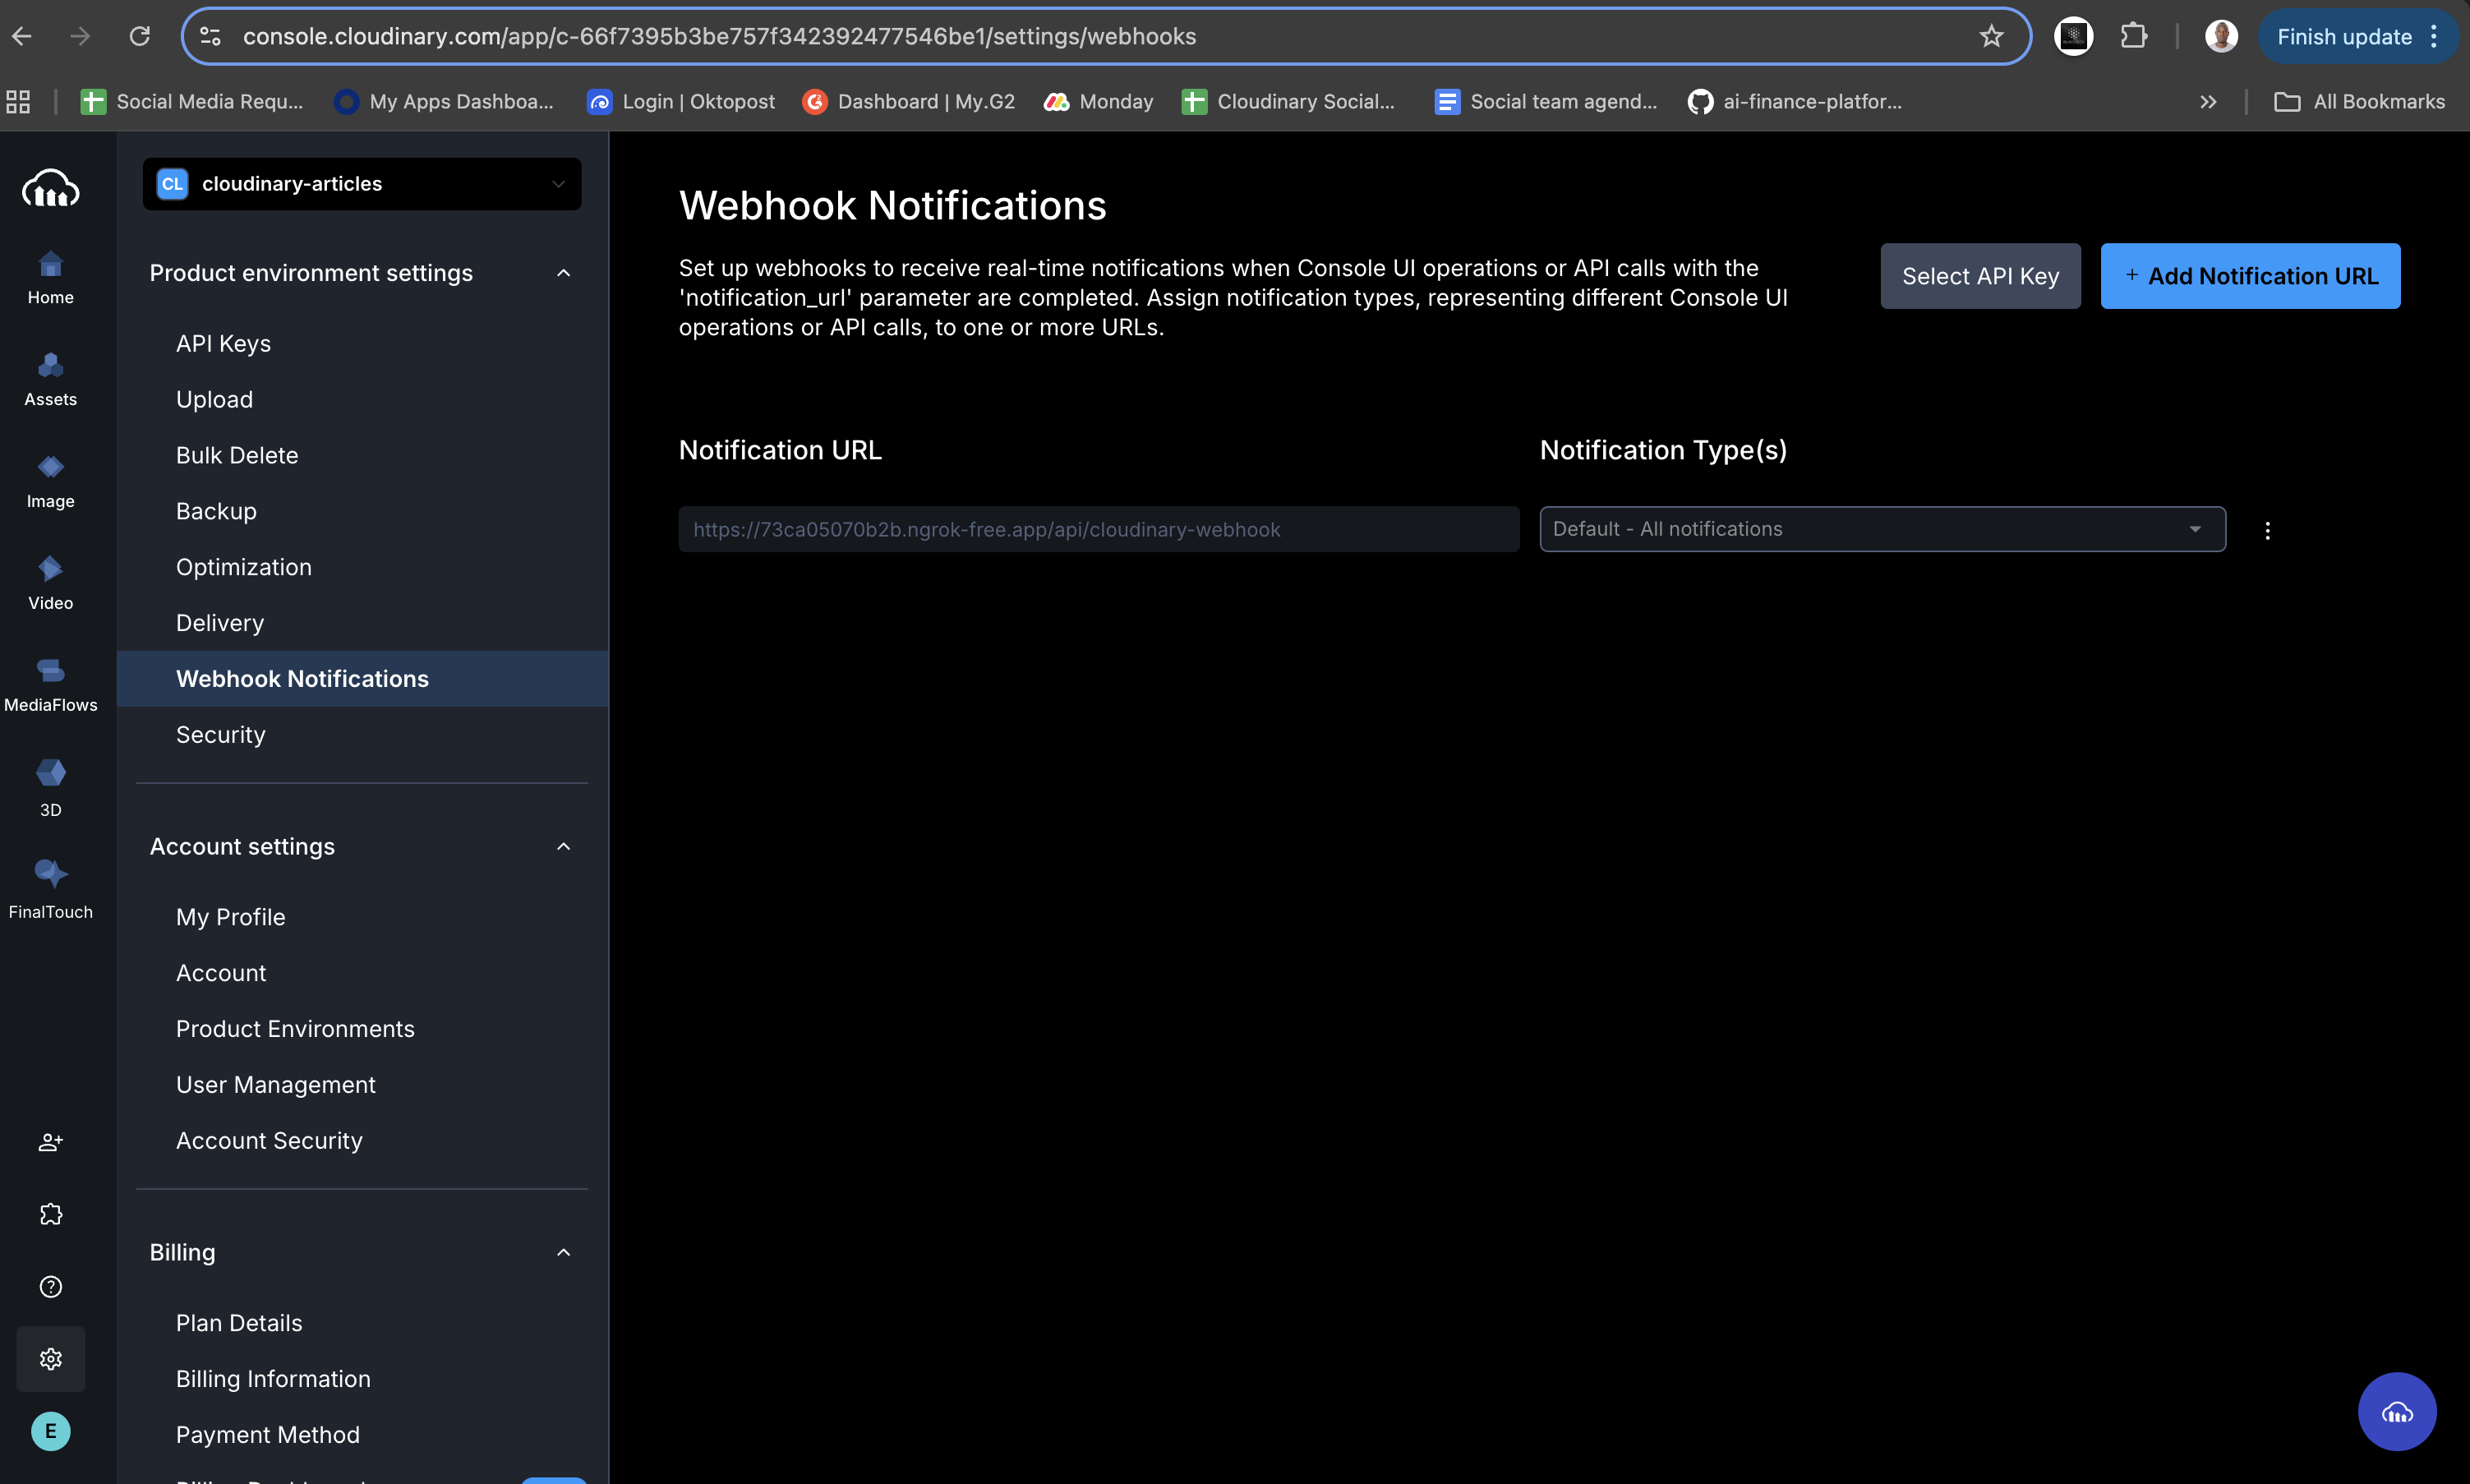
Your app doesn’t wait for Cloudinary. It gets the upload first, then Cloudinary sends the scan result. Your webhook updates the database, UI, and flags any risky image.
Set up the Next.js app with the App Router, Tailwind, and TypeScript.
npx create-next-app@latest safe-community-feed --ts --tailwind --eslint --app
Code language: CSS (css)
Add the UI components. Use shadcn for the Card, Badge, Dialog, Button, and Toaster.
Run the setup:
npx shadcn@latest init
Code language: CSS (css)
Add the components you need:
npx shadcn@latest add button
npx shadcn@latest add card
npx shadcn@latest add badge
npx shadcn@latest add dialog
npx shadcn@latest add sonner

Code language: CSS (css)
Create a file named .env.local in the project root. Put your Cloudinary values inside it.
.env.local
NEXT_PUBLIC_CLOUDINARY_CLOUD_NAME="your-cloud-name"
NEXT_PUBLIC_CLOUDINARY_UPLOAD_PRESET_AWS_REK="safe_ugc_aws_rek"
NEXT_PUBLIC_CLOUDINARY_UPLOAD_PRESET_WEBPURIFY="safe_ugc_webpurify"
NEXT_PUBLIC_CLOUDINARY_UPLOAD_PRESET="ai-moderation-demo"
This component is a client-side control panel ('use client'). It allows the user to:
- Pick a moderation engine (AWS, WebPurify, or Both).
- Dynamically update the Cloudinary preset based on that choice.
- Call our backend server action once upload completes.
We use useState to track the active mode:
// components/shared/UploadButton.tsx

'use client';
import { useState, useTransition } from 'react';
import { CldUploadButton } from 'next-cloudinary';
// ... other imports

type Mode = 'aws' | 'webpurify' | 'both';

export function UploadButton() {
  // ...
  const [mode, setMode] = useState<Mode>('aws');
  const [isPending, startTransition] = useTransition();

  // Map our mode state to .env presets
  const presetByMode: Record<Mode, string | undefined> = {
    aws: process.env.NEXT_PUBLIC_CLOUDINARY_UPLOAD_PRESET_AWS_REK,
    webpurify: process.env.NEXT_PUBLIC_CLOUDINARY_UPLOAD_PRESET_WEBPURIFY,
    both: process.env.NEXT_PUBLIC_CLOUDINARY_UPLOAD_PRESET,
  };

  const activePreset = presetByMode[mode];
  // ...

Code language: JavaScript (javascript)
The activePreset variable is then passed to the Cloudinary upload button. Because its key prop uses activePreset, changing the mode triggers a re-render with the new preset.
// components/shared/UploadButton.tsx (inside the return)

<CldUploadButton
  key={activePreset} // causes a re-mount when preset changes
  uploadPreset={activePreset}
  onSuccess={onUploadSuccess}
  // ...
/>;
Code language: JavaScript (javascript)
When the upload succeeds, onUploadSuccess triggers. We wrap the backend call in a startTransition for a smooth UI:
// components/shared/UploadButton.tsx

  const onUploadSuccess = (result: unknown) => {
    const uploadData = result as UploadResult;
    // ... simple error checking ...

    startTransition(async () => {
      try {
        // Call our server action
        await saveUpload(uploadData.info);

        toast.success('Upload successful');
      } catch (error) {
        toast.error('Upload failed');
      }
    });
  };
Code language: JavaScript (javascript)
With this setup the user has control, and your server-side logic runs right after upload.
Full file on GitHub:
components/shared/UploadButton.tsx
The UploadButton calls saveUpload with uploadData.info. This runs a server action inside lib/actions.ts.
Its job is simple. It reads the data from Cloudinary, checks for early moderation results, decides the first status, then writes the record to db.json.
Cloudinary may return moderation results in the moderation array. We pull them out and decide what the first status should be.
// lib/actions.ts

"use server";
import { revalidatePath } from "next/cache";
// ... other imports

export async function saveUpload(uploadInfo: CloudinaryUploadInfo) {
  try {
    const awsMod = uploadInfo.moderation?.find((m) => m.kind === "aws_rek");
    const webpurifyMod = uploadInfo.moderation?.find(
      (m) => m.kind === "webpurify"
    );

    const awsStatus = awsMod ? awsMod.status : "not_used";
    const webStatus = webpurifyMod ? webpurifyMod.status : "not_used";

    const statuses = [awsStatus, webStatus];
    let overall: SavedImage["moderationStatus"] = "pending";

    if (statuses.some((s) => s === "rejected")) {
      overall = "rejected";
    } else if (statuses.some((s) => s === "approved")) {
      overall = "approved";
    }

    const newImage: SavedImage = {
      id: uploadInfo.public_id,
      url: uploadInfo.secure_url,
      // ...
      moderationStatus: overall,
      aws_rekognition_status: awsStatus,
      webpurify_status: webStatus,
    };

    // write newImage to db.json ...

    revalidatePath("/");
  } catch (error) {
    console.error("Error saving to database:", error);
  }
}
Code language: JavaScript (javascript)
The image is stored even when its status is still pending. Calling revalidatePath("/") makes Next.js refresh the page so the gallery updates at once.
Full file on GitHub:
lib/actions.ts
The saveUpload action was instant. But the AI moderation check takes a few seconds. We can’t make the user wait.
So, how does our app find out the result? Cloudinary tells us.
Once the scan is finished, Cloudinary sends an HTTP POST request (a webhook) to our app. We just need to build an API route to “catch” it.
This is the job of app/api/cloudinary-webhook/route.ts. This file’s only purpose is to listen for that message from Cloudinary, parse it, and pass the data to our next server action.
// app/api/cloudinary-webhook/route.ts

import { NextRequest, NextResponse } from "next/server";
import { updateModeration } from "@/lib/actions";

export async function POST(req: NextRequest) {
  const body = await req.json();

  // Look for the specific 'moderation' notification
  if (
    body.notification_type === "moderation" &&
    body.moderation_kind &&
    body.moderation_status
  ) {
    // We found it. Now update our database.
    await updateModeration(
      body.public_id,
      body.moderation_kind,
      body.moderation_status
    );

    return NextResponse.json({ ok: true, source: "moderation" });
  }

  // Ignore other webhook types (like 'upload')
  return NextResponse.json({ ok: true, source: "ignored" });
}
Code language: JavaScript (javascript)
This route is the “middle-man” that connects Cloudinary’s external AI service directly to our app’s database logic.
See the full webhook file on GitHub:
app/api/cloudinary-webhook/route.ts
The webhook just told our app, “Hey, the AWS scan for image xyz is rejected!”
Now, this function, updateModeration (also in lib/actions.ts), has to act on that news.
Its job is to:
- Find the image in our
db.json. - Update the status for the specific provider (e.g.,
aws_rekognition_status). -
Recalculate the overall
moderationStatusbased on this new information. - Tell Next.js to refresh the page for all users.
The recalculation logic is the most important part: if any service flags an image, we reject it.
// lib/actions.ts

export async function updateModeration(
  publicId: string,
  kind: "aws_rek" | "webpurify",
  status: "approved" | "rejected" | "pending"
) {
  try {
    const dbData = await readDb();
    const index = dbData.findIndex((img) => img.id === publicId);

    if (index === -1) return; // Image not found

    const image = dbData[index];

    // 1. Update the specific provider's status
    if (kind === "aws_rek") {
      image.aws_rekognition_status = status;
    } else if (kind === "webpurify") {
      image.webpurify_status = status;
    }

    // 2. Recalculate the overall status
    const statuses = [image.aws_rekognition_status, image.webpurify_status];

    let overall: SavedImage["moderationStatus"] = "pending";

    if (statuses.some((s) => s === "rejected")) {
      overall = "rejected"; // This is the key!
    } else if (statuses.some((s) => s === "approved")) {
      overall = "approved";
    }

    image.moderationStatus = overall;

    // 3. Save to db.json...
    dbData[index] = image;
    await fs.writeFile(dbPath, JSON.stringify(dbData, null, 2));

    // 4. The magic: force a UI refresh
    revalidatePath("/");
  } catch (error) {
    console.error("Error updating moderation:", error);
  }
}
Code language: JavaScript (javascript)
The revalidatePath("/") call is the final, brilliant piece. It tells Next.js, “All cached data for the homepage is stale. Fetch it again, now.”
The user, who might have been looking at a “pending” image, sees the page instantly update. The image is now “rejected” and hidden. No manual refresh needed.
See the full actions file on GitHub:
lib/actions.ts
We’re all done on the backend. Now, how does the frontend use that moderationStatus?
It starts with the Gallery.tsx component. This is a Server Component that runs first. It’s simple, async, and just asks our lib/actions.ts for the full list of images.
// components/shared/Gallery.tsx

import { getImages } from "@/lib/actions";
import { ImageCard } from "@/components/shared/ImageCard";

export async function Gallery() {
  const images = await getImages();

  if (!images.length) {
    // ... show empty state ...
  }

  return (
    <div className="grid ...">
      {images.map((image) => (
        <ImageCard key={image.id} image={image} />
      ))}
    </div>
  );
}
Code language: JavaScript (javascript)
It passes each image to the ImageCard.tsx component. This is where the “safe” logic lives.
This component is the gatekeeper. It reads the moderationStatus for the image. If the status is 'rejected', it does not render the user’s image. Instead, it shows our safe placeholder, /reject.png.
This is the most important snippet for keeping the community safe:
// components/shared/ImageCard.tsx

"use client";
import { CldImage } from "next-cloudinary";
import Image from "next/image";
// ... other imports

export function ImageCard({ image }: ImageCardProps) {
  // ...
  const isRejected = image.moderationStatus === "rejected";

  return (
    <Card>
      {/* ... CardHeader with "Approved" / "Rejected" Badge ... */}

      <CardContent className="p-0">
        <div className="relative aspect-video">
          {isRejected ? (
            // If rejected, show a safe placeholder
            <Image
              src="/reject.png"
              alt="Rejected content"
              fill
              className="object-cover"
            />
          ) : (
            // If approved or pending, show the real image
            <CldImage
              src={image.id}
              alt="Uploaded image"
              // ...
            />
          )}
        </div>
      </CardContent>

      {/* ... CardFooter with AWS / WebPurify status ... */}
    </Card>
  );
}
Code language: JavaScript (javascript)
And that’s it. The UI is safe by default. It only shows content that is not explicitly rejected.
See the full files on GitHub:
components/shared/Gallery.tsxandcomponents/shared/ImageCard.tsx
And there you have it. We built an end-to-end, event-driven, and, most importantly, safe moderation system.
The user’s experience is seamless. They upload an image and see it in the gallery, while a powerful, asynchronous workflow is protecting your community on the backend.
Here’s the full flow we built:
-
Frontend (
UploadButton). A user uploads an image, selecting a specific AI moderation preset. -
Server action (
saveUpload). The app saves the image with a “pending” status and instantly refreshes the UI. - Cloudinary. The image is sent to AWS Rekognition or WebPurify for AI analysis.
-
Webhook. Cloudinary sends the
approvedorrejectedverdict to our API route. -
Server action (
updateModeration). The verdict is saved, and the UI is again instantly refreshed. -
Frontend (
ImageCard). The card checks the status and automatically hides any rejected content.
Want to learn more about how you can use Cloudinary to build a foundation for a safe and scalable community platform? Contact us today.
- GitHub Project: https://github.com/musebe/safe-community-feed
- Live Demo: https://safe-community-feed.vercel.app/


