
Building online platforms for children comes with the responsibility of ensuring the content is safe to consume. To do so requires moderation, which, if manual, is slow, expensive, and simply can’t keep up with the scale of modern user-generated content (UGC). A single inappropriate image slipping through the cracks can have serious consequences.
In this guide, we’ll build a powerful, automated safety pipeline for effective content moderation. We’ll use the visual workflow builder Cloudinary MediaFlows to instantly scan uploads for unsafe content, protect children’s privacy by blurring their faces, and apply fun, kid-friendly enhancements. We’ll then integrate this pipeline into a Next.js application, creating a secure frontend that only displays content after it has been officially approved.
By the end, you’ll have a fully functional application that not only moderates content but also provides a secure user experience.
- Live Demo: kidsafe-uploader-with-mediaflows.vercel.app
- GitHub Repo: github.com/musebe/kidsafe-uploader-with-mediaflows
Before we start, make sure you have the following:
- Node.js (v18 or later) installed.
- A free Cloudinary account.
- Basic knowledge of React and Next.js.
Ready to build a safe online space for kids? Let’s dive in.
First, we’ll need a solid foundation. We’ll spin up a new Next.js project and use the excellent shadcn/ui library to quickly build a clean, responsive interface.
Open your terminal and run the create-next-app command. We’ll be using the App Router, TypeScript, and Tailwind CSS.
npx create-next-app@latest kidsafe-uploader-with-mediaflows
Code language: JavaScript (javascript)
Follow the prompts, accepting the defaults for a standard setup.
You can view the full project structure on GitHub: kidsafe-uploader-with-mediaflows
Next, add shadcn/ui to handle component styling.
This command configures tailwind.config.ts and global CSS automatically:
npx shadcn-ui@latest init
Code language: CSS (css)
Accept the default options for all questions.
Let’s create a centered card that will hold our upload widget.
Add the Card component from shadcn/ui:
npx shadcn-ui@latest add card
Code language: CSS (css)
Now, in app/page.tsx, create a clean landing page layout.
The core of the page is a Card component that centers our application.
// In app/page.tsx
<main className="flex min-h-screen items-center justify-center">
  <div className="w-full max-w-md">
    <Card>
      <CardHeader className="text-center">
        <CardTitle>Safe Media Uploader</CardTitle>
        <CardDescription>...</CardDescription>
      </CardHeader>
      <CardContent>{/* Uploader component will go here */}</CardContent>
    </Card>
  </div>
</main>;
Code language: HTML, XML (xml)
You can view the full component file here:
app/page.tsx
With this basic layout in place, we’re ready to build the automated safety pipeline.
This is where the magic happens. Instead of writing complex backend code, we’ll use MediaFlows to create our entire safety and enhancement pipeline. It’s like building with logic blocks.
Navigate to MediaFlows in your Cloudinary dashboard and create a new flow. We’ll add and configure blocks in sequence.
Every flow needs to know when to start. We’ll trigger ours whenever an image is uploaded with a specific tag.
-
Block.
File Upload -
Configuration. Set it to trigger on assets with the tag
moderation-queue. This tag is the key that connects our Next.js app to this specific workflow.
Next, we add our automated safety check.
-
Block.
Amazon Rekognition Moderation -
Configuration. For a kid-safe platform, we need to be strict. Set the confidence level to a low value like
0.3(30%) and add sensitive categories likeSuggestive,Explicit Nudity,Violence, andVisually Disturbing.
The moderation block gives us a result: approved or rejected. We need to create two different paths based on this outcome.
-
Block.
If Condition -
Configuration. Set it to check if the
moderation_statusfrom the previous step equalsrejected. This creates a “True” path for unsafe images and a “False” path for safe ones.
On the “True” path (if an image is rejected), we simply tag it for manual review and stop.
-
Block.
Update Tags -
Configuration. Set the action to Add the tag
unsafe-content.
On the “False” path, we’ll run our approved images through a two-step enhancement process.
-
Privacy First. Add an
Edit Mediablock and configure it to apply theblur_faceseffect. -
Kid-Friendly Fun. Add a second
Edit Mediablock that takes the output from the first and applies thecartoonifyeffect.
Finally, we need to add a tag confirming that the image has passed our entire pipeline.
-
Block.
Update Tags -
Configuration. Add the tag
safe-and-processedto the final, transformed image.
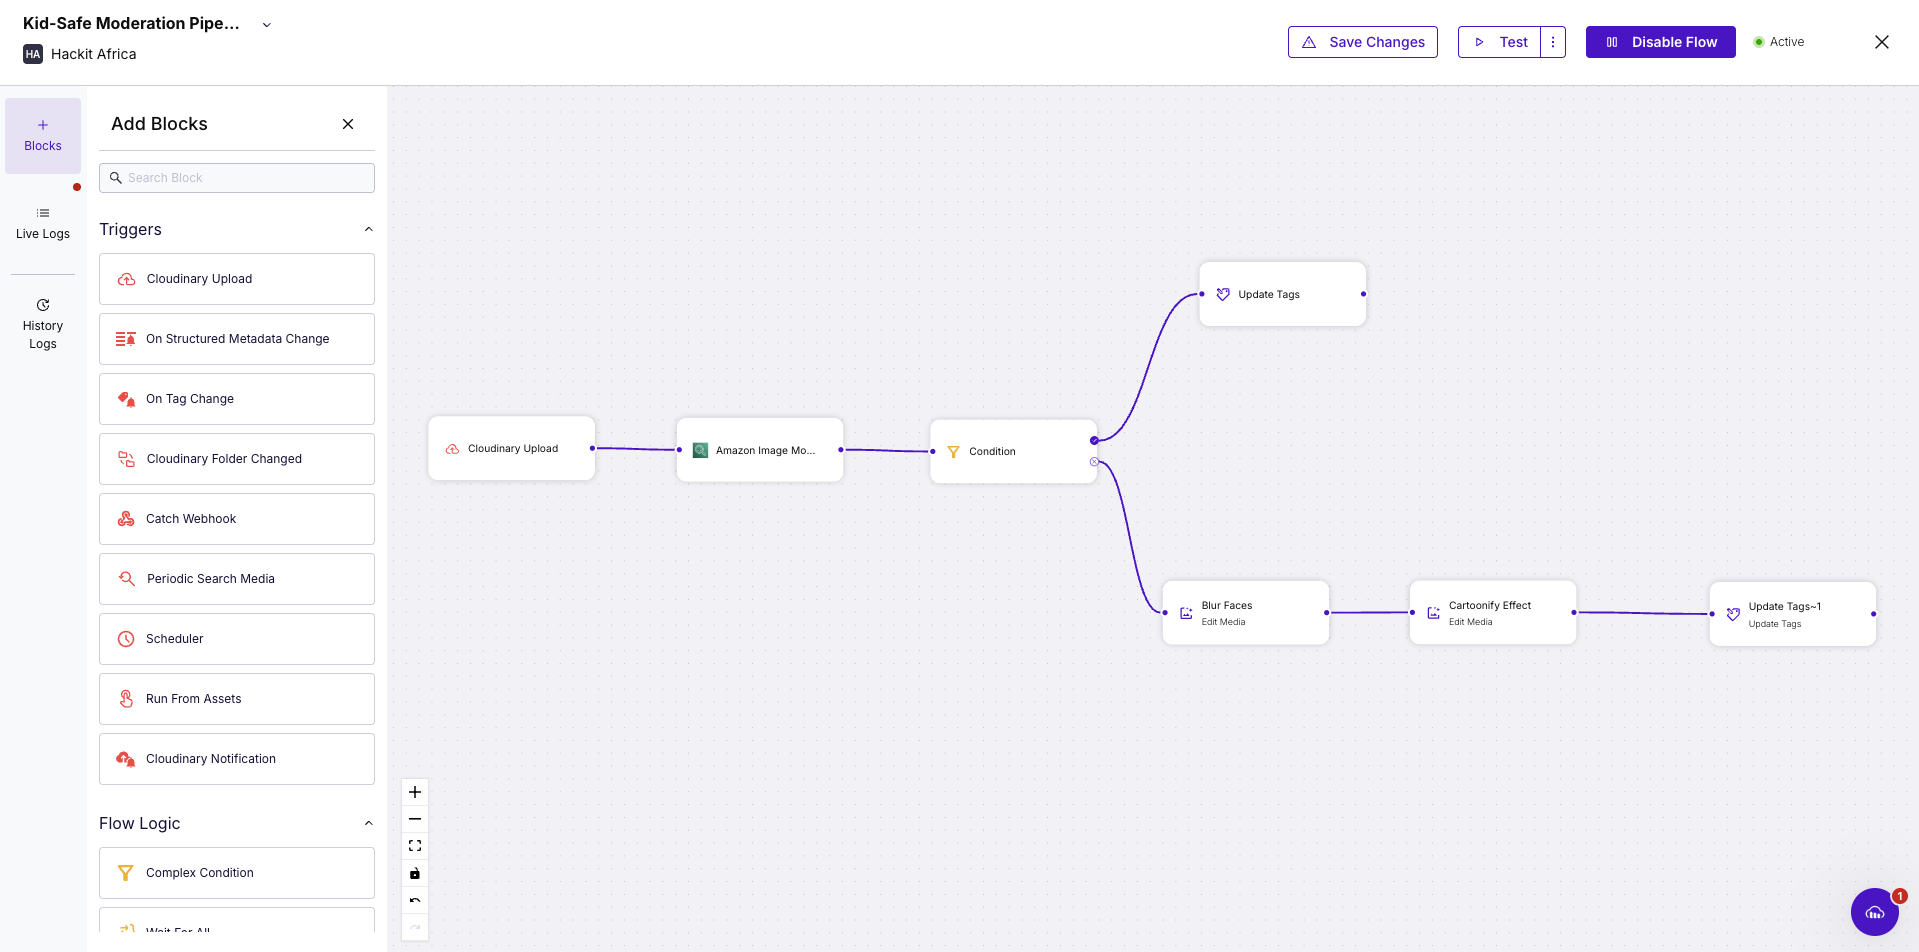
After connecting all the blocks, your completed MediaFlow should look like this. Don’t forget to Save and Enable the flow!
With our automated backend now live, let’s connect it to our Next.js application.
Now that the automated pipeline is ready in the cloud, it’s time to connect your browser to your backend.
We’ll use next-cloudinary to add a pre-built upload widget to the app.
Create a file named .env.local in your project root and add your Cloudinary credentials.
You can find these on your Cloudinary Dashboard.
NEXT_PUBLIC_CLOUDINARY_CLOUD_NAME="your_cloud_name"
CLOUDINARY_API_KEY="your_api_key"
CLOUDINARY_API_SECRET="your_api_secret"
You also need an Unsigned Upload Preset from your Cloudinary settings.
Set the Folder to kid-safe-platform for better organization.
Create a new file at components/Uploader.tsx.
This will handle the upload logic on the client side.
Install the package:
npm install next-cloudinary
Now, add the upload button code:
"use client";

import { CldUploadButton } from "next-cloudinary";

export default function Uploader() {
  return (
    <CldUploadButton
      uploadPreset="your_upload_preset_name"
      options={{ tags: ["moderation-queue"] }} // Triggers the MediaFlow
      onSuccess={(result) => {
        console.log("Upload successful!", result);
      }}
    >
      {/* Your custom button UI goes here */}
    </CldUploadButton>
  );
}
Code language: JavaScript (javascript)
Next, import and place <Uploader /> inside the <CardContent> section of
Run the app. When you upload an image, it will trigger the full moderation and enhancement pipeline you built in MediaFlows.
You won’t see the results yet, but the backend process is active.
See the full code on GitHub:
Your frontend can upload an image, but it doesn’t know what your MediaFlow decides.
Showing an image before it’s approved is risky, since unsafe content could appear to users.
We’ll fix this by adding a secure API route that checks the final moderation result directly from Cloudinary.
In your app directory, create a new file named app/api/check-status/route.ts.
This server-side endpoint will use the Cloudinary Admin API to securely check moderation status.
Inside route.ts, add a POST function that accepts a public_id.
This function polls Cloudinary every few seconds until a final moderation tag appears.
The loop ensures your app waits for the MediaFlow decision before showing the image.
// In app/api/check-status/route.ts
import { v2 as cloudinary } from "cloudinary";

// Configure with your server-side API key and secret
cloudinary.config({
  cloud_name: process.env.NEXT_PUBLIC_CLOUDINARY_CLOUD_NAME,
  api_key: process.env.CLOUDINARY_API_KEY,
  api_secret: process.env.CLOUDINARY_API_SECRET,
});

export async function POST(request: Request) {
  const { public_id } = await request.json();

  // Poll Cloudinary up to 7 times
  for (let i = 0; i < 7; i++) {
    const resource = await cloudinary.api.resource(public_id);
    const tags = resource.tags || [];

    if (tags.includes("safe-and-processed")) {
      return Response.json({ status: "approved" });
    }
    if (tags.includes("unsafe-content")) {
      return Response.json({ status: "rejected" });
    }

    // Wait 3 seconds before checking again
    await new Promise((resolve) => setTimeout(resolve, 3000));
  }

  // Time out after ~21 seconds
  return Response.json({ status: "timeout" }, { status: 408 });
}
Code language: JavaScript (javascript)
This endpoint acts as a secure verifier.
It keeps the browser from guessing moderation results and ensures only approved images are displayed.
See the full code on GitHub:
Now that you have a secure API to verify moderation status, it’s time to connect it to the frontend.
We’ll turn the uploader into an honest one that reflects the true image status, creating a safer user experience.
We need to track the image’s journey.
Instead of just showing a preview, the UI will now have clear states:
processing, approved, rejected, and error.
Use a useState hook in the components/Uploader.tsx component.
"use client";
import { useState } from "react";

type UploadStatus = "idle" | "processing" | "approved" | "rejected" | "error";

export default function Uploader() {
  const [status, setStatus] = useState < UploadStatus > "idle";
  // ...
}
Code language: JavaScript (javascript)Create a function that calls the /api/check-status endpoint.
This sends the public_id of the uploaded image and waits for the final verdict.
const checkModerationStatus = async (publicId: string) => {
  setStatus("processing");
  try {
    const response = await fetch("/api/check-status", {
      method: "POST",
      body: JSON.stringify({ public_id: publicId }),
    });

    const data = await response.json();
    setStatus(data.status); // 'approved' or 'rejected'
  } catch (error) {
    setStatus("error");
  }
};
Code language: JavaScript (javascript)
Trigger this function from the onSuccess callback of <CldUploadButton />.
It starts verification as soon as the upload finishes.
Render different UI elements based on status.
A switch statement makes it clear and simple.
Show a loading message while processing, the cartoon-like image when approved, or a clear rejection message if unsafe.
const renderStatusMessage = () => {
  switch (status) {
    case 'processing':
      return <p>Analyzing for Safety...</p>;
    case 'approved':
      return <CldImage src={...} effects={[...]} />; // Final safe image
    case 'rejected':
      return <div className="text-red-600">Upload Rejected.</div>;
    default:
      return null;
  }
};

return (
  <div>
    <CldUploadButton onSuccess={...} />
    <div className="mt-8">{renderStatusMessage()}</div>
  </div>
);

Code language: JavaScript (javascript)
Your app now provides a truthful, secure experience.
It waits for the backend’s verdict before showing any content, ensuring unsafe images never appear.
See the full code on GitHub:
A moderation pipeline is only useful if it displays approved content.
In this step, we’ll create a gallery page that shows only images marked safe by MediaFlow.
We’ll use a Next.js Server Component for secure and efficient rendering.
The server will fetch approved images from Cloudinary before sending the page to the browser.
Create a new file at app/gallery/page.tsx.
This component connects securely to Cloudinary using your secret credentials, which stay safe on the server.
We’ll use a search expression that filters for images inside the kid-safe-platform folder and tagged with safe-and-processed.
This ensures that only approved images appear in the gallery.
import { v2 as cloudinary } from "cloudinary";

// Configure Cloudinary securely
cloudinary.config({
  cloud_name: process.env.NEXT_PUBLIC_CLOUDINARY_CLOUD_NAME,
  api_key: process.env.CLOUDINARY_API_KEY,
  api_secret: process.env.CLOUDINARY_API_SECRET,
});

export default async function GalleryPage() {
  const searchResult = await cloudinary.search
    .expression("folder=kid-safe-platform AND tags=safe-and-processed")
    .sort_by("created_at", "desc")
    .execute();

  return <GalleryGrid resources={searchResult.resources} />;
}
Code language: JavaScript (javascript)Create a new file at app/gallery/GalleryGrid.tsx.
This component receives the list of approved images from the server and displays them in a responsive grid.
"use client";

import { CldImage } from "next-cloudinary";

export default function GalleryGrid({ resources }) {
  return (
    <div className="grid grid-cols-2 md:grid-cols-4 gap-4">
      {resources.map((resource) => (
        <CldImage
          key={resource.public_id}
          src={resource.public_id}
          alt="An approved and moderated image"
          effects={[{ blurFaces: true }, { cartoonify: true }]}
        />
      ))}
    </div>
  );
}
Code language: JavaScript (javascript)
This split between server fetching and client rendering is a best practice in modern Next.js apps.
It keeps your API keys safe while giving users a fast and secure gallery experience.
See the full code on GitHub:
And there you have it! In just a few steps, we’ve built a robust, fully automated content moderation pipeline. We’ve combined the power of a modern web framework, Next.js, with the simplicity of a visual workflow builder, Cloudinary MediaFlows, to create a platform that enhances safety without compromising user experience.
This project is a powerful testament to how modern, decoupled architecture can solve complex problems like content moderation in an elegant and scalable way.
This application is a fantastic foundation, but you can take it even further. Here are a few ideas:
- Switch to webhooks. Our API uses polling to check for status updates. For a more efficient, real-time solution, you could modify the MediaFlow to send a webhook to your API route upon completion, eliminating the need for repeated checks.
-
Build a manual review dashboard. Create a private, admin-only page that fetches all images with the
unsafe-contenttag. This would give human moderators a dedicated queue to review and re-classify flagged content. - Add more complex logic. Expand your MediaFlow to include other features, like adding a “safe” watermark to approved images or applying different effects based on AI-detected categories.
- Sign up for a Cloudinary account. Start building today with a free account.


