Image metadata contains useful details but are often left blank, making images impossible to search for. Manually tagging important metadata for each image just isn’t feasible as the volume of your visual collection grows. It’s also inconsistent because people can label similar clusters of images differently, even if they should fall into the same category.
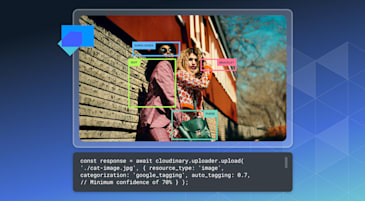
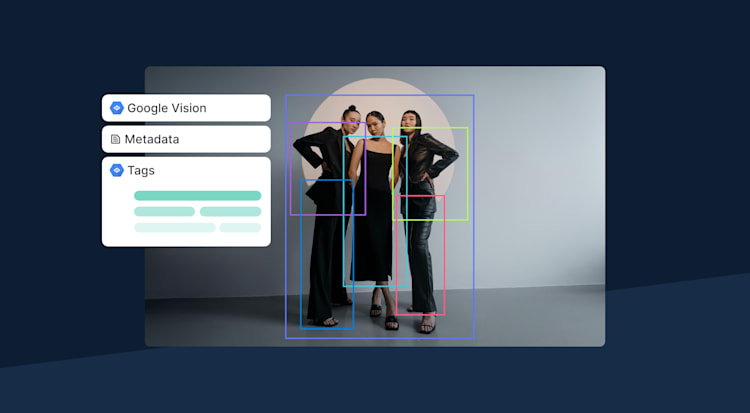
Cloudinary’s AI Vision add-on solves this by reading an image and returning tags that match your own list. This improves the searchability of your assets, ensures your metadata is clean, reduces manual work, and speeds up your review cycles for large image sets.
In this demo, you’ll upload an image using Cloudinary, send it through AI Vision Tagging mode, read the tags, store them, and show them in a small gallery. The whole flow sits inside a simple Next.js app.
-
Test the live version here: https://cloudinary-ai-vision-demo.vercel.app/gallery
-
View the full source code here: https://github.com/musebe/cloudinary-ai-vision-demo
-
Create a free Cloudinary account. The setup is simple and only takes a few steps. Then open your dashboard. You’ll find your cloud name, API key, and API secret. You’ll use these in your
.env.localfile. - Enable the AI Vision add-on. Open the Add-ons page in the Cloudinary console. Search for AI Vision and enable it. This gives your account access to the Analyze API for tagging and queries. AI Vision supports tagging, moderation, and general questions. In this demo, we’ll use Tagging mode so we can generate metadata.
-
Create an Upload Preset. Go to Settings, then Upload. Create a new preset. You can allow unsigned uploads for demos. Name the preset something simple, like
demo_unsigned. You’ll pass this preset to the Upload Widget in your client component. -
Add Cloudinary variables to
.env.local. Your Next.js app needs the Cloudinary values. Add these to.env.local:
NEXT_PUBLIC_CLOUDINARY_CLOUD_NAME=your_cloud_name
CLOUDINARY_API_KEY=your_api_key
CLOUDINARY_API_SECRET=your_api_secret
CLOUDINARY_UPLOAD_PRESET=demo_unsigned
Restart the dev server after adding them.
The Upload Preset controls how images enter Cloudinary. The AI Vision add-on processes the images through the Analyze API. These two parts create the entire metadata flow used later in the demo.
You set up the project with the Next.js App Router and a few key packages. This gives you a clean base for uploads, API routes, and Cloudinary integration.
Run:
npx create-next-app@latest cloudinary-ai-vision-demo
Choose TypeScript and App Router.
Turn on cacheComponents in next.config.ts:
import type { NextConfig } from 'next'

const nextConfig: NextConfig = {
  cacheComponents: true,
}

export default nextConfi
Code language: JavaScript (javascript)
This keeps pages dynamic by default and you can still cache specific components with use cache when needed.
Add Cloudinary and UI tools:
npm install next-cloudinary
npm install cloudinary
Then install shadcn/ui:
npx shadcn@latest init
Add the UI components used in the demo:
npx shadcn@latest add card button badge skeleton
These cover the upload panel, gallery layout, and image cards.
Add your Cloudinary keys in .env.local:
CLOUDINARY_CLOUD_NAME=xxxx
CLOUDINARY_UPLOAD_PRESET=xxxx
CLOUDINARY_API_KEY=xxxx
CLOUDINARY_API_SECRET=xxxx
With Cloudinary ready, you now integrate uploads into the Next.js interface. This step adds two small client components: the Cloudinary Upload Widget and the Upload Panel that previews the uploaded image and triggers AI Vision.
This component opens the Cloudinary upload dialog in the browser.
Once an image is uploaded, it returns public_id, asset_id, size, format, and more.
components/upload-widget-client.tsx
Core idea:
<CldUploadWidget
  uploadPreset={process.env.NEXT_PUBLIC_CLOUDINARY_UPLOAD_PRESET}
  onUpload={(result) => {
    if (result?.info) onUploaded(result.info);
  }}
>
  {({ open }) => (
    <button type="button" onClick={() => open()}>
      Upload Image
    </button>
  )}
</CldUploadWidget>;
Code language: HTML, XML (xml)
This gives you a clean uploader that works inside any client component.
The Upload Panel wraps the widget.
It stores the upload, shows a preview, and gives the user an Analyze button.
components/upload-panel-client.tsx
Key pattern:
const [asset, setAsset] = (useState < UploadedResource) | (null > null);

function handleUploaded(resource: UploadedResource) {
  setAsset(resource);
}
Code language: JavaScript (javascript)
Preview from Cloudinary:
<CldImage
  src={asset.public_id}
  alt="Uploaded image"
  fill
  sizes="(max-width: 768px) 100vw, 40vw"
  className="object-cover"
/>;
Code language: HTML, XML (xml)
At this point:
- Uploads go straight to Cloudinary.
- You have the
public_id. - You’re ready to send the image to AI Vision Tagging.
Now that uploads work, the next step is sending those images to Cloudinary’s AI Vision Tagging service. This happens in two parts:
- A client action that calls.
- A Next.js API Route that talks to Cloudinary’s Analyze API.
This keeps your Cloudinary API secret safe on the server.
When a user uploads an image, they can click Analyze image with AI Vision. This button sends the asset_id, public_id, and URL to a Next.js API endpoint.
Inside the Upload Panel, the key part is:
const res = await fetch("/api/analyze", {
  method: "POST",
  body: JSON.stringify({
    asset_id: asset.asset_id,
    public_id: asset.public_id,
    secure_url: asset.secure_url,
  }),
});
Code language: JavaScript (javascript)
This keeps the client simple. It just sends the image info and waits.
File: components/upload-panel-client.tsx
The real work happens inside the API route.
This endpoint receives the uploaded image and calls Cloudinary’s Tagging Mode. After you provide the definitions for each tag, AI Vision checks the image and returns only the tags that match.
File: app/api/analyze/route.ts
The important part looks like this:
await cloudinary.analyze.ai_vision_tagging({
  source: { asset_id },
  tag_definitions: [
    { name: "person", description: "Does the image contain a person?" },
    { name: "food", description: "Does the image contain food?" },
    { name: "text", description: "Does the image contain text?" },
  ],
});
Code language: JavaScript (javascript)
You can define up to 10 tags.
AI Vision checks the image and returns the tags that fit.
For the demo, each analyzed image is saved to a small JSON file stored locally.
This helps us render a gallery later without using a real database.
The helper lives here: lib/db.ts
Each saved item includes:
- public_id
- created date
- AI Vision tags
- secure URL
This makes it easy to build a basic gallery.
Let’s recap our process so far:
- Upload an image with the Cloudinary widget.
- The app stores the upload info.
- You click Analyze.
- Next.js sends the image to Cloudinary AI Vision.
- AI Vision returns the detected tags.
- The tags and image info are saved to
db.json.
You now have smart metadata for each uploaded image.
Once Cloudinary AI Vision returns the tags, you’ll need a place to keep them. In this demo, you’ll use a very simple approach: a JSON file on disk. This is great for learning and local testing. In a real app you’d swap this for a real database.
All analyzed images are saved to a single JSON file: data/assets.json
Each entry contains:
-
asset_id -
public_id -
secure_url -
format -
bytes -
tags(from AI Vision) -
createdAt -
updatedAt
Think of it as a small table of all your processed images.
You won’t work with the JSON file directly. Instead, you’ll use helper functions in a small module: lib/db.ts
The important functions are:
-
upsertAsset(record). Adds a new asset or updates an existing one. -
listAssets(). Returns all stored images. -
findAssetByAssetId(asset_id). Looks up a single image.
A simplified shape of the stored object looks like this:
type StoredAsset = {
  asset_id: string
  public_id: string
  secure_url: string
  bytes: number
  format: string
  tags: string[]
  createdAt: string
  updatedAt: string
}
This type keeps the metadata tidy and predictable.
The AI Vision API route takes care of saving and updating entries. After it gets tags from Cloudinary, it builds a StoredAsset object and calls upsertAsset. The route also sets createdAt and updatedAt timestamps. If an image is analyzed again, tags can be merged or updated.
File for the route: app/api/analyze/route.ts
So the flow is:
- Analyze image with AI Vision.
- Get tags from Cloudinary.
- Build a
StoredAssetobject. - Save it into
data/assets.jsonusingupsertAsset.
Later, the gallery page reads from listAssets() to render everything.
With uploads stored and tagged, you can now display them in a simple gallery. This part of the app helps you see how AI Vision improves metadata, because every image appears alongside the tags Cloudinary generated.
The gallery is a Server Component page. It loads all saved assets from the JSON store and then renders small cards for each one.
The gallery page calls a helper that returns all stored assets: lib/db.ts
const assets = await listAssets();
Code language: JavaScript (javascript)
Because it runs on the server, it can read the JSON file directly without exposing anything to the client.
The page lives here: app/gallery/page.tsx
Its job is straightforward. It fetches all the images, wraps the display in a small layout, and then passes each asset to a card component, so the file stays clear and easy to follow.
Each image is displayed in a dedicated card that shows:
- The Cloudinary image.
- File format and size.
- AI Vision tags.
- Created time.
File: components/gallery/asset-card.tsx
Inside each card, the image is rendered using CldImage:
<CldImage
  src={asset.public_id}
  alt="Uploaded image"
  width={400}
  height={300}
/>;
Code language: HTML, XML (xml)
The rest of the card displays clean text snapshots of the metadata. Tags appear as small UI badges so they stand out clearly.
You now have a full workflow that uploads an image to Cloudinary, runs it through the AI Vision add-on, stores the returned metadata, and displays everything in a small gallery.
This demo keeps the code readable and easy to extend. You can replace the JSON store with a real database, add more AI Vision modes, or build a full asset dashboard.
You can explore the full code here: