
Digital content managers, technical marketers, and video producers know the repetitive grind of publishing video content across multiple channels all too well. Each platform comes with its own format, requiring different aspect ratios, resolutions, and visual optimizations. That means for every new campaign or content drop, you’re duplicating effort, such as editing, exporting, and uploading multiple versions of the same video.
Every time I edited a new video, I’d have to remember which platform it was for, resize it manually, apply specific overlays, and then categorize it into the right folder. Multiply that by dozens or hundreds of assets, and it got chaotic fast. Asset files would get lost or published in the wrong format. I needed to find a way to automate the whole process.
With Cloudinary’s powerful suite of APIs and tools, I was able to resize, reformat, and deliver videos on the fly across web and mobile platforms without manual exporting or duplicating files.
This guide demonstrates how I automated the delivery of multichannel videos using Cloudinary’s API and MediaFlows, transforming a single master video file into platform-optimized versions for YouTube, TikTok, and Instagram.
Before getting into how it works, let’s take a step back and look at why this kind of solution is necessary in the first place.
Producing optimized video versions for platforms like YouTube, TikTok, and Instagram is one of the most inefficient processes in content creation today. Each platform expects a different resolution or layout (e.g., YouTube – 16:9, TikTok – 9:16, Instagram – 1:1). What looks crisp on YouTube might appear pixelated or distorted on Instagram or TikTok.
To understand the value of automation, let’s acknowledge the common struggles we all face:
- Mismatched resolutions. Maintaining consistent video quality across different resolutions becomes a bottleneck. It can lead to lost fidelity, compression issues, or an empty background space.
- Broken layouts and cropping issues. Improper formatting often results in issues such as speakers’ faces, logos, or subtitles being cropped out. These layout issues not only impact the user experience but also damage brand reputation.
- Time-consuming manual exports. Even with editing tools such as Canva and CapCut, manually exporting video variants can significantly impact production cycles. Teams often spend hours adjusting canvas sizes, repositioning overlays, and ensuring each format matches platform requirements.
These challenges make cross-platform video publishing not just tedious but also creatively limiting.In the next section, I’ll walk you through the process I used to resize and optimize my videos for multiple platforms using Cloudinary while preserving quality and saving hours of manual work.
To follow along with the tutorial, all you’ll need is a Cloudinary account. Sign up for a free Cloudinary account here if you don’t have one.
First, you’ll need to upload a video file to Cloudinary. For this tutorial, the video will serve as the sample to generate platform-specific video variants.

You can access the video hosted on Cloudinary via this link:
To upload your video, you can either use the Upload widget or any of Cloudinary’s SDKs, but for this tutorial, you’ll use the Cloudinary Node.js SDK. Here’s how to do it:
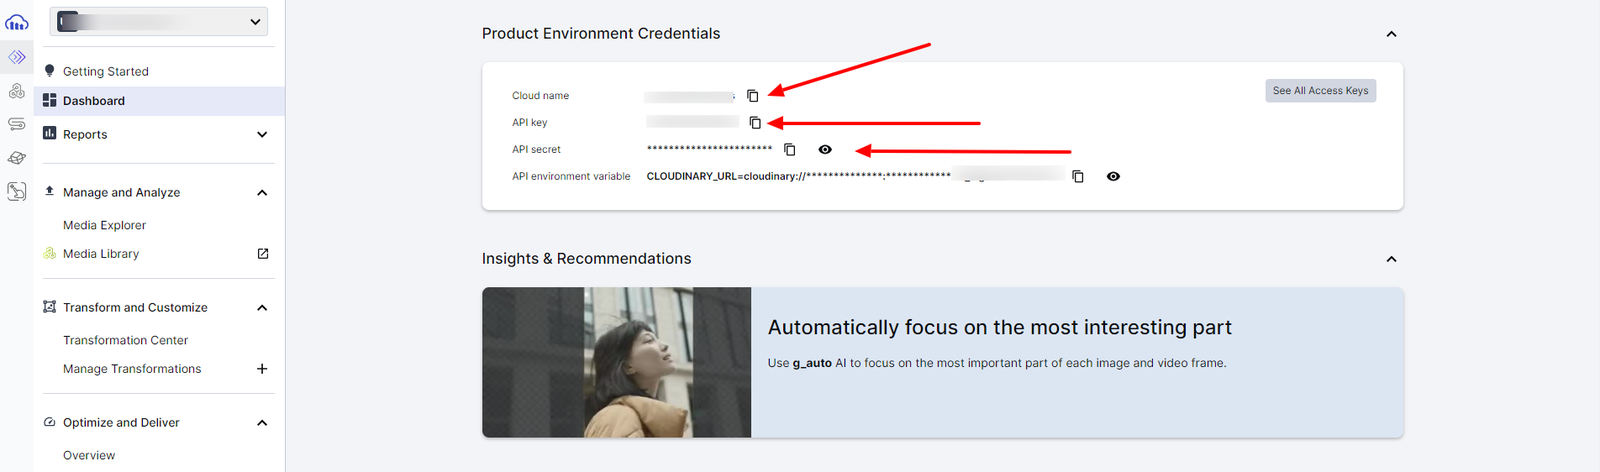
- Step 1: Log in to Cloudinary and access the dashboard to find all the required credentials. Next, create a .env.local file in the root folder of your project to store your Cloudinary credentials.
- Step 2: Install the Cloudinary Node.js SDK. You can check out the Cloudinary Docs for guidance on implementing it on other platforms.
npm install cloudinary
- Step 3: Create a new file called upload.js and add the Cloudinary Node.js SDK (version 2) configuration. Then, configure it using your Cloudinary credentials.
const cloudinary = require('cloudinary').v2;

cloudinary.config({

  cloud_name: 'your_cloud_name',

  api_key: 'your_api_key',

  api_secret: 'your_api_secret'

});Code language: JavaScript (javascript)- Step 4: In the upload.js file, add the code snippet below to upload your video programmatically using Cloudinary’s Node.js SDK.
const uploadVideo = async () => {

try {

  const result = await cloudinary.uploader.upload("master.mp4", {

    resource_type: "video",

    public_id: "my_video",

  });

  console.log(result)

  }

} catch(error){

 console.error("Update error:", error);

}Code language: JavaScript (javascript)
The upload options in the code snippet above consist of:
public_id. A custom public ID or name for the uploaded video.resource_type. Specifies the type of resource for the uploaded file.
Now that you’ve successfully uploaded your video to Cloudinary, the next step is to make it adaptable for different platforms. In the following section, you’ll learn how to generate multiple video variants using the Cloudinary Node.js SDK directly in your code.
Instead of uploading once and transforming later, you can handle both tasks simultaneously, creating TikTok, YouTube, and Instagram versions during the upload process using eager transformations. Eager transformations instruct Cloudinary to automatically generate multiple derived versions of a single uploaded file upfront.
For more complex transformations, particularly when you need Cloudinary to serve the best video or image version based on a user’s device, browser, and network conditions, you can define these transformations directly within a single upload function using Cloudinary’s transformation parameters.
Transformation parameters are a set of instructions that you pass to Cloudinary, either in a URL or through code, which instruct it on how to resize, crop, compress, or change the format of your video to meet each platform’s specific needs.
Here’s how to upload your master video once and have Cloudinary automatically generate all platform-specific versions:
const cloudinary = require('cloudinary').v2;

cloudinary.config({

  cloud_name: 'your_cloud_name',

  api_key: 'your_api_key',

  api_secret: 'your_api_secret',

});

const platformTransformations = () => {

  return [

    {

      transformation: [

        { aspect_ratio: "9:16", crop: "fill", gravity: "auto" },

        { quality: "auto:eco" },

        { fetch_format: "auto" },

        { effect: "accelerate:20" },

      ],

      public_id: "my_tiktok_video"

    },

    {

      transformation: [

        { aspect_ratio: "16:9", crop: "fill" },

        { fetch_format: "auto" },

        { quality: "auto:best" },

      ],

      public_id: "my_youtube_video"

    },

    {

      transformation: [

        { aspect_ratio: "1:1", crop: "fill", gravity: "auto" },

        { fetch_format: "auto" },

        { quality: "auto" },

      ],

      public_id: "my_instagram_video"

    }

  ];

};

// 2. Upload master video and generate all variants

const platformVariants = async () => {

  try {

    const eagerTransforms = platformTransformations().map(t => t.transformation);

    const result = await cloudinary.uploader.upload("master.mp4", {

      resource_type: "video",

      public_id: "master_video",

      eager: eagerTransforms,

      eager_async: false,

    });

    console.log(result.eager); // contains URLs to all transformed variants

  } catch (error) {

    console.error("Upload error:", error);

  }

};

platformVariants();Code language: JavaScript (javascript)
The code snippet above generates multiple versions of your video immediately after it’s uploaded. Each version is stored as a derived asset, as there’s no need to reupload the video. The upload function, platformVariants uses these Eager transformation parameters to make this possible:
eager. This tells Cloudinary which transformed versions to generate on upload.eager_async: false. This waits for those versions to finish before ending the upload process.
There’s also an array function, platformTransformations that contains three objects, each representing a different platform (TikTok, YouTube, Instagram). Each object has a unique identifier (public_id) for each transformed video and a set of transformation parameters (such as aspect_ratio, quality, fetch_format, etc.). This array function represents the transformations for each derived asset during the upload process.
Let’s break down each transformation parameter in the platformTransformations array function.
aspect_ratio. Sets the width to height ratio of the video.crop. Controls how Cloudinary crops the video to fit the aspect ratio without distortion.g_auto. Instructs Cloudinary to automatically determine the most important part of the video (such as a subject’s face or a focal object) when cropping.quality: "auto:eco". This instructs Cloudinary to deliver the most efficient quality automatically. It’s ideal for mobile devices or low-bandwidth platforms, such as TikTok or Instagram.quality: "auto:best". Instructs Cloudinary to deliver the best possible video quality.quality: "auto". This optimizes the video quality and file size automatically.effect "accelerate:20". Speeds up video playback by 20%.fetch_format: "auto". Automatically serves the most efficient video format supported by the user’s browser/device (e.g., WebM, MP4, AV1).
Once the upload process is completed, you can access the video variants through the upload function response. The eager value in the response will contain the URLs for the three platforms (TikTok, YouTube, Instagram).
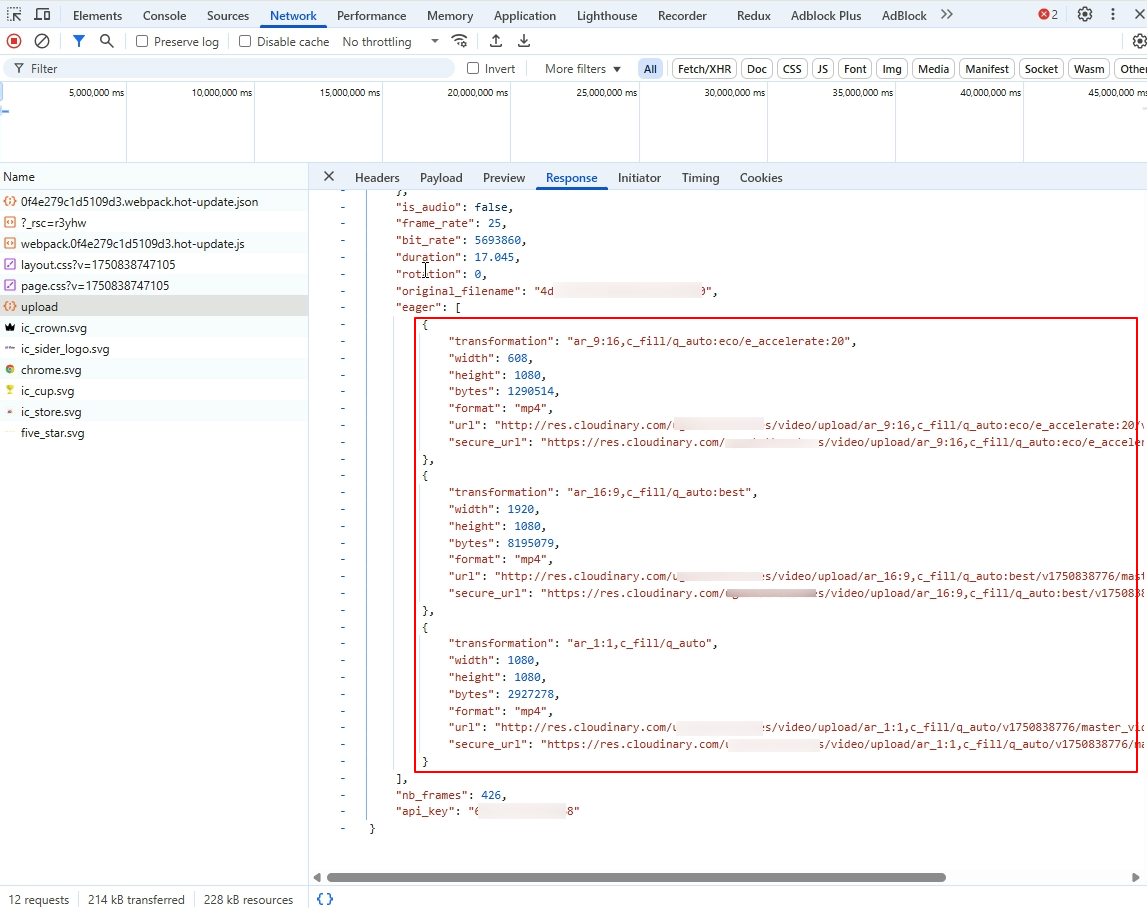
Here’s how each video variant will look like:
TikTok

YouTube


Each transformation creates a video tailored to its target platform with optimized format, resolution, and size.
By applying transformations during upload, you generate optimized versions of your video for each platform, all from the same source file. Once these variants are uploaded, you can distribute them using the URLs from your upload response. The URLs directly link to the transformed videos and can be used across various CMS platforms, embedded in apps, or shared via email or social media campaigns.
The next section talks about a no-code option for non-developers who want to automate video optimization and categorization without writing code.
If you’re not a developer or prefer not to deal with code, Cloudinary’s MediaFlows offers a no-code alternative for video processing using a visual interface. It enables you to chain together actions, such as video optimization and categorization. This is especially useful for users who want to prepare platform-ready videos without writing code, as it automatically organizes content for multiple platforms. MediaFlows offers two options:
- EasyFlows. A no-code, user-friendly interface designed for non-technical users. This option allows users to automate tasks such as applying brand standards, managing asset lifecycles, and auto-tagging assets.
- PowerFlows. A flexible, low-code environment for advanced users. It allows the creation of complex workflows, integration with other systems, and complete control over the media management process.
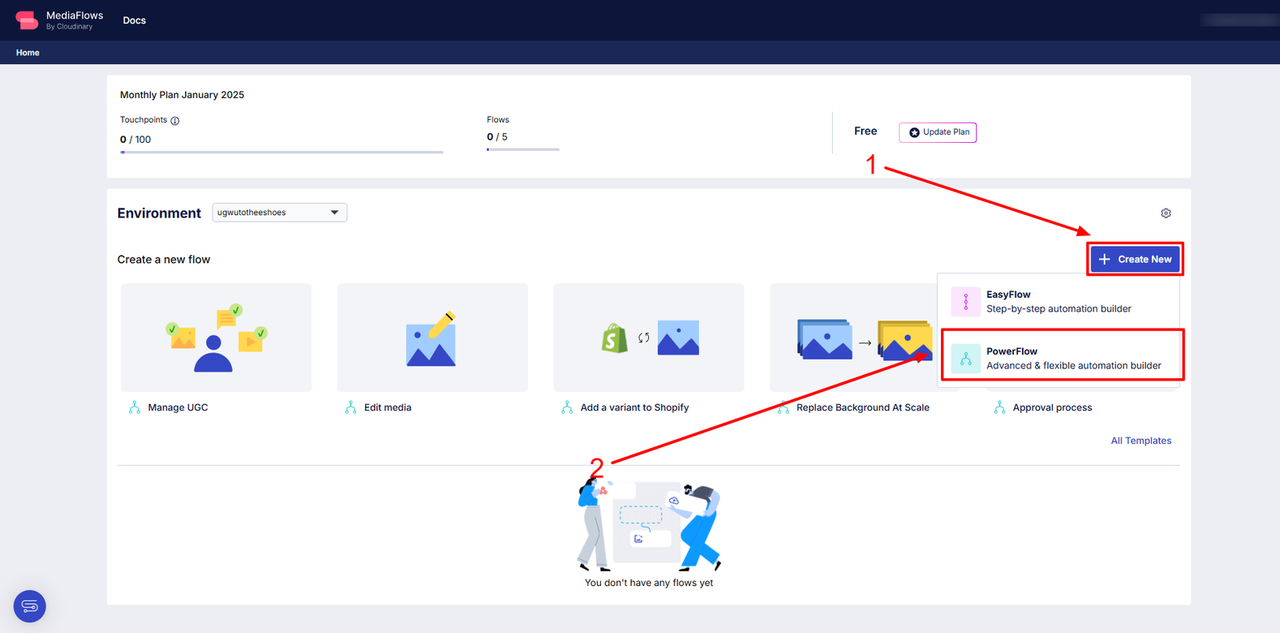
For this tutorial, you’ll be using PowerFlows. Here’s how you can use MediaFlows to automate your videos:
To start using MediaFlows, make sure you’re logged in to your Cloudinary account. Click the MediaFlow icon in the top left corner of your dashboard. Then click + Create New, and select PowerFlow. This will open a visual editor where you can design, test, and deploy automation workflows without writing any code.
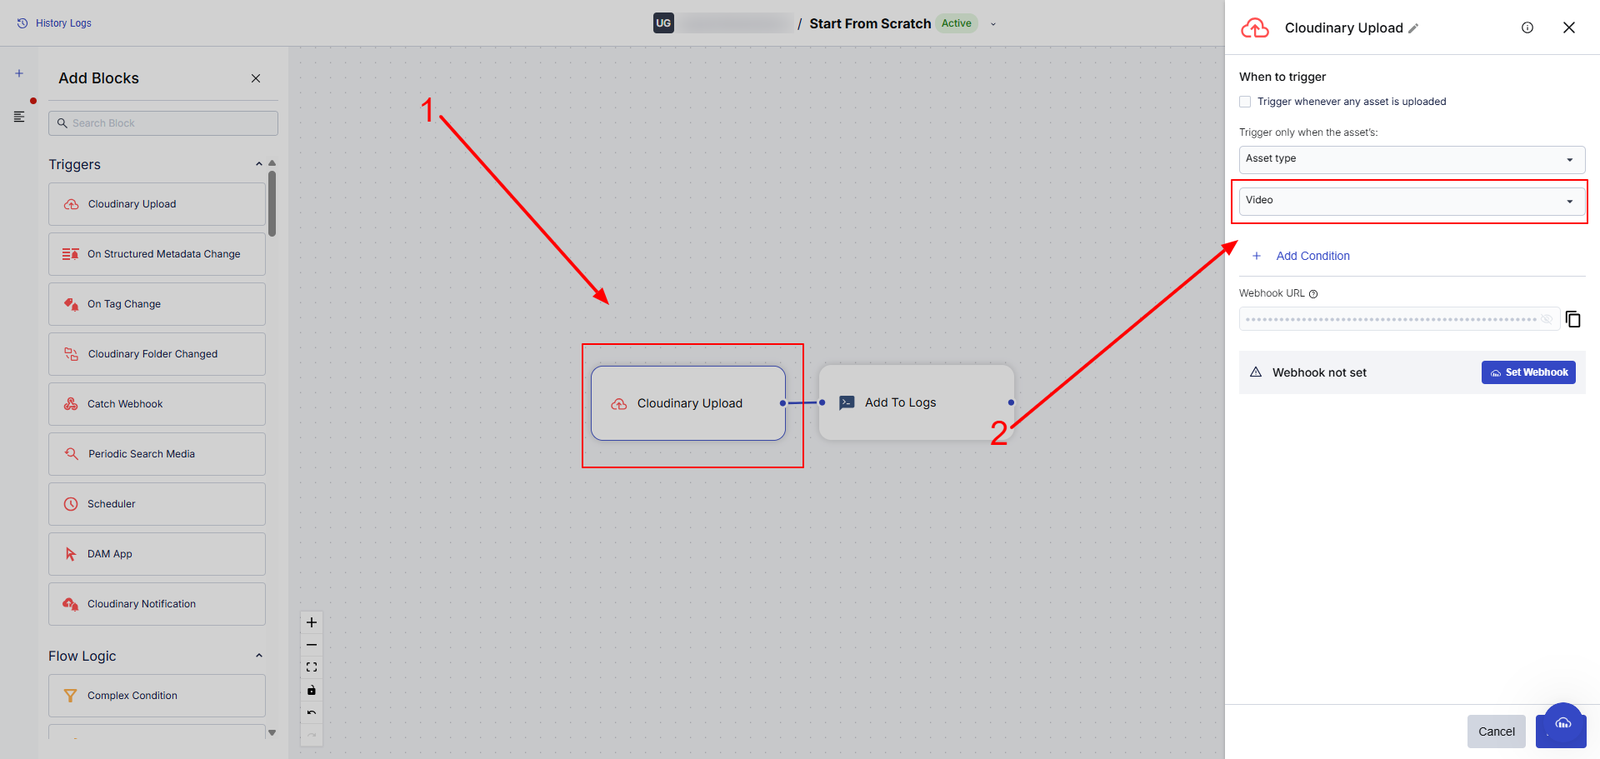
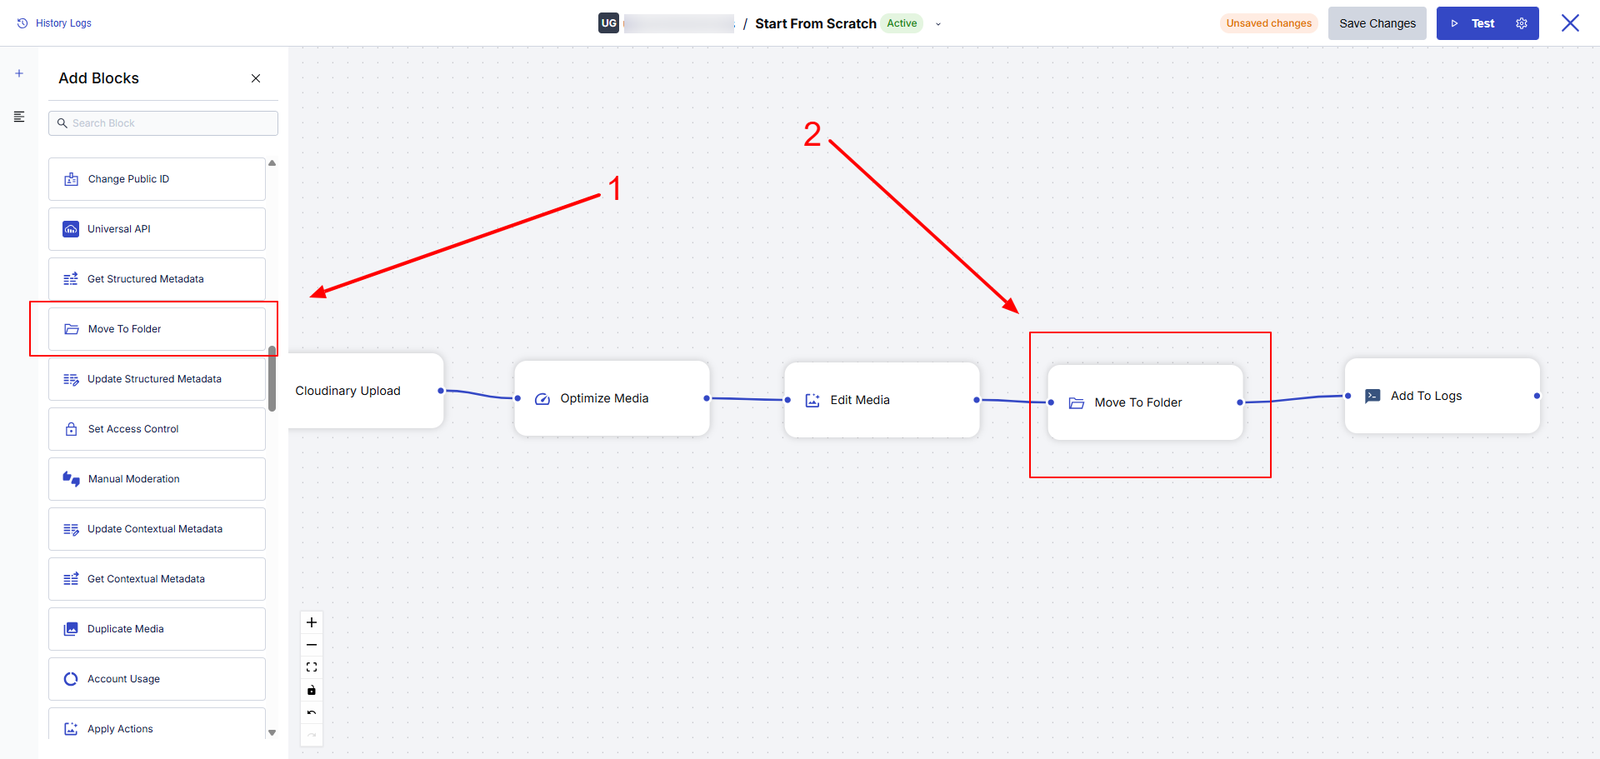
Next, drag the Cloudinary Upload block to the workspace and configure it to accept video files. This block will listen for new uploads.
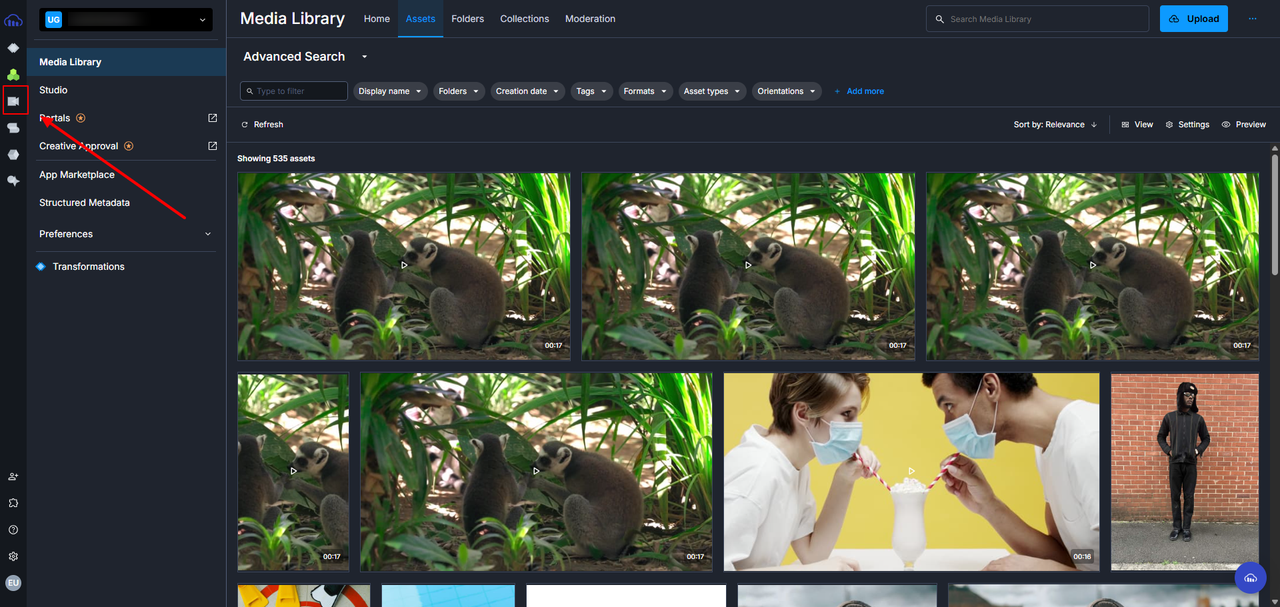
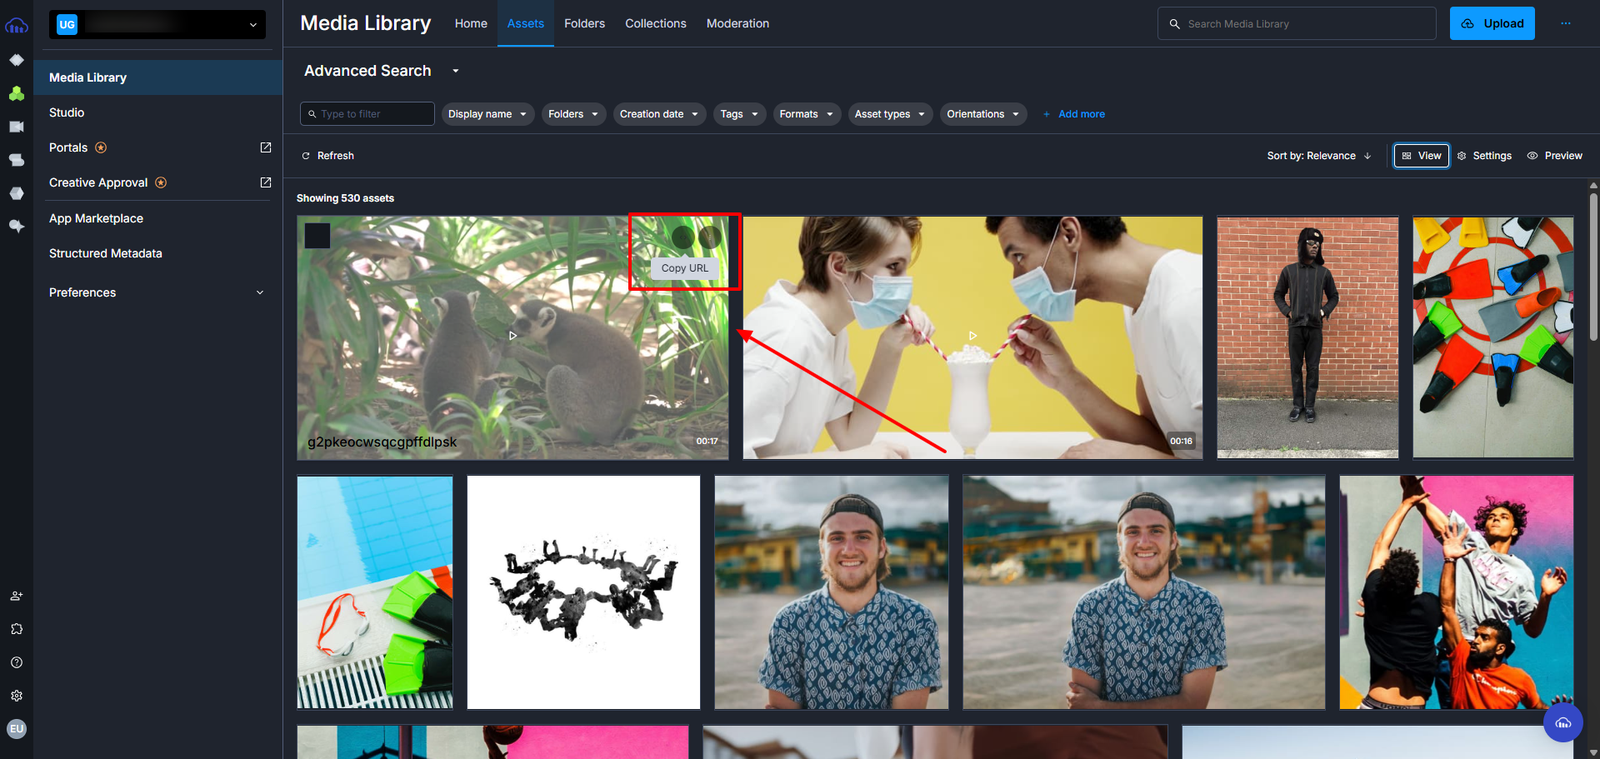
Then, grab a video from your Cloudinary Media Library and copy its URL. This will serve as your sample video for the automation process.
Head back to MediaFlows. In the top-right corner, click the Settings tab, and paste the video URL you copied earlier.
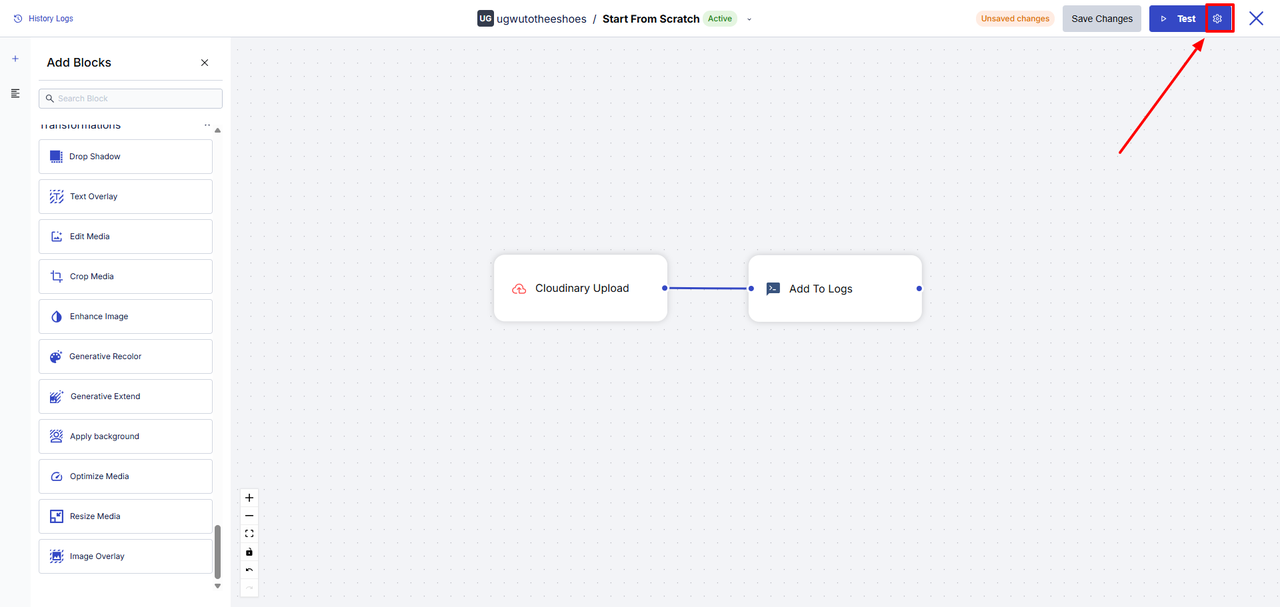

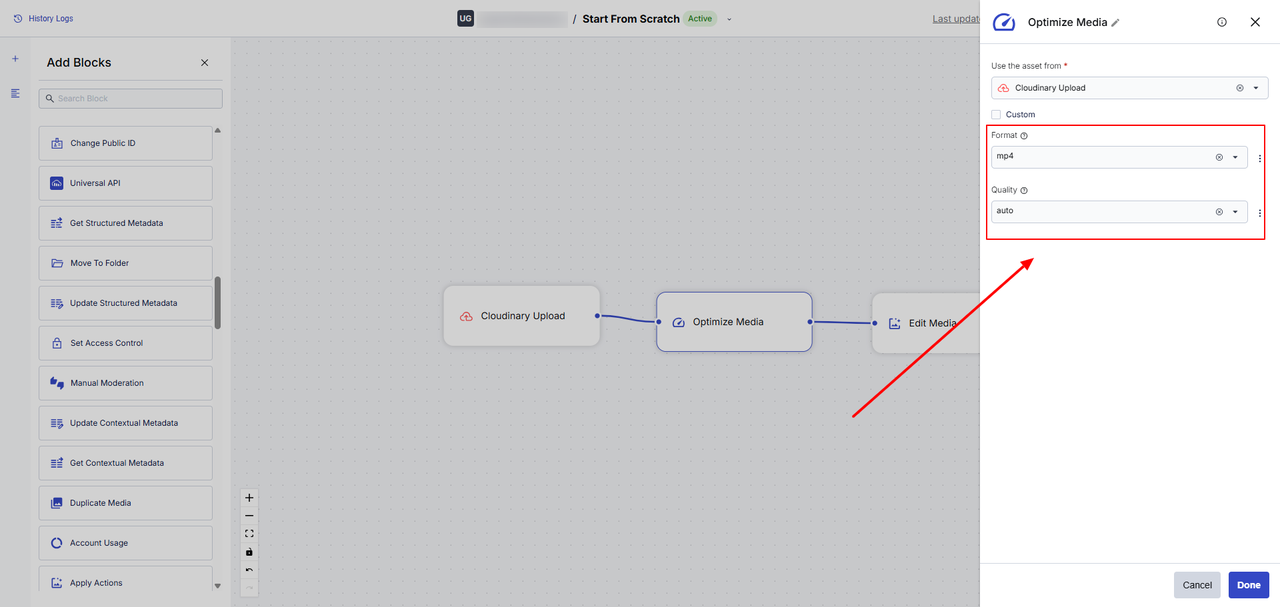
Next, drag the Optimize Media and Edit Media blocks to your workspace and link them both to the Cloudinary Upload block. Configure the Optimize Media block to optimize video quality and file size automatically. Then, configure the Edit Media block to crop the video to fit Instagram’s aspect ratio. This will create an Instagram Reels–optimized version of your video. The most important part of the cropping process is ensuring that key details (such as a subject’s face or a focal object) in the video fit the aspect ratio.

From the Add Blocks sidebar, drag and drop the Move To Folder block onto the canvas. Then, link it to your Edit Media block.
With the Move To Folder block, you can dynamically move videos into relevant folders within your Cloudinary account, grouping content by topic, format, campaign, or platform. Next, configure it to define the destination folder path, like:
- social media/instagram/
- library/tutorials/
- products/nature/
To keep things organized, create a new folder specifically for each of your social media platforms. Once the video is uploaded, Cloudinary stores it in the new folder.
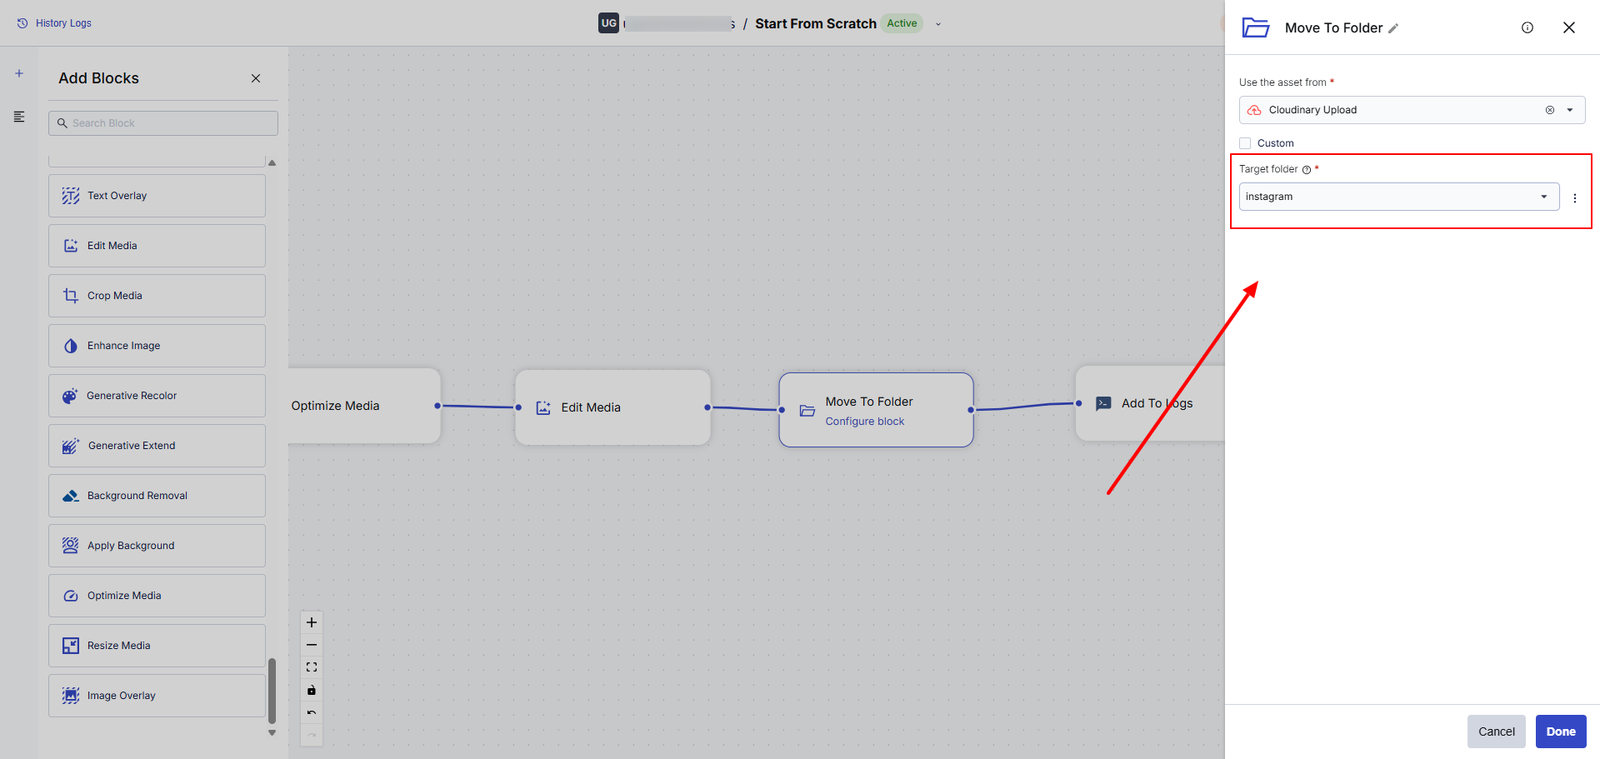
Next, click the Test button in the top-right corner. Cloudinary will optimize your video for Instagram and place it directly into your designated folder.
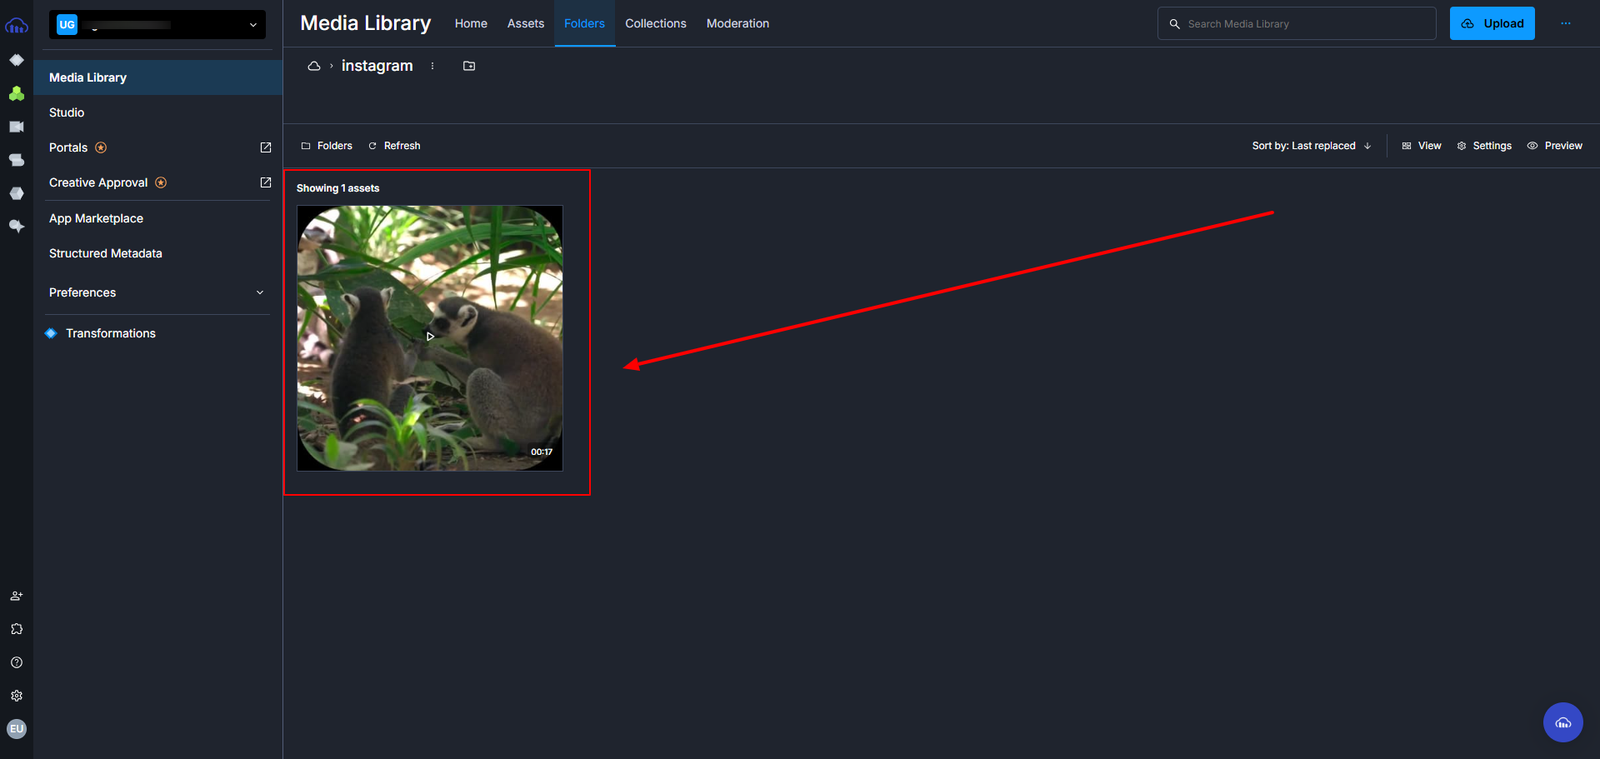
This enables every incoming video to be processed and organized into a logical structure, making your media library easier to navigate and more scalable for teams working across various content types or channels. By this point, every video in your pipeline is:
- Optimized for performance using MediaFlows blocks.
- Visually tailored for each platform.
- Automatically categorized into folders for easy access and contextual organization.
Once you’ve built your first PowerFlow, you can easily repurpose it for future video campaigns.
For example, you can:
- Change the destination folder to reflect a new platform (e.g., social-media/youtube/).
- Modify the same flow for different aspect ratios, languages, or branding variations.
This makes scaling multichannel video delivery not only possible but fast, reliable, and repeatable.
Delivering platform-ready video content shouldn’t require hours of repetitive editing or a patchwork of manual exports. Whether you’re managing TikToks, YouTube content, Instagram Reels, or educational videos across multiple channels, Cloudinary lets you scale video production without increasing complexity.
Sign up on Cloudinary and start using a single API to automate video formatting, optimize aspect ratios, and organize your content pipeline across every platform.

