How Do You Resize Images in Java?
Java is a widely used object-oriented programming language initially designed for distributed enterprise applications. Today, it plays a key role in mobile development, particularly as the programming language for Android smartphone apps. Java is also commonly used in edge devices and Internet of Things (IoT) development.
Resizing an image involves adjusting its pixel dimensions, either by removing pixels to reduce its physical size or by adding pixels, which can lead to a loss of image quality. If the resizing operation alters the aspect ratio, it will distort the image, causing it to “squeeze” out of its original proportions.
Java provides several techniques for programmatic bulk image resize, including the getScaledInstance() method and the Graphics2D class. We’ll also show how to use Cloudinary to resize images in Java while automatically adjusting the image to focus on objects of interest.
In this article, we cover the following techniques to resize images in Java:
- Resizing an Image Using BufferedImage.getScaledInstance()
- Resizing an Image Using Graphics2D
- Automatically Resize and Crop Images in Java with Cloudinary
Techniques to Resize Images in Java
Resizing an Image Using BufferedImage.getScaledInstance()
You can resize an image in Java using the getScaledInstance() function, available in the Java Image class. We’ll use the BufferedImage class that extends the basic Image class. It stores images as an array of pixels.
First, we import the necessary Java libraries:
import javax.imageio.ImageIO;
import javax.swing.*;
import java.awt.*;
import java.awt.image.BufferedImage;
import java.io.File;
import java.io.IOException;
To read an image from the file system, we create an object from the BufferedImage class and use the ImageIO.read() method. The File() method calls the constructor of the File class, taking the path of the image as an argument.
BufferedImage bufferedImage = ImageIO.read(new File("C:\\example.png"));
We now have a new object containing the image, which provides the getScaledInstance() method, which we can use to get a resized version of the image. The method takes the following arguments:
- Target width in pixels after resizing
- Target height in pixels after resizing
- Image scaling algorithm (if you don’t have a special preference, you can use Image.SCALE_DEFAULT which uses the default sampling algorithm)
Here is how to scale the source image to 800 x 500 pixels:
Image image = bufferedImage.getScaledInstance(800, 500, Image.SCALE_DEFAULT);
Note that this operation scales the bufferedImage object in memory, but does not save the resized image to the file system, and also does not display the image.
Let’s display the resized image using a JFrame. We’ll set the layout to FlowLayout, which arranges components in the JFrame from left to right. We will also set the size of the JFrame to be larger than the image, ensuring that it is displayed in its entirety.
ImageIcon icon = new ImageIcon(image);
JFrame frame = new JFrame();
frame.setLayout(new FlowLayout());
frame.setSize(1200, 800);
The last step is to display the image to the user. We’ll do this using a JLabel object, adding the JLabel to the frame and setting visibility to true.
JLabel jLabel = new JLabel();
jLabel.setIcon(icon);
frame.add(jLabel);
frame.setVisible(true);
frame.setDefaultCloseOperation(JFrame.EXIT_ON_CLOSE);
Resizing an Image Using Graphics2D
Another option for resizing an image in Java is the Graphics2D class. This class extends the Graphics class and provides fine-grained control over geometry, coordinate transformations, and color management for 2-dimensional shapes and images.
Here are the required imports:
import javax.imageio.ImageIO;
import java.awt.*;
import java.awt.image.BufferedImage;
import java.io.File;
import java.io.IOException;
Like in the previous example, we use ImageIo.read() and the File() method to read the image from the file system and store it as a BufferedImage object:
BufferedImage bufferedImage = ImageIO.read(new File("C:\\example.png"));
We create another object that will store the resize operation result:
BufferedImage bufferedImageResult = new BufferedImage(
        resizeWidth,
        resizeHeight,
        bufferedImage.getType()
);
Now it’s time to use the g2d class. We’ll call the createGraphics() method, passing the bufferedImageResult object. This returns a g2d (Graphics2D) object.
Graphics2D g2d = bufferedImageResult.createGraphics();
We can now use the drawImage() function on the g2d object, which takes the following arguments:
- A BufferedImage object
- X and Y coordinates. For a resize operation, these should be set to 0.
- The new height and width after resizing.
- ImageObserver – handles notifications of image loading; not needed in this case and can be left as null.
The code looks like this:
g2d.drawImage(
        bufferedImage,
        0,
        0,
        resizeWidth,
        resizeHeight,
        null
);
We use the following command to dispose of context and resources used by g2d, which are not necessary for the next steps:
g2d.dispose();
Finally, we save the resized image in the local directory using the ImageIo.write() function.
String formatName = imagePathToWrite.substring(
        imagePathToWrite.lastIndexOf(".") + 1
);
ImageIO.write(
        bufferedImageResult,
        formatName,
        new File(imagePathToWrite)
);
Automatically Resize and Crop Images in Java with Cloudinary
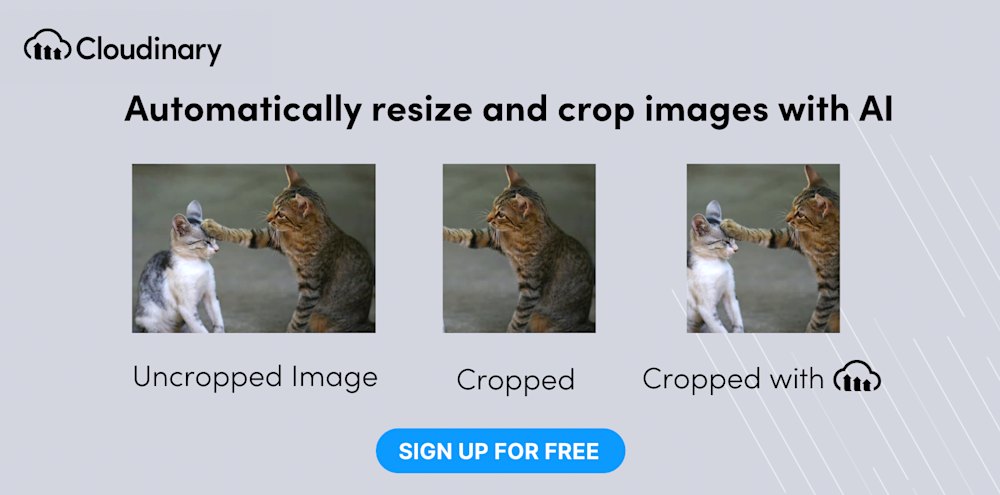
Cloudinary, a cloud-based service for managing images and videos, offers a generous free-forever subscription plan. On this platform, you can upload your images, apply built-in effects, filters, and modifications. You can also automatically resize images, focus on the most important elements using AI, or adapt them to your website design without the need to manually crop or scale them.
You can set the target dimensions of your resized image by specifying width, height, and/or the target aspect ratio as qualifiers of your resize transformation.
You can change the dimensions of an uploaded image by setting the image’s height, width, and/or aspect ratio, and Cloudinary automatically resizes or crops the image to fit into the requested size.
For example, this original image is 1200 x 1200 pixels:

Resizing the image to 200 x 200 pixels, using crop, scale, fill and pad results in the following images:

Get started with automated resize and cropping today!
- Get a free Cloudinary account
- Install the Java SDK
- Deliver the crop transformations shown above as follows:
# focus on the model in portrait crop
cloudinary.url().transformation(new Transformation().height(200).width(200).crop("crop")).imageTag("https://res.cloudinary.com/demo/image/upload/docs/model.jpg");
# detect the face for thumbnail crop
cloudinary.url().transformation(new Transformation().height(200).width(200).crop("crop")).imageTag("https://res.cloudinary.com/demo/image/upload/docs/model.jpg");
# crop to a banner automatically focusing on region of interest
cloudinary.url().transformation(new Transformation().aspectRatio("2.5").width(450).crop("crop")).imageTag("https://res.cloudinary.com/demo/image/upload/docs/model.jpg");

