
I’ve worked on enough campaigns to know that when a team produces one great video, the next step is creating a version for TikTok, YouTube, Instagram, LinkedIn, email, landing pages, etc. In content marketing, this is referred to as video repurposing or content recycling.
On paper, reusing a video should be a quick process. You already have the content, so you just tweak it for each channel, right? In reality, it’s just time-consuming.
It’s not that the edits are hard, but they’re repetitive. That pushed me to rethink the whole process and build what I now call my “one API, many outputs” setup. It’s not a fancy in-house platform. It’s just using Cloudinary’s Video API to automate your post-production video workflow.
In this post, you’ll learn how to set up the same video workflow using Cloudinary’s Video API, so you can turn one master video into a full set of ready-to-publish assets in minutes.
When I say “one API, many outputs,” I’m referring to a setup where a single master video can be converted into every social media format, without the need to open a video editor even once.
Here’s how the process works:
- You upload the master file to Cloudinary. That’s the only manual step.
- As soon as the master video is uploaded into Cloudinary, the API automatically generates the different versions you’ve defined.
- Each version is cropped, branded, captioned, and optimized in the same pass.
- The final variants are instantly available via URLs you can drop into your CMS, DAM, or embed directly on a landing page.
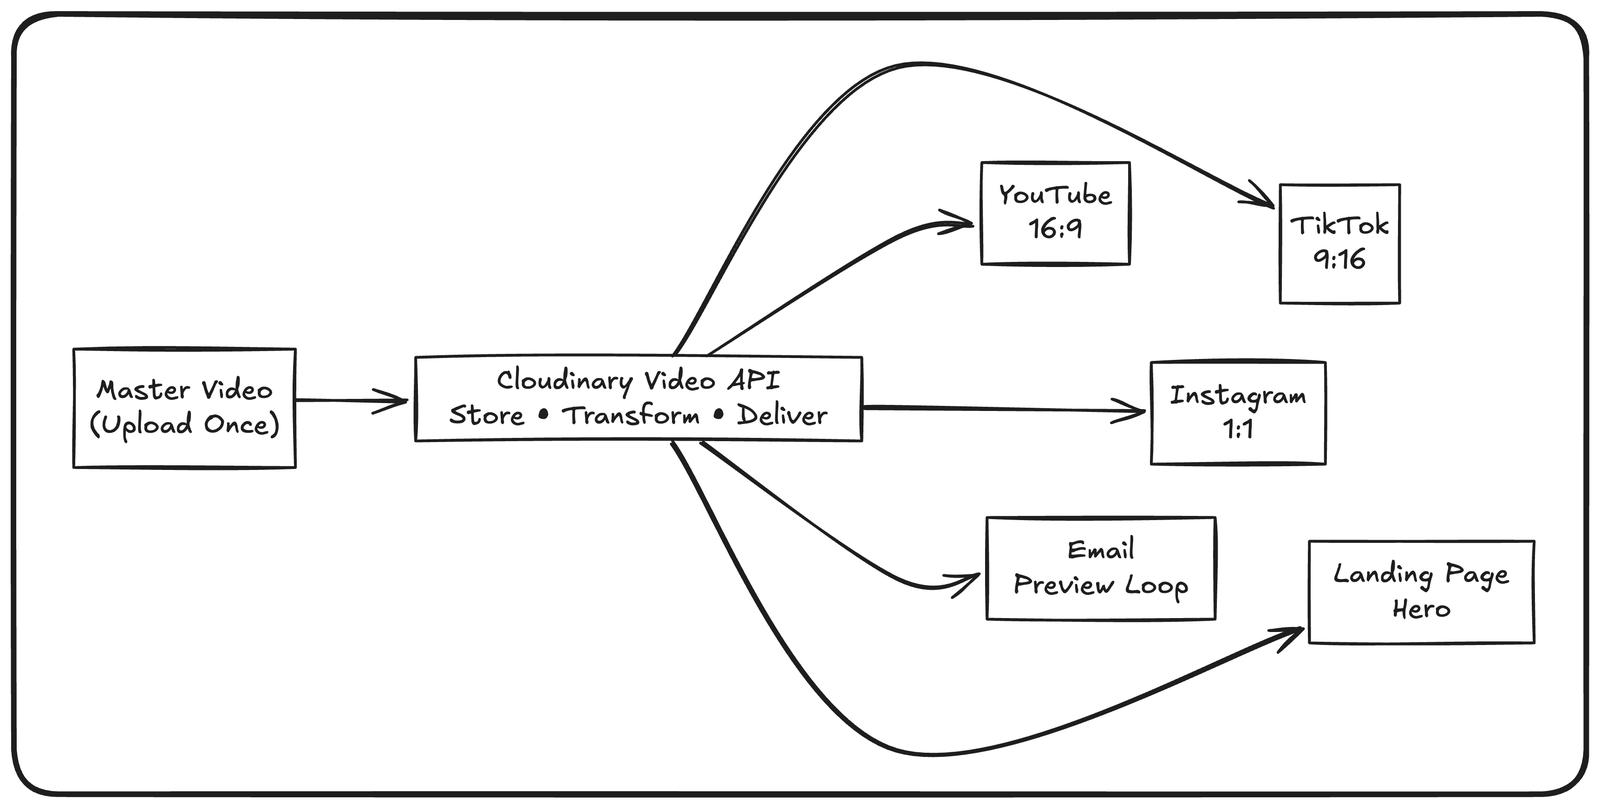
The key is that Cloudinary’s Video API isn’t just a converter. It stores the original file, applies multiple transformations (crop, overlay, trim, format, and quality settings) in real time or upon upload, and delivers them through a CDN.
The system doesn’t care if you need three formats or 30. It just follows the rules you’ve set. So, instead of “export, tweak, upload” for each platform, it’s “upload once, use anywhere.” That’s the foundation this workflow is built upon.
Before variants can be created, a master video must be uploaded to Cloudinary. You can use the Cloudinary Node.js SDK, which can be installed with the command: npm install cloudinary
Cloudinary provides SDKs for many backend and frontend languages, so you don’t have to use Node.js if that’s not part of your stack.
After installing the SDK, you’ll need three credentials: Cloud Name, API Key, and API Secret. These are found in your Cloudinary dashboard under the Settings page:
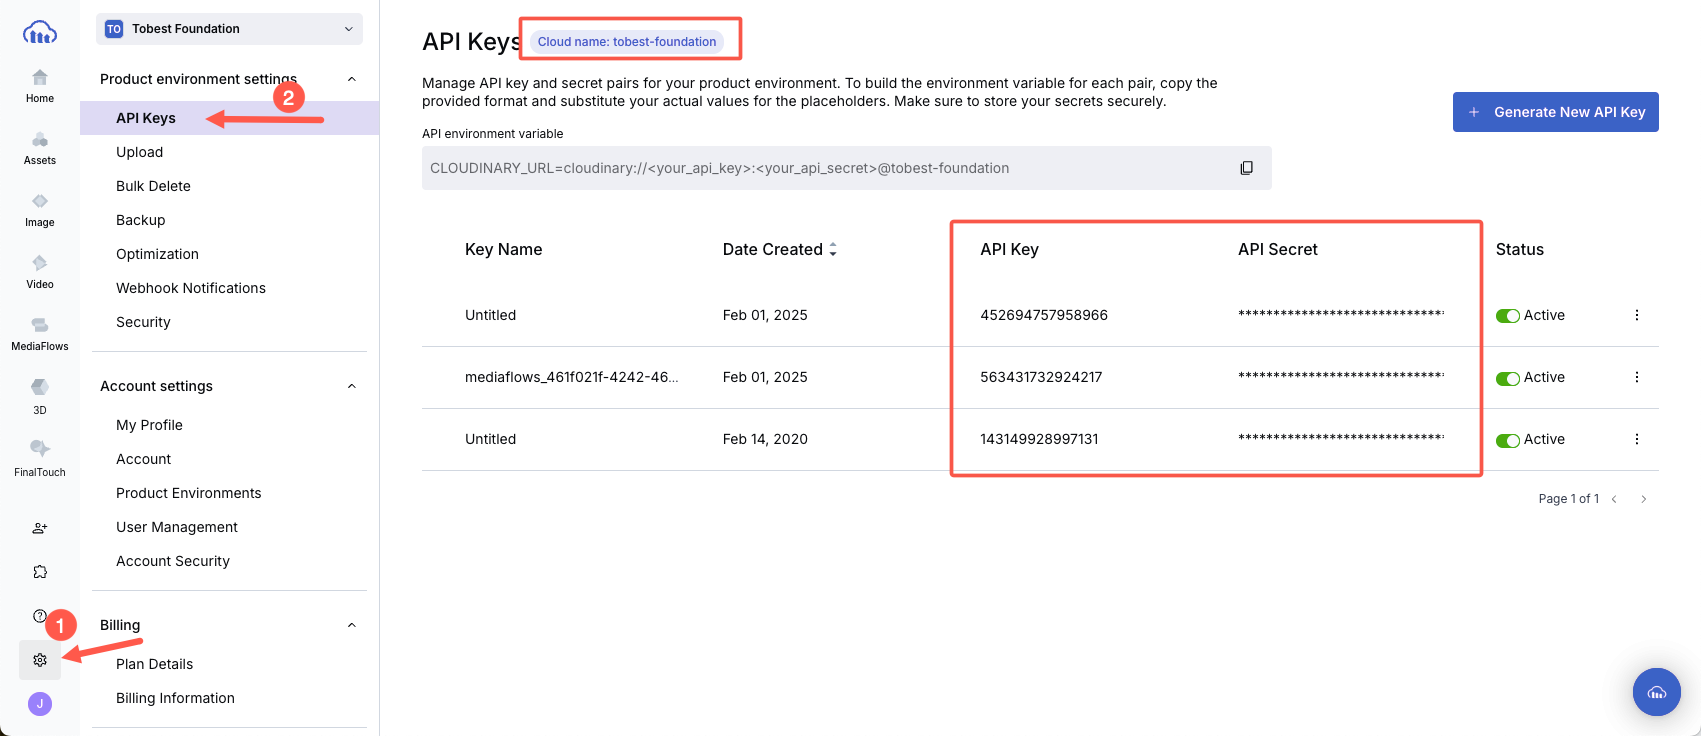
Pull them into a .env file so they don’t end up hardcoded in your scripts:
CLOUDINARY_CLOUD_NAME=your_cloud_name

CLOUDINARY_API_KEY=your_api_key

CLOUDINARY_API_SECRET=your_api_secret Here’s what your project folder should look like:
video-pipeline/

├─ assets/

│  └─ master_video.mp4        # your source video

├─ .env                       # your Cloudinary secrets (never commit)

├─ package.json

└─ scripts/

   └─ upload.js               # the code you showedCode language: PHP (php)
In package.json, enable ES modules and add a run script:
{

  "type": "module",

  "scripts": { "upload": "node scripts/upload.js" }

}Code language: JSON / JSON with Comments (json)
Then, install the dependencies:
<code>npm install cloudinary dotenv</code>Code language: HTML, XML (xml)Finally, you can use this upload script in scripts/upload.js:
import { v2 as cloudinary } from 'cloudinary';

import 'dotenv/config'; // loads .env

// Configure Cloudinary from environment variables

cloudinary.config({

  cloud_name: process.env.CLOUDINARY_CLOUD_NAME,

  api_key: process.env.CLOUDINARY_API_KEY,

  api_secret: process.env.CLOUDINARY_API_SECRET,

});

async function uploadVideo() {

  try {

    const result = await cloudinary.uploader.upload(

      "assets/master_video.mp4", // Path to your video file

      {

        resource_type: "video",             // Must be "video" for video uploads

        public_id: "campaign/master_video", // Optional: specify folder and name

      }

    );

    console.log("Upload successful:", result);

  } catch (error) {

    console.error("Upload failed:", error);

  }

}

uploadVideo();Code language: JavaScript (javascript)
Run it with: npm run upload
This runs the code and uploads the master video. Every transformation points back to the same public_id, which is the foundation for generating all variants.
Let’s now explore five variants you will most likely need to repurpose your video across different channels, and how to set them up with Cloudinary.
Every platform has its preferred aspect ratio, and getting this right is a key part of video repurposing for social media. Cloudinary’s c_fill and g_auto use content-aware cropping to automatically detect and keep the subject in focus while fitting it into the target ratio.
From one master video, you can generate all your social-friendly formats with a few simple transformation URLs, like so:
// TikTok 9:16

const tiktokUrl = cloudinary.url("campaign/master_video", {

  resource_type: "video",

  transformation: [

    { aspect_ratio: "9:16", crop: "fill", gravity: "auto" },

    { quality: "auto", fetch_format: "auto" }

  ]

});

// YouTube 16:9

const youtubeUrl = cloudinary.url("campaign/master_video", {

  resource_type: "video",

  transformation: [

    { aspect_ratio: "16:9", crop: "fill", gravity: "auto" },

    { quality: "auto", fetch_format: "auto" }

  ]

});

// Instagram 1:1

const instagramUrl = cloudinary.url("campaign/master_video", {

  resource_type: "video",

  transformation: [

    { aspect_ratio: "1:1", crop: "fill", gravity: "auto" },

    { quality: "auto", fetch_format: "auto" }

  ]

});

console.log(tiktokUrl);

console.log(youtubeUrl);

console.log(instagramUrl);Code language: JavaScript (javascript)
Here’s what the TikTok output looked like:
https://res.cloudinary.com/<cloud_name>/video/upload/ar_9:16,c_fill,g_auto,q_auto,f_auto/campaign/master_video.mp4Code language: HTML, XML (xml)On platforms where videos autoplay with sound muted, captions have been crucial for both engagement and accessibility in my projects. Instead of manually transcribing every clip, you can use Cloudinary’s AI transcription add-ons.
For example, here’s how to use the Google AI Video Transcription add-on to generate a WebVTT (.vtt) file at upload time:
await cloudinary.uploader.upload("assets/master_video.mp4", {

  public_id: "campaign/master_video",

  resource_type: "video",

  raw_convert: "google_speech:vtt" // generate WebVTT subtitles

});Code language: JavaScript (javascript)
By adding :vtt to the raw_convert parameter, Cloudinary creates a .vtt file alongside your master video. Once transcription is complete, you’ll have campaign/master_video.google.vtt ready to use automatically.
When you want captions burned directly into the video (for TikTok or ad placements), overlay them with a transformation:
const videoWithSubs = cloudinary.url("campaign/master_video", {

  resource_type: "video",

  transformation: [

    { overlay: "subtitles:campaign/master_video.google.vtt" },

    { flags: "layer_apply" }

  ]

});Code language: JavaScript (javascript)
The corresponding URL looks like this:
https://res.cloudinary.com/<cloud_name>/video/upload/l_subtitles:campaign/master_video.google.vtt/fl_layer_apply/campaign/master_video.mp4Code language: HTML, XML (xml)If you prefer to let users toggle captions on or off, simply deliver the .vtt file separately:
<video controls playsinline preload="metadata">

  <source src="https://res.cloudinary.com/<cloud_name>/video/upload/campaign/master_video.mp4" type="video/mp4">

  <track src="https://res.cloudinary.com/<cloud_name>/raw/upload/campaign/master_video.google.vtt" kind="subtitles" srclang="en" label="English" default>

</video>Code language: HTML, XML (xml)
This way, the video stays clean while captions remain available when needed.
For some campaigns, you may need more than just a static poster. A short teaser clip converts better, as people are more likely to watch a 10-second highlight and then tap through to the full video.
Instead of manually cutting previews for each platform, you can use Cloudinary’s e_preview effect to generate them automatically.
const previewUrl = cloudinary.url("campaign/master_video", {

  resource_type: "video",

  effect: "preview", // generates AI-selected preview

  quality: "auto",

  fetch_format: "auto"

});Code language: JavaScript (javascript)
This produces a short, AI-generated highlight reel from your master video, which is ready to embed:
<code><video src="https://res.cloudinary.com/<cloud_name>/video/upload/e_preview,q_auto,f_auto/campaign/master_video.mp4" controls playsinline loop muted preload="metadata"></video></code>Code language: HTML, XML (xml)For longer videos (like talks or tutorials), you can fine-tune the duration and segment length:
const customPreviewUrl = cloudinary.url("campaign/master_video", {

  resource_type: "video",

  effect: "preview:duration_15:max_seg_5:min_seg_dur_3",

  quality: "auto",

  fetch_format: "auto"

});Code language: JavaScript (javascript)
That configuration gives you a 15-second preview split into five segments of at least three seconds each. Feel free to check out Cloudinary’s great example on CodePen.
Sometimes the base video isn’t enough. In ad campaigns, you often need to layer in a call-to-action (“Shop Now”), a promo code, or a brand logo. Doing that with a video editor slows everything down as every small tweak means re-exporting and re-uploading.
Instead, you can layer text, images, or branding elements dynamically with Cloudinary’s transformation URLs. This allows you to test creative variations directly in the browser or your CMS, without another round of editing.
Here’s an example that places a “New Arrivals” text banner at the bottom of your video:
const overlayUrl = cloudinary.url("campaign/master_video", {

  resource_type: "video",

  transformation: [

    { overlay: "text:roboto_250_bold:New Arrivals", color: "black" },

    { gravity: "south", y: 0.15, flags: "layer_apply" }

  ]

});

console.log(overlayUrl);Code language: JavaScript (javascript)
That outputs a URL like this:
https://res.cloudinary.com/<cloud_name>/video/upload/l_text:roboto_250_bold:New%20Arrivals,co_black,fl_layer_apply,g_south,y_0.15/campaign/master_video.mp4Code language: HTML, XML (xml)Drop that into a <video> tag, and you’ve got a branded clip. To make it more engaging, animate your overlay with fade effects:
const animatedOverlayUrl = cloudinary.url("campaign/master_video", {

  resource_type: "video",

  transformation: [

    { overlay: "text:roboto_250_bold:New Arrivals", color: "black" },

    { duration: 7.5, effect: "fade:1000" }, // fade in over 1s

    { effect: "fade:-1000" },               // fade out over 1s

    { gravity: "south", y: 0.15, flags: "layer_apply" }

  ]

});Code language: JavaScript (javascript)
This creates a 7.5-second text overlay that animates in and out, making the call-to-action feel more engaging.
One of the biggest workflow wins comes from letting Cloudinary handle transcoding automatically. Normally, you’d have to export multiple versions of a video (MP4 for Safari, WebM for Chrome, HEVC for iOS, etc.). Instead, you can upload once, and Cloudinary will deliver the right format for each device and browser.
Add f_auto to your delivery URL to let Cloudinary choose the optimal codec (VP9, HEVC, H.264, AV1, etc.) on the fly:
const autoFormatUrl = cloudinary.url("campaign/master_video", {

  resource_type: "video",

  fetch_format: "auto"

});

console.log(autoFormatUrl);Code language: JavaScript (javascript)
This results in Chrome users getting VP9-encoded WebM, Safari getting HEVC-encoded MP4, and older browsers falling back to H.264, all from the same original asset.
You can pair this with q_auto for content-aware compression. Cloudinary analyzes the video and delivers the lowest bitrate that still looks sharp.
const optimizedUrl = cloudinary.url("campaign/master_video", {

  resource_type: "video",

  fetch_format: "auto",

  quality: "auto"

});Code language: JavaScript (javascript)
That one change consistently reduces file sizes by 20-40% without requiring manual bitrate adjustments.
For longer content or when bandwidth fluctuates, use Cloudinary’s adaptive streaming feature. Request an HLS (.m3u8) or DASH (.mpd) manifest with sp_auto to deliver multiple renditions at different bitrates automatically:
const hlsUrl = cloudinary.url("campaign/master_video.m3u8", {

  resource_type: "video",

  streaming_profile: "auto"

});Code language: JavaScript (javascript)
This means that a user with a fast connection might see 1080p or 4K, while someone with a slow mobile connection gets a lower-quality 480p stream, without you having to build or manage separate files.
Once the transformation logic worked in isolation, the next challenge was automating it as part of a larger content pipeline.
I didn’t want to manually call Cloudinary every time a video was added. The goal is to have the whole system triggered automatically by CMS or DAM events.
To make that happen, you can connect four key pieces: asset naming, transformation presets, webhooks or scheduled jobs, and caching + analytics. Here’s how each one fits in.
Start by giving every uploaded video a predictable public_id pattern.
<code>projectName/channelName/campaignName/assetSlug</code>Code language: HTML, XML (xml)This way, your CMS can reference the master asset by ID, and the delivery URLs can be constructed on the fly without needing to look anything up.
For example:
<code>marketing/tiktok/black-friday/sneaker-drop</code>Code language: HTML, XML (xml)From this ID alone, you can tell where it belongs and which transformation presets to apply. You can also attach metadata and tags at upload so non-dev tools can discover things:
await cloudinary.uploader.upload("assets/master.mp4", {

  resource_type: "video",

  public_id: "prod/brandx/black-friday/master",

  tags: ["campaign:black-friday", "brand:brandx", "type:master"],

  context: "alt=Black Friday master|owner=marketing|locale=en",

});Code language: JavaScript (javascript)Rather than hardcoding crop and overlay parameters everywhere, create named transformations in Cloudinary. This gives me one edit point when a platform specification changes.
Here’s an example of creating a named transformation:
import { v2 as cloudinary } from "cloudinary";

await cloudinary.api.create_transformation(

  "tiktok_vertical",                        // name you’ll use in URLs

  { transformation: [

      { aspect_ratio: "9:16", crop: "fill", gravity: "auto" }, // smart crop

      { effect: "preview:duration_6:max_seg_2:min_seg_dur_1" }, // teaser

      { overlay: "logo_main", flags: "layer_apply", gravity: "north_west", width: 200 },

      { color: "white", overlay: "text:Roboto_60_bold:Shop%20Now" },

      { flags: "layer_apply", gravity: "south", y: 30 }

    ]}

);Code language: JavaScript (javascript)
In your CMS, store only the public_id and the variant name. Then, when you render the asset, simply call:
https://res.cloudinary.com/<cloud_name>/video/upload/t_tiktok_vertical/<public_id>.mp4Code language: HTML, XML (xml)Now, when you change the preset in Cloudinary, every place that uses it updates instantly.
You can set up a webhook endpoint so that when a master video finishes uploading or an eager transformation completes, Cloudinary pings your backend:
app.post("/hooks/cloudinary", express.urlencoded({ extended: true }), (req, res) => {

  const { public_id } = req.body;

  cms.markAssetReady(public_id);

  ci.triggerBuild();

  res.sendStatus(200);

});Code language: PHP (php)
For recurring updates, such as swapping out overlays with new promotional text, schedule a nightly job that regenerates URLs for affected assets and sends a HEAD request to warm the CDN caches.
Cloudinary’s /v<timestamp>/ URL versioning handles cache-busting when assets change. Always deliver with f_auto,q_auto,sp_auto so devices get the best format and bitrate automatically:
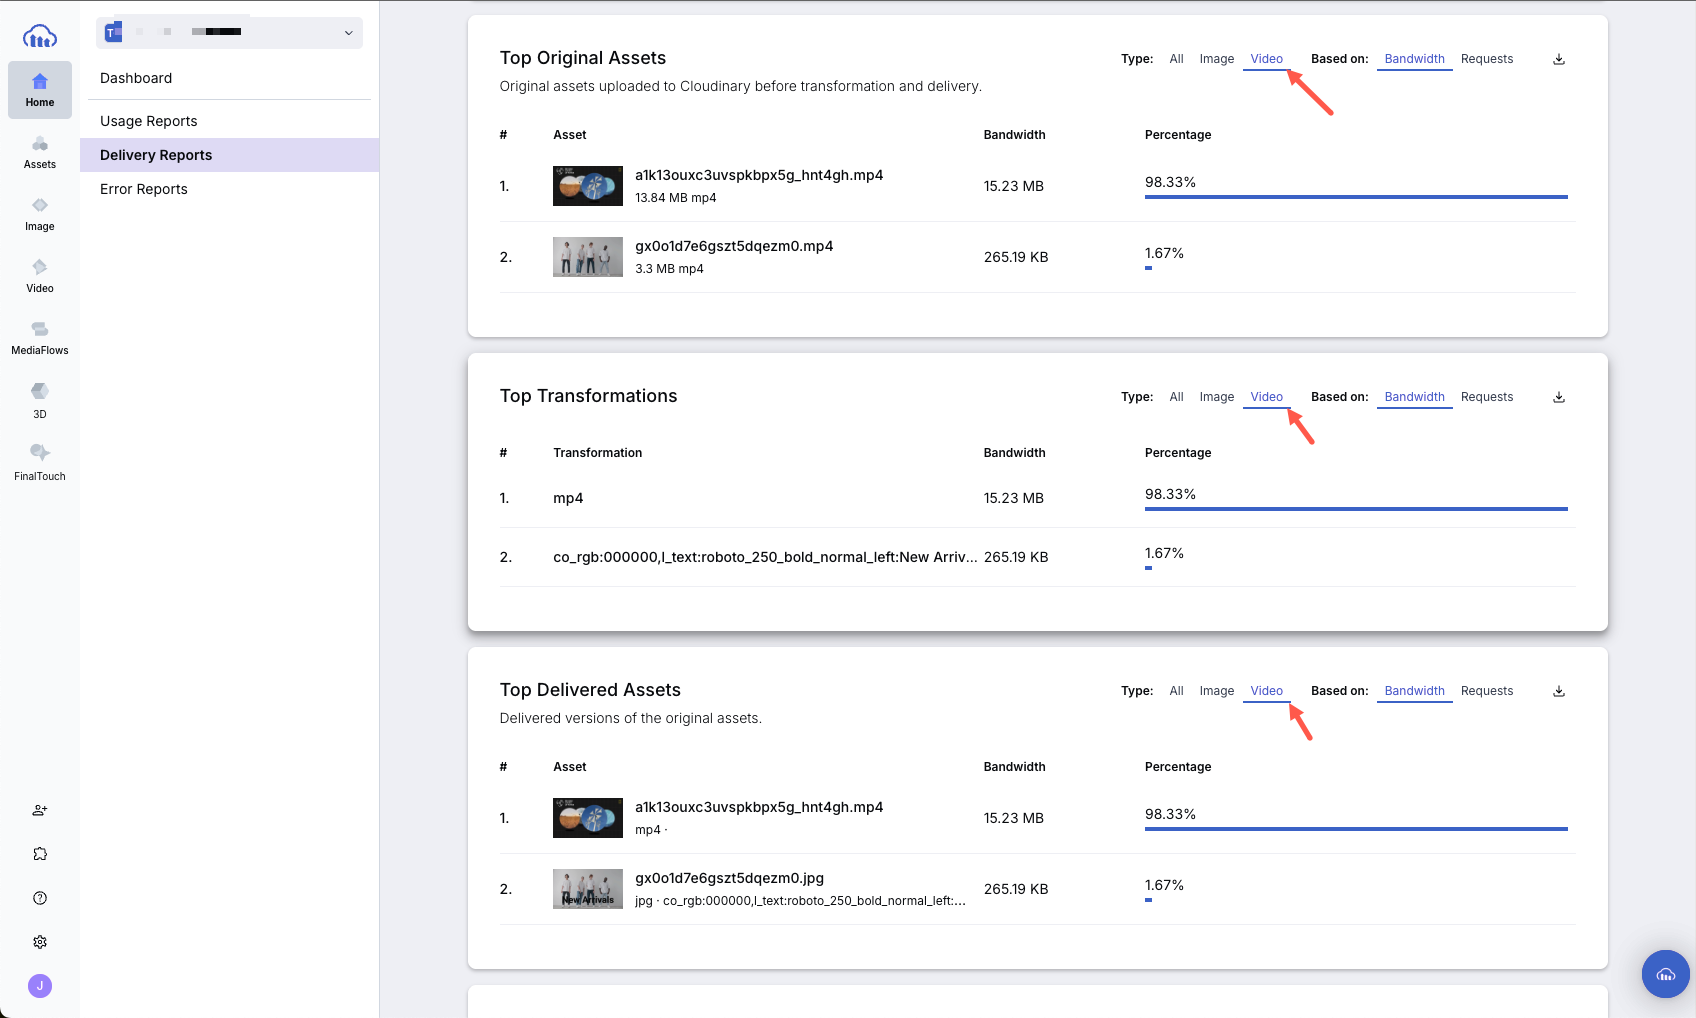
<code>.../video/upload/sp_auto,q_auto,f_auto/t_tiktok_vertical/<public_id>.m3u8</code>Code language: HTML, XML (xml)From there, you can use Delivery Reports to see which variants actually get watched and tie that data back to your CMS analytics to decide which presets to keep or drop.
Now that you’ve seen each piece separately, here’s how it all comes together in one transformation call.
Here’s an example that turns one master video into a platform-ready asset:
- Smart crop to 9:16 for vertical platforms.
- Add a “Shop Now” call-to-action overlay.
- Apply content-aware compression (
q_auto) and automatic format selection (f_auto). - Deliver as either MP4 or HLS for adaptive streaming.
const fullWorkflowUrl = cloudinary.url("campaign/master_video.m3u8", {

  resource_type: "video",

  transformation: [

    { aspect_ratio: "9:16", crop: "fill", height: 1280 },

    {overlay: { font_family: "Arial", font_size: 80, font_weight: "bold", text: "Shop Now" }, color: "#ffffff"},

    { duration: 7.5, effect: "fade:1000" },

    { effect: "fade:-1000" },

    { effect: "fade:-1000", duration: 7.5 },

    { gravity: "south", y: 0.15, flags: "layer_apply" },

    { quality: "auto", fetch_format: "auto" },

    { streaming_profile: "auto" }

  ]

});

console.log(fullWorkflowUrl);Code language: JavaScript (javascript)
This is what the MP4 URL looks like:
https://res.cloudinary.com/<cloud_name>/video/upload/ar_9:16,c_fill,h_1280,q_auto,f_auto/l_text:Arial_80_bold:Shop%20Now/co_rgb:ffffff/e_fade:1000/e_fade:-1000/du_7.5/fl_layer_apply,g_south,y_0.15/campaign/master_video.mp4Code language: HTML, XML (xml)With this one API call, the video is ready for any channel. This is the power of building a cross-channel video repurposing workflow with Cloudinary.
Faster turnaround, cleaner workflows, and videos that just work everywhere. What’s not to love? But to make it crystal clear, here are some standout wins of this cross-channel video repurposing system:
- Drastically reduced time-to-publish. No more manual cropping, re-exporting, and re-uploading for each platform. A single transformation call outputs all the versions you need in minutes, rather than hours or days.
- Consistent branding across formats. Logos, lower-thirds, watermarks, and call-to-action overlays appear identically on every variant, so your visual identity is preserved whether the video is on TikTok, YouTube, Instagram, or your own site.
- Better SEO through faster, mobile-ready video. Cloudinary’s automatic compression (
q_auto) and format optimization (f_auto) keep file sizes small and load times fast, which search engines reward. Mobile viewers also get versions tailored to their devices without extra work on your end. - Improved developer-marketer collaboration. Instead of passing video files back and forth, marketing teams can request changes (like an updated overlay or subtitle) that developers implement once in code. The system then automatically regenerates every variant, creating a scalable video content workflow.
- Built-in accessibility and localization. Subtitles, captions, and multi-language tracks can be added and baked into any variant, ensuring your content is inclusive and ready for global audiences from day one.
Repurposing video across channels doesn’t have to mean endless exports and edits. By automating transformations with Cloudinary’s Video API, you can publish faster, stay on brand, and scale creative output effortlessly.
Whether you’re a marketer looking to simplify video workflows or a developer integrating automation into your CMS, a “one API, many outputs” system gives you a repeatable, time-saving foundation. Contact us today to learn more.
Resources:


