
Developers often find themselves caught between two priorities: delivering high-quality, videos that autoplay to increase engagement and meeting performance goals for fast load times and strong Core Web Vitals. That tradeoff becomes hard to ignore when video makes up the largest share of page weight.
In 2022, video accounted for 82% of all internet traffic, but only 43% of websites met Core Web Vitals benchmarks. Over the past decade, average page sizes have increased by nearly 600 percent, and unoptimized video is a major reason.
This guide walks through how I used Cloudinary’s Video API and transformation tools to reduce video load times, cut bandwidth usage, and improve Largest Contentful Paint (LCP), all without sacrificing visual quality.
Here’s what the optimized implementation delivered:
- 67% reduction in video load times.
- 45% improvement in LCP.
- 52% less bandwidth usage.
If you’re working on video-heavy websites or applications, measurable optimization can improve the user experience. During my tests, I found that using the Cloudinary Video API and taking advantage of its built-in transformation tools helped videos load faster and improved page performance overall. That’s a big win for most projects.
Web projects have grown complex and larger in size over the past decade. As customers continue to demand rich video experiences, software teams often don’t have the resources for optimizing that content. Video content can represent 60% of page size and, if not properly optimized, it can bottleneck performance.
My experience using the Cloudinary API to optimize video content addresses three critical questions that developers hear constantly:
- What’s the measurable impact on Core Web Vitals?
- Can automated optimization maintain visual quality while reducing bandwidth?
- How do you prove ROI to justify video optimization investment?
To answer these questions and measure the results, I first needed to set up a testing framework. In the next section, we’ll go through an overview of the project’s baseline performance and how it improved using the Cloudinary API and its available video optimization options.
To understand the real impact of video optimization, I ran a series of performance tests and tracked key metrics. Here’s a brief summary of how the setup was done and the tools used to measure results.
For the testing, I combined PageSpeed Insights and Lighthouse. PageSpeed Insights measures Core Web Vitals, which directly impact the user experience. These analyses tend to give you better insight into a website’s overall performance, rather than just its loading time. With Lighthouse, we can test applications using the PageSpeed Insights service from the command line.
First, I set up a baseline using Cloudinary’s standard video delivery, without optimizations. This way, I could measure the impact of each transformation:
<!-- Baseline: No optimization -->

<video controls width="1280" height="720">

  <source src="https://res.cloudinary.com/demo/video/upload/sample-video.mp4" type="video/mp4">

</video>Code language: HTML, XML (xml)- File Size: 11.3MB
- LCP: 4.2 seconds
- Load Time: 6.8 seconds
- Bandwidth: Full original resolution
This is the video I used for testing with a basic web page and PageSpeed Insights for performance testing:
To give some context, here are the results from one of the test runs using Lighthouse:

With the baseline results in place, it was time to start applying some of the Cloudinary optimization parameters systematically:
<!-- Optimized: Full optimization stack -->

<video controls width="1280" height="720" loading="lazy">

  <source src="https://res.cloudinary.com/demo/video/upload/q_auto:good,f_auto,br_1000k,w_1280,c_limit/sample-video" type="video/mp4">

</video>Code language: HTML, XML (xml)
Here’s a quick overview of what each of these parameters does:
q_auto:good. This parameter helps you apply intelligent quality compression. Cloudinary applies video compression automatically depending on the video content and the browser where it’s being reproduced.f_auto. Automatic format selection changes the format in which Cloudinary serves video content (WebM, HEVC, H.264) depending on the end browser and bandwidth.br_1000k. A video’s bitrate is the amount of data used per second to compress and display a video. Higher bitrates translate to better quality and a smoother playing experience, but they can also cause stuttering if the user’s device and/or internet connection can’t handle them.w_1280,c_limit. This parameter helps to set responsive sizing for the video. This is important to make video content display better on mobile devices.loading="lazy". Lazy loading makes it so that if the video content is below the fold (i.e., if it’s not the part of the website that you see right away when you open a URL), it doesn’t load immediately. This helps the browser prioritize the content that users see first.
All of that takes only a few lines of code, and you can reuse a lot of those parameters across the videos you want to serve. Cloudinary not only serves the video content, but it can also optimize it dynamically with the right parameters (f_auto, for example).
Overall, the data shows that using the Cloudinary API to deliver video content can significantly reduce loading times and the strain on your servers. Let’s take a look at the results, first in terms of Core Web Vitals, and then bandwidth and loading metrics.
Core Web Vitals are a fantastic way to measure overall page performance and user experience. Poor Core Web Vitals directly correlate with a worse user experience, and in this case, videos that load slowly and affect page performance.
| Metric | Baseline | Optimized | Improvement |
| LCP (Largest Contentful Paint) | 4.2s | 2.3s | 45% faster |
| FID/INP (Interaction to Next Paint) | 180ms | 120ms | 33% faster |
| CLS (Cumulative Layout Shift) | 0.12 | 0.05 | 58% more stable |
| Overall Performance Score | 52 | 78 | 50% improvement |
Using the Cloudinary API to serve video content and optimize it dynamically significantly improved Core Web Vitals during my testing. In other words, content loads faster and without impacting other elements on the page.
Core Web Vitals offer a great way to measure the user experience, but they don’t tell us how fast video loads. In this section, you can see the original file size of the video included in the test page and its loading time:
| Optimization | File Size | Load Time | Bandwidth Saved | Visual Quality |
| Baseline | 11.3MB | 6.8s | – | Original |
q_auto only | 8.9MB | 4.9s | 28% | Visually identical |
q_auto + f_auto | 7.2MB | 3.8s | 41% | Visually identical |
| Full optimization | 5.9MB | 2.2s | 52% | Visually identical |
The Cloudinary Video API offers a lot of options for optimization. To get a better sense of their impact, I implemented them one by one and measured the performance improvements. While doing that, I compared the resulting videos side by side with the original to see if I could spot any differences. There was no noticeable drop in quality for each optimization.
To better understand how the Cloudinary video API works, let’s go through each of the optimization parameters that I used in the earlier tests. For each parameter, I’ll explain how it works, how to configure it, and what kind of performance improvements you can expect to see if you implement it.
You can use MediaFlows to automate some optimization workflows for video content. However, the Video API gives you more control (and options) than using MediaFlows.
// quality options:

// - "auto:eco"  → Aggressive compression

// - "auto:good" → Balanced size and quality (recommended)

// - "auto:best" → Highest quality, larger file size

const optimizedUrl = cloudinary.url("sample-video", {

  quality: "auto:good",

});Code language: JavaScript (javascript)
What this translates to: Applying this transformation results in an average 28% reduction in file size, with no noticeable drop in quality (verified by a second pair of eyes). Cloudinary’s algorithm adapts to video content. Static scenes compress more aggressively than high-motion sequences.
const responsiveUrl = cloudinary.url("sample-video", {

  quality: "auto:good",

  fetch_format: "auto",  // Serves WebM, HEVC, or H.264 based on browser

});Code language: JavaScript (javascript)
What this translates to: This transformation results in an average 13% file size reduction beyond quality optimization. Modern browsers receive VP9-encoded WebM, while Safari gets HEVC video.
const streamOptimizedUrl = cloudinary.url("sample-video", {

  quality: "auto:good",

  fetch_format: "auto",

  bit_rate: "1000k",  // Consistent streaming quality

});Code language: JavaScript (javascript)
What this translates to: This optimization all but eliminated buffering events with my testing device, and it helped provide predictable bandwidth usage. Implementing this made videos load much “smoother” on average and helped provide a similar experience across test runs.
<!-- Above-the-fold: Eager loading -->

<video controls loading="eager">

  <source src="[optimized-cloudinary-url]">

</video>

<!-- Below-the-fold: Lazy loading -->

<video controls loading="lazy">

  <source src="[optimized-cloudinary-url]">

</video>Code language: HTML, XML (xml)
What this translates to: Implementing lazy loading can help a lot with improving loading times for media-heavy web projects. However, it’s a good rule of thumb to never lazy-load above-the-fold video content.
For hero videos that contribute to LCP, use loading="eager" or omit the attribute entirely. Lazy loading is a powerful tool, but one that you must use with great responsibility if you don’t want above-the-fold content to fail to load.
Cloudinary’s adaptive bitrate streaming is different from fixed bitrate control. With the fixed bitrate control parameter, you manually set a bitrate (like br_1000k) to avoid fluctuations. On the other hand, adaptive bitrate streaming dynamically switches between bitrates depending on what can provide the best performance for whoever is watching the video.
const abrUrl = cloudinary.url("long-form-video", {

  streaming_profile: "auto",  // Automatic profile selection

  quality: "auto:good",

  fetch_format: "auto"

});Code language: JavaScript (javascript)
Adaptive bitrate streaming can make a significant difference for longer videos. However, it didn’t make much of an impact with smaller files (since they’re faster to load anyway). In most cases, fixed bitrate control will deliver the kind of performance results you need.
Cloudinary enables you to track video analytics (with the right configuration), which means the platform collects data as it serves video to your customers. Using the Cloudinary Video Player, you can track data such as device information and user location:
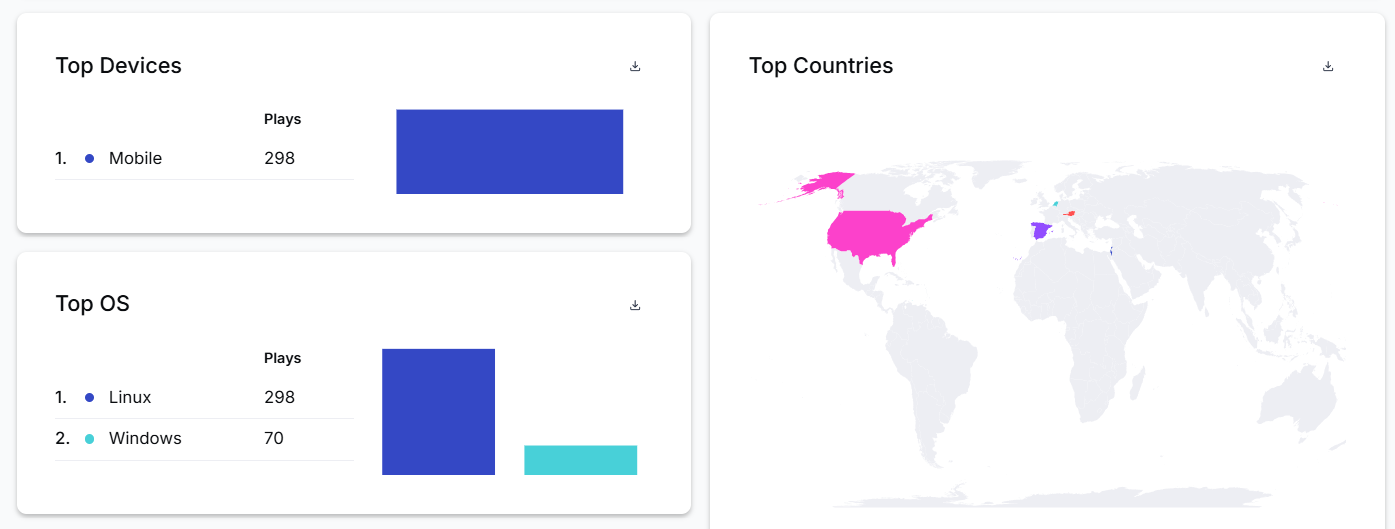
With enough data (a lot of video views), you’ll be able to easily see the difference Cloudinary makes in video delivery on your site.
For my application, I measured video engagement using the view_watch_time parameter. This lets me get analytics on how long users spend watching each video on average. That data can be very valuable for marketing since it gives you insight into which videos have a good hook or opening that keeps people watching. Aside from that, Cloudinary video analytics lets you keep track of basic variables like the number of plays a video gets or how many unique viewers it has.
Analytics should be a key component of any video deployment stack, and Cloudinary makes it easy to access a lot of data if you use its video player.
Video optimization can make a significant difference in the performance of your websites and applications. If you rely heavily on video content, Cloudinary’s optimization features can deliver significant performance gains while maintaining visual quality, but the key to success lies in proper measurement and validation.
Key takeaways from my experience:
- Start with data. Establish clear baselines before optimizing.
- Optimize progressively. Layer improvements and measure each step.
- Validate visually. Technical metrics must align with user perception.
- Monitor continuously. Performance optimization is an ongoing process.
- Prove business value. Check user engagement metrics to see if video optimization has a measurable impact on your project’s user experience. A better user experience should translate to more conversions, at least for most projects.
Finally, keep in mind that the significant video performance improvements I achieved using Cloudinary to serve and optimize videos aren’t guaranteed results. Your results will vary based on content type, user base, and implementation approach. If you’re working on improving performance for a web application, you need to incorporate media optimization as part of that workflow. Most modern web applications are fairly media-heavy, which makes video and image optimization critical steps if you want to improve user engagement.
Ready to start measuring your own video optimization ROI? Sign up to Cloudinary to use video optimization tools and measure real-time results.
Resources:


