
Stunning videos can underperform. A video experimentation strategy is a structured approach to finding out what drives performance for your specific audience. It involves creating multiple versions of a video, each with specific changes, and tracking their performance.
It eliminates the guesswork about which video format, length, or style works best for each platform.
The variables you can test include:
- Format. Vertical (9:16), horizontal (16:9), and square (1:1) versions to match platform-specific viewing behaviour.
- Length. Short cuts for TikTok, longer versions for YouTube, mid-length for Instagram.
- Overlays. Versions with and without captions, branded text, CTAs, or graphic elements.
- Pacing. Fast-cut edits versus slower, cinematic versions.
- Personalization. Localized text, name overlays, or dynamic messaging tailored to different audience segments.
You distribute these variants through A/B testing across platforms, regions, or audience segments. Each variant’s performance is tracked using key metrics such as click-through rate (CTR), view duration, completion rate, and conversion rate. Over time, you build a clear picture of what works where.
In this post, you’ll learn:
- Why a single video can’t perform well across every platform.
- How to generate platform-specific video variants with Cloudinary (TikTok, YouTube, and Instagram) from a single master file using the Node.js SDK.
- How to auto-categorize and tag your variants with Google Automatic Video Tagging.
- How to measure and compare variant performance across platforms.
Most brands invest heavily in producing high-quality video content, then publish it across every platform without testing what actually drives engagement on each one. A vertical, fast-paced edit might work on TikTok but feel rushed on YouTube. A cinematic 16:9 version with a slow intro might hold attention on YouTube but get scrolled past on Instagram.
The gap between creative instinct and viewer behavior is where most brands lose money. Your videos still underperform because you are repeating these patterns:
- Your team optimizes for production quality, not platform behavior. Video producers rely on creative instincts when making editing decisions. Those instincts are often good, but they don’t account for how differently people watch content on TikTok, YouTube, and LinkedIn.
- You fit a single video into every platform. Each channel has its own viewing habits and content expectations. TikTok audiences expect quick cuts and vertical framing. YouTube audiences tolerate longer intros and expect higher production value. Instagram sits somewhere in between, favoring bold visuals and autoplay-friendly formats.
- Your team’s creative decision is a guess. You might debate internally whether the CTA should go at the beginning or the end, whether to add captions, or whether a square crop works better than a vertical one. Testing removes the debate and gives you an answer.
The solution is to treat video production and video experimentation as two parts of the same workflow. You produce the creative asset, then test variations across platforms and let the data guide your next round of decisions.
Cloudinary lets you generate and modify video properties like size, format, overlays, captions, and playback speed without duplicating files. A single uploaded video can be delivered in vertical, square, or landscape formats depending on the platform, simply by changing the transformation parameters.
Before you start building, make sure you have:
- A Cloudinary account. The free tier works for this tutorial.
- Node.js installed on your machine.
- The Cloudinary Node.js SDK installed in your project.
- The Google Automatic Video Tagging add-on enabled in your Cloudinary dashboard (required for the auto-categorization section).
In this section, you’ll upload a master video file and use Cloudinary’s Node.js SDK to generate three platform-specific variants automatically: one for TikTok, one for YouTube, and one for Instagram.
Log in to your Cloudinary account and navigate to the dashboard to retrieve your cloud name, API key, and API secret.
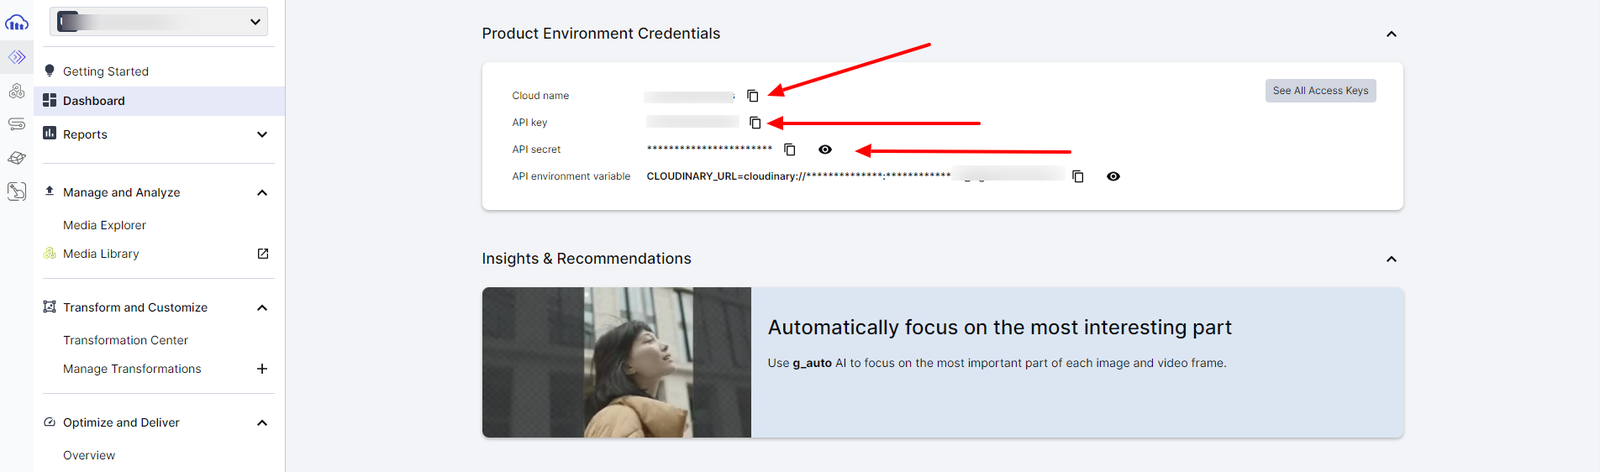
Create a .env file in your project root to store your credentials:
CLOUDINARY_CLOUD_NAME=your_cloud_name

CLOUDINARY_API_KEY=your_api_key

CLOUDINARY_API_SECRET=your_api_secretInstall the Cloudinary SDK and the dotenv package to load your environment variables:
<code>npm install cloudinary dotenv</code>Code language: HTML, XML (xml)Create a new file called video.js and configure the SDK:
require('dotenv').config();

const cloudinary = require('cloudinary').v2;

cloudinary.config({

  cloud_name: process.env.CLOUDINARY_CLOUD_NAME,

  api_key: process.env.CLOUDINARY_API_KEY,

  api_secret: process.env.CLOUDINARY_API_SECRET,

});Code language: JavaScript (javascript)Each platform needs a different format. Here are the three variants you’ll generate:
| Platform | Aspect Ratio | Dimensions | Style |
| TikTok | 9:16 (vertical) | 1080 x 1920 | Fast-paced, text overlay at top |
| YouTube | 16:9 (landscape) | 1920 x 1080 | Cinematic, CTA at bottom |
| 1:1 (square) | 1080 x 1080 | Bold text overlay, quick transitions |
You’ll define these as eager transformations on a single upload. Eager transformations tell Cloudinary to pregenerate the derived versions upon upload completion, so all three variants are ready for immediate delivery.
Add the following to your video.js file:
const variants = [

  {

    name: "tiktok",

    transformation: [

      { width: 1080, height: 1920, crop: "fill", gravity: "auto" },

      {

        overlay: {

          font_family: "Arial",

          font_size: 60,

          text: "FITNESS CHALLENGE",

        },

        color: "white",

        gravity: "north",

        y: 100,

      },

      { quality: "auto" },

    ],

  },

  {

    name: "youtube",

    transformation: [

      { width: 1920, height: 1080, crop: "fill", gravity: "auto" },

      {

        overlay: {

          font_family: "Arial",

          font_size: 40,

          text: "Subscribe for more!",

        },

        color: "#FF0000",

        gravity: "south",

        y: 50,

      },

      { quality: "auto:best" },

    ],

  },

  {

    name: "instagram",

    transformation: [

      { width: 1080, height: 1080, crop: "fill", gravity: "auto" },

      {

        overlay: {

          font_family: "Impact",

          font_size: 70,

          text: "30-DAY CHALLENGE",

          background: "white",

        },

        color: "black",

        gravity: "north",

        y: 50,

      },

      { quality: "auto" },

    ],

  },

];Code language: JavaScript (javascript)
Here’s what each transformation parameter does:
width, height: Sets the video dimensions to match the platform’s expected format.crop: "fill": Ensures the video fills the entire frame, cropping excess content.gravity: "auto": Keeps the most important part of the video in frame when cropping.overlay: Adds text on top of the video. You can customize the font, size, color, and position.gravity: "north", gravity: "south": Positions the overlay text at the top or bottom of the frame.y: 100: Offsets the overlay from its gravity anchor by 100 pixels.quality: "auto": Lets Cloudinary optimize the video quality and file size automatically.quality: "auto:best": Prioritizes the highest possible quality (useful for YouTube where viewers expect sharpness).
Now you’ll upload a single master video file and pass all three variant definitions as eager transformations. This means Cloudinary processes all three versions in one API call.
async function uploadWithVariants() {

  try {

    const result = await cloudinary.uploader.upload(

      "./fitness-promo.mp4",

      {

        resource_type: "video",

        public_id: "fitness_promo_master",

        eager: variants.map((v) => ({

          transformation: v.transformation,

        })),

        eager_async: true,

        eager_notification_url: "https://your-webhook-url.com/notify",

      }

    );

    console.log("Master video uploaded:", result.secure_url);

    console.log("Public ID:", result.public_id);

    // Generate delivery URLs for each variant

    variants.forEach((variant) => {

      const url = cloudinary.url(result.public_id, {

        resource_type: "video",

        transformation: variant.transformation,

      });

      console.log(`${variant.name} URL:`, url);

    });

    return result;

  } catch (error) {

    console.error("Upload failed:", error.message);

  }

}

uploadWithVariants();Code language: JavaScript (javascript)
A few things to note about this code:
eagerpasses all three transformation sets to Cloudinary in one upload. This pregenerates the derived versions so they’re ready for immediate delivery.eager_async: truetells Cloudinary to process the variants in the background. This is important for video because transformation can take time, and you don’t want the upload call to hang.eager_notification_urlis the webhook URL to which Cloudinary sends a notification once each eager transformation completes. Replace this with your own endpoint, or remove it if you don’t need notifications.The cloudinary.url()helper generates the delivery URL for each variant without making another API call. You can use these URLs directly in your application.
Run the script:
<code>node video.js</code>Code language: HTML, XML (xml)Once the upload completes, you’ll see the master video URL and three variant URLs in your console. You can also check your Cloudinary Media Library to see all versions.
The response includes URLs for each variant:
{

  "tiktok": "https://res.cloudinary.com/<cloud>/video/upload/c_fill,g_auto,h_1920,w_1080/l_text:Arial_60:FITNESS%20CHALLENGE,co_white,g_north,y_100/q_auto/fitness_promo_master.mp4",

  "youtube": "https://res.cloudinary.com/<cloud>/video/upload/c_fill,g_auto,h_1080,w_1920/l_text:Arial_40:Subscribe%20for%20more!,co_rgb:FF0000,g_south,y_50/q_auto:best/fitness_promo_master.mp4",

  "instagram": "https://res.cloudinary.com/<cloud>/video/upload/c_fill,g_auto,h_1080,w_1080/l_text:Impact_70:30-DAY%20CHALLENGE,b_white,co_black,g_north,y_50/q_auto/fitness_promo_master.mp4"

}Code language: JSON / JSON with Comments (json)
TikTok, YouTube, and Instagram variants respectively:
You uploaded one video and got three platform-ready versions. No manual resizing, re-exporting from your editor, or duplicate files in your media library.
As your experimentation scales, keeping track of which variant is which gets harder. Is “fitness_promo_v3_tiktok_final_FINAL” the one with the fast cuts or the one with the CTA at the top? Manual labelling breaks down quickly.
Cloudinary’s Google Automatic Video Tagging add-on solves this by analysing each video’s content and automatically applying descriptive tags. Instead of labelling videos as “Variant A” or “Fitness Version,” Cloudinary scans the footage and tags it with themes like “cardio,” “indoor,” “instructional,” or “high-energy.”
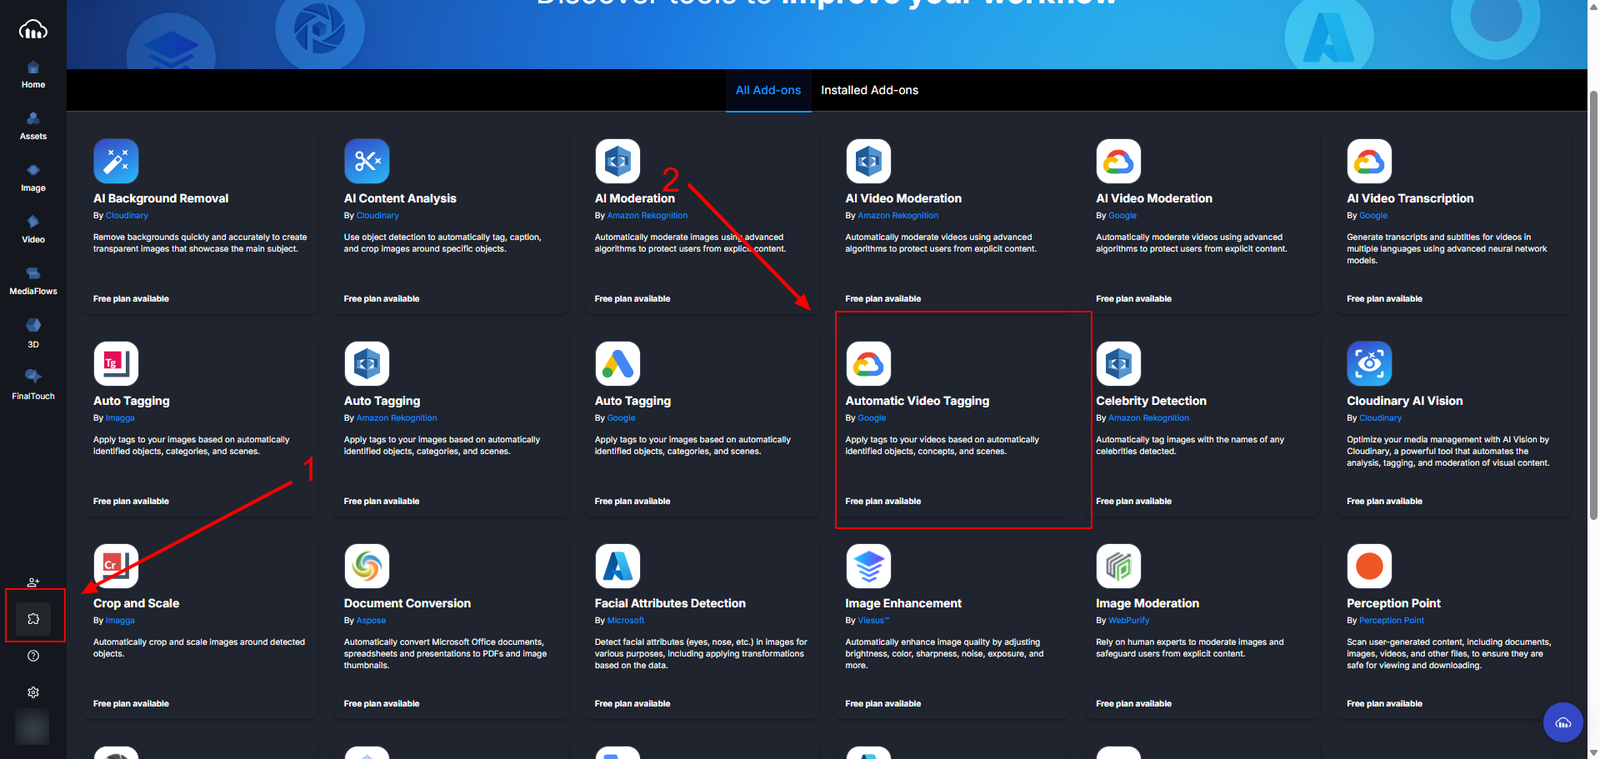
In your Cloudinary dashboard:
- Click Add-ons in the sidebar.
- Find Automatic Video Tagging by Google.
- Select the free plan.
Integrate tagging directly into your upload function by adding the categorization and auto_tagging parameters:
async function uploadWithVariantsAndTags() {

  try {

    const result = await cloudinary.uploader.upload(

      "./fitness-promo.mp4",

      {

        resource_type: "video",

        public_id: "fitness_promo_master",

        eager: variants.map((v) => ({

          transformation: v.transformation,

        })),

        eager_async: true,

        // Auto-tagging parameters

        categorization: "google_video_tagging",

        auto_tagging: 0.7,

      }

    );

    console.log("Upload complete:", result.secure_url);

    console.log("Tags:", result.tags);

    console.log(

      "Categorization status:",

      result.info?.categorization?.google_video_tagging?.status

    );

    return result;

  } catch (error) {

    console.error("Upload failed:", error.message);

  }

}

uploadWithVariantsAndTags();Code language: JavaScript (javascript)
Two parameters handle the tagging:
categorization: "google_video_tagging": Triggers Google’s video analysis, which scans your footage for visual objects, scenes, and motion.auto_tagging: 0.7: Automatically applies any tag with a confidence score above 70%.
Google’s video analysis runs asynchronously after the upload. The initial response shows the categorization status as “pending”:
{

  "public_id": "fitness_promo_master",

  "secure_url": "https://res.cloudinary.com/...",

  "info": {

    "categorization": {

      "google_video_tagging": {

        "status": "pending",

        "data": 0.7

      }

    }

  }

}Code language: JSON / JSON with Comments (json)
Once the analysis finishes (usually within a few minutes), the tags appear in your Cloudinary Media Library. For a fitness video, you might see tags like “exercise,” “gym,” “indoor,” “cycling,” or “physical fitness.”
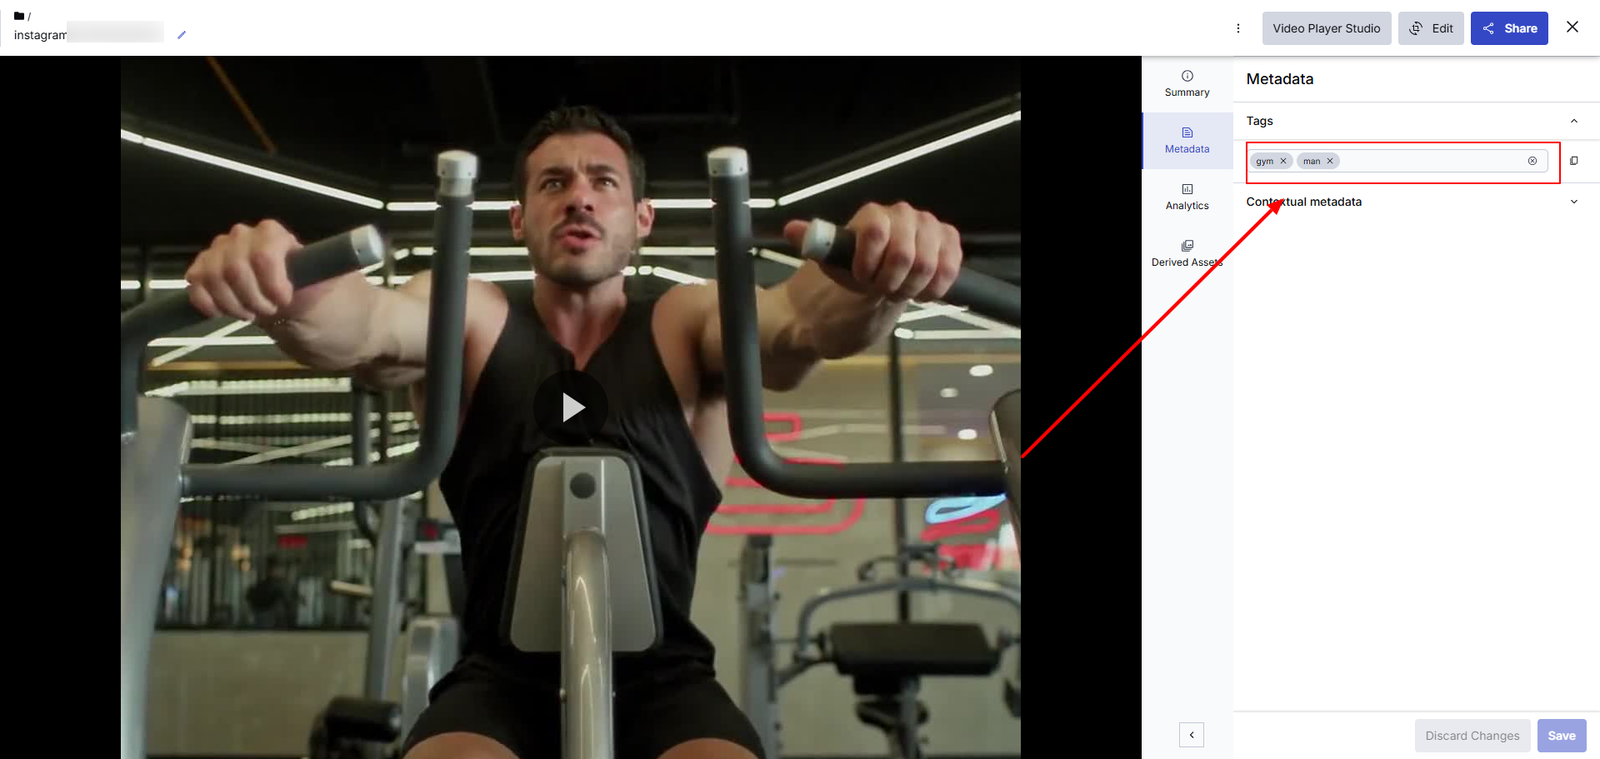
These tags let you filter and compare variants based on their actual content rather than file names. When you run dozens of experiments, this kind of automatic organization saves hours of manual labelling.
With your variants generated and tagged, you’re ready to distribute them and measure the results. Here’s how this works in practice using the fitness campaign as an example.
You deploy the three fitness video variants across their target platforms:
- Variant A (TikTok): Vertical 9:16 edit with fast pacing, sticker overlays, and background music.
- Variant B (YouTube): Cinematic 16:9 version with a slow intro, subtitles, and a voice-over CTA at the end.
- Variant C (Instagram): 1:1 square format with bold text overlays and quick-cut transitions, optimized for autoplay.
After running the test for two weeks, here’s what the data might look like:
| Metric | TikTok (9:16) | YouTube (16:9) | Instagram (1:1) |
| Avg. completion rate | 60-70% | ~50% | 30-50% |
| Sweet spot duration | 21-34 seconds | 2-10 minutes | 15-30 seconds |
| Strongest engagement window | First 3 seconds | First 10 seconds | First 5 seconds |
| Top-performing element | Fast pacing, creative overlays | Subtitles, voice-over CTA | Bold text, autoplay-friendly format |
These figures reflect general platform benchmarks, not results from a specific test. Your actual numbers will depend on your audience, content type, and distribution strategy.
A few patterns emerge from results like these:
- The TikTok version outperforms in completion rate and early engagement. Short, high-energy edits resonate on this platform. If your completion rate drops below 50%, experiment with a stronger hook in the first two seconds.
- The YouTube version needs a faster hook. A 50% completion rate is average, but you can improve it by front-loading the value. Test moving the CTA from the end to the first 15 seconds and see if completion improves.
- The Instagram version works well on mobile. Bold text overlays and shorter transitions perform here because most Instagram viewers watch without sound. If your Instagram completion rate is below 30%, test adding captions to every frame.
The key insight is that each platform rewards different creative choices. Without testing, you’d never know that your YouTube intro was too slow or that your Instagram version needed captions. Experimentation surfaces these insights and gives you a clear action plan for the next round.
Here’s the full cycle, from upload to iteration:
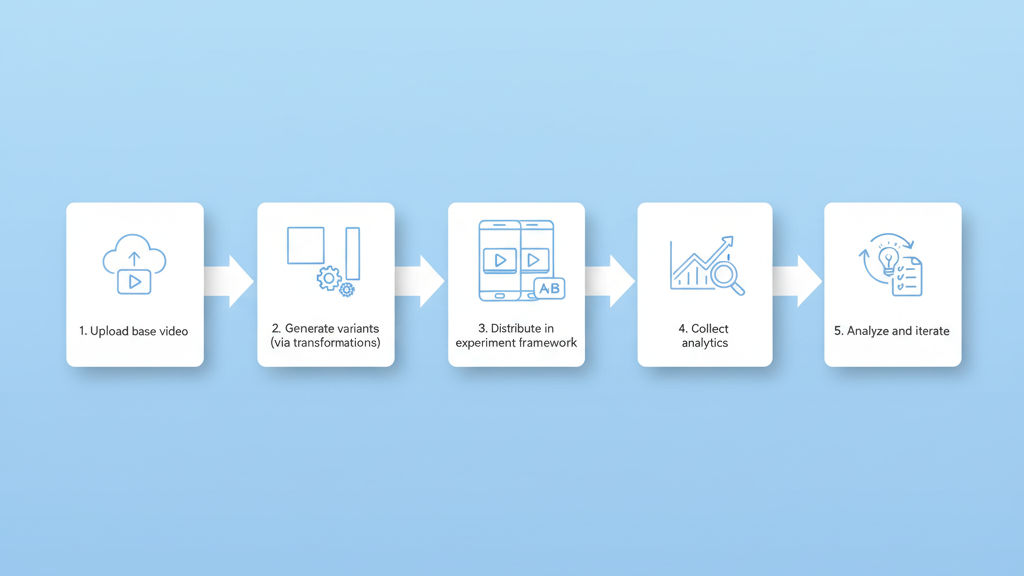
- Upload your master video to Cloudinary.
- Generate variants using eager transformations (format, overlays, pacing).
- Distribute each variant to its target platform.
- Collect analytics from each platform’s native tools (TikTok Analytics, YouTube Studio, Instagram Insights).
- Analyze and iterate. Use the data to inform your next round of variants. Double down on what works, cut what doesn’t.
Each cycle gets you closer to understanding what your audience actually responds to on each platform.
You’ve seen how to build a video experimentation strategy from start to finish: why platform-specific variants matter, how to generate them from a single master file with Cloudinary, how to auto-tag and categorize variants with Google Video Tagging, and how to measure and compare results across platforms.
The workflow is repeatable. Upload once, generate variants, distribute, measure, iterate. Every cycle gives you better data and better-performing content.
Start small. Pick one video, generate three platform variants using the code in this guide, and compare the results after two weeks. The data will tell you more about your audience than any amount of creative instinct.
Sign up for a free Cloudinary account to get started.
Resources:
- Cloudinary video transformation documentation
- Cloudinary Node.js SDK
- Google Automatic Video Tagging add-on
- Cloudinary video upload guide
- Video SEO guide
Why should brands create different videos for TikTok, YouTube, and Instagram?
Each platform has different viewing behaviors, screen formats, and creative expectations. TikTok typically favors mobile-first vertical video and immediate hooks, YouTube supports both short- and long-form storytelling, and Instagram commonly uses vertical or square formats with prominent visual overlays. Platform-specific versions help brands test which framing, pacing, duration, and messaging resonate with each audience. Cloudinary can create these versions from one master asset using video transformations, reducing the need to manually export and manage separate source files.
How can Cloudinary create multiple video variants from one file?
Cloudinary uses URL-based or SDK-based transformations to dynamically change a video’s dimensions, aspect ratio, crop, text overlays, quality, format, playback speed, and other properties. A single master video can therefore generate vertical, square, and landscape versions without permanently duplicating the original asset.
What are eager video transformations in Cloudinary?
Eager transformations generate selected video variants during or immediately after upload rather than waiting until someone first requests each transformed URL. This is useful when teams know in advance that they will need specific TikTok, YouTube, Instagram, advertising, or campaign versions and want those assets ready for immediate delivery.
Can Cloudinary automatically crop videos for different aspect ratios?
Yes. Cloudinary can resize and crop videos into formats such as 9:16, 16:9, 4:5, and 1:1. Using automatic gravity helps identify the most relevant area of the frame so important subjects are less likely to be removed when the aspect ratio changes.
How do you start a video experimentation program?
Start with one high-value master video and one clearly defined question, such as whether vertical or square framing produces a higher completion rate. Generate two or three controlled variants, publish them to comparable audiences, measure the results for a fixed period, and use the winning attributes to guide the next experiment.


