
Do you like to show your photos exactly as they were taken or do you usually tweak them a little to get that extra punch? Just a few years ago, almost all photos were displayed and shared as-is. Image transformations and improvements were left to the Photoshop experts. Then came the more user-friendly desktop apps, like Picasa and Instagram, that allowed any user to easily improve their photos.
You can manually retouch your images one by one. But how does this scale to your website or mobile app? When you have many visitors uploading their photos to your online service, how can you retouch these automatically?
In this blog post we introduce Cloudinary’s image improvement filters and effects. With these new capabilities, you can now embed better looking images in your websites and mobile apps with ease.
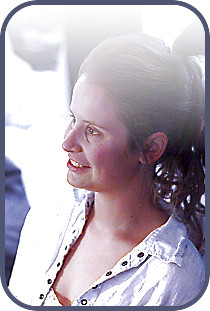
Take a look at left-most image below. This image was uploaded to Cloudinary, and doesn’t look optimal. Applying Cloudinary’s new cloud-based ‘improve‘ effect (e_improve for URLs) will make it look much better, don’t you think?

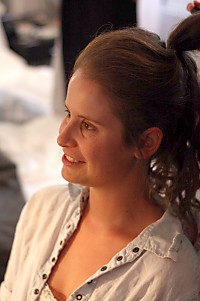
The following Ruby on Rails code generates a transformation URL with the same ‘improve‘ effect:
<%= cl_image_tag("orly.jpg", :crop => :scale, :width => 200, :effect => :improve) %>
Here’s another example of the powerful impact of the ‘improve‘ effect:


You can simply set the ‘effect‘ parameter to ‘improve‘ and most images and thumbnails on your website would automatically look much better. Here’s a PHP code for reaching the same result.
<?php echo cl_image_tag("gray_mountain.jpg",
     array("width" => 300, "crop" => "scale", "effect" => "improve")); ?>
The ‘improve’ effect gives you a powerful improvement filter. Occasionally though, you may want to fine-tune your image tweaking. To do that, Cloudinary offers granular filters you can use individually or combined, to create customized effects.
Automatic contrast balancing is available by setting the ‘effect‘ parameter to ‘auto_contrast‘ (or e_auto_contrast for URLs). The following example shows the uploaded image before and after contrast balancing.
Two additional effects are automatic color balancing and brightness balancing. You can apply them by setting the ‘effect‘ parameter to ‘auto_color‘ or ‘auto_brightness‘ (e_auto_color or e_auto_brightness for URLs).
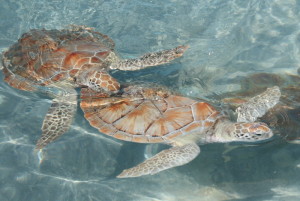
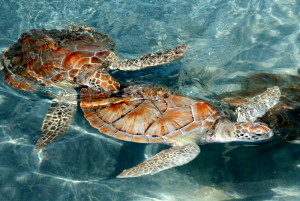
The following example shows the impact of applying both ‘auto_color’ and ‘auto_brightness’ on an uploaded image:


Same example in Django:
cloudinary.CloudinaryImage("nice_beach.jpg").image(transformation =
  [dict(width=300, crop="scale"), dict(effect="auto_color"),
   dict(effect="auto_brightness")])
Brightness level adjustment is very useful to fix dark images. However, on certain scenarios, you might encounter images that have both bright and dark sections. In this case simply increasing the brightness might overexpose the brighter areas of the image.
The new fill-light effect can be used to fix this exact scenario. The following example increases the fill light by setting the ‘effect‘ parameter to ‘fill_light‘ (e_fill_light for URLs).
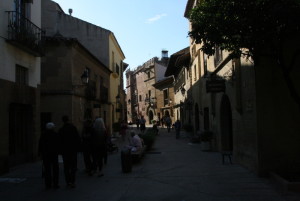

Same example in .NET:
cloudinary.Api.UrlImgUp.Transform(
  new CloudinaryDotNet.Transformation().Width(300).Crop("scale").Effect("fill_light")).
    BuildImageTag("street.jpg");
Cloudinary’s set of automatic image improvement filters, together with its custom filters and effects, allows you to easily generate ‘cool’ chained effects that should match your taste and graphic requirements.
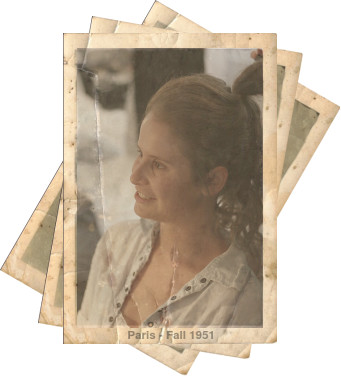
The following example applies multiple transformations to reach a unique, custom filter. It applies the auto improve effect, increases sharpness level, reduces the red levels and increases the blues. It also increases brightness, adds a gradient fade effect, rounds the image’s corners and adds a wide border. All done via a simple URL. Isn’t that cool?
If you don’t want to embed such long URLs in your website, you can always define a named transformation instead. For example, we defined a transformation named ‘sample_artistic’ that applies all the above effects. Simply add t_simple_artitistic your code and all images will be automatically modified accordingly. Here’s a much shorter URL that generates the same result:
You can also use Cloudinary’s overlays, underlays, opacity changes and text layers to dynamically and automatically create cool results, like the one below, for any uploaded image:
Do you work on a site or app that allows you or your users to upload images? Using Cloudinary and a tiny transformation URL change, you can have your site’s images look much more vibrant and professional and make your visitors happier.
You can always use Cloudinary’s face detection based cropping to focus on the relevant parts of the photo. Now you can also improve your images, make them look more vivid and balanced. With Cloudinary you can also easily change your mind and modify the default filters being applied. With just one more change to your URLs and all your images will be dynamically recreated for you with the updated filters, delivered optimized through a fast CDN.
If you don’t have a Cloudinary account yet, you can sign up now for free.
Further Reading on Image Optimization
- Website image optimization and fast delivery with Cloudinary
- The complete guide to PHP image compression and optimization
- Python Image Optimization and Transformation
- Image Optimization in Ruby
- Image Optimization for WordPress
- Learn about the pros and cons of JPEG 2000
- Adopting the WebP Image Format for Android on Websites Or Native Apps
- 10 Website Image Mistakes that Slow Load Times
- Automatically Reduce Image Size Without Losing Quality
- Automate Placeholder Generation and Accelerate Page Loads
- 3 Ways to Do Progressive JPEG Encoding