Every product that lets users upload images eventually meets the same unwelcome guest: the upload you really wish hadn’t happened. A profile photo that’s actually a screenshot of something graphic. A “product shot” that’s spam. The naïve answer, just trust users and clean up later doesn’t scale past your first hundred uploads, and manual review queues are slow, expensive, and demoralizing.
The better answer is to moderate the moment the image lands, automatically, and only loop in a human for the genuine edge cases. In this tutorial we’ll build exactly that, mostly without writing queue code, using Cloudinary PowerFlows for the pipeline and Next.js for the frontend.
Here’s the finished product, a gallery where approved images render crisply and anything unapproved is blurred until it clears review:
- Live demo: https://ugc-moderation-pipeline.vercel.app/
- Source code: https://github.com/musebe/ugc-moderation-pipeline
We’ll build a content-moderation pipeline that triggers on every upload to a ugc/ folder, runs Cloudinary’s AI Vision moderation, routes approved images to published/ and rejected ones to quarantine/, fires a webhook, and shows the result in a Next.js gallery where unapproved images stay blurred.
Let’s start at the end. By the time you’re done you’ll have a deployed app with:
| Feature | What It Does |
|---|---|
| Drag-and-drop upload | Sends images straight into a ugc/ folder via an unsigned preset |
| Automatic AI moderation | Cloudinary AI Vision scores each image against plain-language rules |
| Auto-routing | Approved → published/, rejected → quarantine/ |
| Live status gallery | Filter by All / Approved / Rejected / Pending |
| Blur-on-unapproved | Only approved images render clearly; the rest stay obscured |
| Webhook callback | Your app is notified the instant a verdict is reached |
The whole system is a relay race between Cloudinary and your Next.js app:
        ┌─────────────┐
 upload │   ugc/      │
───────▶│  (Next.js)  │
        └──────┬──────┘
               │  trigger
        ┌──────▼───────────────┐
        │  PowerFlow            │
        │  • Add to Logs        │
        │  • AI Vision Moderate │
        │  • Condition (rejected?)
        └───┬───────────────┬───┘
       approved          rejected
            │                │
   ┌────────▼─────┐  ┌───────▼────────┐
   │ Update Tags  │  │ Move to Folder │
   │ → published/ │  │ → quarantine/  │
   └────────┬─────┘  └───────┬────────┘
            │                │
            └──────┬─────────┘
            Send HTTP Request
                   │
        ┌──────────▼───────────┐
        │ /api/webhooks/...     │
        │ + /api/gallery (read) │
        └──────────────────────┘
Code language: JavaScript (javascript)
Each stage maps to a specific Cloudinary capability:
| Pipeline stage | Powered by |
|---|---|
| Trigger on new upload | PowerFlow “Cloudinary Upload” trigger |
| Audit trail | “Add to Logs” block |
| Content scoring | AI Vision Moderate by Prompts add-on |
| Branching | “Condition” block on any_rejected |
| Routing | “Move to Folder” + “Update Tags” |
| Notify app | “Send HTTP Request” block |
| Read status back | Admin Search API (folder="…") |
Cloudinary offers two automation tools:
EasyFlows are great for linear “do X then Y” chains, but moderation is fundamentally a fork in the road: approved and rejected images need to go to different places.
PowerFlows gives you the option to branch. You start with a visual canvas containing a Condition block, which you can express: “if any rule rejects this image, quarantine it; otherwise publish it” without hand-writing a queue worker. That’s the entire reason this tutorial is built on PowerFlows.
Note: If your automation has an if/else, go with PowerFlows.
Before building, make sure you have:
-
A Cloudinary account with the AI Content Analysis (AI Vision) add-on enabled.
-
Node.js 18+ and npm.
-
An unsigned upload preset that drops files into
ugc/. Create it under Settings → Upload → Add upload preset:Field Value Preset name ugc_unsignedSigning Mode Unsigned Folder ugc
Note: Don’t add a moderation add-on to the preset. Moderation runs inside the PowerFlow. Doing both moderates every image twice and burns double the credits.
Open MediaFlows > PowerFlows > Create flow. Here’s the full canvas we’re aiming for:
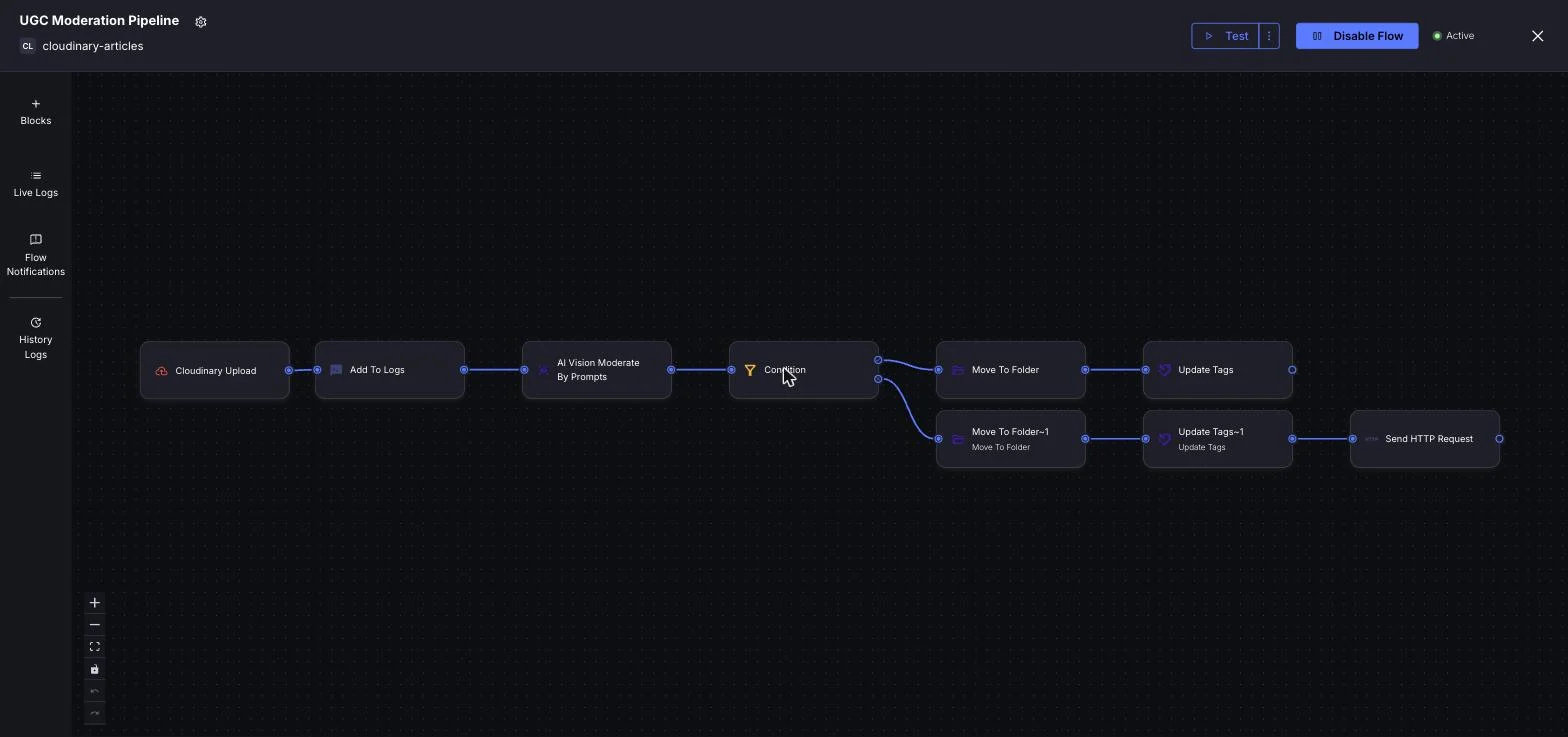
Prefer clicking through it yourself? The deployed app has a step-by-step setup page that walks each block with these same screenshots.
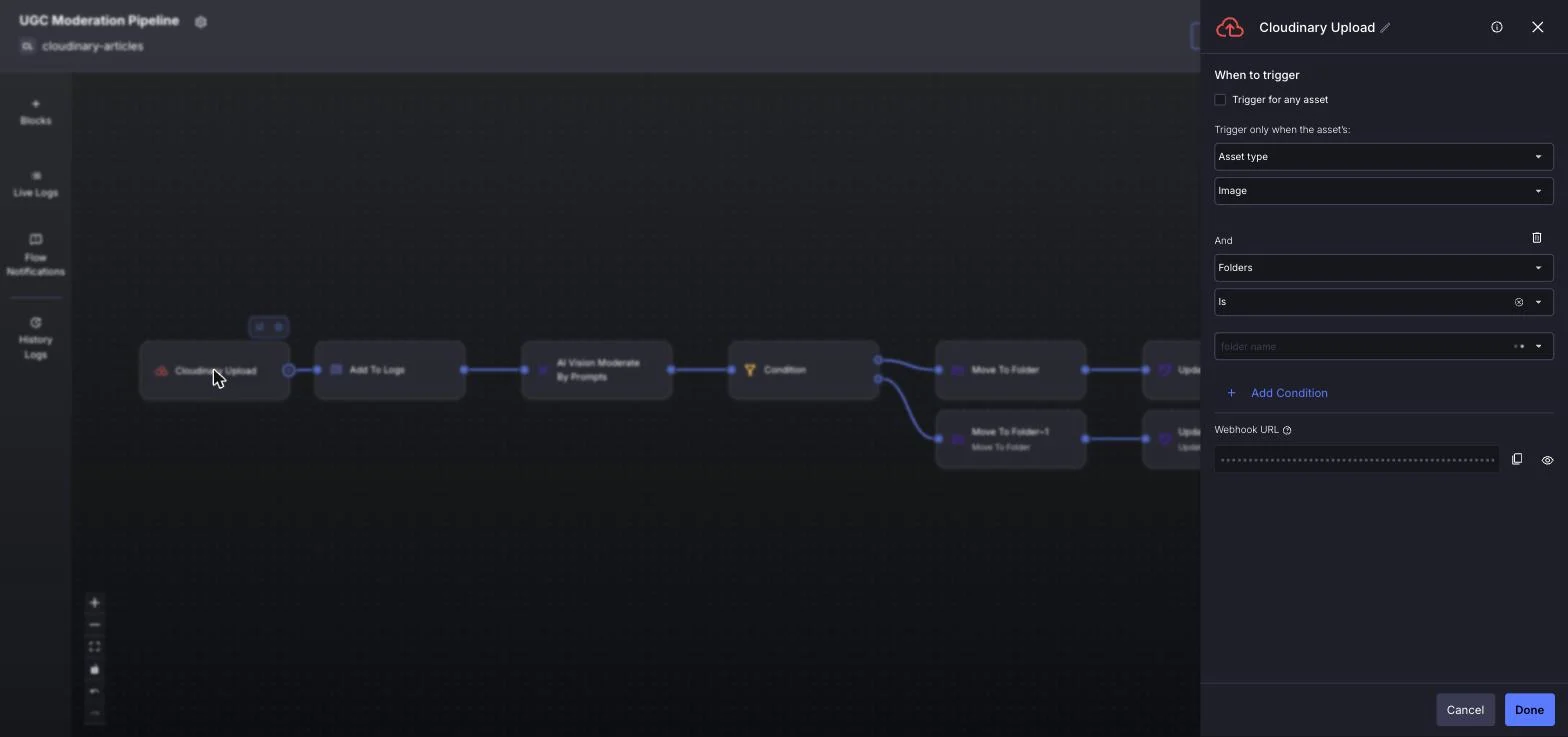
Add a Cloudinary Upload trigger and scope it to images landing in the ugc/ folder. This is what makes the pipeline fire automatically on every new upload.
Add the AI Vision Moderate by Prompts block. Instead of training a model, you describe what to reject in plain language (e.g., “contains nudity”, “contains violence”). Each rule returns a pass/fail.
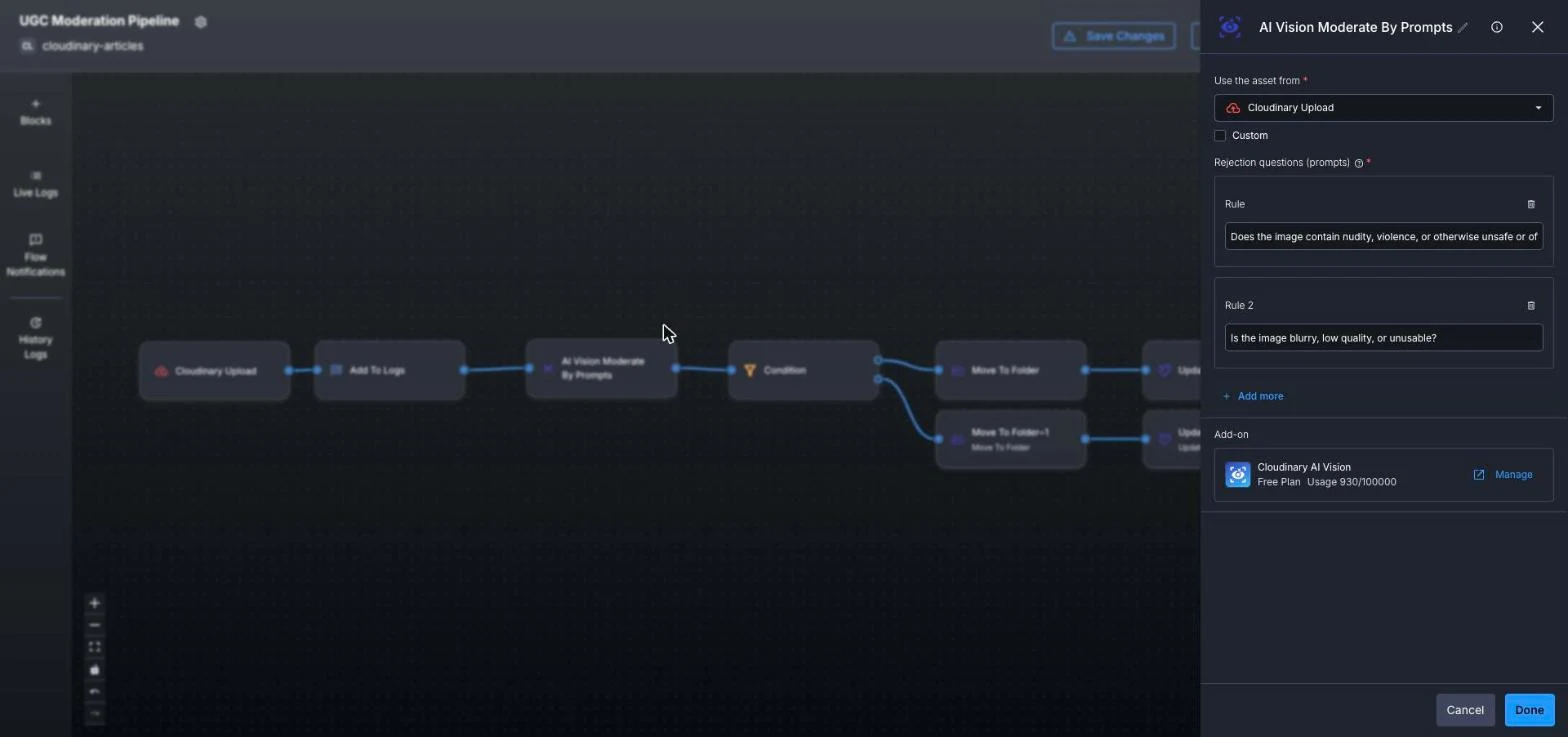
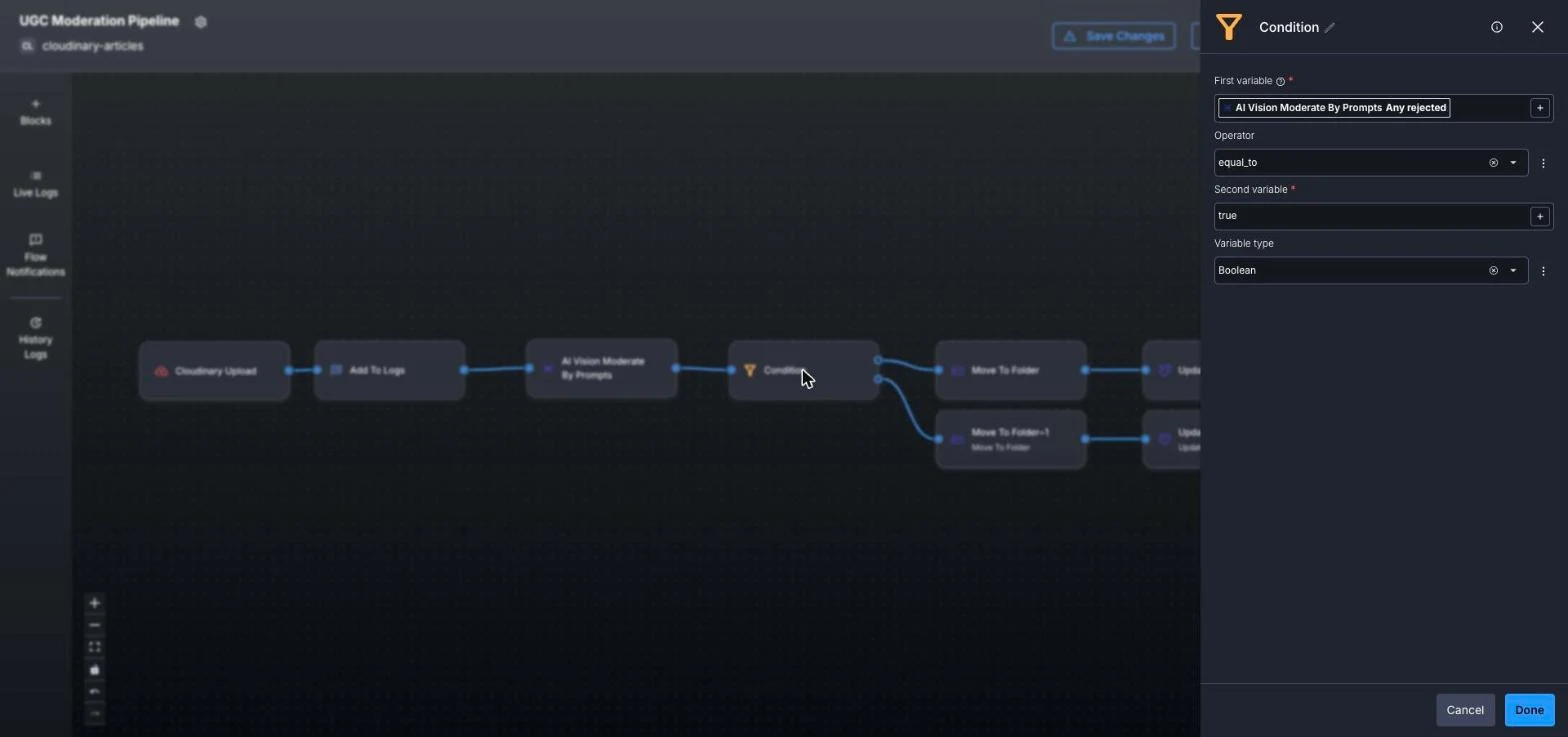
Add a Condition block testing any_rejected == true. This is the fork that EasyFlows couldn’t give us.

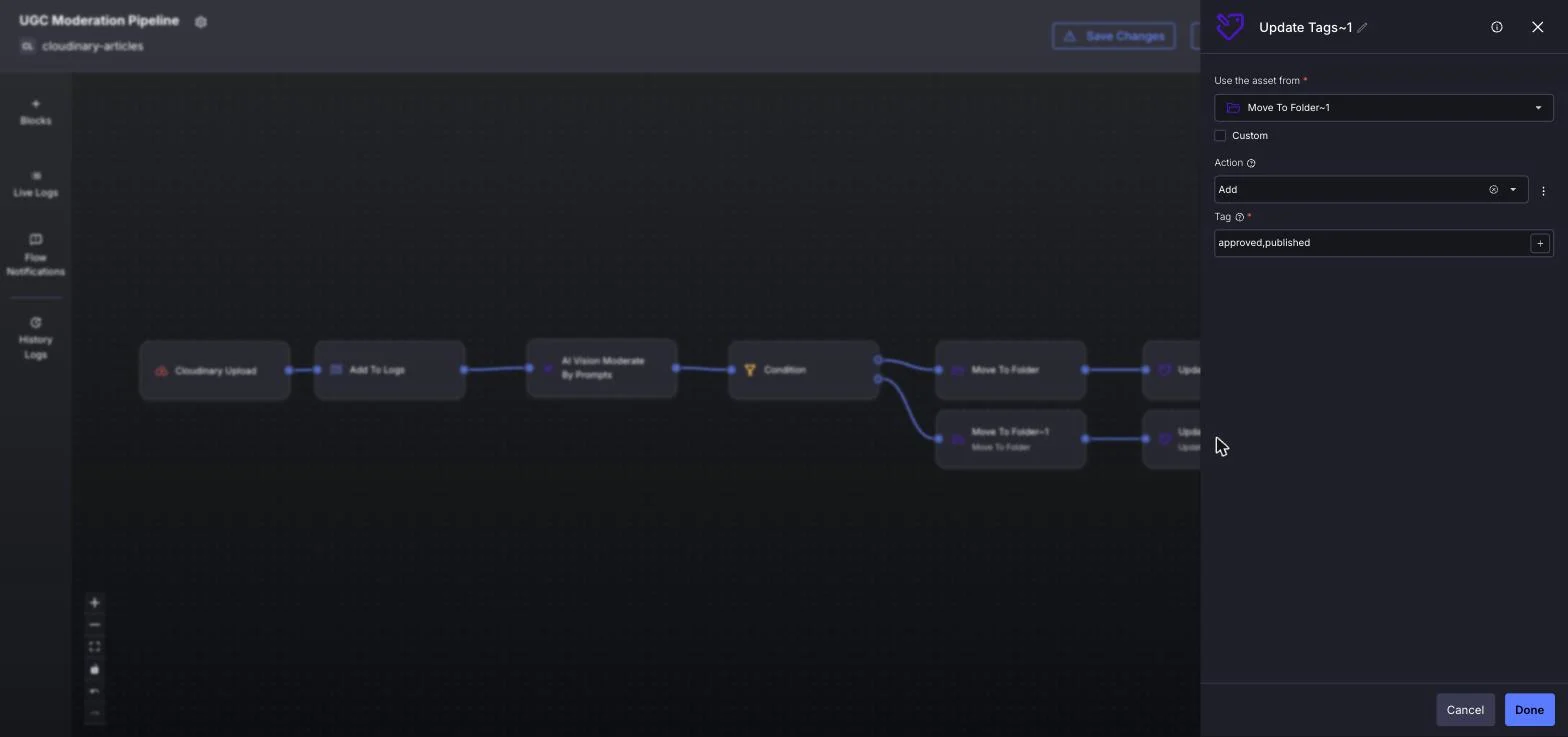
On the approved branch, add Update Tags to tag the asset published and route it to published/.
Finally, add a Send HTTP Request block pointing at your webhook. Use a JSON body that includes the verdict and the asset’s public ID:
{
  "status": "approved",
  "folder": "published",
  "moderation": "ai_vision",
  "public_id": "{{$.Cloudinary_Upload.result.public_id}}"
}
Code language: JSON / JSON with Comments (json)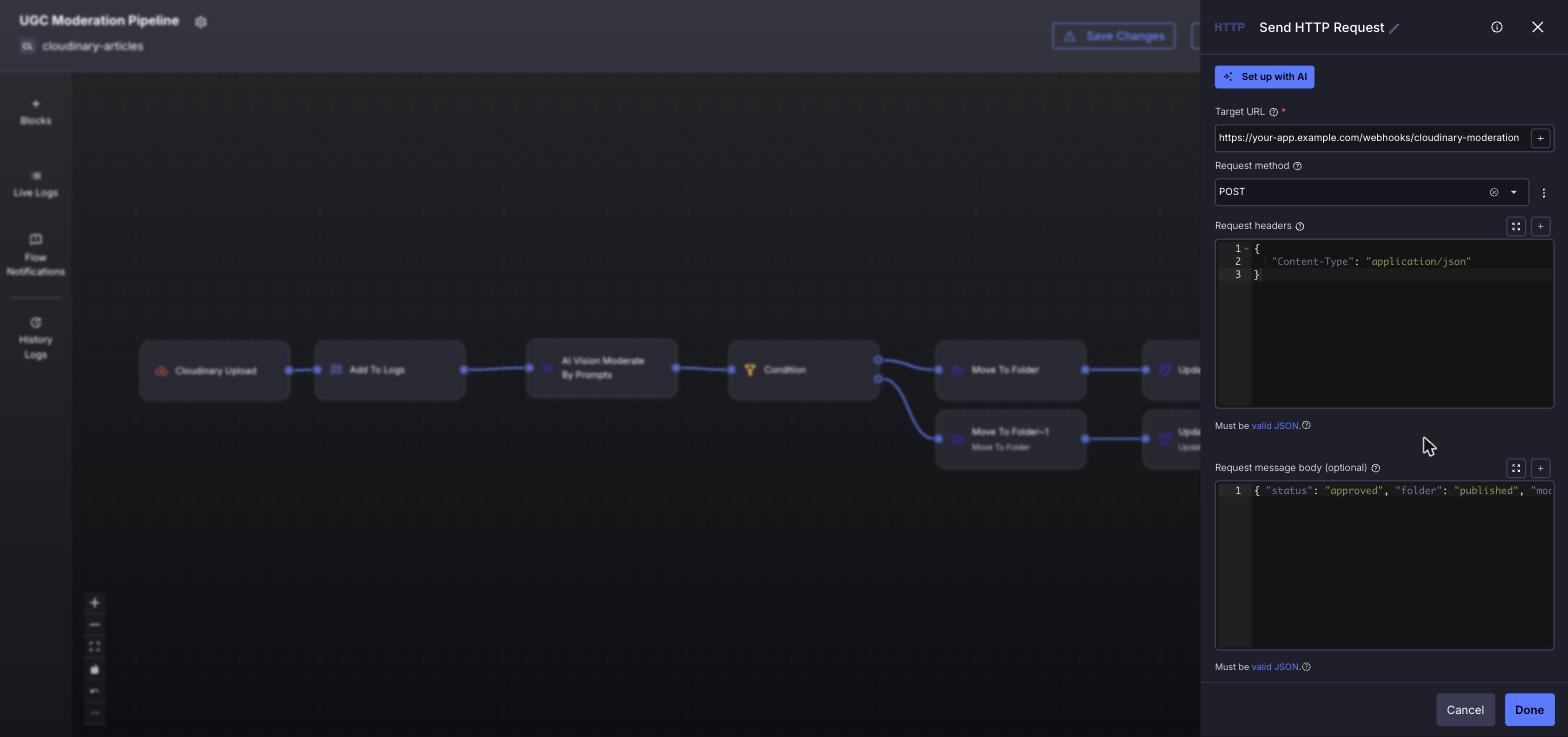
Do this on both branches. The rejected branch sends the same body with
"status": "rejected"and"folder": "quarantine". Otherwise your app only ever hears about approvals.
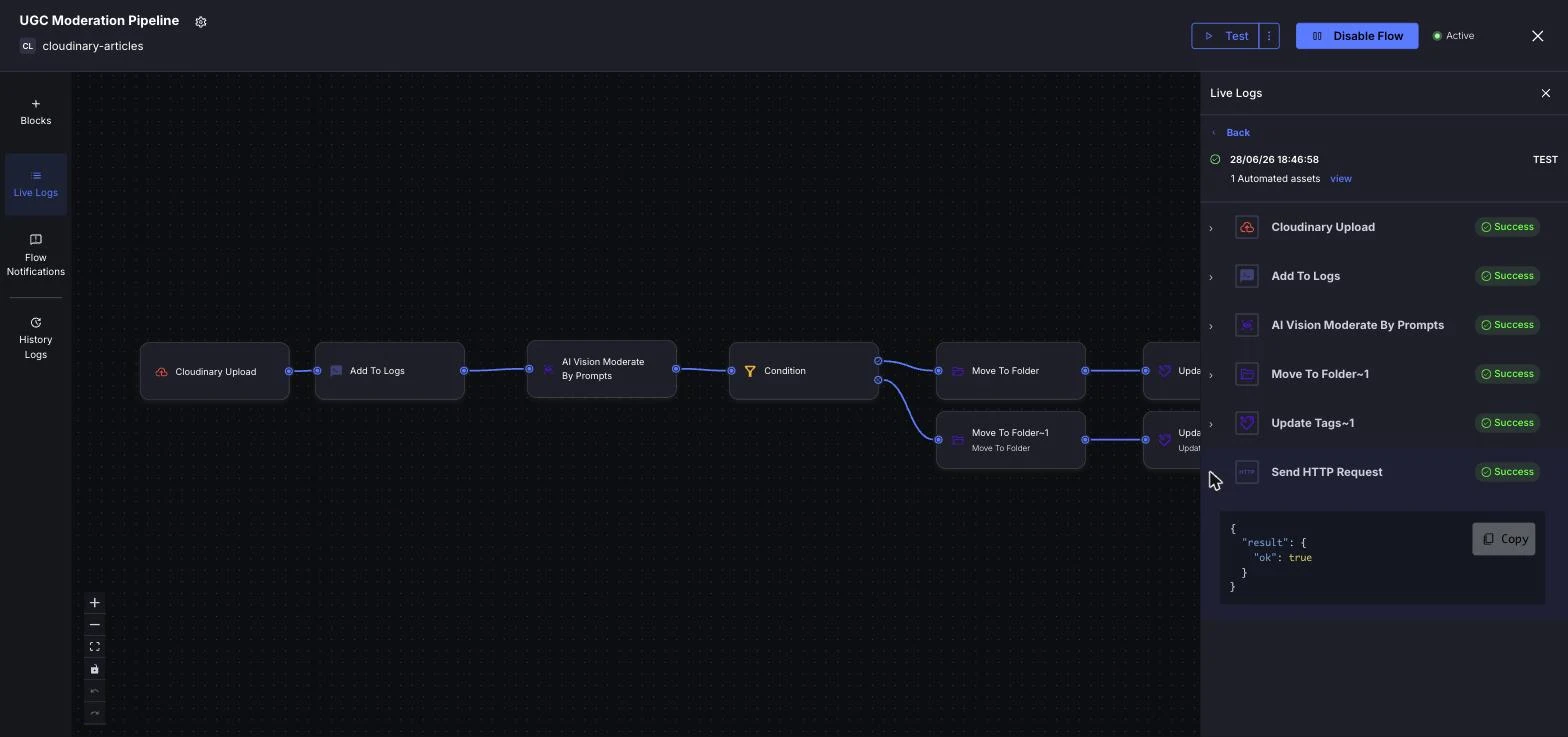
Hit Test, then open Live Logs. Every block should glow green:
Spin up the project:
npx create-next-app@latest ugc-moderation-pipeline
# TypeScript · Tailwind · ESLint · App Router · src/ dir · alias @/*

npx shadcn@latest init -d
npx shadcn@latest add button card badge separator alert tabs

npm i cloudinary next-cloudinary lucide-react
Code language: CSS (css)
Create .env.local:
NEXT_PUBLIC_CLOUDINARY_CLOUD_NAME=your-cloud-name
NEXT_PUBLIC_CLOUDINARY_UPLOAD_PRESET=ugc_unsigned
CLOUDINARY_API_KEY=your_api_key      # server-only
CLOUDINARY_API_SECRET=your_api_secret # server-only — never NEXT_PUBLIC
Code language: PHP (php)
The project structure:
| Path | Role |
|---|---|
src/app/page.tsx |
Home — hero + upload + gallery |
src/components/upload-gallery.tsx |
Upload widget + filterable gallery |
src/app/api/gallery/route.ts |
Lists assets + derives status |
src/app/api/webhooks/cloudinary-moderation/route.ts |
Receives verdicts |
src/lib/cloudinary.ts |
Server SDK config |
src/app/setup/page.tsx |
Visual PowerFlow walkthrough |
The home page does two jobs: It lets users upload, and shows everything that’s been uploaded with a moderation badge. Uploads use CldUploadWidget (unsigned, targeting ugc/); the gallery refetches after each upload and polls briefly so a freshly-uploaded pending tile flips to its verdict once the flow finishes.
Here’s the engine — the status mapping and the blur rule.
View the full component:
upload-gallery.tsx
// A tile is only sharp when approved — everything else stays blurred.
function GalleryTile({ item }: { item: GalleryItem }) {
  const blurred = item.status !== "approved";
  return (
    <Card className="overflow-hidden">
      <div className="relative aspect-square bg-muted">
        <CldImage
          width={400}
          height={400}
          src={item.publicId}
          alt={item.status}
          crop="fill"
          className={`h-full w-full object-cover transition ${
            blurred ? "blur-xl scale-110" : ""
          }`}
        />
        <div className="absolute left-2 top-2">
          <StatusBadge status={item.status} />
        </div>
      </div>
    </Card>
  );
}
Code language: JavaScript (javascript)
The status-to-UI contract, in one table:
| Status | Folder | Badge | Image Treatment |
|---|---|---|---|
| ✅ Approved | published/ |
green | rendered clearly |
| ⛔ Rejected | quarantine/ |
red | blurred + “hidden” overlay |
| ⏳ Pending | ugc/ |
grey | blurred + “reviewing…” |
Here’s the clever bit: we don’t need a database to know each image’s status. The folder is the status. An image in published/ is approved; in quarantine/ it’s rejected; still in ugc/ it’s pending. We just ask Cloudinary what’s in each folder.
The engine of src/app/api/gallery/route.ts:
async function listFolder(folder: string): Promise<Raw[]> {
  const res = await cloudinary.search
    .expression(`folder="${folder}"`)
    .sort_by("created_at", "desc")
    .max_results(100)
    .execute();
  return (res.resources ?? []) as Raw[];
}

// GET /api/gallery → merge ugc/ (pending) + published/ (approved) + quarantine/ (rejected)
Code language: HTML, XML (xml)
Gotcha we hit (so you don’t): our first version used
cloudinary.api.resources_by_asset_folder(...), which returned404for every folder. That endpoint only exists on accounts in dynamic-folder mode. The Search API (folder="…") works on both fixed and dynamic folders — switch to it and the gallery lights up instantly. Surfacing the real error message instead of a generic “failed” string is what made this a 30-second fix instead of an afternoon.
The webhook endpoint stores each verdict so the app can read it back. For a demo it keeps an in-memory map; for production it auto-detects a Vercel KV store. The engine of route.ts:
export async function POST(req: NextRequest) {
  const secret = process.env.WEBHOOK_SHARED_SECRET;
  if (secret && secret !== "change-me") {
    if (req.headers.get("x-webhook-secret") !== secret) {
      return NextResponse.json({ error: "unauthorized" }, { status: 401 });
    }
  }
  const { status, folder, moderation, public_id } = await req.json();
  if (public_id) await setVerdict(public_id, { status, folder, moderation, at: Date.now() });
  return NextResponse.json({ ok: true });
}
Code language: JavaScript (javascript)If you’re not on Next.js, here’s the same receiver in ~20 lines of Express:
const express = require("express");
const app = express();
app.use(express.json());

const verdicts = {};

app.post("/webhooks/cloudinary-moderation", (req, res) => {
  const { status, folder, moderation, public_id } = req.body || {};
  if (public_id) verdicts[public_id] = { status, folder, moderation, at: Date.now() };
  console.log("[moderation]", req.body);
  res.json({ ok: true });
});

app.get("/webhooks/cloudinary-moderation", (req, res) => res.json({ verdicts }));

app.listen(3000, () => console.log("Webhook receiver on :3000"));
Code language: PHP (php)Where to take this next:
| Extension | How |
|---|---|
| Slack alerts | Add a second HTTP block on the rejected branch posting to a Slack Incoming Webhook with the asset URL |
| Durable storage | Swap the in-memory map for Vercel KV — the route already auto-detects it |
| Human-in-the-loop | Route low-confidence scores to a third “review” folder instead of auto-rejecting |
| Custom rules | Edit the AI Vision prompts — they’re plain English, no retraining |
- Push to GitHub and import the repo into Vercel.
- Add all four
env varsin Project → Settings → Environment Variables, including the server-onlyCLOUDINARY_API_KEY/CLOUDINARY_API_SECRET. - Deploy, then copy your production URL.
- Back in the PowerFlow, set both Send HTTP Request blocks’ Target URL to:
https://<your-app>.vercel.app/api/webhooks/cloudinary-moderation - Rerun Test — all green.
Note:
Env varchanges don’t apply to existing deployments. Redeploy after editing them.
You’ve built a production-shaped moderation pipeline where scoring, branching, routing, and notifying lives in a visual PowerFlow, and your Next.js app simply reads the result back from Cloudinary’s folders. No queue workers, no model training, and the two bugs most people hit (the by_asset_folder 404 and the webhook 401) already defused.
- Live demo: ugc-moderation-pipeline.vercel.app
- Full source: github.com/musebe/ugc-moderation-pipeline
- Docs: Cloudinary PowerFlows · AI Vision moderation · next-cloudinary
Ready to level up your visual media workflow? Start using Cloudinary for free and build better visual experiences today.
Why is manual image moderation unsustainable for UGC platforms, and how does automated routing solve it?
What is the technical difference between Cloudinary EasyFlows and PowerFlows, and why is the latter required for moderation?
PowerFlows provide a visual canvas with condition blocks that can evaluate rules and route assets to different folders based on the moderation verdict. This makes PowerFlows better suited to branching moderation workflows.
How does the plain-language prompt scoring system in AI Vision Moderation work without training custom models?
The model evaluates the image against those prompts and returns a result for each rule. This enables teams to set up moderation logic without building or training their own machine learning models.
How can developers determine the moderation status of an image without using a database?
The gallery can then query the contents of those folders directly. This reduces database synchronization requirements and keeps the asset workflow lightweight.
Why does the standard resources_by_asset_folder endpoint sometimes throw a 404 error, and how do you resolve it?
resources_by_asset_folder endpoint has account configuration requirements and may not work as expected in environments that don’t support the required folder behavior. In those cases, the request can return a 404 error.
A more flexible approach is to use the Cloudinary Search API with an expression that queries assets by folder. This allows developers to retrieve folder assets through search expressions and can simplify troubleshooting across different account configurations.
How does the frontend handle image blurring for unapproved or pending assets?
Once the application receives confirmation that the asset has been approved, the UI can update and transition the image into sharp focus.