
User-generated content (UGC) pipelines, while great for streamlining the collection of and publication of customer content, often suffer from brittle logic. These pipelines break easily when input data patterns change (e.g., “Only allow vertical images”), leading to technical debt that can become insurmountable, fast.
A hybrid architecture fixes this problem:
-
Next.js, as the Interface, handles the upload and displays the final audited result.
-
MediaFlows (PowerFlows), as the Intelligence, “looks” at the asset, makes a decision based on AI Vision, and tags the asset accordingly.
-
Live Demo: https://ai-governance-hub-pi.vercel.app/
-
GitHub Repository: https://github.com/musebe/ai-governance-hub
Leverage MediaFlows’ PowerFlows advanced logic capabilities that simpler flows lack. While standard flows are great for basic transformations, PowerFlows allows you to:
- Integrate AI Vision. Use the “Ask me anything” block for complex visual reasoning.
- Complex logic branching. Use conditional forks based on AI-generated JSON data.
- External connectivity. Communicate with your Next.js backend via custom HTTP Webhooks.
By decoupling the reasoning into a PowerFlow, you’ll ensure the Next.js codebase stays clean, performant, and focused on user experience.
Here are the steps in your data flow:
-
Upload. The user uploads an image with a specific
governance_scan_pendingtag. - Audit. The PowerFlow agent detects the tag, runs an AI Vision scan, and makes a decision.
-
Sync. The agent stamps the asset with a final status (
approved/rejected) and pings our Next.js app via a webhook. - Display. The UI automatically updates to reflect the AI’s decision.
Before you build the intelligence, it needs a stable home. Scaffold a fresh Next.js 16 project using the latest standards.
Run the following command in your terminal to create a new project with TypeScript, Tailwind CSS, and the App Router:
npx create-next-app@latest ai-governance-hub --typescript --tailwind --app
Code language: CSS (css)To keep your governance logic isolated and scalable, use a domain-driven folder structure. Instead of scattering logic, everything related to your AI agent lives in a dedicated feature folder.
-
src/features/governance/: The “Engine Room” containing your types, server actions, and UI components. -
src/lib/cloudinary.ts: The centralized configuration for the Cloudinary SDK.
Create a .env.local file in your root directory. These keys are the bridge between your Next.js app and the Cloudinary API.
NEXT_PUBLIC_CLOUDINARY_CLOUD_NAME="your_cloud_name"
NEXT_PUBLIC_CLOUDINARY_API_KEY="your_api_key"
CLOUDINARY_API_SECRET="your_api_secret"
Code language: JavaScript (javascript)Never prefix your API_SECRET with NEXT_PUBLIC_. It must remain server-side only to prevent unauthorized access to your media library.
The PowerFlow needs a sterile environment to operate in. We don’t want it auditing every vacation photo in your library, only the ones sent for governance.
Use an Unsigned Upload Preset to allow your Next.js frontend to upload directly to Cloudinary without requiring a signature from our server for every single interaction.
- Go to your Cloudinary Settings > Upload.
- Create a new preset and set the Signing Mode to
Unsigned. - For security, restrict the preset to only allow uploads to the
governance_labfolder. - Under Upload Metadata, ensure you allow the
governance_scan_pendingtag. This tag is the on switch for your AI agent.
By directing all uploads to a specific folder (e.g., governance_lab), you’ll make your PowerFlow trigger more precise. This prevents “leakage” where the AI agent might accidentally run on assets it wasn’t intended for.
Now, enter the PowerFlow canvas to build the brain of your operation. This is where you’ll transition from a static application to an active, agentic system.
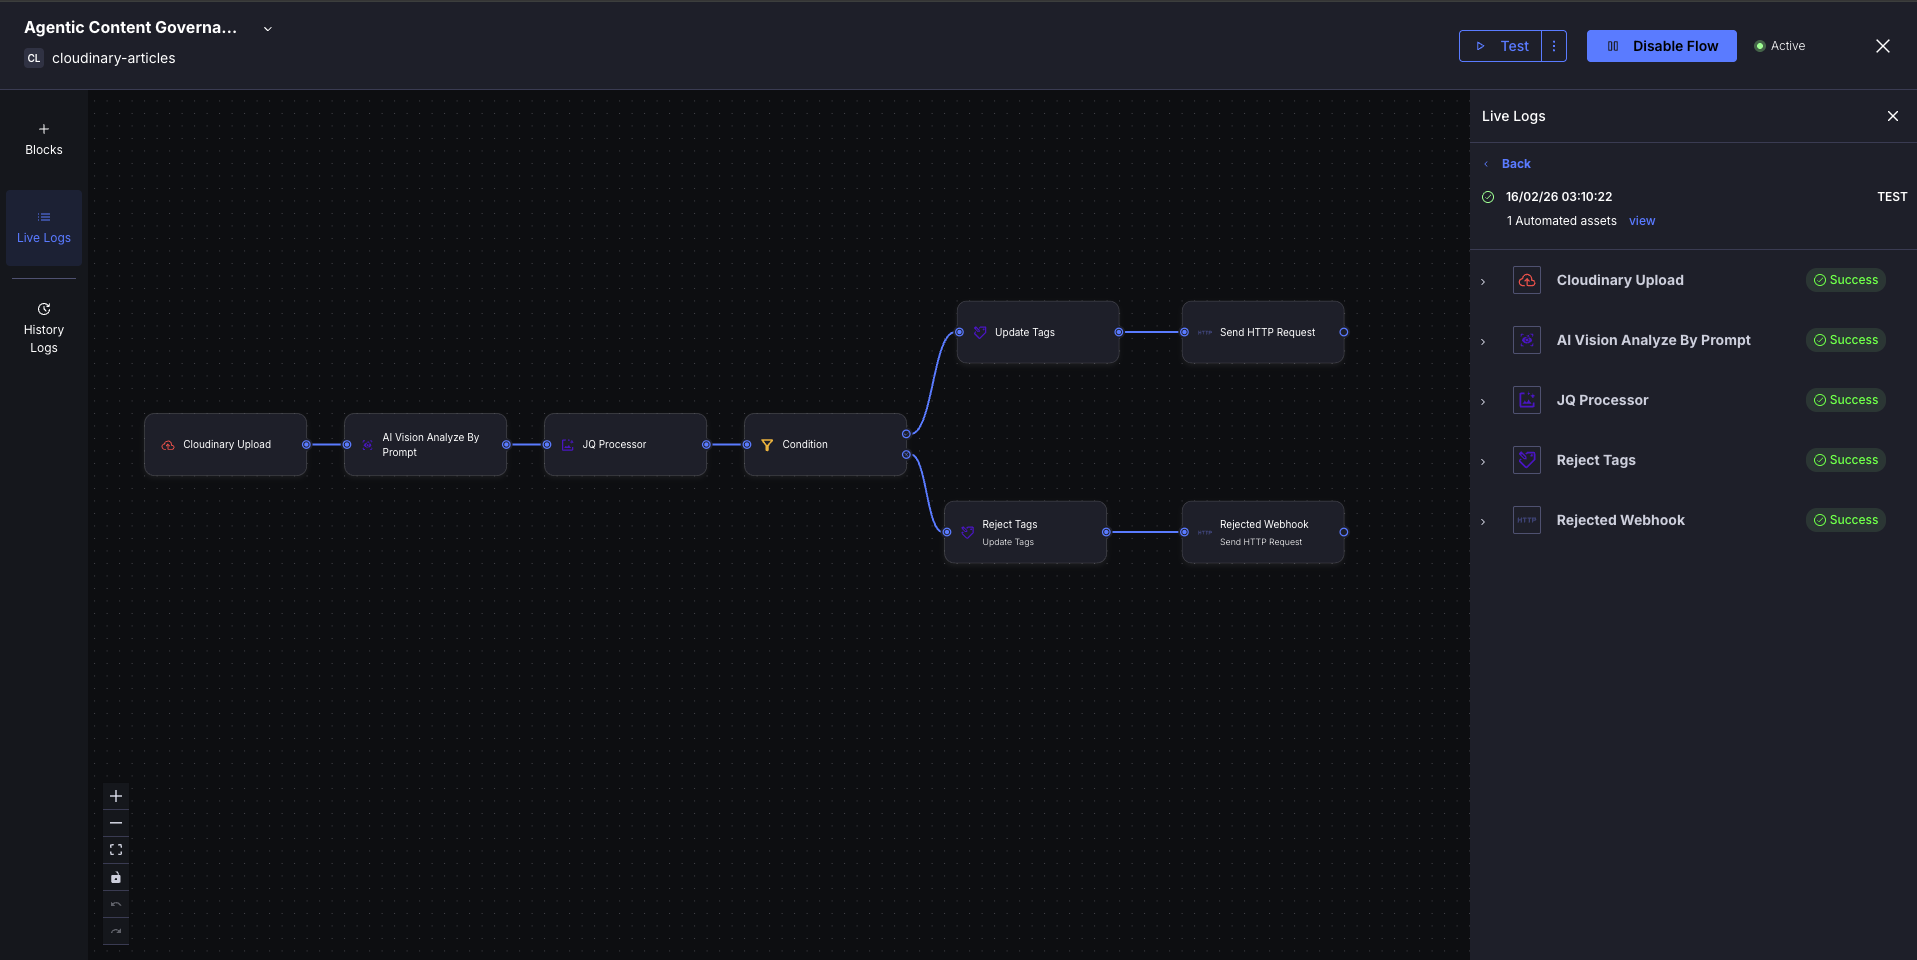
This visual representation shows the end-to-end logic of your agent. It begins with an upload trigger, moves through AI visual analysis and JQ data parsing, and finally branches into automated tagging and webhook notifications.
Every PowerFlow starts with a “Trigger Block”. For this project, use the “On Asset Upload” block.
-
Filter logic. To ensure the agent only wakes up for your specific governance task, configure the block to listen for the tag:
governance_scan_pending. - The “engine.” This filter acts as a guardrail. When your Next.js app uploads an image with this tag, Cloudinary sends a signal to this PowerFlow to start the audit.
Next, drag in the “AI Vision: Analyze By Prompt” block. This is where the raw image is converted into structured intelligence.
As for the prompt, you’ll need more than “is this good?” Provide a concise, yet detailed prompt:
“Analyze this e-commerce product image for quality. Ensure it is well-lit, centered, and has no distracting text overlays. Return your analysis in a strict JSON format: { ‘valid’: boolean, ‘reason’: ‘string’ }.”
By forcing a JSON response, you’re using deterministic logic that your code can actually parse.
Want to dive deeper into the AI Vision block? Check out this Cloudinary blog post for a detailed look at how to use AI for automated categorization and moderation, mirroring the logic we’re building here.
Once the AI Vision block completes its audit, you’ll be left with a raw string of JSON. To turn this text into actionable logic, extract the specific values using a lightweight processing language called JQ.
Insert a “JQ Processor” block immediately after the analysis. This block acts as a bridge between the AI’s “thoughts” and our system’s “decisions.”
You’ll use a simple command to isolate the boolean value we need: fromjson | .valid
This transforms a complex text block like { "valid": true, "reason": "High quality" } into a simple true. This step is vital because it converts subjective AI analysis into a deterministic “Yes” or “No” that the PowerFlow can follow.
Now that you have a clean boolean value, use a “Condition” block to branch your workflow. This is where the agentic part of the governance happens.
- Configure the condition to check if the result of our JQ Processor is equal to (Boolean) true.
- The fork:
- If True: The asset follows the Approved path.
- If False: The asset follows the Rejected path.
By using this fork, you’ll ensure that every single asset uploaded to our Next.js app is automatically sorted without a human ever having to click a button.
With the logic forked, you’ll need the agent to perform two final actions: “Stamp” the asset with its new status and notify your Next.js application that the audit is complete.
Place an “Update Tags” block at the end of both the Approved and Rejected paths. This ensures your Media Library remains an organized source of truth.
- The Approved Path:
- Add Tags:
status_approved - Remove Tags:
governance_scan_pending
- Add Tags:
- The Rejected Path:
- Add Tags:
status_rejected - Remove Tags:
governance_scan_pending
- Add Tags:
By removing the trigger tag (governance_scan_pending), you’ll prevent the flow from retriggering in an infinite loop. The asset is now officially processed.
The final piece of the agentic puzzle is the “Send HTTP Request” block, which acts as the agent’s outbox, sending a signal back to your production environment.
- Method:
POST - URL:
https://ai-governance-hub-pi.vercel.app/api/webhook/cloudinary - The payload is sending a lean JSON object containing the
public_idand thestatus.
{
  "public_id": "{{$.On_Asset_Upload.result.public_id}}",
  "status": "approved"
}
Code language: JSON / JSON with Comments (json)
This step is what makes the UI self-healing. Instead of your app constantly asking Cloudinary, “Is it done yet?”, the PowerFlow proactively notifies your system the moment a decision is made.
Need to master the integration of these Cloudinary features into your Next.js projects? Check out this video guide for a deep dive that provides the perfect context for the webhook architecture you just built.
With your PowerFlow agent listening for the governance_scan_pending tag, you’ll need to build the “switch” in your Next.js frontend that triggers it. Use the CldUploadWidget from the next-cloudinary library to handle the heavy lifting.
In Next.js 16, third-party widgets like Cloudinary’s uploader can sometimes cause hydration mismatches because they rely on browser APIs that aren’t available during server-side rendering (SSR). To solve this, ensure your upload component is rendered on the client side only after the initial mount.
For the logic, you’ll isolate the uploader within a component that manages its own mounting state to ensure the widget only initializes once the browser environment is fully ready.
The critical connection between your frontend and PowerFlow happens within the widget’s configuration. Inject the “Agentic Trigger” by passing the governance_scan_pending tag.
/** * Main Engine: The Agentic Upload Trigger
 * Rule 1.1: See full implementation in GitHub repo
 */

<CldUploadWidget
  uploadPreset="your_unsigned_preset"
  options={{
    tags: ["governance_scan_pending"],
    folder: "governance_lab",
  }}
  onSuccess={() => {
    // Rule 2.2: Refresh the route to show the "Analyzing" state
    router.refresh();
  }}
>
  {({ open }) => (
    <Button onClick={() => open()}>Upload to Governance Lab</Button>
  )}
</CldUploadWidget>;
Code language: PHP (php)
By tagging the upload with governance_scan_pending, you aren’t just uploading a file; you’re dispatching a command to your PowerFlow agent to begin the audit. The user sees a button, but underneath, you’ve kicked off an entire AI-driven backend process.
View the full implementation here.
Looking to master the
CldUploadWidgetfor a native-feeling upload experience in Next.js? Check out this video guide for a deep dive that provides the perfect foundation for the frontend integration we are building here.
Now that your frontend can trigger the agent, you’ll need a way to display the results as they happen. Because the AI audit takes a few seconds, you can’t rely on a single static fetch. Instead, a “self-healing” UI will automatically update when the PowerFlow completes its work.
To fetch your audited assets with sub-second accuracy, use the “Cloudinary Search API”. Unlike standard listing methods, the Search API is indexed for high performance and allows you to filter by folder, tags, and custom metadata.
- Create a function in
src/features/governance/actions.tsthat queries yourgovernance_labfolder. - And use
.sort_by('created_at', 'desc')to ensure new uploads appear at the top immediately.
/** * Main Engine: High-Performance Asset Discovery
 * Rule 1.1: See full implementation in GitHub repo
 */
export async function fetchGovernedAssets() {
  return await cloudinary.search
    .expression('folder:governance_lab')
    .sort_by('created_at', 'desc')
    .execute();
}
Code language: JavaScript (javascript)How does the UI “know” when the AI has finished? Instead of complex WebSockets, you’ll use a clean Next.js polling pattern.
- If an asset in your list still has the
governance_scan_pendingtag, the UI displays a blurred “Analyzing” state. - Use a
useEffecthook in your client component that sets a small interval. - Every few seconds, it calls
router.refresh(). Because your gallery is a Server Component, this retriggers thefetchGovernedAssetsaction. - As soon as the PowerFlow removes the pending tag and adds
status_approved, the UI “flips” from a loading state to a high-res, verified image.
This creates a seamless experience where the user sees their content graduate from analysis to approval in real time.
View the full implementation here.
The final bridge in your architecture is the webhook. While your gallery uses polling for immediate UI feedback, the Webhook is the source of truth that allows your Next.js backend to react to the PowerFlow agent’s decision.
In Next.js, create a specialized route to listen for the POST request that you configured in Section 6.
- The file is
src/app/api/webhook/cloudinary/route.ts - The route receives the
public_idand thestatus. It then usesrevalidateTagwith a mandatory profile argument. By setting{ expire: 0 }, you’ll ensure that the next request to your gallery skips the cache and fetches the fresh AI-stamped data from the Search API.
/** * Main Engine: The Webhook Listener
 * Rule 1.1: See full implementation in GitHub repo
 */

export async function POST(request: Request) {
  try {
    const body = await request.json();
    console.log('--- MediaFlows Webhook Success ---', body.public_id);
    revalidateTag('governance-list', { expire: 0 });

    return NextResponse.json({
      success: true,
      message: 'Cache revalidated',
      asset: body.public_id
    });
  } catch {
    return NextResponse.json({ error: 'Invalid Webhook Payload' }, { status: 400 });
  }
}
Code language: JavaScript (javascript)
View the full implementation here.
You’ve built a high-performance content pipeline that moves beyond the limitations of “hard-coded” validation. By offloading the reasoning to Cloudinary PowerFlows, you’ve created a system that’s both flexible and powerful.
The bridge between Next.js and MediaFlows represents the future of agentic content management. Whether you’re building an e-commerce marketplace, a social media platform, or an asset portal, this hybrid model provides a scalable foundation.
Sign up for a free Cloudinary account today to get started.
Resources:
- Live Demo: https://ai-governance-hub-pi.vercel.app/
- Full Source Code: https://github.com/musebe/ai-governance-hub
- MediaFlows Documentation: Cloudinary Docs


