Cloudinary Assets Overview
Last updated: May-27-2025
Cloudinary Assets introduction
Cloudinary Assets, Cloudinary's Digital Asset Management (DAM) product, enables you and your creative and marketing teams to collaborate throughout all steps of your digital asset management workflow. From uploading photographers' photos and videos, to tagging and sharing them, performing sophisticated searches to find just the right assets for a particular new design or campaign, and up to the point that final assets are selected and ready to go live.
Cloudinary Assets is designed for large organizations and enterprises delivering content to websites or apps. Images, videos and other files, refined using Cloudinary Assets by marketers, are then passed to developers. These developers can utilize Cloudinary's media management API to seamlessly transform and distribute the polished media assets, ensuring optimized, rapid, and responsive delivery to customers. For more information, see Get started with Assets.
- The Assets user guide provides comprehensive explanations of all DAM features.
- If you have a Cloudinary Master admin or Admin user role, it may be your responsibility to define the way the Assets will be used in your organization. The Assets administrator guide provides detailed information about a variety of DAM-related administration activities that you can perform.
We also invite you to check out our Assets video tutorials to learn more about getting started with Cloudinary Assets and the features it offers.
Cloudinary Console
You can use the web-based Cloudinary Console to administer your Cloudinary account and product environments.
What's a product environment?
A product environment (previously known as a sub-account) is an entity within your account that includes an asset repository, some product environment-specific settings, and other elements that are stored in your product environment and help you manage it, such as upload presets, named transformations, and more.
A product environment can represent a production or staging environment, different organizations, products, or geographic sites that you want to manage separately within a single Cloudinary account.
 , Image
  , and Video
  , using the Product Selector located at the top left of your Console.
 Users with the Media Library user and Media Library admin roles can't switch products.
This section describes the options available for Assets. For details on working with Image and Video APIs, see the Service overview. For information about our other products, see More products.
Left Sidebar
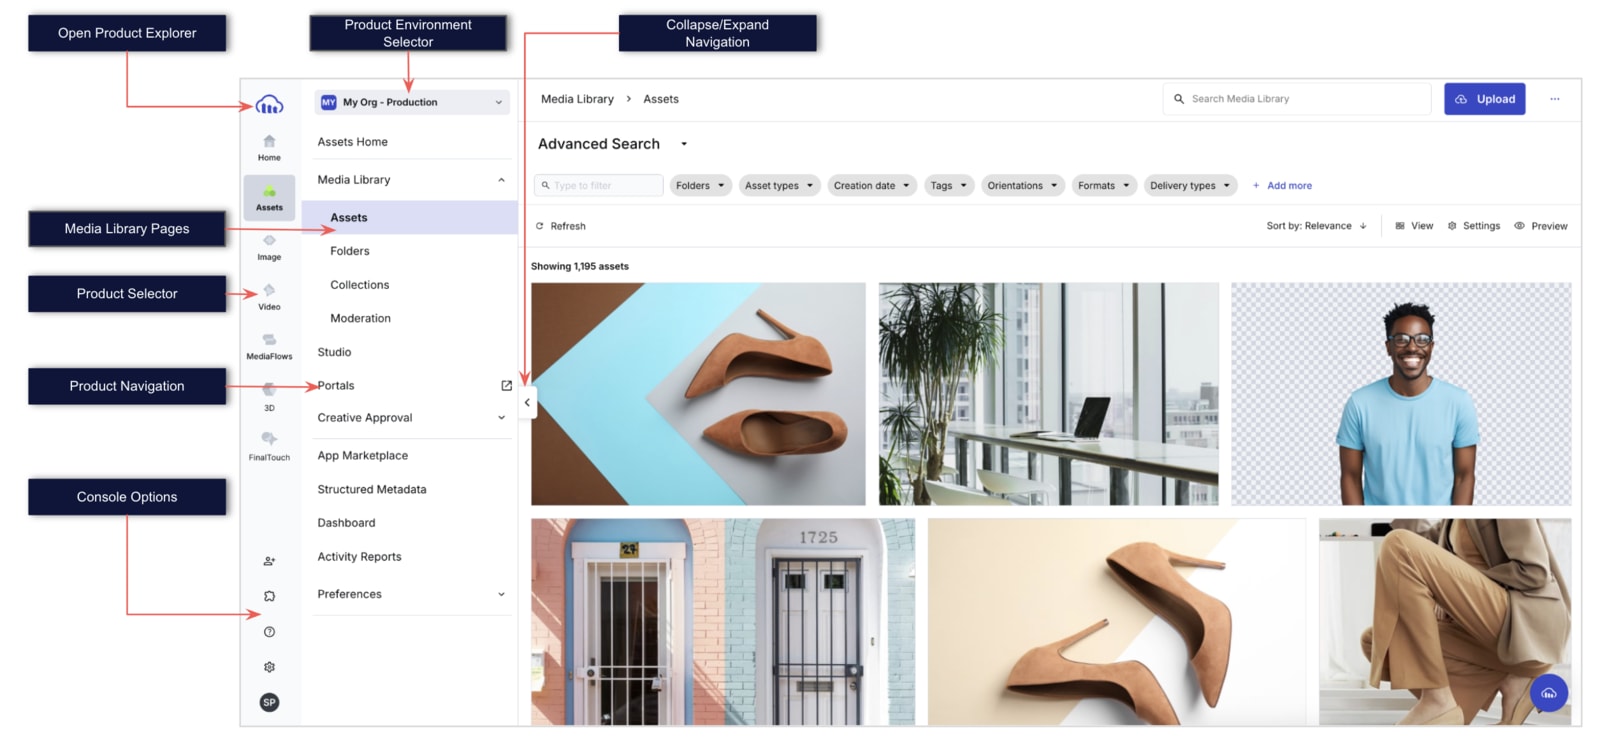
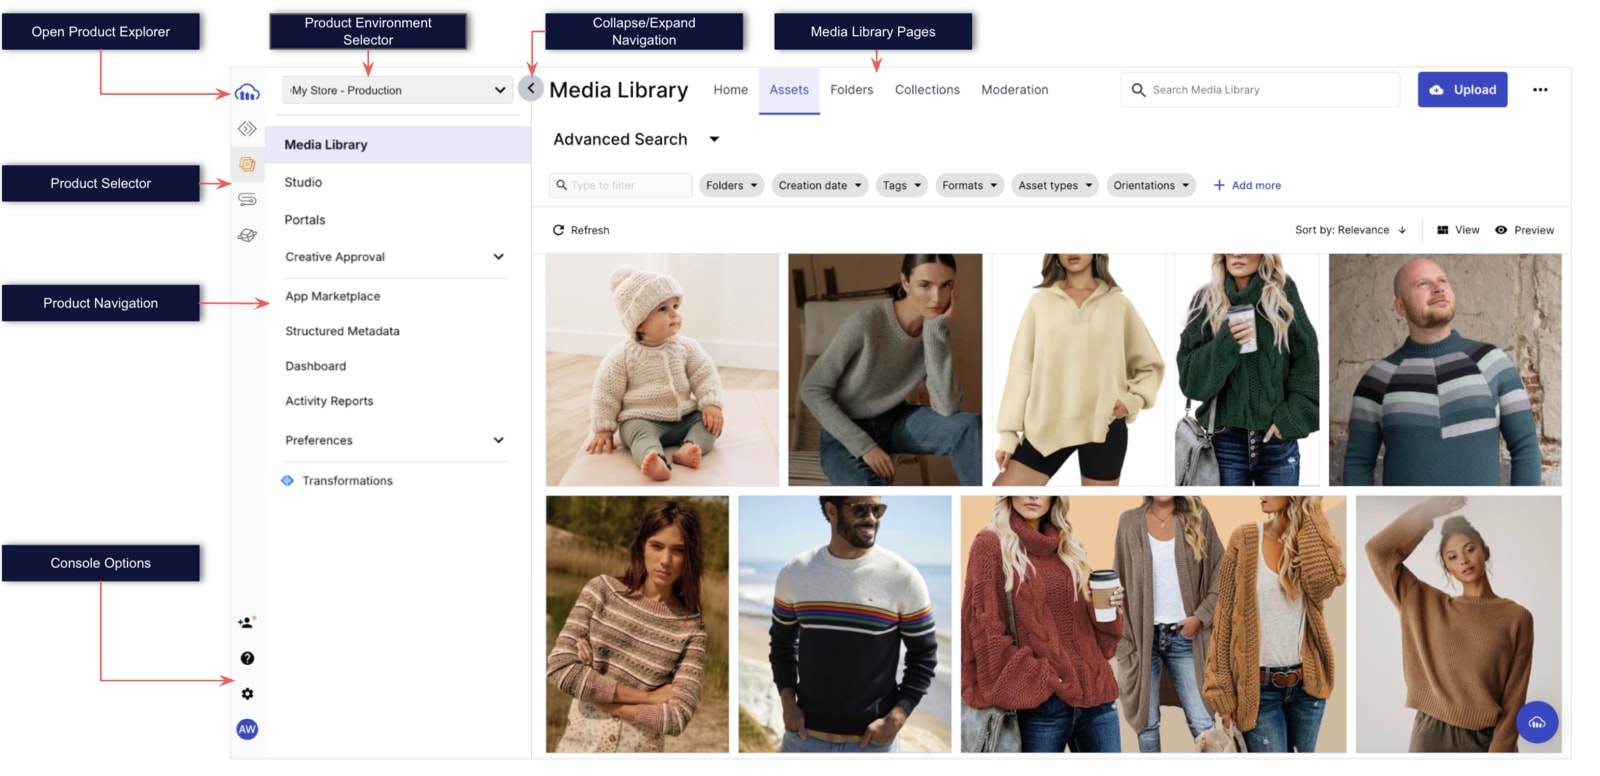
The following options are available from the Console Options sidebar, located at the far left of the Console:
| Option | Description |
|---|---|
 |
Open the Product Explorer to learn about Cloudinary's product offerings, including descriptions, feature lists and insights into how each product can significantly enhance your workflow. |
| Product Selector | Click the logo for the Cloudinary product you want to work with to display the navigation options for that product. |
| --- | |
| Invite New Users | Add new users to your account. Learn more. |
| Add-on Marketplace | View details about all available add-ons and see your usage for those you're already subscribed to. |
| Help | Access a variety of resources to learn more about working with Cloudinary including documentation, get customer support, view the latest release notes for your active product, find training courses, read blog posts, and more. |
| Settings | Manage your personal profile, account-level settings, and product environment-level settings. These settings allow you to control and tweak almost every aspect of your asset pipeline behavior. |
| Profile Avatar | Jump to your profile settings, invite friends to sign up for Cloudinary and earn extra credits, or log out of your account. |
Assets Console
- Some accounts created on or after Apr-23-2025 have the new App Console.
In this version, the first item on the left navigation, below the Cloudinary logo, is the Home node. - All accounts created prior to Apr-23-2025 have the Classic Console.
In this version, the first item on the left navigation, below the Cloudinary logo, is the Programmable Media node.
Over the course of the coming quarters, all accounts will gradually move to the new App Console.
App Console (new)
Classic Console
Assets navigation options
When the Assets product is selected, the following options may be available from the Product Navigation menu, depending on your user role.
While Assets administrators have access to all or most of the options, Media Library users are only able to access the Media Library.
| Option | Description |
|---|---|
| Product environment selector | Enables you to switch between the product environments or, depending on your role, create a new one. Note: Free accounts support only one product environment. |
| --- | |
|
Assets Home (App Console only) |
A UI for easily browsing and searching through your existing assets, drag & drop upload, and much more. For details, see Media Library features and the Assets user guide. Note: In the App Console, Assets Home is a standalone page in the Product Navigation (separate from the Media Library pages). If you have the Classic Console, you’ll find this same functionality within the Media Library, accessible via the Home tab. |
| Media Library | A UI for easily browsing and searching through your existing assets, drag & drop upload, and much more. For details, see Media Library features and the Assets user guide. |
| Studio | Easily apply transformations and AI-driven actions to multiple images through an intuitive interface. You can create variations and, if you're an admin, save templates for future downloads. For more information, see Studio. Note: This feature is a premium offering for Assets Enterprise plans, and its availability depends on your account setup. |
| Portals | Securely share, curate, and track media asset usage with portals designed for external stakeholders like partners, clients, and press. Provide controlled access to brand resources, approved content, and more. For more information, see Portals. Note: This feature is a premium offering for Assets Enterprise plans, and its availability depends on your account setup. |
| Creative Approval | Streamline asset reviews by enabling teams to view, comment, and approve creative content through structured, stage-based workflows. For more information, see Creative approval flows - for admins and Creative approval proofs - for users. Note: This feature is a premium offering for Assets Enterprise plans, and its availability depends on your account setup. |
| App Marketplace | A marketplace for selecting apps to extend your Media Library's core functionality. For more information, see DAM Apps. |
| Structured Metadata | Create and manage a wide variety of structured metadata fields for your product environment. You can set a variety of options, including default values, mandatory fields, and conditional rules that dictate when a field or field value will be available. For more information, see Structured metadata. |
| Dashboard | View summary details and trend graphs to help you analyze your overall DAM usage in terms of total assets, collection activity, and uploads. |
| Activity Reports | Generate a report that lists account management activities as well as all actions performed on tracking-enabled product environments. Note: This feature is a premium offering for Assets Enterprise plans, and its availability depends on your account setup. |
| Preferences | Enables you to control the behavior and/or appearance of the Media Library, such as determining the way custom metadata is displayed and maintained or what's included in the results when you run an advanced search. For more information, see Media Library preferences. |
|
Transformations (Classic Console only) |
Provides various options for generating and managing transformations through the Transformation Builder and transformation templates. These templates can be applied to assets in the Media Library, instantly generating different asset variations for preview or download. For details, see Named transformations. Notes: - Availability of this premium feature for Assets is plan-dependent. - In the Classic Console, you can access the Transformations page from the Product Navigation Menu. If you have the (App Console only), you’ll find this same functionality by selecting assets in the Media Library and choosing Transform from the Edit drop down in the assets toolbar. |
The following differences apply to the Assets Free plan:
- The Portals, Creative Approval, Dashboard, Activity Reports, and Preferences features are unavailable.
- The Structured Metadata page is read-only and doesn't provide editing or management capabilities.
- The Dashboard feature is limited.
To learn more about the features available in the Assets Free plan and how they can support development workflows, see Media Library for Developers.
For upgrade options or more information, contact us.
Media Library features
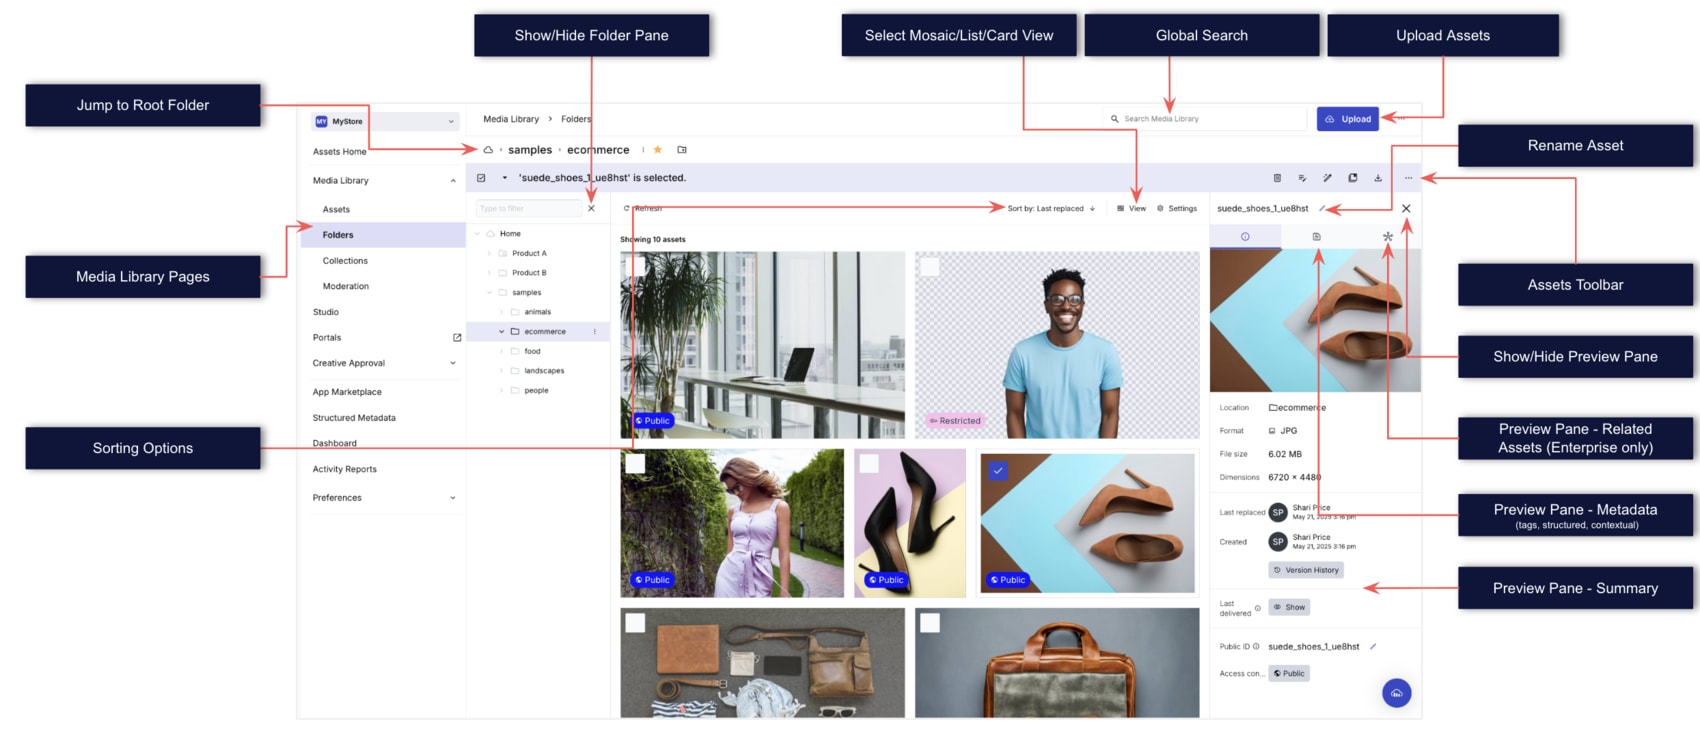
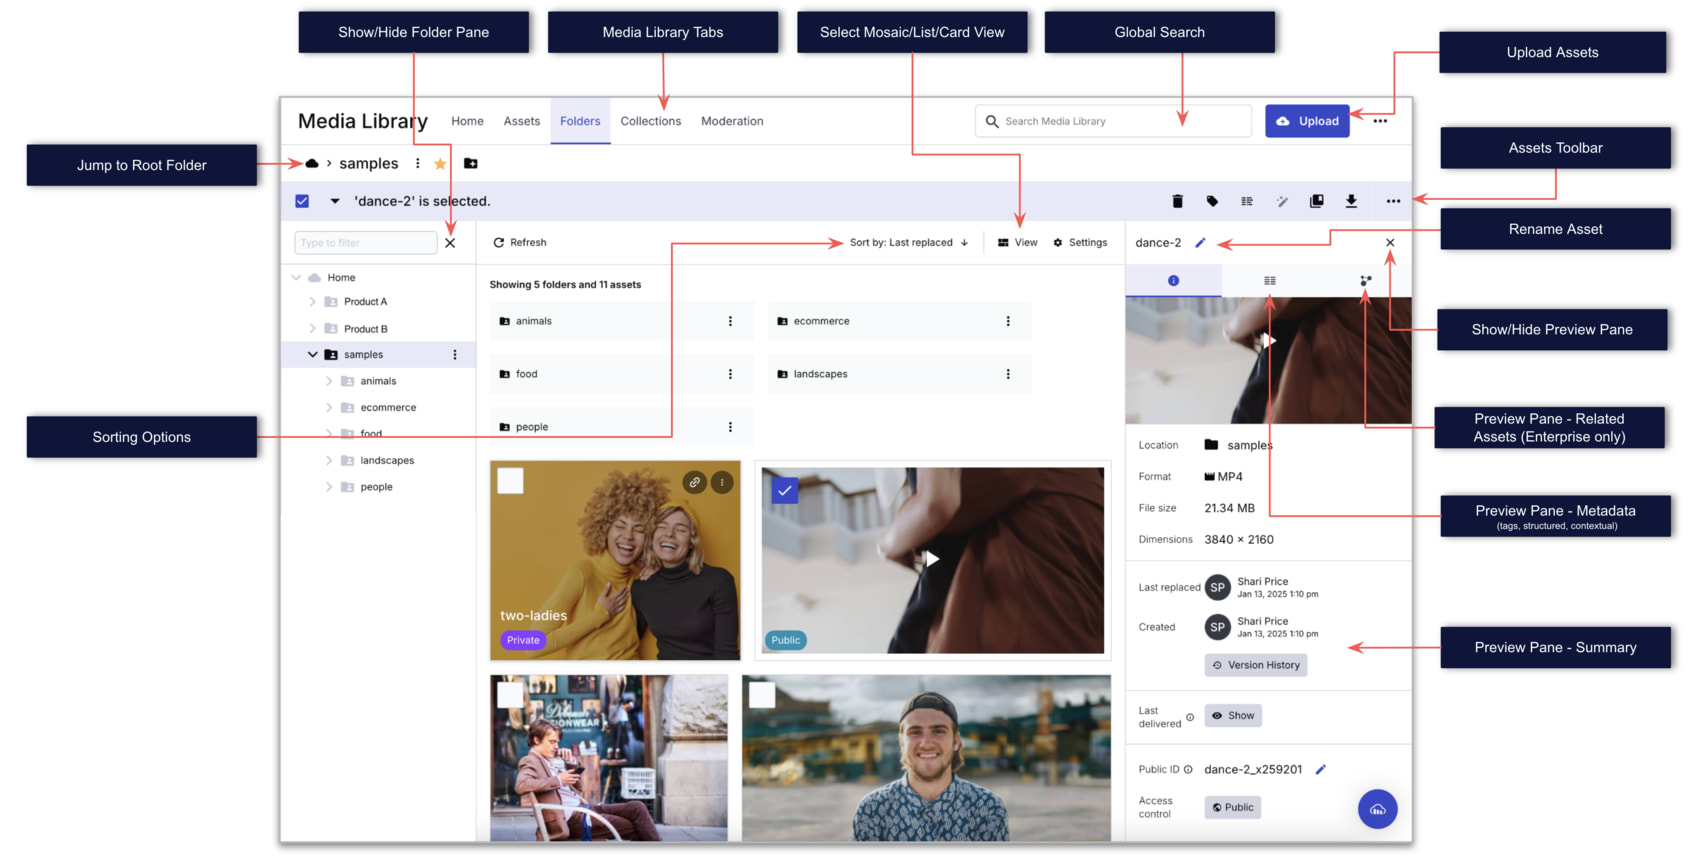
The Cloudinary Media Library provides you access to all your digital assets and is the main touch point into the Cloudinary's Assets product. All the features mentioned here are described in depth in the Assets user guide.
This documentation focuses on the full feature set available to Assets Enterprise customers. Where relevant, we note when a feature isn't available on the Assets Free plan.
To learn more about what’s included in the Assets Free plan and how it supports development workflows, see Media Library for Developers.
From the Media Library you can:
- Switch between different Media Library pages.
- If you have the App Console , use the left Product Navigation Menu.
- If you have the Classic Console , use the tabs at the top of the Media Library.
- Upload new images, videos, audio, or other files.
- Create and navigate through folders or share folders with user groups.
- Create and browse collections or share collections with user groups or external parties.
- Perform advanced searches.
- Select multiple assets to perform bulk operations including delete, add/edit tags, move, download, or review moderated assets.
- Select a single asset to view or update basic asset details, view or activate advanced asset analysis operations, or to generate transformations for that asset.
App Console
Classic Console
Media Library pages
The Media Library offers the following pages:
-
Assets Home or Home:
- In Assets Enterprise plans:
- Provides quick access to featured, predefined searches, bookmarks, and a personalized hero image selected by your administrator in the Media Library Preferences.
- If your account has creative approval, displays proofs waiting for your review and approval.
- Displays saved searches your administrator shared with you.
- Shows folders, collections, and saved searches that you starred as favorites.
- In the Assets Free plan:
- Offers a quick and visual way to access common actions like uploading and searching.
- In both plans, you can perform actions on your assets using the asset context menu.
- In Assets Enterprise plans:
- Assets: Provides a flat display of all assets sorted by one of the selected sort options and enables Advanced Search of assets via a large variety of filters.
- Folders: Displays assets within their folder structure. Selecting this tab navigates you to the root folder.
- Collections: Displays assets within their respective collections.
- Moderation: Allows you to view and reject or approve assets in any stage of moderation. (You may or may not see this tab, depending on your user permissions.)
Supported browsers (Media Library and Console UI)
The Cloudinary Media Library and other areas of the Console UI are designed to work with the latest web browsers. If you use an outdated browser, some Media Library or Console features may not be available or may not work as expected. Additionally, using a modern browser can help keep your computer and data safer.
Therefore, we recommend that you use one of the following supported browsers:
| Chrome | Download | Update installed version |
| Firefox | Download | Update installed version |
| Safari* | Download | Update installed version |
| Edge | Download | (updates available from within the browser) |
- Internet Explorer: To enable us to take advantage of modern web functionality and to provide the best user experience, the Cloudinary Media Library and other areas of the Console UI can no longer be used from the Internet Explorer web browser.
- Safari: The Safari browser may not work well when accessing the Media Library from an external platform. Use one of the other recommended browsers listed above when working with Cloudinary via these integrations.


