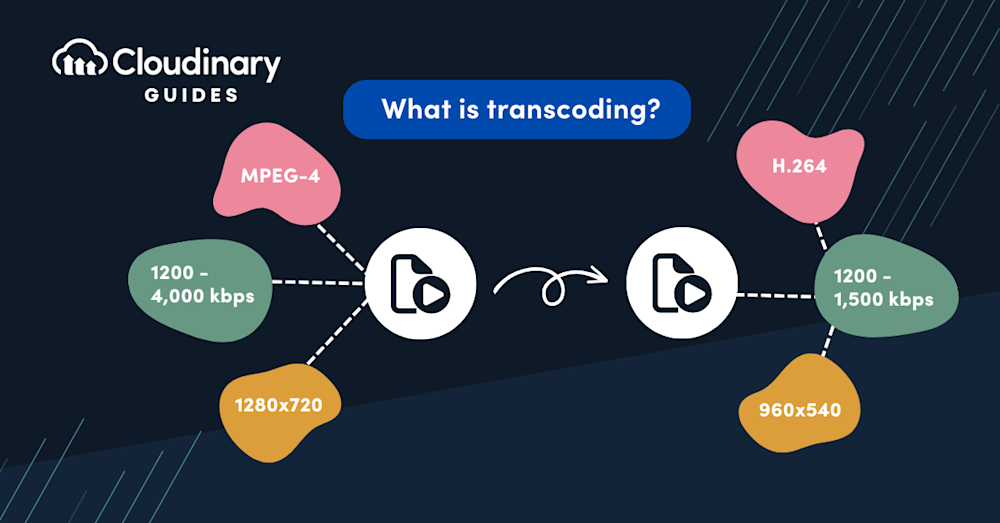
Video transcoding is the process of converting a video file from one format or codec to another, ensuring compatibility across devices, platforms, and streaming services. This process involves three main steps: decoding the original video, optionally making adjustments such as changing resolution, bitrate, or frame rate, and then re-encoding the video into the desired format. Transcoding is essential for optimizing file size and quality, enabling smooth playback, and supporting adaptive streaming for varying network conditions. For example, you might transcode a Windows Media file to MP4 so it can be played on a portable device, or convert a high-definition video to a lower resolution. Here are some other reasons why video transcoding might be useful:
- Reduce file size: Transcoding can reduce the size of a video file.
- Enable playback: Transcoding can allow videos to play on devices that don’t support certain codecs.
- Improve streaming: Transcoding can help create optimized video streams for more widely supported streaming formats, which can ensure live streams are compatible with a variety of screens. It can also help minimize latency and buffering times for video streaming with slower data speeds.
- Editing Efficiency: Transcoding can create lower-resolution proxy files to speed up editing workflows on less powerful machines.
- Editing Efficiency: By transcoding to more efficient codecs or reducing resolution, you can significantly cut down on storage requirements.
The article delves into the technical aspects and benefits of video transcoding. It explores how transcoding enables the conversion of video files into different formats to meet various needs such as compatibility with different devices and platforms, and improved playback performance.
This is part of a series of articles about video editing effects.
In this article:
- What is a Transcoder?
- What is Live Transcoding?
- How Video Transcoding Works: Decoding, Adjustments, and Encoding
- When Should You Transcode Video?
- How Do You Transcode Video?
- What Are the Types of Video Transcoding?
- Lossless vs. Lossy Transcoding
- Video Transcoding Example Use Cases
- What Are the Best Practices of Video Transcoding?
- How Do You Transcode Video With Cloudinary?
- Optimize Your Video Management with Cloudinary
What is a Transcoder?
A transcoder is a system or tool used in video streaming which is responsible for transcoding processes. Transcoding essentially refers to the conversion of a video’s format, including its bitrate, codec, or resolution. This process allows the video to be accessible and playable on different devices.
Because transcoding can be a complex and computationally-intensive operation, it requires powerful hardware resources such as faster CPUs or graphics acceleration capabilities. A transcoder usually takes the form of a streaming server or a cloud-based streaming platform.
What is Live Transcoding?
Live transcoding regulates the process of transcoding live videos in real time. The process might seem similar to pre-recorded video transcoding but it’s quite different and challenging as well. Live transcoding is significant in maintaining a successful live stream since it enables adaptive bitrate streaming (ABR) methodologies.
Despite its importance, live transcoding can also lead to stream latency as it introduces a delay between the publisher and the viewer. That means while selecting a transcoder for live transcoding, you need to consider its ability to handle the quality, speed, and scaling demands.
How Video Transcoding Works: Decoding, Adjustments, and Encoding
The video transcoding process consists of three main steps:
- Decoding: The original video file is decoded, reversing the previous encoding to make the raw video and audio data accessible for processing.
- Adjustments: During or after decoding, adjustments can be made to the video, such as changing the resolution, bitrate, or frame rate to suit the target device or platform.
- Encoding: The processed video data is then re-encoded into the desired output format or codec, ready for distribution or playback.This workflow ensures that videos are optimized for compatibility, quality, and efficiency across a wide range of use cases.
When Should You Transcode Video?
By transcoding video, you accomplish the following:
- Improve editing efficiency by generating proxy files with reduced resolution and bitrate, easing playback and editing on less powerful systems.
- Optimize storage requirements by transcoding to more efficient codecs or lower resolutions, reducing disk space usage.
- Simultaneously create a set of time-aligned video streams, each with a different frame size and bitrate.
- Convert codecs and protocols for a larger audience.
- Package those internet-friendly streams into adaptive streaming formats, such as HLS, enabling playback on almost any screen.
Transcoding is essential for video delivery and streaming if—
- Your software or device does not support the format of your footage. In that case, transcoding is the only solution.
- The original footage uses up too many system resources, as in the case of a huge 3K video attempting to play on a mobile device. As a resolution, you must transcode the file for a lighter format.
- Your video format, such as HD DVD, is out of date. Transcode the media file to a modern format and you’ll be home free.
How Do You Transcode Video?
Even though the video-transcoding process varies from case to case, a few practices are in popular use. Here is an example:
Step 1: Inputs
Two inputs are required:
- Details of the input file or format, which you can determine by analyzing the transcoded media.
- The complete set of parameters for the output, which you can access from the rules within the media’s supply-chain system. Alternatively, you can derive it from the metadata according to the variables in the workflow engine.
Step 2: Transcoding pipeline
The pipeline involves processing all the components, such as video, ANC, and audio, in the transcoded file. When transcoding starts, the metadata is split as needed among the components. The transcoder analyzes the file and instructions and then configures the pipe. To shorten the process, concatenate the steps involved instead of performing them sequentially.
Here is an example of how transcoding works with one component—a video:
- Demux the input: Extract all the compressed data from the package, the wrapper, or both.
- Decode the video: Decompress the file as close as possible to the original uncompressed frames.
- Process the video: Scale, interlace, deinterlace, adjust frame rate, or perform advanced image-processing steps that change picture elements to improve the perceived result of encoding.
- Encode the video: Do that with the required destination codec.
- Mux the video: Pack it into a wrapper or package, combining the video with other components as required.
Pro Tip!Consider Cloudinary Video API
When working with video, consider using Cloudinary’s Video API, which offers real-time video transcoding, content-aware compression, on-the-fly video transformation, and more.
-> Learn More About the Capabilities of Cloudinary’s Video API
What Are the Types of Video Transcoding?
There are three main types:
- Standard transcoding, which involves changing the video or audio to transcode a video or stream. For example, streaming a digital conference usually requires working with IP cameras set within a conference space. If those cameras use the Real Time Streaming Protocol (RTSP) and cannot create a video stream suitable for online playback, you can convert the content into an adaptive bitrate stream by transcoding the video.
- Transsizing (image scaling), which involves resizing a video frame. For example, you can lower a 4K resolution to 1,080 pixels.
- Transrating, which changes the bitrate without modifying the video content, format, or codec. For example, to ensure that the video can fit into less storage space or can be broadcast over a lower bandwidth connection, reduce an 8-Mbps bitrate to 3-Mbps.
Transrating comprises three types:
- Lossless to lossless, which maintains the quality of the video across formats, enabling you to take advantage of more effective hardware or compression algorithms.
- Lossless to lossy, which reduces the quality of the video but yields a smaller and faster file or one that’s compatible with the requirements of a certain platform, browser, or player.
- Lossy to lossless, which ensures that the video quality does not deteriorate further during the conversion process. Note that, by adopting this process, you cannot regain the data and quality previously lost through compression.
Lossless vs. Lossy Transcoding
Lossless transcoding converts a video file without any loss of quality, similar to compressing a file without losing data. This is useful when you want to maintain the highest possible fidelity, such as for archiving or professional editing workflows.
Lossy transcoding reduces the file size by discarding some data, which may result in a slight decrease in video quality. This approach is commonly used for streaming, sharing, or storing videos where bandwidth or storage is limited, and a balance between quality and efficiency is needed.
Video Transcoding Example Use Cases
Here are some examples of transcoding use cases:
Converting a Windows Media file to MP4 for Portable Device Playback
The ubiquity of portable devices, such as smartphones and tablets, has driven a need for universally compatible video formats. Windows Media files, while once popular on PCs, are not natively supported on many of these devices.
By transcoding a Windows Media file to the more widely accepted MP4 format, users ensure that their videos can be played seamlessly across a broader range of devices, including iOS and Android smartphones, tablets, and many other MP4-compatible platforms.
This conversion increases accessibility and simplifies sharing and playback without needing specialized apps or software.
Adjusting Bitrate to Make 4K Video Streamable
4K videos, known for their ultra-high-definition clarity, come with significantly large file sizes due to the extensive data required to represent their detailed imagery. Streaming such heavy files directly can cause buffering issues, leading to a subpar viewing experience, especially for viewers with limited bandwidth.
By transcoding and adjusting the bitrate of these 4K videos, the file size can be reduced, making them more suitable for streaming without compromising excessively on visual quality. This ensures that viewers can enjoy high-quality video streams without frequent interruptions or long loading times.
Creating Lower Resolution “Proxy” Files from Camera Captures
When dealing with high-resolution footage directly from cameras, video editors often face challenges in real-time playback during the editing process due to the hefty data loads. Transcoding these high-resolution files into lower resolution, smaller “proxy” files can alleviate this problem.
These proxy files retain the same temporal characteristics as the original footage but are much easier to handle and manipulate in editing software. Editors work with these lighter files during the editing process and, once completed, the final edit can be conformed back to the original high-resolution footage for final export.
Transcoding Apple ProRes to H.264 for Delivery
Apple ProRes is a high-quality, lossless codec primarily used in professional video editing environments for its superior color fidelity and flexibility in post-production. However, due to its large file size, it’s not optimal for wide-scale distribution or streaming on the internet.
Before delivering the final video product to audiences or clients, it’s common practice to transcode from ProRes to a more compressed codec like H.264. H.264 retains a good balance between file size and quality, making it an excellent choice for delivery, especially for online platforms and streaming services.
This conversion ensures that the final product is accessible and streamable to a broad audience without requiring vast amounts of bandwidth or storage.
What Are the Best Practices of Video Transcoding?
Take the steps below to produce high-quality video content through transcoding.
1. Set a two-pass variable bitrate (VBR).
Encode high-quality videos with various scene types through a two-pass VBR. Unlike the regular VBR and CBR [constant bitrate], a two-pass VBR features two encoding stages:
- The first stage computes the ultimate bitrate required for all the keyframes in the video.
- The second stage renders the entire video based on those bitrates.
A two-pass VBR chooses keyframes for the scene changes, with the keyframe’s encoding actions relying on the previous and subsequent keyframes. That makes for an effective bitrate for rendering top-quality, prerecorded—but not live-streaming—videos.
2. Select the right bitrate.
Be sure to pick the correct bitrate before encoding video. Such a practice is particularly ideal for CBR-encoded videos that encode at the highest bitrate. Also, keep your VBR the same as the pixel width of your video.
Additionally, the correct bitrate varies according to the kind of video you are encoding. Animated videos play well even at average-to-low bitrates, whereas action movies or videos with dynamic adjustments typically encode at higher bitrates to enhance the quality.
Blocking artifacts, also called pixelations, are formed by an encoding obstruction, which negatively impacts quality during compression. To minimize those artifacts, advance the effectiveness of High Efficiency Video Coding (HEVC) by setting the vertical and horizontal frame-size measurements as multiples of 16.
3. Develop adaptive sets.
For a smooth video playback, create adaptive sets, which are transcodes of the same video with several bitrates. To do that, use adaptive streaming tools to produce a video copy that captures the viewer’s connection speed for a sleek viewing experience.
How Do You Transcode Video With Cloudinary?
Transcode videos the smart way by having Cloudinary automatically select the best codec and the most suitable video format for you. That task, originally slated for images only, now also applies to videos as an integral part of Cloudinary’s video APIs.
Besides, Cloudinary delivers the appropriate video format and codec (H.264, HEVC, or VP9) for the viewing device and browser—a future-proofed capability that will accommodate next-generation codecs like AV1. That’s peace of mind exemplified.
To add the capability of automatic, browser-based format and codec selection, simply set the fetch_format parameter to auto (f_auto in URLs). Most Chrome users would then receive a VP9-encoded WebM file; Safari users, an HEVC-encoded MP4 file. In case those formats do not work on the requesting browser, Cloudinary delivers the video as an H-264-encoded MP4 file, which plays well in almost all browsers.
On top of all that, you can combine the automatic format-selection feature (f_auto) with Cloudinary’s automatic quality feature (q_auto) for even more impressive results. With q_auto, an intelligent quality and encoding algorithm analyzes video content to pinpoint the best quality-compression level and optimal encoding settings, ultimately delivering a premium-grade, small-sized video. A win-win, bar none!
Optimize Your Video Management with Cloudinary
Streamline your video transcoding processes and enhance your viewer’s experience with Cloudinary’s advanced video management solutions. Leveraging the latest in codec technology and automatic format selection, Cloudinary ensures that your videos not only meet but exceed the current standards for quality and performance. Whether it’s through intelligent compression algorithms or adaptive format delivery, our tools are designed to provide seamless video playback tailored to every user’s device and browser.
Take the next step towards optimizing your video content—try Cloudinary today and witness the difference in your digital media projects!
Related content: Read our guide to transparent video and video tagging.


