Images are at the heart of every great website. Consequently, image optimization is vital, substantially impacting user experience, page load times, and search engine rankings. However, managing and optimizing images can be daunting, hindering performance without the right tools.
Meet Gatsby, a game-changer in the world of website development. This modern, open-source framework empowers developers to create fast, visually captivating websites that are user and search engine favorites. Cloudinary seamlessly integrates with Gatsby, packing a powerful punch that makes your image workflow a breeze. Its robust features and benefits elevate the performance and aesthetics of your Gatsby-powered projects.
Dive into this article as we explore how to integrate Cloudinary with Gatsby, unlocking the full potential of spectacular visuals and lightning-fast loading times.
Image Optimization with Gatsby
Gatsby’s modern, performance-focused web architecture excels notably in handling image optimization natively. The secret sauce to this capability is a robust suite of plugins working synergistically to deliver an efficient, seamless image experience. The gatsby-plugin-image plugin, for instance, simplifies image layout and processing configurations. Additionally, Gatsby uses numerous other plugins to handle image transformations within React, but this doesn’t work at scale or fully transform the image.
It’s also key to note that Netlify — Gatsby’s parent company — no longer supports image optimization through its own platform. This shift presents developers with both a challenge and an opportunity. While it does remove one means of image optimization, it also opens the door to exploring other potentially more powerful and flexible solutions.
Taking Gatsby Image Optimization to the Next Level with Cloudinary
Cloudinary is a versatile and feature-rich platform designed to address the diverse needs of media management, encompassing images, videos, and other multimedia assets. It offers a powerful image and video manipulation engine at its core, allowing developers to perform a wide range of transformations effortlessly. These transformations include resizing, cropping, format conversion, and quality adjustment, enabling precise control over media assets.
While Gatsby image optimization excels during the build process, Cloudinary complements these capabilities by offering real-time, on-the-fly image optimization. This means images are optimized during static site generation and runtime, catering to dynamic content and user-generated uploads. Plus, Cloudinary’s adaptive delivery mechanism ensures that the right image is delivered to users based on their device, browser, and network conditions, further improving load times and user experiences.
Cloudinary seamlessly integrates with Gatsby through plugins to make it even easier, allowing developers to harness its power without disrupting their existing workflows. By combining Gatsby’s static optimization with Cloudinary’s dynamic image optimization, websites can strike an ideal balance between speed and visual appeal. This integration empowers developers to manage media assets, adapt content for various contexts, and deliver exceptional user experiences.
Integrating Cloudinary with Gatsby
Now that we know about the incredible capabilities of Gatsby image optimization, let’s dive into the exciting process of creating your own website and harnessing the full potential of Cloudinary for image optimization. In this demo, we’ll look at integrating Cloudinary with your Gatsby project, ensuring that your website looks stunning and provides an exceptional user experience.
Setup and Configuration
Before we begin with Gatsby image optimization, you have to ensure that you have the following prerequisites installed:
- Install Node.js. We recommend using the LTS (Long-Term Support) version for stability and compatibility. You can download it from the official Node.js website.
- Install Gatsby CLI. Gatsby CLI is your go-to tool for creating and managing Gatsby projects. If you haven’t already installed it, you can do so globally using
npm:npm install -g gatsby-cli
- Create a Cloudinary Account. To take full advantage of Cloudinary’s image optimization features, you’ll need a Cloudinary account. If you don’t have one yet, you can sign up for free at Cloudinary.
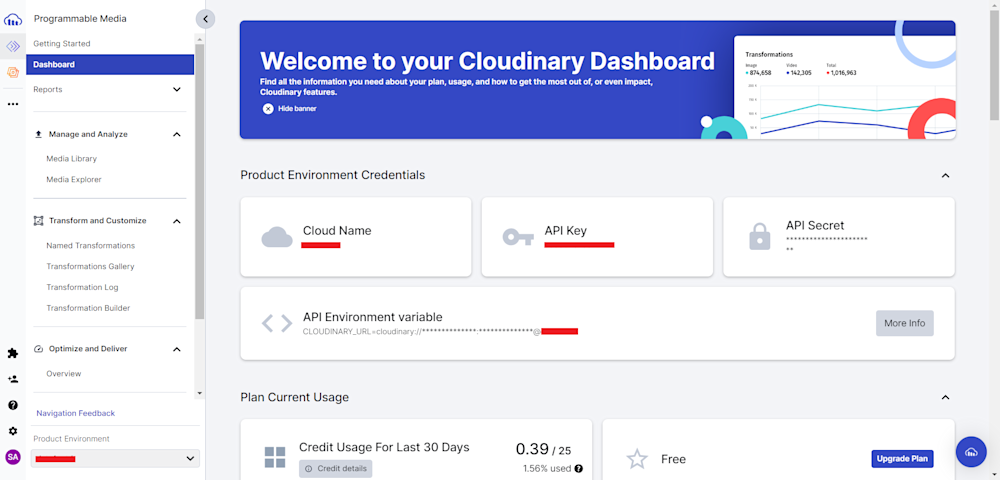
Next, log in to your Cloudinary account and copy your Product Environment Credentials. Save these for now, as we will be using them later.
Creating Our Gatsby Project
Now that we have everything set up, let’s create our first Gatsby image optimization project using the following initialization command:
gatsby new my-cloudinary-gatsby-site
Next, navigate into your project directory using the following command:
cd .\my-cloudinary-gatsby-site
With your Gatsby image optimization project now ready, the next step involves the installation of the Gatsby plugins for Cloudinary integration. Run the following commands to install the necessary Cloudinary plugins:
npm install gatsby-source-cloudinary gatsby-transformer-cloudinary dotenv
Here we are installing the gatsby-source-cloudinary plugin that fetches data directly from your Cloudinary account, and the gatsby-transformer-cloudinary plugin allows us to create Cloudinary transformations into Gatsby nodes. We have also installed dotenv plugin that allows us to configure our environment variables.
Now that you have installed the necessary plugins, you need to configure our Cloudinary credentials. To do this, create a .env file in your project’s root directory and adding your Cloudinary API credentials as follows:
CLOUDINARY_CLOUD_NAME=your_cloud_name
CLOUDINARY_API_KEY=your_api_key
CLOUDINARY_API_SECRET=your_api_secret
Here replace your_cloud_name, your_api_key, and your_api_secret with your actual Cloudinary credentials.
Now that your Cloudinary credentials are initialized the next step involves configuring your Gatsby image optimization project to incorporate these credentials. So open up your gatsby-config.js file and add your environment variables:
require("dotenv").config({
  path: `.env.${process.env.NODE_ENV}`,
});

module.exports = {
  // ...other Gatsby configurations...

  plugins: [
    // ...other plugins...

    {
      resolve: `gatsby-source-cloudinary`,
      options: {
        cloudName: process.env.CLOUDINARY_CLOUD_NAME,
        apiKey: process.env.CLOUDINARY_API_KEY,
        apiSecret: process.env.CLOUDINARY_API_SECRET,
        resourceType: `image`,
        type: `upload`,
      },
    },
    `gatsby-transformer-cloudinary`,
  ],
};
With this our project is complete. Now we can create our own sample website. Here we will be creating a basic page from the Gatsby documentation:
// File: ./pages/images.js

import React from 'react';
import { graphql } from 'gatsby';
import { GatsbyImage, getImage } from 'gatsby-plugin-image';

export default function GasbyImagePage({ data }) {
  return (
    <main>
      {data.allCloudinaryMedia.nodes.map((media, index) => {
        const image = getImage(media);
        return <GatsbyImage key={index} image={image} />;
      })}
    </main>
  );
}

export const query = graphql`
  query {
    allCloudinaryMedia {
      nodes {
        gatsbyImageData(width: 300, placeholder: BLURRED)
      }
    }
  }
`;
And that is it. Your project now pulls data from your Cloudinary account into the Gatsby image optimization data layer with gatsby-source-cloudinary for each media file found based on your configuration. This is used with gatsby-transformer-cloudinary to Add gatsby-plugin-image support to the sourced CloudinaryMedia nodes and upload local images and remote images to Cloudinary from within your Gatsby project.
How Cloudinary Helps Gatsby Image Optimization
Now that we’ve introduced Gatsby image optimization through Cloudinary as a potent ally for Gatsby image optimization, let’s dive deeper into how this dynamic media management platform can unlock the full potential of Gatsby.
Responsive Images
One of the foremost challenges in modern web development is ensuring your website looks and performs seamlessly across devices with varying screen sizes and resolutions. Cloudinary automatically delivers the most appropriate image variant through responsive images to each user based on their device and viewport size. This ensures that your Gatsby site shines on smartphones, tablets, desktops, and everything without compromising speed or visual quality.
Image Formats and Quality Settings
Cloudinary’s capabilities extend to selecting the most suitable image format and quality settings for Gatsby image optimization. Additionally, Cloudinary allows precise control over image quality, ensuring a fine balance between visual appeal and performance. This means your Gatsby site will automatically serve the most optimized image format and quality level, reducing load times while maintaining impeccable visual fidelity.
Advanced Effects and Transformations
Beyond basic image optimization, Cloudinary empowers developers to add creative flair to their Gatsby sites. With a vast array of advanced effects and transformations, you can enhance images with overlays, watermarks, filters, and more, all while ensuring optimal load times. These transformations are applied on the fly, meaning you can create visually stunning and optimized web pages without managing multiple versions of the same image.
The Importance of Image Optimization
Cloudinary’s versatility ensures it seamlessly integrates with many web development frameworks and platforms. Beyond just Gatsby image optimization, other prominent frameworks such as React, Vue.js, Angular, and even CMS platforms like WordPress and Shopify can all harness Cloudinary to supercharge their image optimization efforts. While specific frameworks may have unique implementation nuances, the underlying principles of image optimization remain consistent. These include:
- Responsive Image Delivery. Just as we’ve explored how Cloudinary ensures responsive image delivery for Gatsby image optimization, this practice remains crucial across various frameworks. Ensuring that images adapt to different devices and screen sizes is a universal necessity.
- Optimal Format Selection. The automatic format selection capability provided by Cloudinary makes a difference across all platforms. Selecting the most efficient image format based on browser support and image content is a strategy that enhances performance across the board.
- Quality Control. Striking the right balance between image quality and load times is a common challenge. Cloudinary’s control over image quality settings can be applied universally to maintain a visually appealing experience without compromising speed.
- Creative Enhancements. Applying advanced effects and transformations to images is a versatile tool applicable in various development contexts. Whether it’s enhancing product images in an e-commerce site or adding visual effects to a blog, Cloudinary empowers developers to infuse creativity into their projects.
- Scalability. Cloudinary’s cloud-based infrastructure takes the burden of image storage and optimization off your server. This means your application can seamlessly scale to accommodate increasing traffic and media assets without concerns about server capacity.
- Version Control and Backup. Cloudinary automatically maintains multiple versions of your media assets, providing a valuable backup in case of accidental data loss or changes. Version control simplifies the management of your media library.
- Security and Accessibility. Cloudinary offers robust security features, including access control, authentication, and encryption. It ensures that your media assets are protected from unauthorized access while complying with accessibility standards for inclusive web experiences.
- Seamless Integration. Cloudinary’s extensive plugins and APIs enable effortless integration with various platforms and content management systems. This versatility streamlines the implementation process, allowing you to quickly reap the benefits of Cloudinary and Gatsby image optimization suite
Final Thoughts
The combination of Gatsby image optimization and Cloudinary signifies a significant transformation. We’ve examined the intricacies of Gatsby’s image optimization, revealing how this partnership empowers developers to reshape web experiences. Plus, we showed you just how important image optimization is to website efficiency and the user experience.
Cloudinary’s image optimization strategies are versatile, applicable beyond specific frameworks, and universally enhance user experiences. Whether you’re navigating different development environments and platforms, Cloudinary, along with Gatsby image optimization plays a vital role in elevating images, ensuring websites are fast, sleek, and engaging.
Gatsby’s role as a static site generator, combined with Cloudinary’s comprehensive media management capabilities, creates a harmonious blend of performance and aesthetics for Gatsby image optimization. This goes beyond image optimization — it’s a gateway to crafting remarkable digital stories.
Important: As of 15/12/2023, the Cloudinary app for Shopify will no longer be supported and no new functionality or fixes will be provided. However, those already using the existing app can continue to use it AS IS. You can also submit a request if you’d like to try out this “AS IS” app.


