
What Is react-native-image-crop-picker?
The react-native-image-crop-picker module, or ImageCropPicker, is an open-source module for React-native mobile applications. It allows iOS and Android users to directly select images and videos from their library or the device’s camera. This module allows the cropping of images as per the application’s requirements. It also provides other functionalities, such as multiple image selection and cropping images to a specific aspect ratio.
ImageCropPicker abstracts the complexities of dealing with native device capabilities, providing a simple, JavaScript-based API that can be easily integrated into any React-native application. It is customizable and works seamlessly on both Android and iOS platforms, making it suitable for cross-platform mobile application development.
You can get react-native-image-crop-picker from the official GitHub repo.
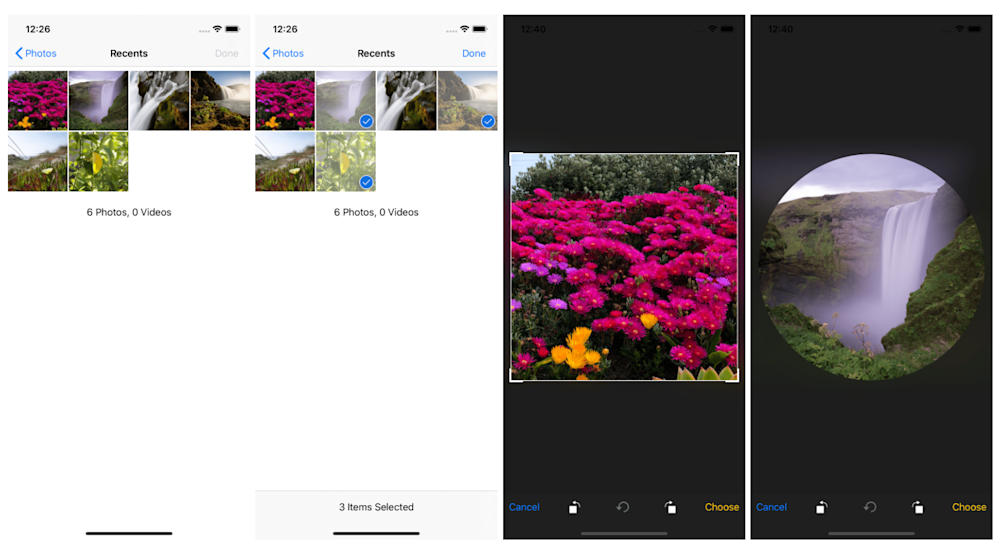
Image credit: react-native-image-crop-picker on GitHub
Before we start
Cropping images in React? There’s an easy, automatic way to resize, rescale, and crop.
Cloudinary is a cloud-based image management platform with a generous free plan and a React SDK. Cloudinary can:
- Resize your images on the server side so they load faster for users
- Automatically crop images with AI-based object and face recognition
You can sign up free and try it for yourself or learn more below.
This is part of a series of articles about image optimization.
In this article:
How Does react-native-image-crop-picker Work?
React-native-image-crop-picker can interface with a device’s native file and camera systems. When a user invokes the image or video selection process, react-native-image-crop-picker presents a native UI that allows the user to browse their device’s photo library or access the camera directly. Once an image or video is selected or captured, it is returned to the React Native application as a JavaScript object, which can be manipulated as needed.
The cropping functionality allows developers to specify the aspect ratio for the crop or let the user manually select the cropping area. This is particularly useful in applications where images need to fit into specific layouts or dimensions. React-native-image-crop-picker also provides a range of customization options for the selection UI, such as the number of images that can be selected and whether to show a cropping box.
React-native-image-crop-picker utilizes React Native’s bridge system to communicate between the JavaScript code and the native platform code. This provides developers with a simple and intuitive JavaScript API, meaning that react-native-image-crop-picker is lightweight, with minimal impact on the application’s performance.

How to Build an Image Picker Using react-native-image-crop-picker
Let’s see how you can use the react-native-image-crop-picker library to build an image picker for your application.
Prerequisites: Before you begin, make sure react-native and react-native-cli are installed on your machine.
Installing react-native-image-crop-picker
First, we need to install the library. We can do this by running the following command in your terminal:
npm install react-native-image-crop-picker --save
After that’s completed, we need to link the library to our project. Use the following command to achieve this:
npx react-native-asset react-native-image-crop-picker
Now react-native-image-crop-picker is installed and linked to our project.
Android Configuration
The next step is to configure the library for Android. In your android/app/src/main/AndroidManifest.xml file, you need to add the following permissions:
<uses-permission android:name="android.permission.CAMERA"/>
<uses-permission android:name="android.permission.WRITE_EXTERNAL_STORAGE"/>
Also, we’ll have to add some code in android/app/src/main/java/com/[your_project]/MainActivity.java file. Here’s the code:
import com.reactnative.ivpusic.imagepicker.PickerPackage; //import package

public class MainActivity extends ReactActivity {

    @Override
    protected List<ReactPackage> getPackages() {
        return Arrays.asList(
            new MainReactPackage(),
            new PickerPackage() //Add this line
        );
    }
}
Building an Avatar Profile Update
Now, we can build an avatar profile update feature using your newly installed and configured library.
In our ProfileUpdate.js file, import the library:
import ImagePicker from 'react-native-image-crop-picker';
We can use the library to select an image from the gallery or take a new one. This can be done by calling the openPicker or openCamera functions, respectively. Here’s an example:
ImagePicker.openPicker({
    width: 300,
    height: 400,
    cropping: true
}).then(image => {
    console.log(image);
});
The openPicker function opens the device gallery for the user to select an image. The width and height options define the aspect ratio for the cropping tool. The cropping: true option enables cropping. If the user selects an image, the promise is resolved with an image object.
Taking a Photo Using the Device Camera
Just like selecting an image from the gallery, taking a photo with the device camera is also very straightforward. Here’s how you can do it:
ImagePicker.openCamera({
    width: 300,
    height: 400,
    cropping: true,
}).then(image => {
    console.log(image);
});
The openCamera function opens the device camera for the user to take a new photo. The rest of the options work the same as openPicker.
Start the application using the command npx react-native run-android
You now have an image picker powered by the react-native-image-crop-picker library.
Pro TipConsider Cloudinary’s Digital Asset Management
Looking for a centralized location to manage all your media assets? Cloudinary’s Media Library makes it easy to upload, store, manage, and deliver images and videos efficiently.
Mastering Your Images with Cloudinary and react-native-image-crop-picker
Cloudinary is a comprehensive cloud-based media management platform offering vast tools and services for optimizing images. With Cloudinary, developers can seamlessly upload, store, transform, and deliver images, all while maintaining optimal performance and visual quality. From resizing and cropping to format conversion and image compression, Cloudinary’s robust feature set caters to the diverse needs of mobile app developers.
With react-native-image-crop-picker, developers can easily capture or select images from the device’s gallery, providing a seamless user experience. By integrating Cloudinary’s SDK into the mix, developers can programmatically apply transformations and edits to these images, unlocking a world of creative possibilities.
Let’s dive into a step-by-step tutorial to demonstrate how easy it is to edit an image using Cloudinary.
Step 1: Upload an Image
Begin by uploading our desired image to Cloudinary, utilizing the platform’s uploader.upload method. This process involves sending the image to Cloudinary’s servers, where it is stored and made accessible via a unique public ID.
let result = await
 cloudinary.uploader.upload('path/to/your/image.jpg');
Step 2: Apply Transformations
After uploading, transformations can be applied to the image. Cloudinary’s API supports multiple transformation parameters, enabling developers to programmatically resize, crop, enhance, and add various effects to images.
cloudinary.url(result.public_id, {transformation:[
    {width: 300, height: 300, gravity: "face", crop: "fill"},
    {overlay: "text:arial_60:Cloudinary Magic!", gravity: "south", y: 20, color: "white"}
]});
This example showcases a transformation sequence that first adjusts the image size and focuses on the central subject, followed by adding a text overlay.
Step 3: Deliver the Optimized Image
The final step entails the delivery of the optimized image. Utilizing the secure URL generated by Cloudinary, developers can seamlessly integrate the transformed image into their applications, ensuring optimal load times and presentation.
By combining the power of Cloudinary with react-native-image-crop-picker, mobile app developers can take their image optimization game to the next level. From seamless integration to programmatically applying transformations, this dynamic duo empowers developers to unlock the full potential of their images and deliver visually stunning mobile applications.
So why settle for ordinary images when you can master them with Cloudinary and react-native-image-crop-picker? Explore the possibilities and elevate your mobile app projects to extraordinary heights.
Learn more in Cloudinary’s React quick start guide

