
What Is the Image.open Python Function?
The Image.open Python function, a part of the Pillow library (PIL), allows you to open and manipulate an image file in a variety of formats, such as JPEG, PNG, BMP, GIF, and PPM. Image.open is a high-level, easy-to-use function that is the first step in any image processing task in Python.
The Image.open Python function only requires a single line of code to call the function and open an image file. The opened image can then be used for various tasks, like cropping, rotating, resizing, filtering, and other image manipulations.
The Image.open Python function is the basis for many applications, from building an image classifier in machine learning and creating thumbnails for a website to automating image editing tasks.
Before we start
Working with images in Python? There’s an easy, automatic way to resize and crop them
Cloudinary is a cloud-based image management platform with a generous free plan and a Python SDK. Cloudinary can:
- Resize your images on the server side so they load faster for users
- Automatically crop images with AI-based object and face recognition
You can sign up free and try it for yourself or learn more below.
This is part of a series of articles about image optimization
In this article:
- Understanding Image.open Syntax and Parameters
- Open, Show and Save Images in Python
- Tips for Efficient Use of Image.open Function in Python
- Fully Automated Python Image Resize and Cropping with Cloudinary

Understanding Image.open Syntax and Parameters
The syntax for the Image.open function is straightforward. The function takes in one required argument, the file path (fp) or file object, and returns an Image object. The syntax looks like this:
Image.open(fp, mode='r')
The Image.open function can also accept an optional mode parameter, which is set to r by default. This parameter determines how the file is to be opened. We’ll explain in more detail below.
The ‘fp’ Argument
fp stands for file path. This is the only required argument for the Image.open function. The function uses this argument to locate and open the image file. The file path can be either an absolute path, including the full path to the file, or a relative path starting from the current directory.
from PIL import Image

# Open an image file using absolute path
img = Image.open('/Users/user/Pictures/image.jpg')
print(img)

# Open an image file using relative path
img = Image.open('image.jpg')
print(img)
The fp can also be a file-like object. A file-like object is any Python object that behaves like a file. For instance, you can use the BytesIO object from the io module to open an image from a bytes object.
Using ‘mode’
The mode parameter is an optional argument that specifies how the file should be opened. By default, the mode is set to r, which means the file is opened in read mode. This is the mode you will use most of the time when working with Image.open.
However, the Image.open function supports other modes as well. These include:
w: Open the file in write modea: Open the file in append modex: Open the file for exclusive creation, failing if the file already existsb: Binary modet: Text mode+: Open for updating (reading and writing)
Open, Show and Save Images in Python
Opening an image in Python using PIL is straightforward. The first step involves importing the PIL library.
from PIL import Image
Once the library is successfully imported, the next step is to open an image. This is done by calling the Image.open() function and pass the path to the image as an argument, like so:
img = Image.open('path_to_image')
In the above line of code, ‘path_to_image‘ is the path to the image file you want to open. The Image.open() function reads the file and returns a value of the Image object, which is then stored in the variable 'img'.
Note: The Image.open() function does not load the raster data. It only opens the image file, reads the metadata (like the image dimensions and color format), and prepares the data to be loaded when necessary. This is called lazy loading, a feature that makes the function efficient for working with large images or when only parts of the image are required.
How to Display an Image with PIL
Once an image has been opened using the Image.open() function, the next step is to display or show the picture. The PIL library provides the Image.show() function for this purpose.
The Image.show() function pops up the image in a separate window. It is a handy tool when you want to quickly display an image. Here’s how you use it:
img = Image.open('path_to_image')
img.show()
In the above code, img.show() opens a window and displays the image stored in the img variable. The window is an external application provided by your operating system’s default image viewer.
Although Image.show() is useful for quick displays, it’s important to note that it’s not suitable for production environments. This is because it saves the image to a temporary file and calls the open utility to display it. This can be slow and inefficient for large images or in situations where the image needs to be displayed multiple times.
How to Save an Image with PIL
You might want to save the result after opening and potentially modifying an image. The PIL library provides the Image.save() function to do just that.
The Image.save() function requires at least one argument: the file name (or path). If no file extension is provided, PIL will attempt to determine the file format based on the existing filename.
Here’s an example of how to use the Image.save() function:
img = Image.open('path_to_image')
img.save('new_path_to_image')
In the above code, img.save('new_path_to_image') saves the image stored in the img variable to the path specified. If the path does not exist, the function will create it. If a file already exists at the specified path, it will be overwritten.
It’s important to remember that the Image.save() function does not automatically close the file. After saving an image, you should call the Image.close() function to ensure that all resources are cleaned up properly.
img = Image.open('path_to_image')
img.save('new_path_to_image')
img.close()
Tips for Efficient Use of Image.open Function in Python
To fully leverage its capabilities and ensure your image processing is as efficient and effective as possible, there are several tips and best practices you should consider. We’ve got some key insights to help you optimize how you use it, enhancing the performance and the quality of your image processing.
Use with Statements to Ensure Images Are Properly Closed
While it may seem trivial, failing to close an image after processing can lead to resource leaks, slowing down your application over time.
The simplest and most effective way to ensure that your images are properly closed after processing is by using the with statement. This statement creates a context in which your image is opened, and once the processing is done, the image is automatically closed, even if an error occurs during the process.
Here is an example of how to use the with statement with Image.open:
from PIL import Image

with Image.open('image_file.jpg') as img:
    # Process the image here
    pass
Implement Try-Except Blocks to Handle Errors
Errors can sometimes occur when loading an image using Image.open. Various factors, such as an incorrect file path, an unsupported file format, or a corrupted image file, can cause these errors.
To handle these errors effectively, use try-except blocks in your code. These blocks will try to execute a block of code, and if an error occurs, they will catch the exception and execute a different block of code.
Here’s an example of how you can use a try-except block to handle errors with Image.open:
from PIL import Image

try:
    with Image.open('image_file.jpg') as img:
        # Process the image here
        pass
except IOError:
    print("An error occurred while trying to open the image.")
With this try-except block, if an IOError occurs when trying to open the image, the program will catch the exception and print a message instead of crashing. This will make your program more robust and reliable and provide you with valuable information about what went wrong, helping you diagnose and fix the problem more effectively.
Remember That Image.open Uses Lazy Loading
Another important thing to remember when using the Image.open Python function is that it is “lazy”, meaning it only loads the image data when it is required. This powerful feature can allow you to open an image and inspect its properties without loading the entire image into memory.
However, it’s also something to be aware of when processing large images. If you’re not careful, you can end up loading the entire image into memory multiple times, significantly slowing down your application.
To avoid this, it’s a good practice to load the image data into memory only once when required. You can do this by calling the load method on the image object returned by Image.open:
from PIL import Image

with Image.open('image_file.jpg') as img:
    img.load()
    # Process the loaded image data here
By calling img.load(), you ensure that the image data is loaded into memory only once, saving resources and improving the performance of your Python application.
Fully Automated Python Image Resize and Cropping with Cloudinary
Cloudinary is a cloud-based service for managing images and videos, which offers a generous free plan and a Python SDK. It lets you upload your images and apply built-in effects, filters, and modifications. You can also resize images automatically, focusing on the most important elements with AI, or adapt them to your website design without having to crop or scale them manually.
You can set the target dimensions of your resized image by specifying width, height, and the target aspect ratio as qualifiers of your resize transformation.
You can change the dimensions of an uploaded image by setting the image’s height, width, and aspect ratio, and Cloudinary automatically resizes or crops the image to fit the requested size.
For example, this original image is 1200 x 1200 pixels:

Resizing the image to 200 x 200 pixels using crop, scale, fill, and pad results in the following photos:
Get started with automated resize and cropping today!
- Get a free Cloudinary account
- Install the Python SDK
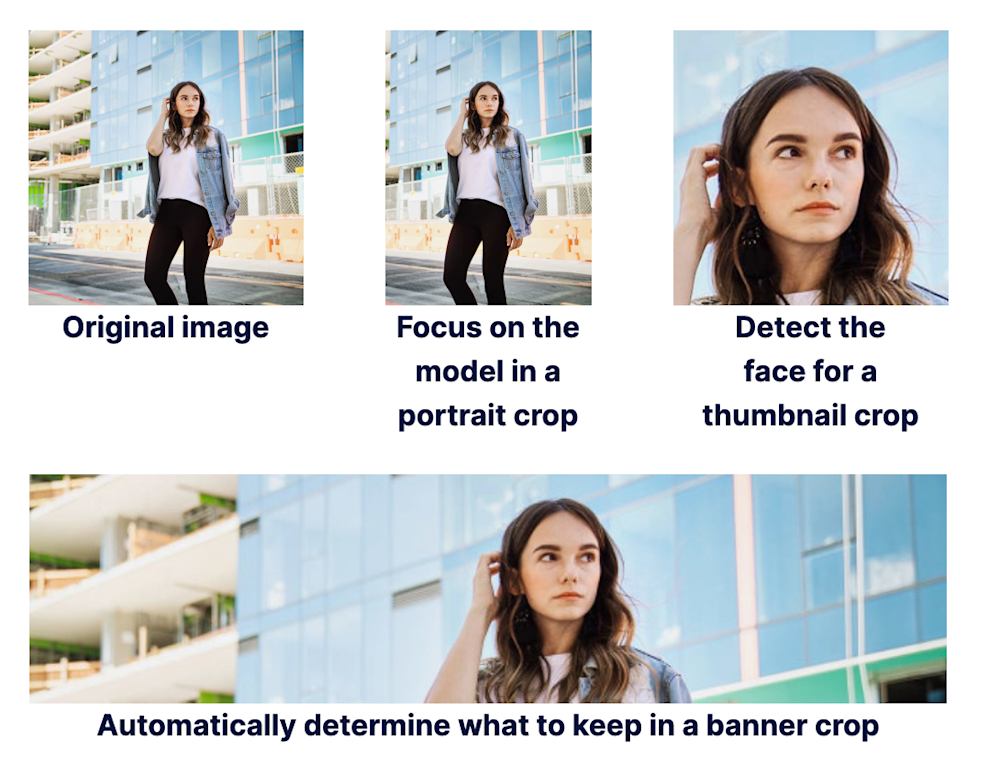
- Deliver the crop transformations shown above as follows:
# Focus on the model in a portrait crop.
CloudinaryImage("docs/model.jpg").image(gravity="person", height=600, width=450, crop="fill")

# Detect the face for a thumbnail crop.

CloudinaryImage("docs/model.jpg").image(gravity="face", height=250, width=250, crop="thumb")

# Crop to a banner, automatically focusing on a region of interest.

CloudinaryImage("docs/model.jpg").image(gravity="auto", height=150, width=600, crop="fill")
Learn more in Cloudinary’s Python quick start guide.

