Images breathe life into websites, convey messages, and evoke emotions in ways that words alone cannot. Netlify, a phenomenal platform for developing, deploying, and managing modern web projects, offers an array of vital features. These include continuous deployment, serverless functions, and a global content delivery network (CDN).
However, Netlify is stepping away from offering its asset optimization service in the ever-evolving web development landscape, leading developers to search for alternate, efficient image optimization solutions. That’s where Cloudinary steps in! Cloudinary has been specifically designed to take your image management to new heights of efficiency.
In this guide, we’ll delve into how you can integrate Cloudinary with Netlify – seamlessly optimizing your images, enhancing your web applications’ performance and loading speed.
Understanding Images on Netlify
The process is pretty straightforward when we talk about implementing images on the Netlify platform. You simply include your images in the site’s build directory, and they’re served alongside your HTML, CSS, and JavaScript as part of your site’s published resources. However, this simplistic approach brings us to a key consideration: image optimization.
Image optimization plays a critical role in enhancing web performance. It involves reducing image file sizes as much as possible without sacrificing quality so that page load times remain low. This is extremely important because faster pages both rank and convert better. Think of it this way: images that are not optimized can substantially drag down your site’s performance due to their large file size. Consequently, this can result in lower visitor engagement, poorer user experience, and, ultimately, lower search engine rankings.
Until recently, Netlify had an in-built Asset Optimization feature that managed these optimizations. However, they are in the process of phasing out this feature. That leaves us with an impending need for an alternative solution to cater to the image optimization requirements of the platform.
So, how do we continue to ensure that our high-performing images and applications load swiftly? We find an alternate solution – Cloudinary.
Cloudinary: A Powerhouse for Image Optimization
With Cloudinary, users can effortlessly manage, transform, and serve images to their web applications. Its capabilities extend beyond image hosting, making it a versatile asset for web developers. It’s a comprehensive cloud-based solution that handles image assets effectively and offers robust tools for image manipulation, optimization, and delivery.
Our image optimization features provide automatic image compression, format conversion, and responsive image delivery. These are crucial for ensuring your web content loads quickly and looks stunning on all devices. What sets Cloudinary apart is its ability to deliver optimized images on the fly, reducing the need for manual intervention and speeding up your development process.
Additionally, Cloudinary is an ideal companion for Netlify users, especially given Netlify’s decision to sunset its in-house optimization feature. With Cloudinary seamlessly integrated into your Netlify workflow, you can continue to deliver high-performance, optimized images to your audience, maintaining a top-notch user experience.

Integrating Cloudinary with Netlify
Now, let’s see the practical aspects of integrating Cloudinary with your Netlify project, ensuring a smooth and efficient workflow for image management and optimization. This integration will streamline your image management workflow and enhance your website’s performance.
Setup and Configuration
Begin by creating a Cloudinary account if you haven’t already. You can sign up for a free account on Cloudinary’s website. After signing in to your Cloudinary account, go to your dashboard to find your API credentials. Keep these credentials handy, as we’ll need them for the integration.
Image Uploads
With Cloudinary integrated into your project, handling image uploads becomes more efficient. You can choose between two approaches based on your needs:
- Advanced Users/Developers. If you prefer programmatic control, Cloudinary provides robust APIs and SDKs that allow you to programmatically upload images, offering a flexible way to manage your assets. These images can then be seamlessly referenced within your Netlify project.
- Simplified Integration. Alternatively, suppose you want a simpler way to manage Netlify images without extensive coding. In that case, Cloudinary’s integration with Netlify streamlines adding and using images in your web application. You can directly reference Cloudinary-hosted images in your HTML or CSS without manual uploads.
Cloudinary’s automated optimization is a standout feature. By specifying transformation parameters in your image URLs, Cloudinary ensures that your Netlify images are always optimized for the web. This includes adjusting image size, format, or quality dynamically. This is particularly valuable for delivering an excellent user experience, regardless of the user’s device or connection speed.
Configuring the Cloudinary Plugin in Netlify
Now, let’s configure the Cloudinary plugin directly within your Netlify project.
Step 1: Select Your Project in Netlify
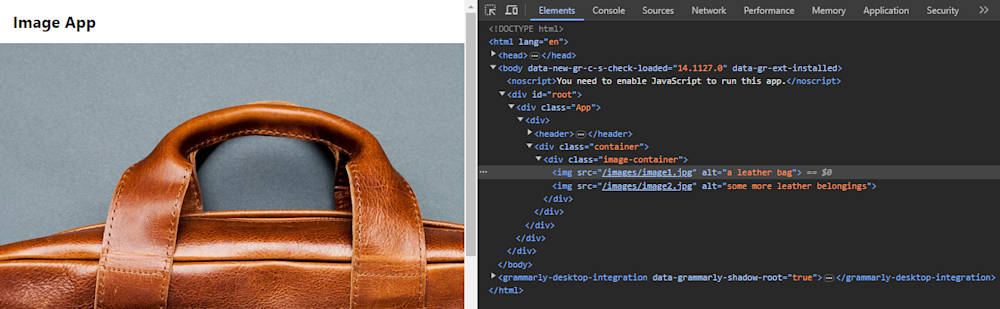
If you’re not already logged in, sign in to your Netlify account. From your Netlify dashboard, choose the specific project you want to integrate with Cloudinary. Let’s visit the deployed site by clicking Open production deploy.
Notice that currently, the image assets of this website are being retrieved from the project repository and are in the JPG image format.
Step 2: Add Cloudinary Plugin
Now, let’s optimize our site assets. First, select the Integrations option from Netlify’s main menu and search for the Cloudinary plugin.
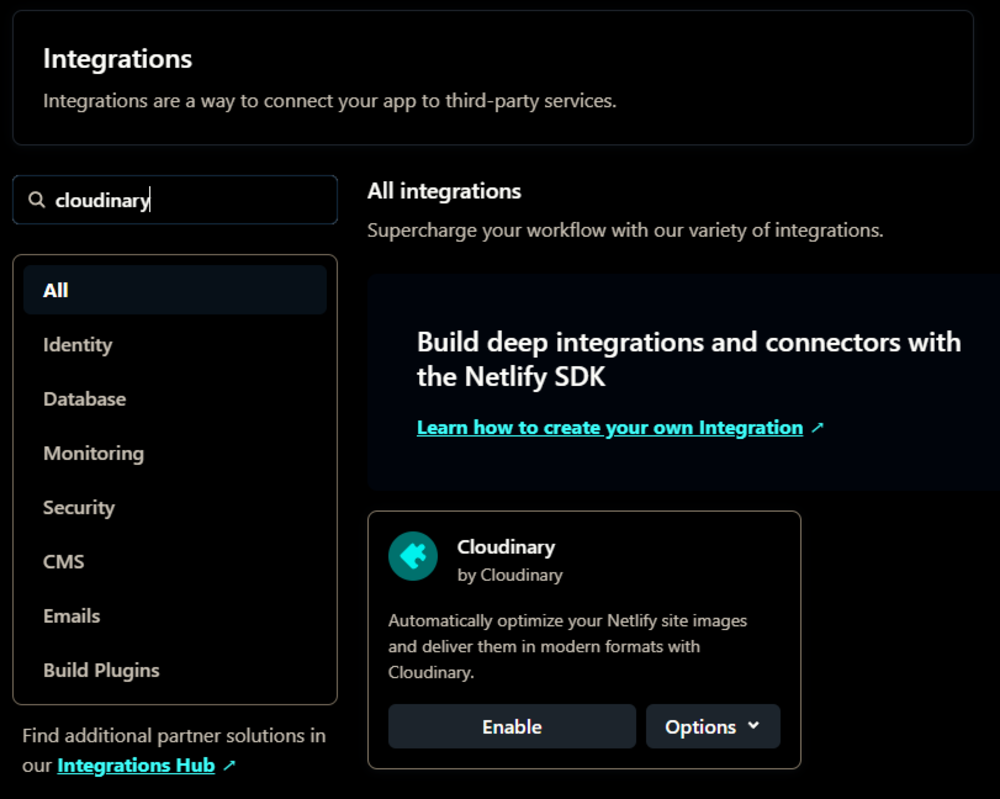
Now, click Enable and install the plugin in your desired project after providing the required environment variables of your Cloudinary account.
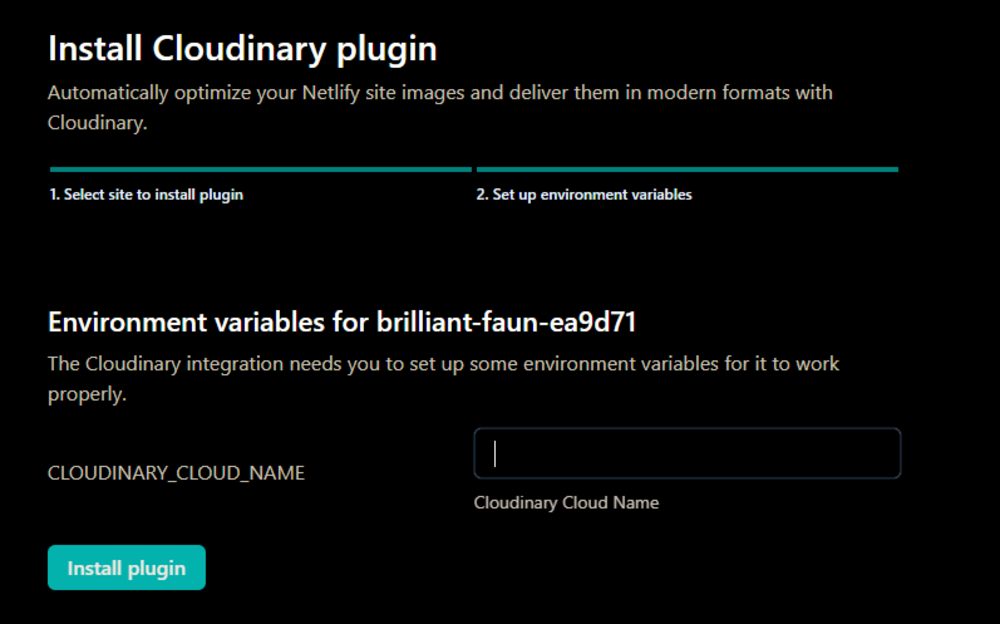
Note that we have added the plugin directly via the Netlify website, but you can also add a .toml file to your project repository to configure and add the Cloudinary plugin to your site.
Step 3: Redeploy Your Site
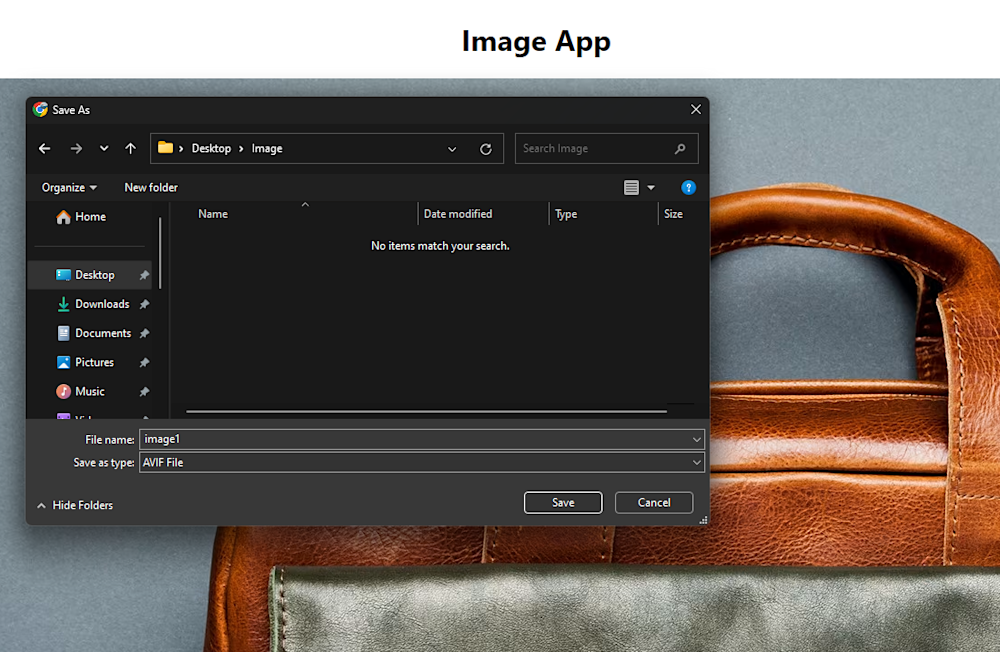
Right after plugin installation, Netlify will automatically trigger a redeployment of your website with the Cloudinary plugin integrated. Once the deployment is completed, your website will now use Cloudinary’s automatic image optimization. Even if we try saving our image, we can see the file format has been changed to the most optimized available format.
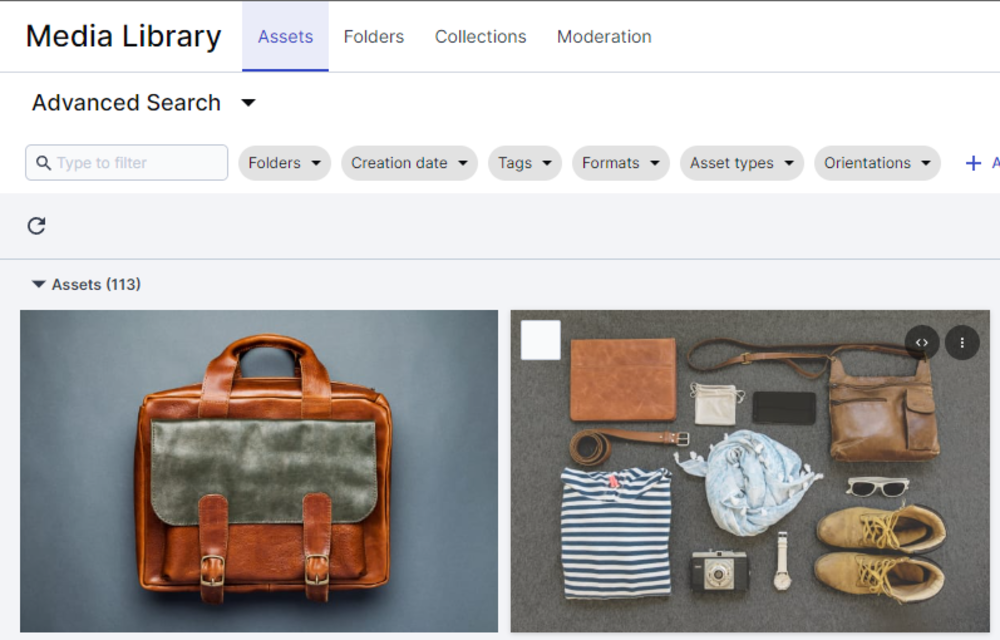
You can even go to Cloudinary’s Media Explorer or Media Library and check that the Netlify images on the website are being served from Cloudinary.

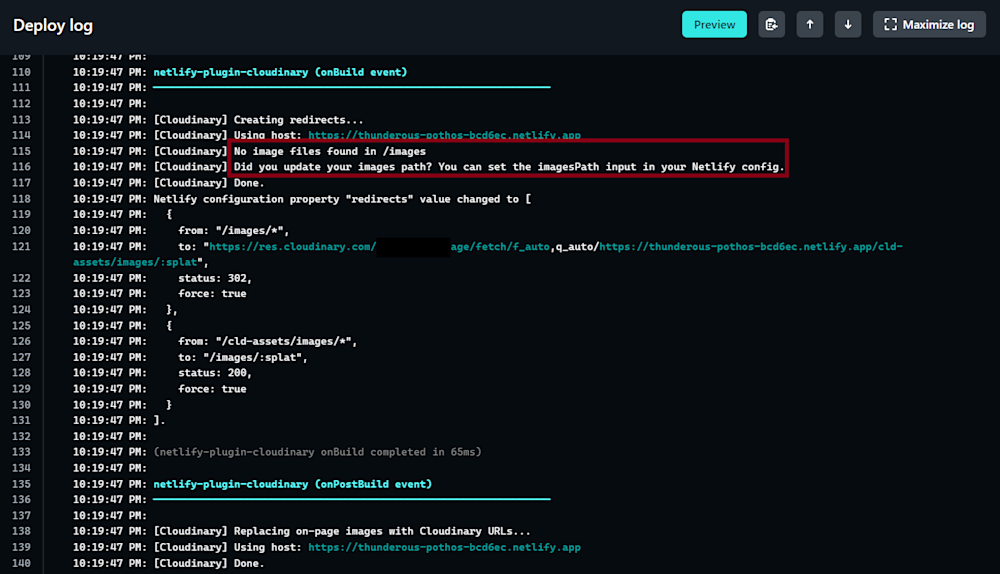
You will, however, have to be careful about the sub-directory of your images in your repository. If image assets are not found in the path expected by Netlify, you may get a similar error:
Overall, by configuring the Cloudinary plugin directly within your Netlify project, you’ve successfully harnessed the power of Cloudinary’s image management and optimization capabilities. This integration simplifies your workflow and ensures your web content remains high-performing and visually appealing, ultimately enhancing the overall user experience.
Key Features of Cloudinary
Now that we’ve laid the foundation, it’s time to explore the vast array of features Cloudinary offers for image optimization. Here’s just some of what Cloudinary can do for your Netlify pages:
- Adaptive Image Delivery. Cloudinary’s adaptive image delivery ensures that Netlify images are perfectly suited for every device and screen size. With responsive design support, images are automatically delivered in the most appropriate dimensions and formats, guaranteeing an exceptional user experience across desktops, tablets, and mobile devices.
- Format and Quality Automation. Leveraging Cloudinary’s intelligent format selection and compression algorithms, Netlify users can effortlessly strike the ideal balance between image quality and file size. This automation optimizes Netlify images on the fly, reducing load times and bandwidth consumption while maintaining visual excellence.
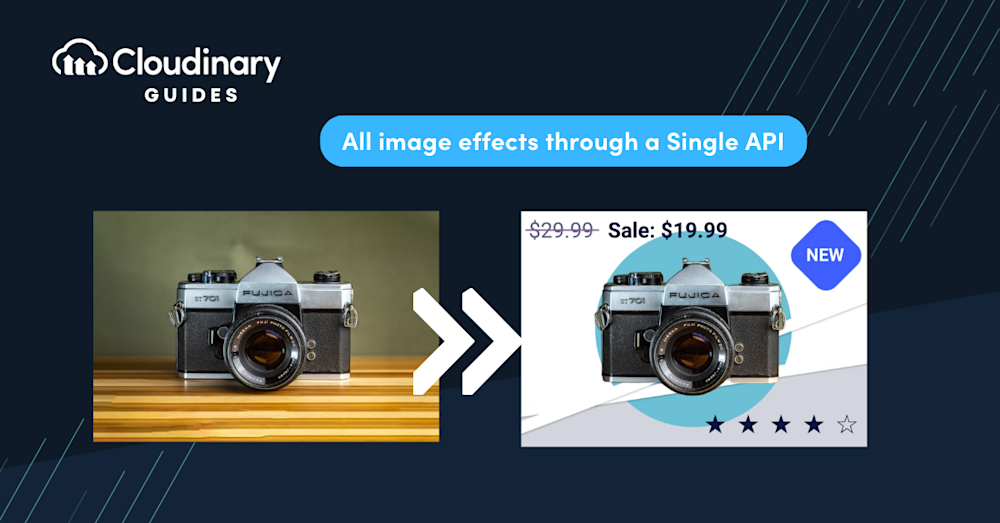
- Enhancements and Transformations. Cloudinary empowers Netlify users to enhance their images with various transformations, including filters, overlays, and other effects. Importantly, these enhancements do not come at the cost of load time. Developers and designers can fine-tune images to achieve their desired visual impact without compromising website performance.
Incorporating these Cloudinary features enhances image optimization and streamlines the process of delivering stunning visuals to users, making it an invaluable asset for Netlify projects.
Final Thoughts
With Netlify’s decision to sunset its built-in asset optimization feature, the synergy between Netlify and Cloudinary emerges as a game-changer for developers and designers alike. By exploring and using Cloudinary for Netlify projects, web professionals can unlock the full potential of their images.
Cloudinary’s adaptive image delivery, format and quality automation, and image enhancements empower developers and designers to create visually stunning and fast-loading websites. It’s a partnership that elevates user experiences, enhances website performance, and simplifies the complexities of image optimization.
We encourage you to take the leap and integrate Cloudinary into your Netlify projects. As the web continues to evolve, staying at the forefront of image optimization is essential for creating websites that captivate users and deliver exceptional performance. With Netlify and Cloudinary in your toolkit, you’re well-equipped to achieve it!
Learn more:
Automatically Optimize Images With Cloudinary’s Netlify Build Plugin
Mobile Video Revolution: How-to Guide for Using Cloudinary’s iOS Native Video Player

