Video subtitles are text overlays that appear on-screen to convey spoken dialogue and other audio information while a video is playing. They serve several purposes, such as translating dialogue for non-native speakers to understand foreign-language content, or as an accessibility tool for people who are deaf by transcribing the audio content. They can also serve as descriptions of non-dialogue sounds, like music or sound effects, depending on their type.
This article explains how to use FFmpeg to add subtitles to videos, covering supported formats, techniques, and integration with Cloudinary for enhanced media management.
Key takeaways:
- How to embed soft and hard subtitles to a video
- How to add multiple subtitles to a video
- How to use Cloudinary to add subtitles to videos on the fly
In this article:
- What Subtitle Formats Are Supported by FFmpeg?
- Hard vs. Soft Subtitles
- Adding Subtitles to Video with FFmpeg
- Hardcoding Subtitles into Video Files (Hard Subtitle)
- Embedding Subtitles as a Separate Track a.k.a Soft Subtitles
- Styling SRT Subtitles
- Adding Multiple Subtitles
- Integrating FFmpeg Subtitles with Cloudinary
- Styling Subtitles With Cloudinary
What Subtitle Formats Are Supported by FFmpeg?
FFmpeg supports a wide range of subtitle formats, each having its own distinct characteristics, advantages and disadvantages. Here are some of the most popular options currently used on modern platforms.
1. SRT (SubRip)
SRT is one of the most popular and widely supported subtitle formats. It’s a plain text file containing sequential subtitle numbers, timestamps in HH:MM:SS,MS (hours:minutes:seconds,milliseconds) format, and the subtitle text itself. A typical SRT file consists of four components:
- Sequence number: A numeric counter, starting at 1, that identifies each sequential subtitle block.
- Timecode: Specifies the start and end time for the subtitle to appear on the screen. The format is hours:minutes:seconds,milliseconds.
- Subtitle text: The actual text that will be displayed on the screen.
- Blank line: A blank line that separates the end of one subtitle entry from the start of the next one.
The following example shows the typical structure of an SRT file with two subtitle entries:
1
00:00:01,000 --> 00:00:03,000
Greetings, how are you?

2
00:00:04,000 --> 00:00:06,500
I'm good, thanks!
2. ASS (Advanced SubStation Alpha)
ASS is a more advanced subtitle format that offers extensive styling and positioning control. It allows you to define font, size, color, and placement of the subtitles, making it popular for anime and video contents that require precise text control.
A typical ASS file is organized into several sections, similar to an INI file, with each section enclosed in brackets (e.g., [Script Info]). Here’s an example:
[Script Info]
; This is a basic ASS subtitle file example.
Title: My Video Subtitles
ScriptType: v4.00+
PlayResX: 1280
PlayResY: 720
WrapStyle: 1

[V4+ Styles]
Format: Name, Fontname, Fontsize, PrimaryColour, SecondaryColour, OutlineColour, BackColour, Bold, Italic, Underline, StrikeOut, ScaleX, ScaleY, Spacing, Angle, BorderStyle, Outline, Shadow, Alignment, MarginL, MarginR, MarginV, Encoding
Style: Default,Arial,30,&H00FFFFFF,&H000000FF,&H00000000,&H00000000,0,0,0,0,100,100,0,0,1,2,2,2,10,10,10,1


[Events]
Format: Layer, Start, End, Style, Name, MarginL, MarginR, MarginV, Effect, Text
Dialogue: 0,0:00:01.00,0:00:03.50,Default,,0,0,0,,Hello, good morning.
Dialogue: 0,0:00:04.25,0:00:06.80,Narrator,,0,0,0,,{\i1}What did you say?.{/i1}
Dialogue: 0,0:00:10.50,0:00:13.20,Default,,0,0,0,,{\b1}This text is bold.{/b1}
The [Script Info] section contains metadata and general settings for the entire subtitle script. The [V4+ Styles] section is where all the subtitle styles are defined, while the [Events]section is the core of the subtitle file, containing the actual subtitle events – it defines what text to display, when to display it, and with which style.
3. Web Video Text Tracks (WebVTT)
WebVTT is a plain-text file (.vtt file extension) format for displaying timed text tracks that are synchronized with content in HTML <video> and <audio> elements. It can be used to add closed captions to videos and can be styled using JavaScript and CSS. WebVTT is similar to SRT but with enhanced features for web-based video. It supports additional metadata, such as speaker information and basic styling.
Here’s an example of a WebVTT file:
WEBVTT

1
00:00:22.230 --> 00:00:24.606 line:0 position:20% size:60% align:start
This is the first subtitle.

2 Some Text
00:00:30.739 --> 00:00:34.074
This is the second.

3
00:00:34.159 --> 00:00:35.743
This is the third
4. Timed Text Markup Language (TTML)
TTML is a World Wide Web Consortium (W3C) standard for representing timed text, which is used for subtitles, captions, and other synchronized text in online and broadcast media. It’s XML-based and commonly used for web video content, and competes with the WebVTT format. FFmpeg’s support for TTML decoding and demuxing is limited, so you’re better off using alternatives like WebVVT.
When choosing a subtitle format to use, it’s important to remember that different platforms and devices have different subtitle formats they are compatible with. Choosing the correct format choice ensures that your subtitles are presented correctly, synced, and formatted to meet the requirements of your viewers.
Hard vs. Soft Subtitles
Generally, the methods of adding subtitles to videos can be categorized into two, namely hard subtitles and soft subtitles.
- Hard Subtitles: These are permanently burned directly into the video, automatically becoming a part of the footage, making them impossible to be turned off by viewers. They can be used when subtitles must always be visible, like in educational tutorials or social media videos.
- Soft Subtitles: These are stored as separate tracks in the video file and viewers can toggle them on or off. They are often used for flexibility when subtitles are not mandatory, such as in movies or multilingual content.
Adding Subtitles to Video with FFmpeg
In this section, we’ll walk you through how to add SRT subtitles to a video file using FFmpeg. FFmpeg offers multiple ways to add subtitles, from hardcoding them into the video to embedding them as separate tracks (soft subtitle).
You can download the original video file (with no subtitles) for this demo from here. We saved it as “coastal-beach.mp4”.
Before we can use FFmpeg, we need to install it first. You can install it for your OS from the official website. Adding subtitles to videos using FFmpeg requires libass, and the libavcodec and libavformat libraries. If you installed a recent version of FFmpeg, they are automatically included in your installation.
You can confirm this by running ffmpeg -version in the terminal – you should see --enable-libass and the libraries in the output as shown below:
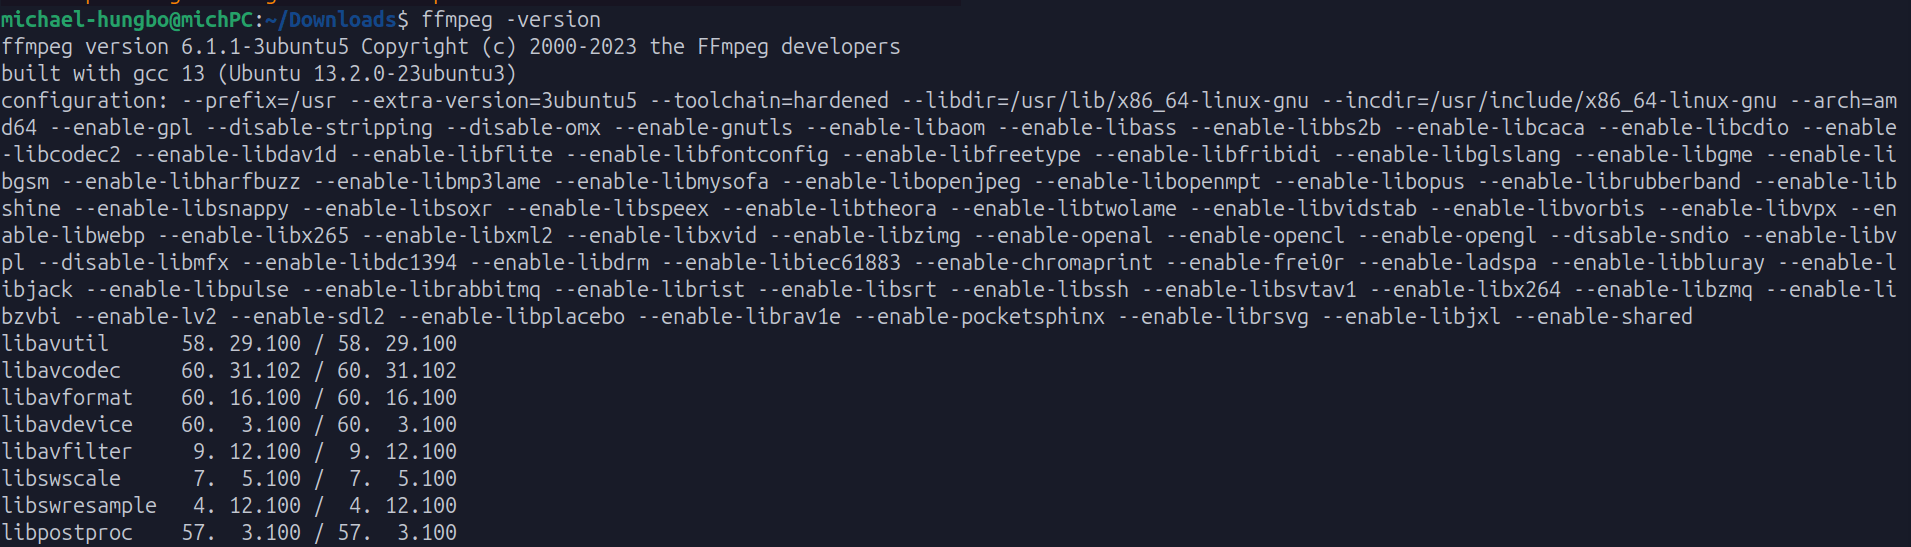
If these libraries appear in the terminal output, you’re ready to start using FFmpeg!
Hardcoding Subtitles into Video Files (Hard Subtitle)
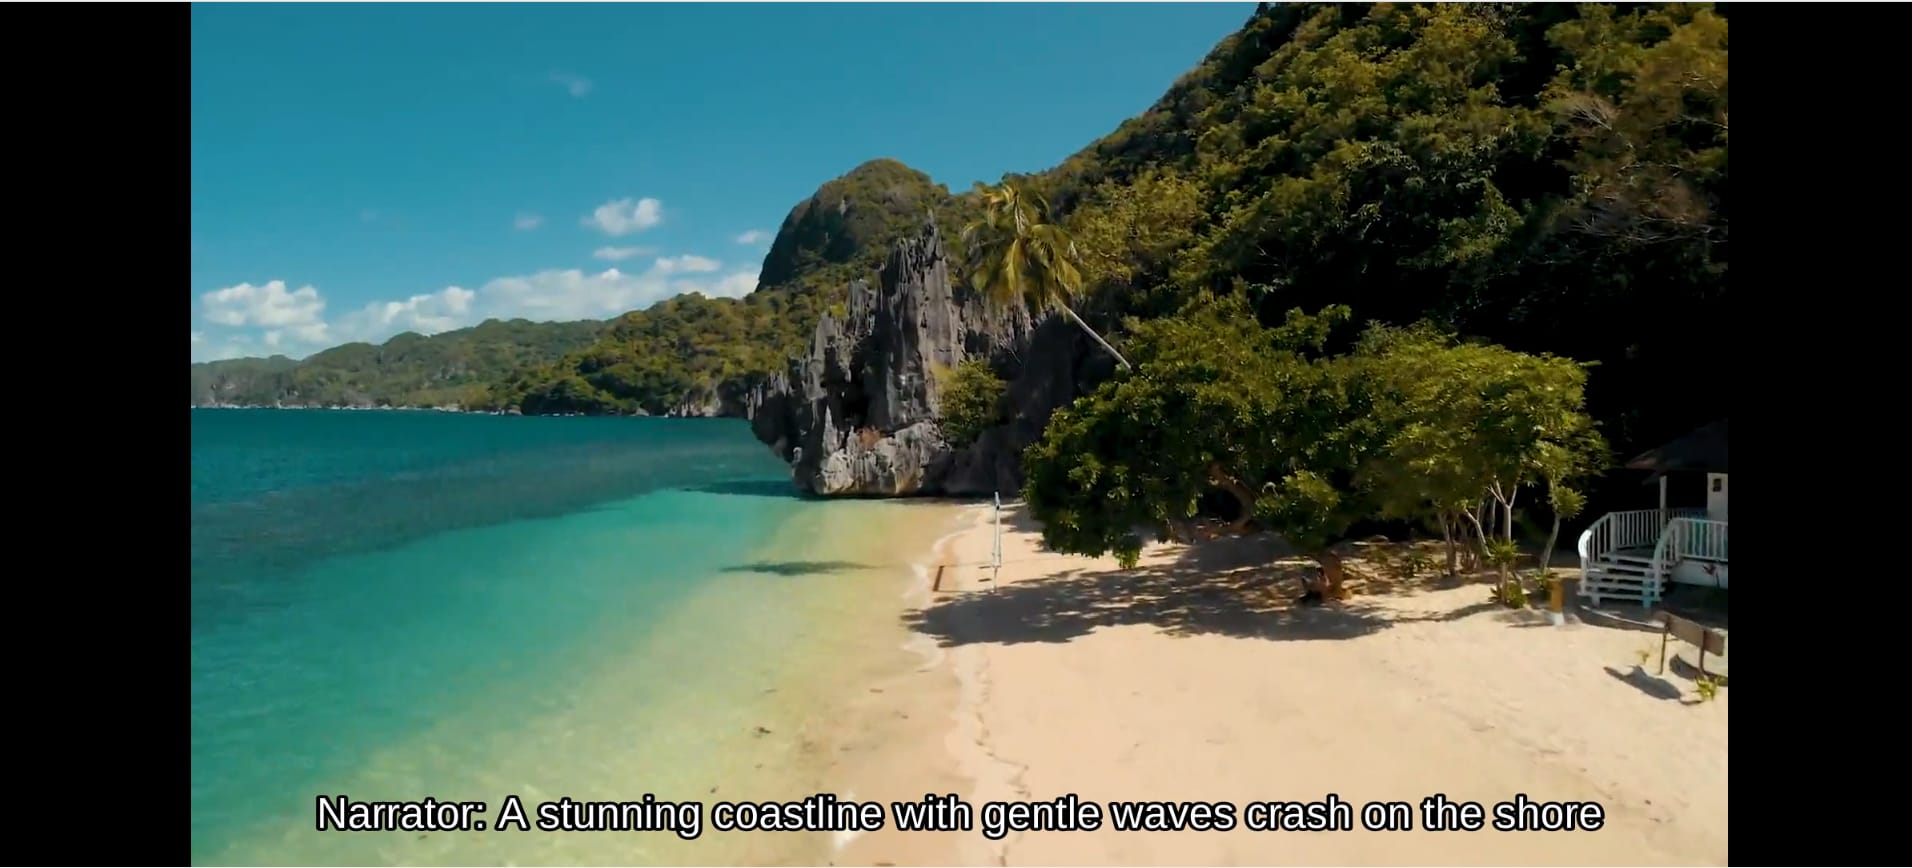
FFmpeg provides the subtitles filter for drawing subtitles on top of a video. For our demo, we need to create the SRT file containing the subtitles we want to add to the video. So, create a named subtitles.srt using a text editor with the following content:
1
00:00:01,000 --> 00:00:05,000
Narrator: A stunning coastline with gentle waves crash on the shore

2
00:00:05,200 --> 00:00:08,000
... a beautiful forest and rocky mountains line the horizon.

3
00:00:8,200 --> 00:00:10,000
Narrator: What a perfect day to be at the beach!
Make sure the subtitle file and the video file are in the same folder, then run the following command:
ffmpeg -i coastal-beach.mp4 -vf subtitles=subtitles.srt new_video.mp4
In the command above:
-i coastal-beach.mp4: Specifies the input video.-vf subtitles=subtitles.srt: Applies the subtitle filter to overlay the SRT file.new_video.mp4: Saves the result as a new video file.
This is what the output looks like:
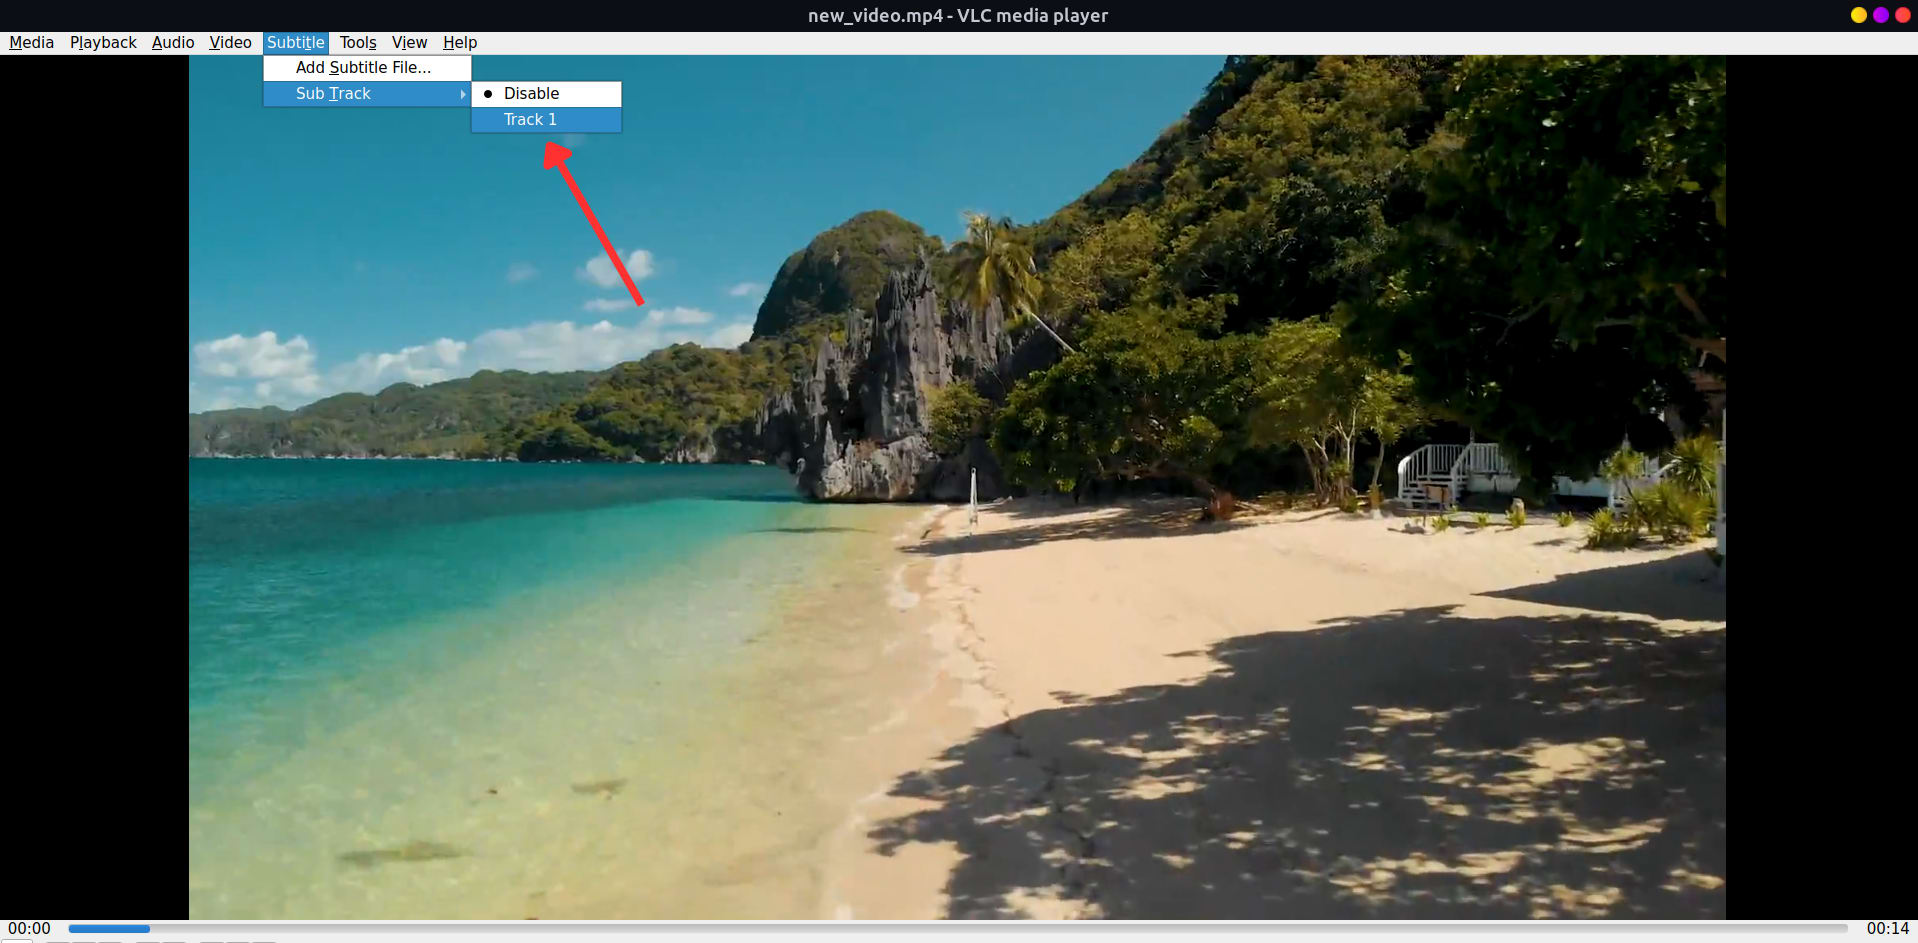
Embedding Subtitles as a Separate Track a.k.a Soft Subtitles
Embedding subtitles as a separate track makes it selectable, allowing viewers to toggle them on or off. To add a soft subtitle to our sample video using FFmpeg, we can use the following command:
ffmpeg -i coastal-beach.mp4 -i subtitles.srt -c:v copy -c:a copy -c:s mov_text new_video.mp4
In the command above:
-c:v copy -c:a copycopies the video and audio streams without re-encoding, saving processing time, while-c:s mov_textembeds the subtitles as a text track.
Now, playing the output video allows us to enable or disable the subtitle track as shown in the screenshot below:
Styling SRT Subtitles
SRT files support a few basic HTML-style tags to apply simple inline formatting within the subtitle text itself. However, whether these tags actually work depends entirely on the video player. The supported formatting tags include:
- <b>text</b>: for Bold text
- <i>text</i>: for italics
- <u>text</u>: for underline
- <font color=”#hexcode”>text</font>: for adding colored text.
Here’s an example styled SRT subtitle file:
1
00:00:01,000 --> 00:00:05,000
<b>Narrator</b>: A stunning coastline with gentle waves crash on the shore

2
00:00:05,200 --> 00:00:08,000
...<font color=#FFFF00"> a beautiful forest and rocky mountains line the horizon</font>.

3
00:00:8,200 --> 00:00:10,000
Narrator: <i>What a perfect day to be at the beach</i>!
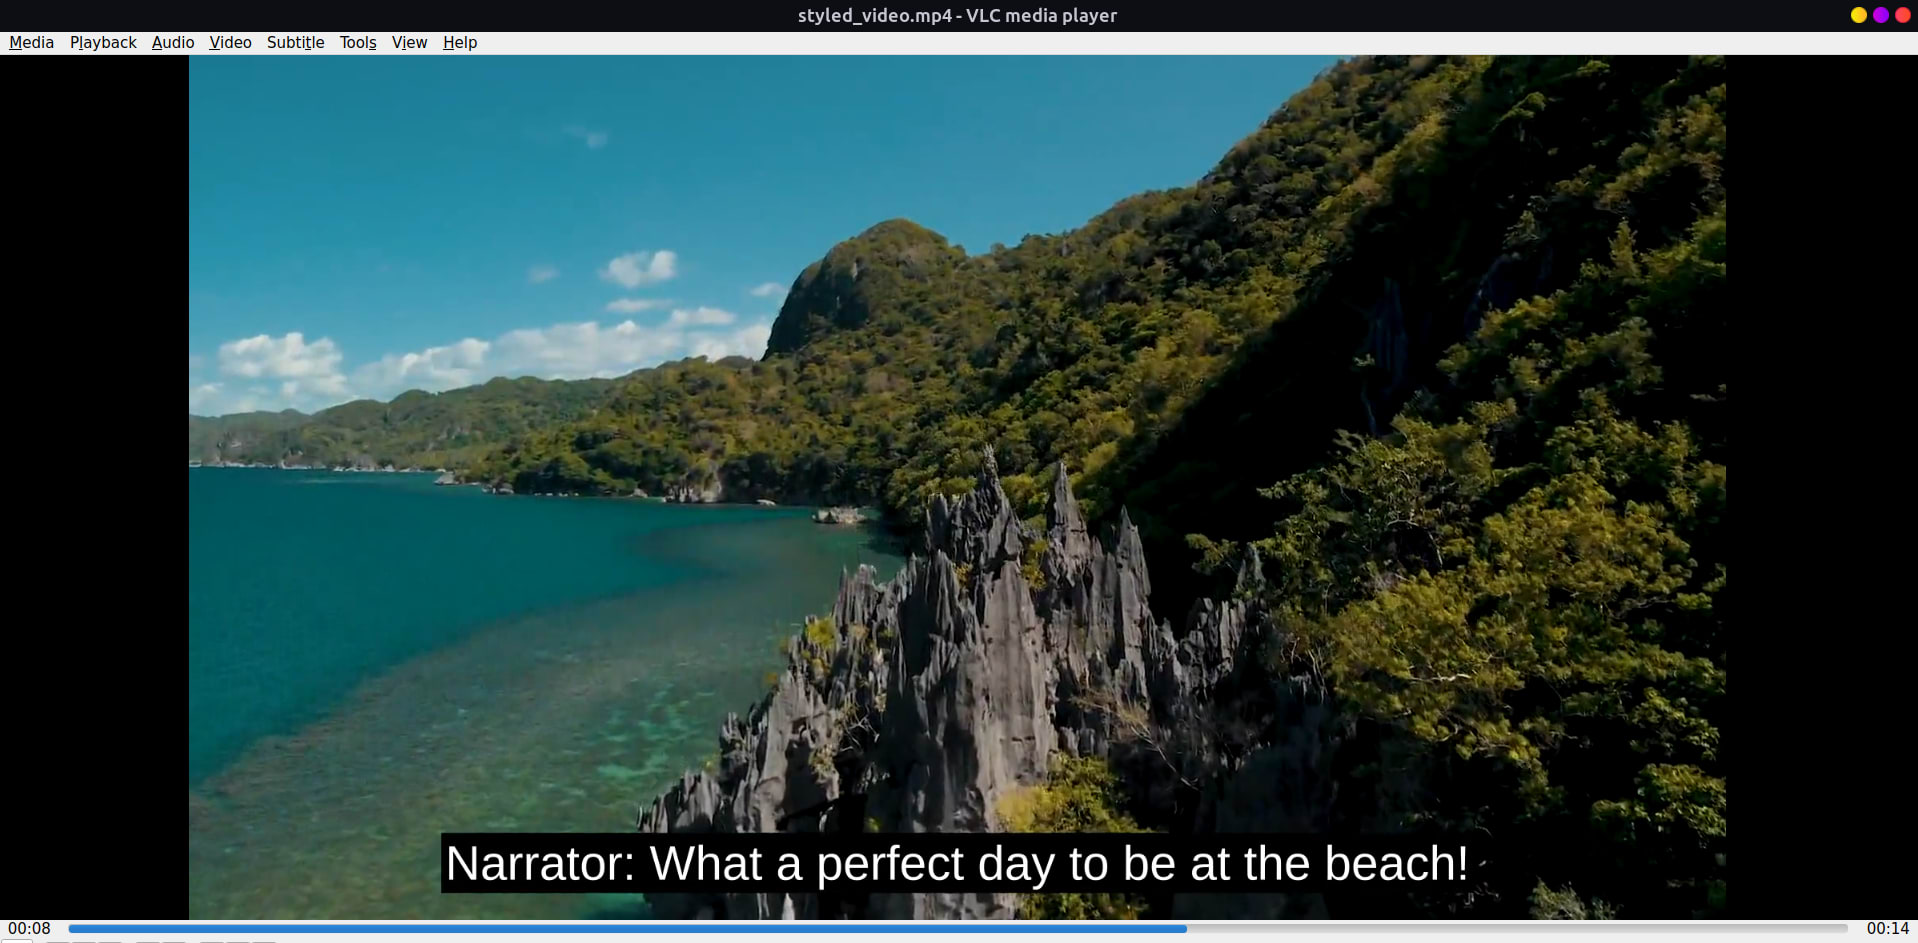
Alternatively, you can use the force_style option to style SRT files. This option allows you to override the default subtitle appearance by treating the SRT file as if it were an ASS file. However, this method works for hardcoded subtitles only.
The following example sets the font to Arial, size to 18, creates a semi-transparent black background box, and positions the subtitles at the bottom-center (Alignment=2):
ffmpeg -i coastal-beach.mp4 -vf "subtitles=subtitles.srt:force_style='FontName=Arial,FontSize=18,PrimaryColour=&H00FFFFFF,BackColour=&HA0000000,BorderStyle=3,Alignment=2'" styled_video.mp4
This is what the result looks like:
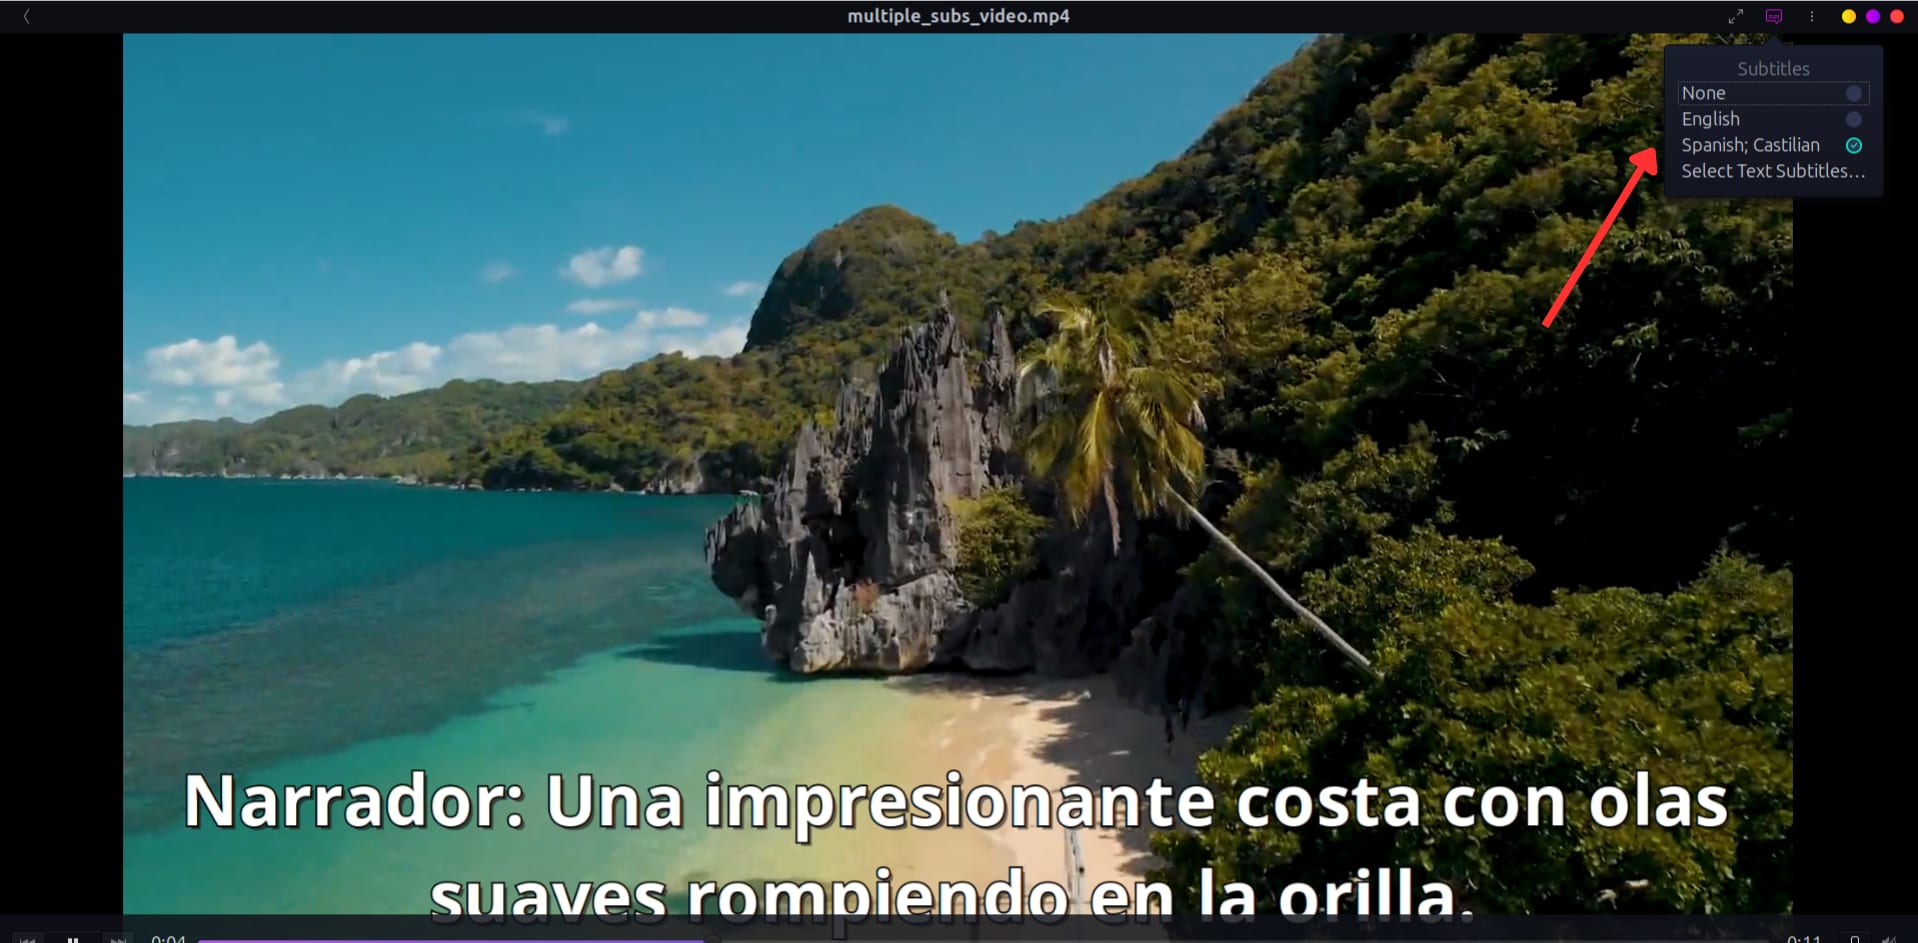
Adding Multiple Subtitles
Embedding multiple subtitle tracks to a video is essentially an expansion of the single soft subtitle command, where you add a new pair of input and output metadata for each subtitle file.
To demonstrate, we’ll create two different subtitle files: english_sub.srt and spanish_sub.srt and add it to our demo video. Create a file named english_sub.srt in your text editor and add the following text to it:
1
00:00:01,000 --> 00:00:05,000
Narrator: A stunning coastline with gentle waves crash on the shore

2
00:00:05,200 --> 00:00:08,000
... a beautiful forest and rocky mountains line the horizon.

3
00:00:8,200 --> 00:00:10,000
Narrator: What a perfect day to be at the beach!
Next, create a spanish_sub.srt file with the following content:
1
00:00:01,000 --> 00:00:05,000
Narrador: Una impresionante costa con olas suaves rompiendo en la orilla.

2
00:00:05,200 --> 00:00:08,000
... un hermoso bosque y montañas rocosas bordean el horizonte.

3
00:00:8,200 --> 00:00:10,000
Narrador: ¡Qué día tan perfecto para estar en la playa!
Next, run the following command to add multiple soft subtitle tracks to the demo video:
ffmpeg -i coastal-beach.mp4 \
       -i english_sub.srt \
       -i spanish_sub.srt \
       -map 0 -map 1 -map 2 \
       -c copy \
       -c:s mov_text \
       -metadata:s:s:0 language=eng \
       -metadata:s:s:1 language=spa \
       multiple_subs_video.mp4
The command looks quite complex, so let’s understand what the parameters are doing:
-i english_sub.srt: The first subtitle file.-i spanish_sub.srt: Second subtitle file.-map 0 -map 1 -map 2: This maps streams from all inputs to the output.-map 0maps the video and audio, while-map 1and-map 2map the subtitle streams.-c copy:-c:s mov_text: Sets the subtitle codec tomov_text, which is standard for the MP4 container.-metadata:s:s:0 language=eng: Sets the language code for the first subtitle track to English.-metadata:s:s:1 language=spa: Sets the language code for the second subtitle track to Spanish.multiple_subs_video.mp4: The output video filename.
Now viewers can select from multiple subtitles in their video player as shown in the following screenshot:
Integrating FFmpeg Subtitles with Cloudinary
Cloudinary is a cloud-based media management platform that simplifies the entire media workflow, including the storage, transformation, optimization, and delivery of images and videos. If you’re a developer building simple or complex applications, Cloudinary allows adding subtitles to videos in two primary ways:
- Programmatically using URL transformations or any of Cloudinary’s programming languages SDKs.
- Automatically generate subtitles using the Google AI Video Transcription add-on.
Cloudinary allows you to embed subtitle texts from an SRT or WebVTT file into a video. However, the subtitle file must first be uploaded as a raw file, then using its public_id, you can add it as an overlay on a video uploaded to your product environment.
We have already uploaded the subtitle file to our product environment here:
https://res.cloudinary.com/cloudinarymich/raw/upload/samples/subtitles_hn4td8.srt
And the demo video here:
https://res.cloudinary.com/cloudinarymich/video/upload/samples/coastal-beach_pawyms.mp4
Next, to add the subtitle as an overlay on the video, we’ll use Cloudinary’s URL transformation by adding the l_subtiles parameter to the video URL and the subtitle’s public_id:
https://res.cloudinary.com/cloudinarymich/video/upload/l_subtitles:samples:subtitles_hn4td8.srt/samples/coastal-beach_pawyms.mp4
Here’s the generated video with subtitles:
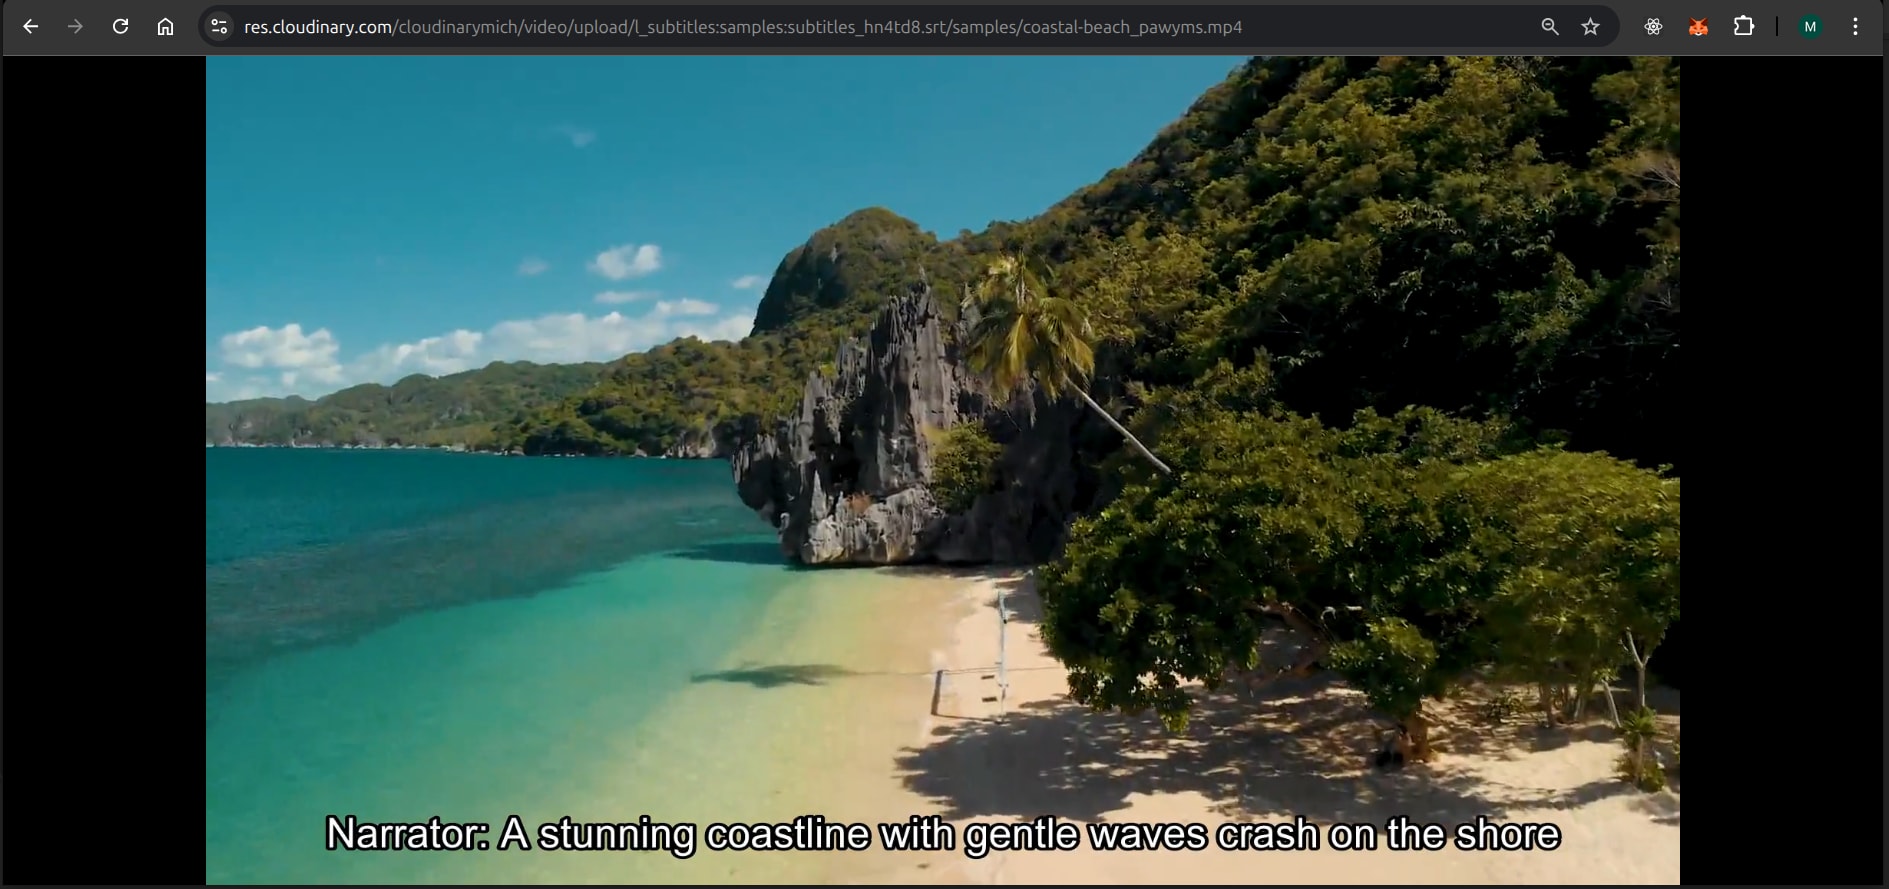
NOTE: samples in the URL above is the sub-folder that the subtitle file is in in our Cloudinary product environment. Cloudinary’s transformation syntax uses a colon (:) instead of a slash (/) to separate folder names within the layer component.
Styling Subtitles With Cloudinary
To customize your video subtitles, you have several options:
- Specify the font and font size as values of the
l_subtitlesparameter. - Control the subtitle text color using the
coqualifier. - Set either a background color (
b) or an outline color (bo) for the subtitle text.
If you don’t set any of these, the system will use the default styling: Arial, size 15, white text, and a black border.
You can learn more about using subtitles in Cloudinary in the transformation reference docs.
Wrapping Up
Video subtitles are an essential tool that allows your content to reach a global audience, irrespective of the languages they speak. In this guide, we demonstrated that FFmpeg is a versatile tool for developers and media professionals to add subtitles to their videos. Platforms like Cloudinary, simplifies the process even further by moving you from offline media processing to a streamlined, cloud-based workflow. This allows you to manage, transform, and deliver sub-titled content at scale.
When it comes to media management and processing, the possibilities with Cloudinary are endless. If you haven’t done so already, sign up for a free account to start exploring everything Cloudinary has to offer!
Frequently Asked Questions
Is adding subtitles to a video the same as closed captioning?
No, they are distinct, though often conflated, methods of providing on-screen text. There are a few characteristics that differentiate the two from each other. For instance, the primary audience for subtitles are viewers who cannot understand the spoken language in the video, while Closed captioning (CC) is often tailored for viewers who are deaf or hard-of-hearing.
How can I fix subtitles that are out of sync with the video using FFmpeg?
You can easily adjust the timing of your subtitle file using the -itsoffset option. This is applied to the subtitle input file to introduce a positive or negative delay. A positive offset value delays the subtitle, while a negative value speeds it up. Here’s an example:
ffmpeg -i coastal-beach.mp4 -itsoffset 2.5 -i subtitles.srt -c copy -map 0 -map 1 output.mp4

