 Ask AI
Klaviyo Connect App
Last updated: Sep-24-2026
The Klaviyo Cloudinary integration lets you use your Cloudinary media, including dynamic, personalized image templates, directly in Klaviyo emails.
Overview
Klaviyo is a marketing automation platform for email and SMS campaigns. The Cloudinary integration for Klaviyo connects your cloud to Klaviyo and adds Cloudinary assets as Universal Content blocks.
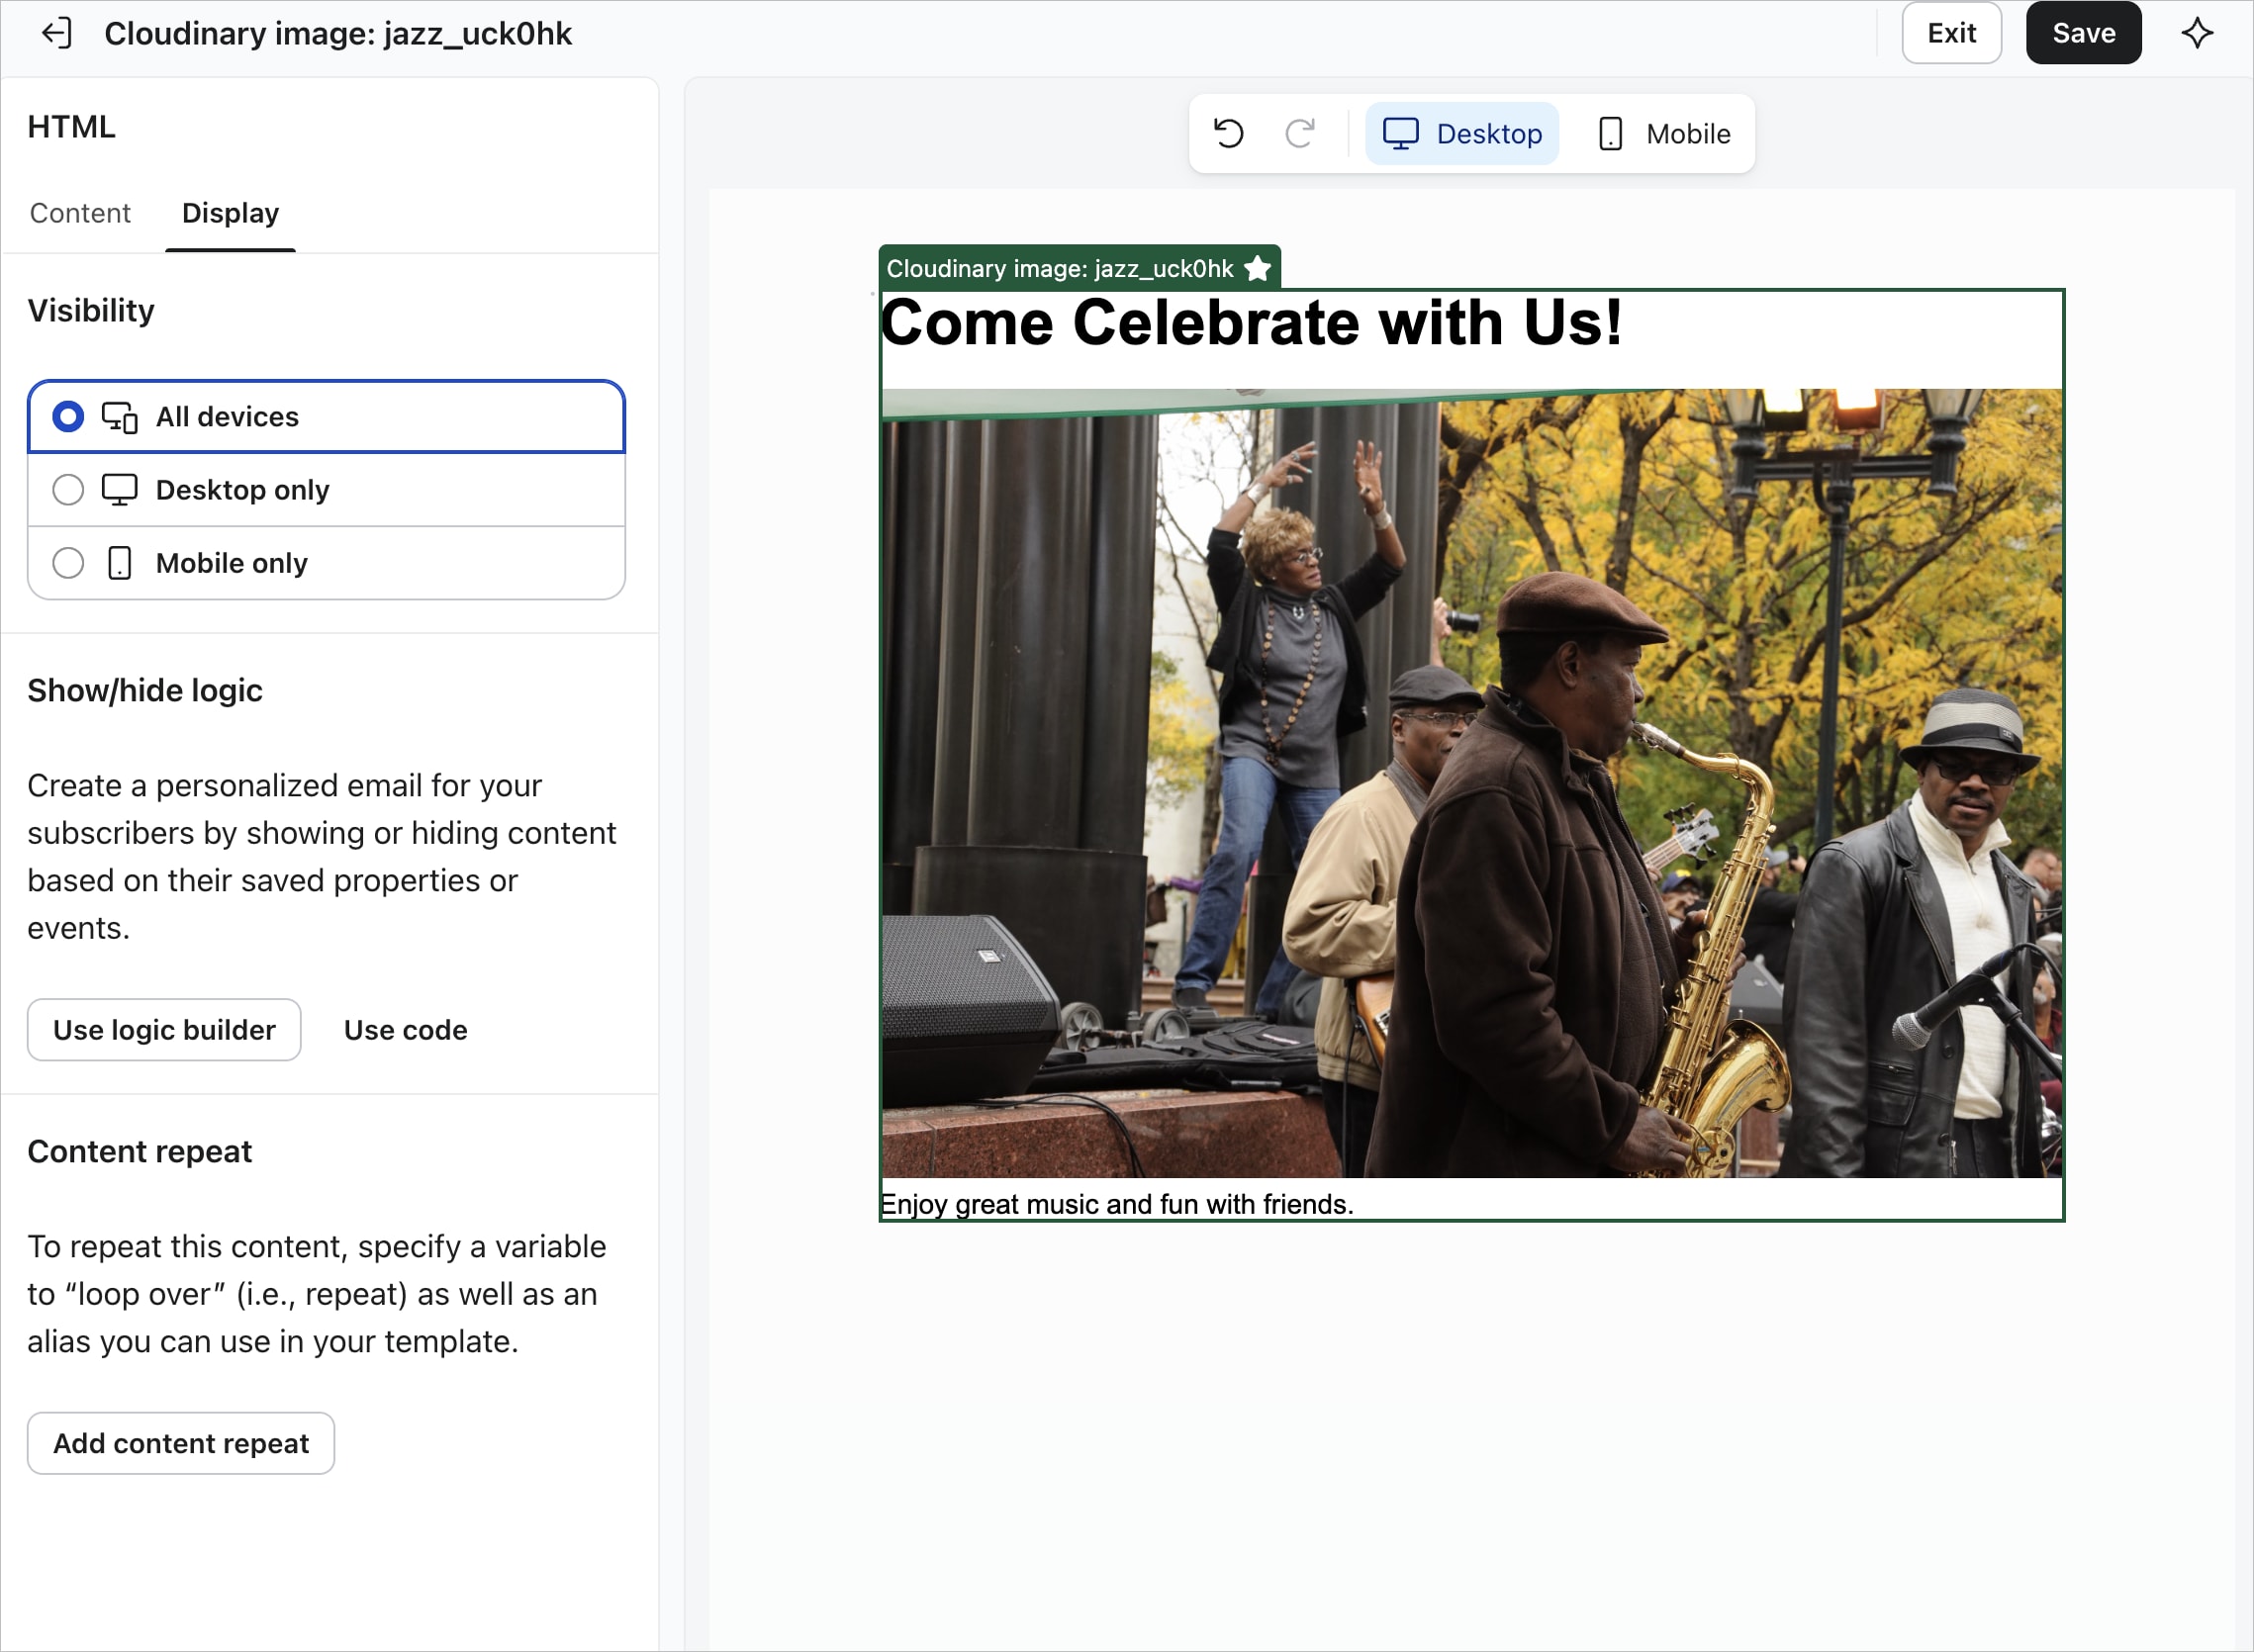
The integration enables you to:
- Access and select Cloudinary assets directly within the Klaviyo email editor
- Reference assets as reusable Universal Content blocks without duplicating them into Klaviyo
- Personalize dynamic images using Klaviyo profile attributes and event data
- Automatically keep every email up to date when you re-render an asset in Cloudinary
- Track which Universal Content blocks in Klaviyo reference a given Cloudinary asset
Use cases
Single source of truth for campaign assets
Save Cloudinary assets to Klaviyo as Universal Content blocks that reference the Cloudinary URL instead of copying the file into Klaviyo's image library. Re-rendering the asset in Cloudinary automatically updates every campaign and flow email that uses it.
Personalize visuals with customer data
Bind the text and image fields of a dynamic image (a Cloudinary .cldt.json template) to Klaviyo profile attributes or event data to personalize the visual for each recipient, then save the result as a Universal Content block. Recipients without matching personalization data see the dynamic image's default values.
- Safari: The Safari browser may require additional steps when logging in to the Media Library. If you encounter an issue, follow the prompts to log in separately and attempt to open the Media Library again. Alternatively, use one of the other recommended browsers when working with Cloudinary.
-
Third-party cookies: Some browsers (such as Firefox) may block third-party cookies by default, which can prevent the Media Library Widget from functioning properly. Users may need to explicitly allow third-party cookies for the Cloudinary domain (
https://cloudinary.com) in their browser settings.
Prerequisites
- A Cloudinary account with Media Library access (sign up for free if you don't have one).
- A Klaviyo account with permission to connect third-party apps.
Set up the integration
Connect Klaviyo to your Cloudinary account
- Sign in to Cloudinary.
- Click to open the Klaviyo Connect dialog box from Cloudinary's App Marketplace.
- Click Enable.
- Click Connect Cloudinary to Klaviyo, allowing pop-ups if prompted.
- Approve the requested permissions in the Klaviyo sign-in window to:
- Verify your account
- Create and update Universal Content blocks
- Upload to the Klaviyo image library (only used if you choose the copy-upload option when saving assets)
- List the events you can personalize on (e.g., Placed Order, Added to Cart)
- Read recent events to populate relevant event fields and product images
When you return to Cloudinary, the Setup tab shows that you're Connected.
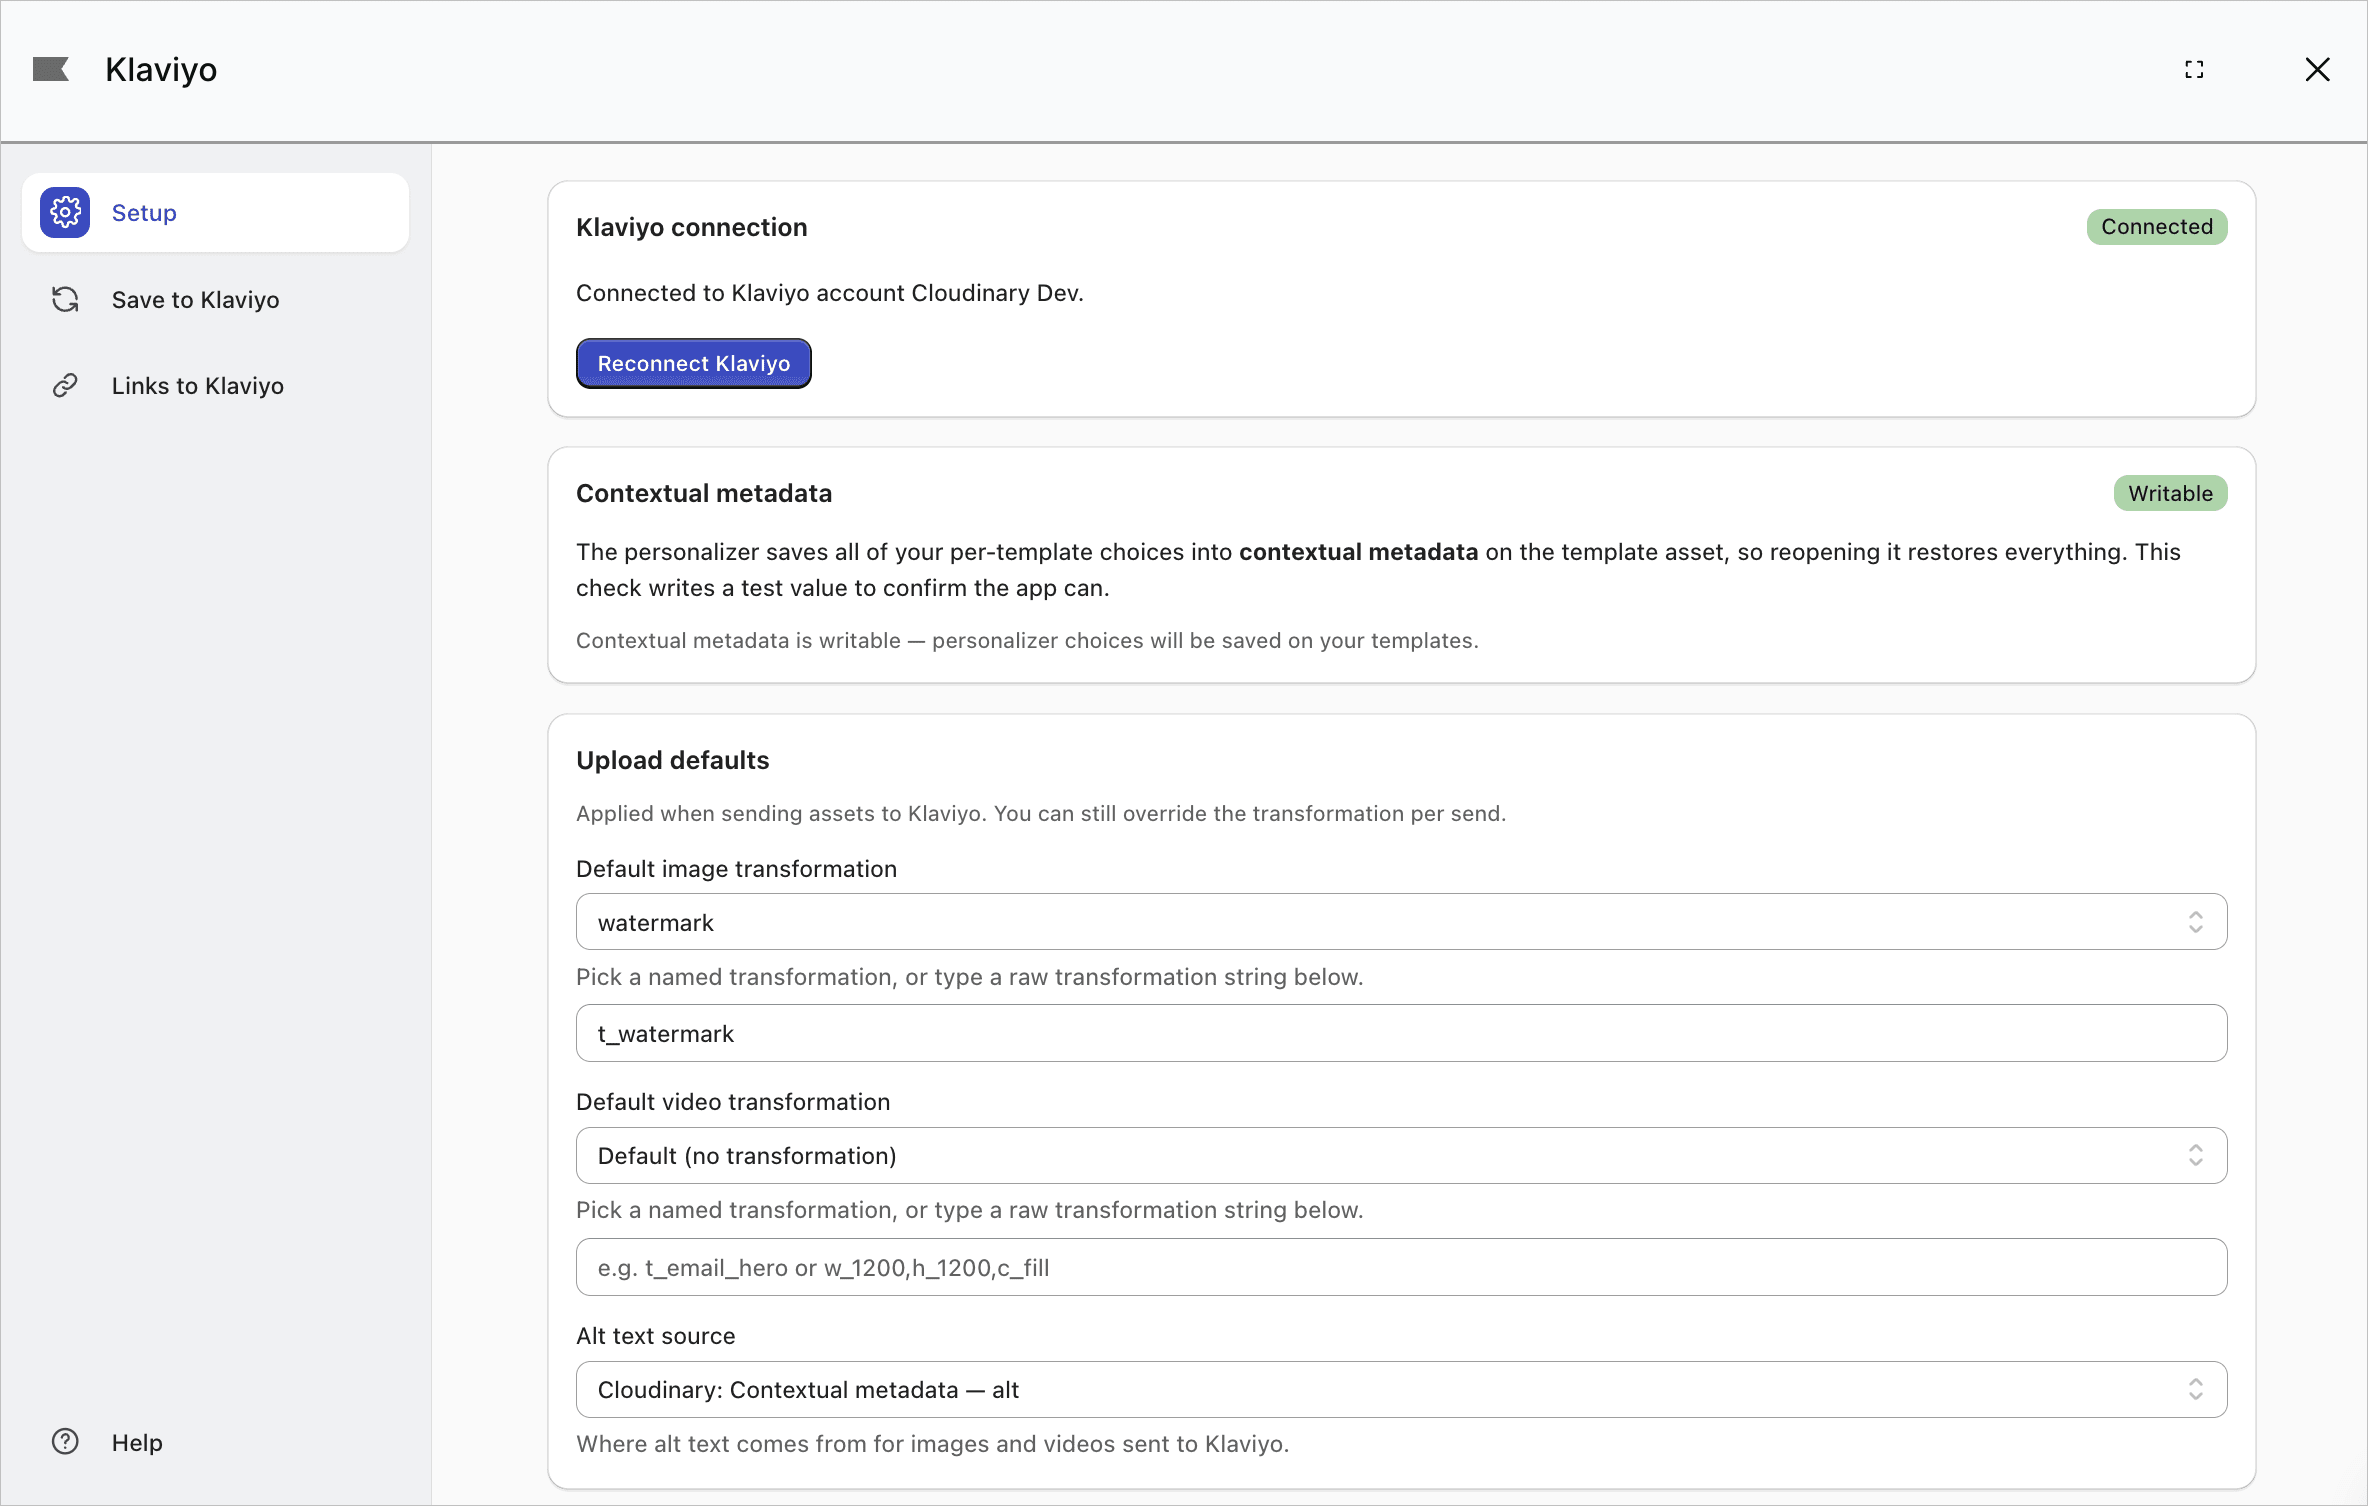
Configure upload defaults
On the app's Setup tab, set the defaults applied whenever you save an asset to Klaviyo:
- Default image/video transformation: Select one from your image or video named transformations, respectively.
- Alt text source: Select the metadata option used as the alt text for assets you save to Klaviyo.
Configure coupon links
If you personalize text with coupon codes, set your storefront address and your coupon URL convention once on the app's Setup tab. The app then composes the target link for each coupon you bind, so the link in every email applies that recipient's own code.
Use Cloudinary assets in Klaviyo
Save Cloudinary images, videos, and dynamic images to Klaviyo, and add them as reusable Universal Content to your campaigns and flows.
Save assets to Klaviyo
Saving an asset to Klaviyo creates a Universal Content block that you can then add to any campaign or flow email.
To use one or more Cloudinary assets in Klaviyo:
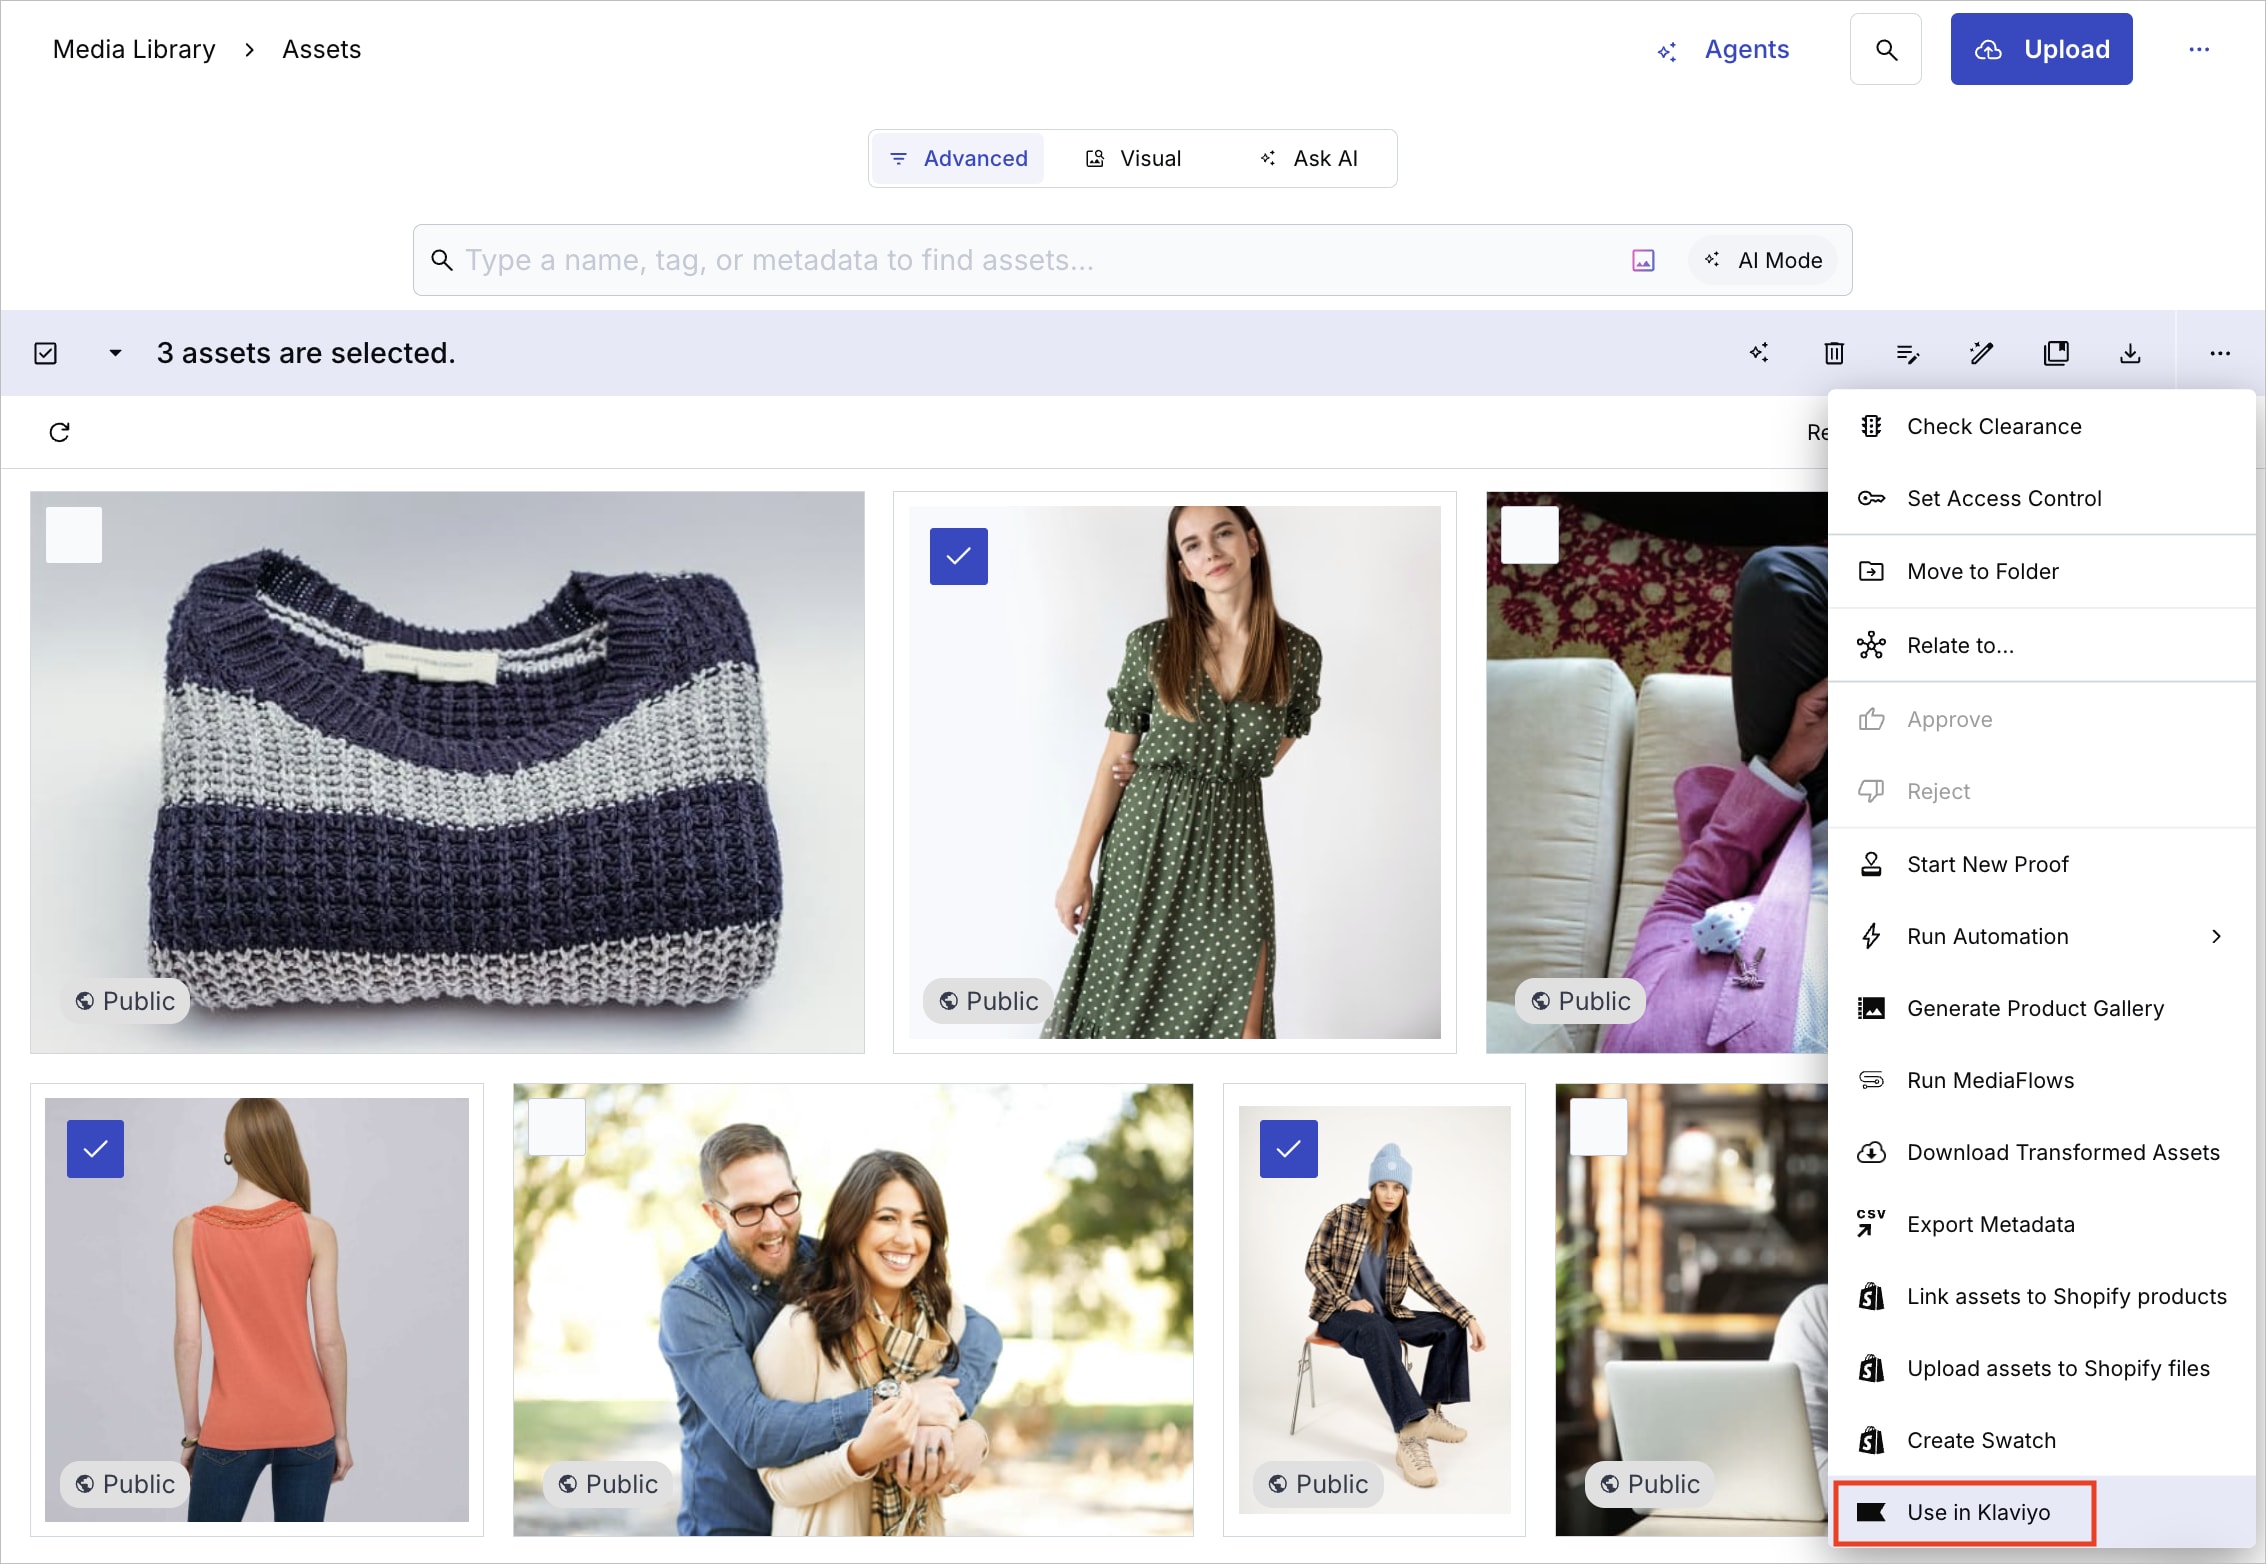
- In the Cloudinary Media Library, select one or more assets.
- From the assets toolbar, choose Use in Klaviyo.

- In the Save to Klaviyo dialog box, optionally expand Delivery options to change the defaults:
- Select a storage option:
- As Universal Content blocks (recommended), selected by default: references the Cloudinary URL without duplicating the asset, and updates automatically whenever you re-render the asset in Cloudinary.
- Upload a copy to Klaviyo's image library: stores a separate copy in Klaviyo that no longer stays in sync with Cloudinary.
- Select a named transformation, or type a raw transformation string, to save variations of the selected assets in Klaviyo.
- Select a storage option:
- In the Save as-is section, click the Save ... to Klaviyo button. The label reflects how many assets you selected, for example Save 3 assets to Klaviyo. If some of the selected assets are already saved in Klaviyo, the dialog box identifies them and saves only the remaining ones. To update assets that are already saved, use Re-save to refresh.

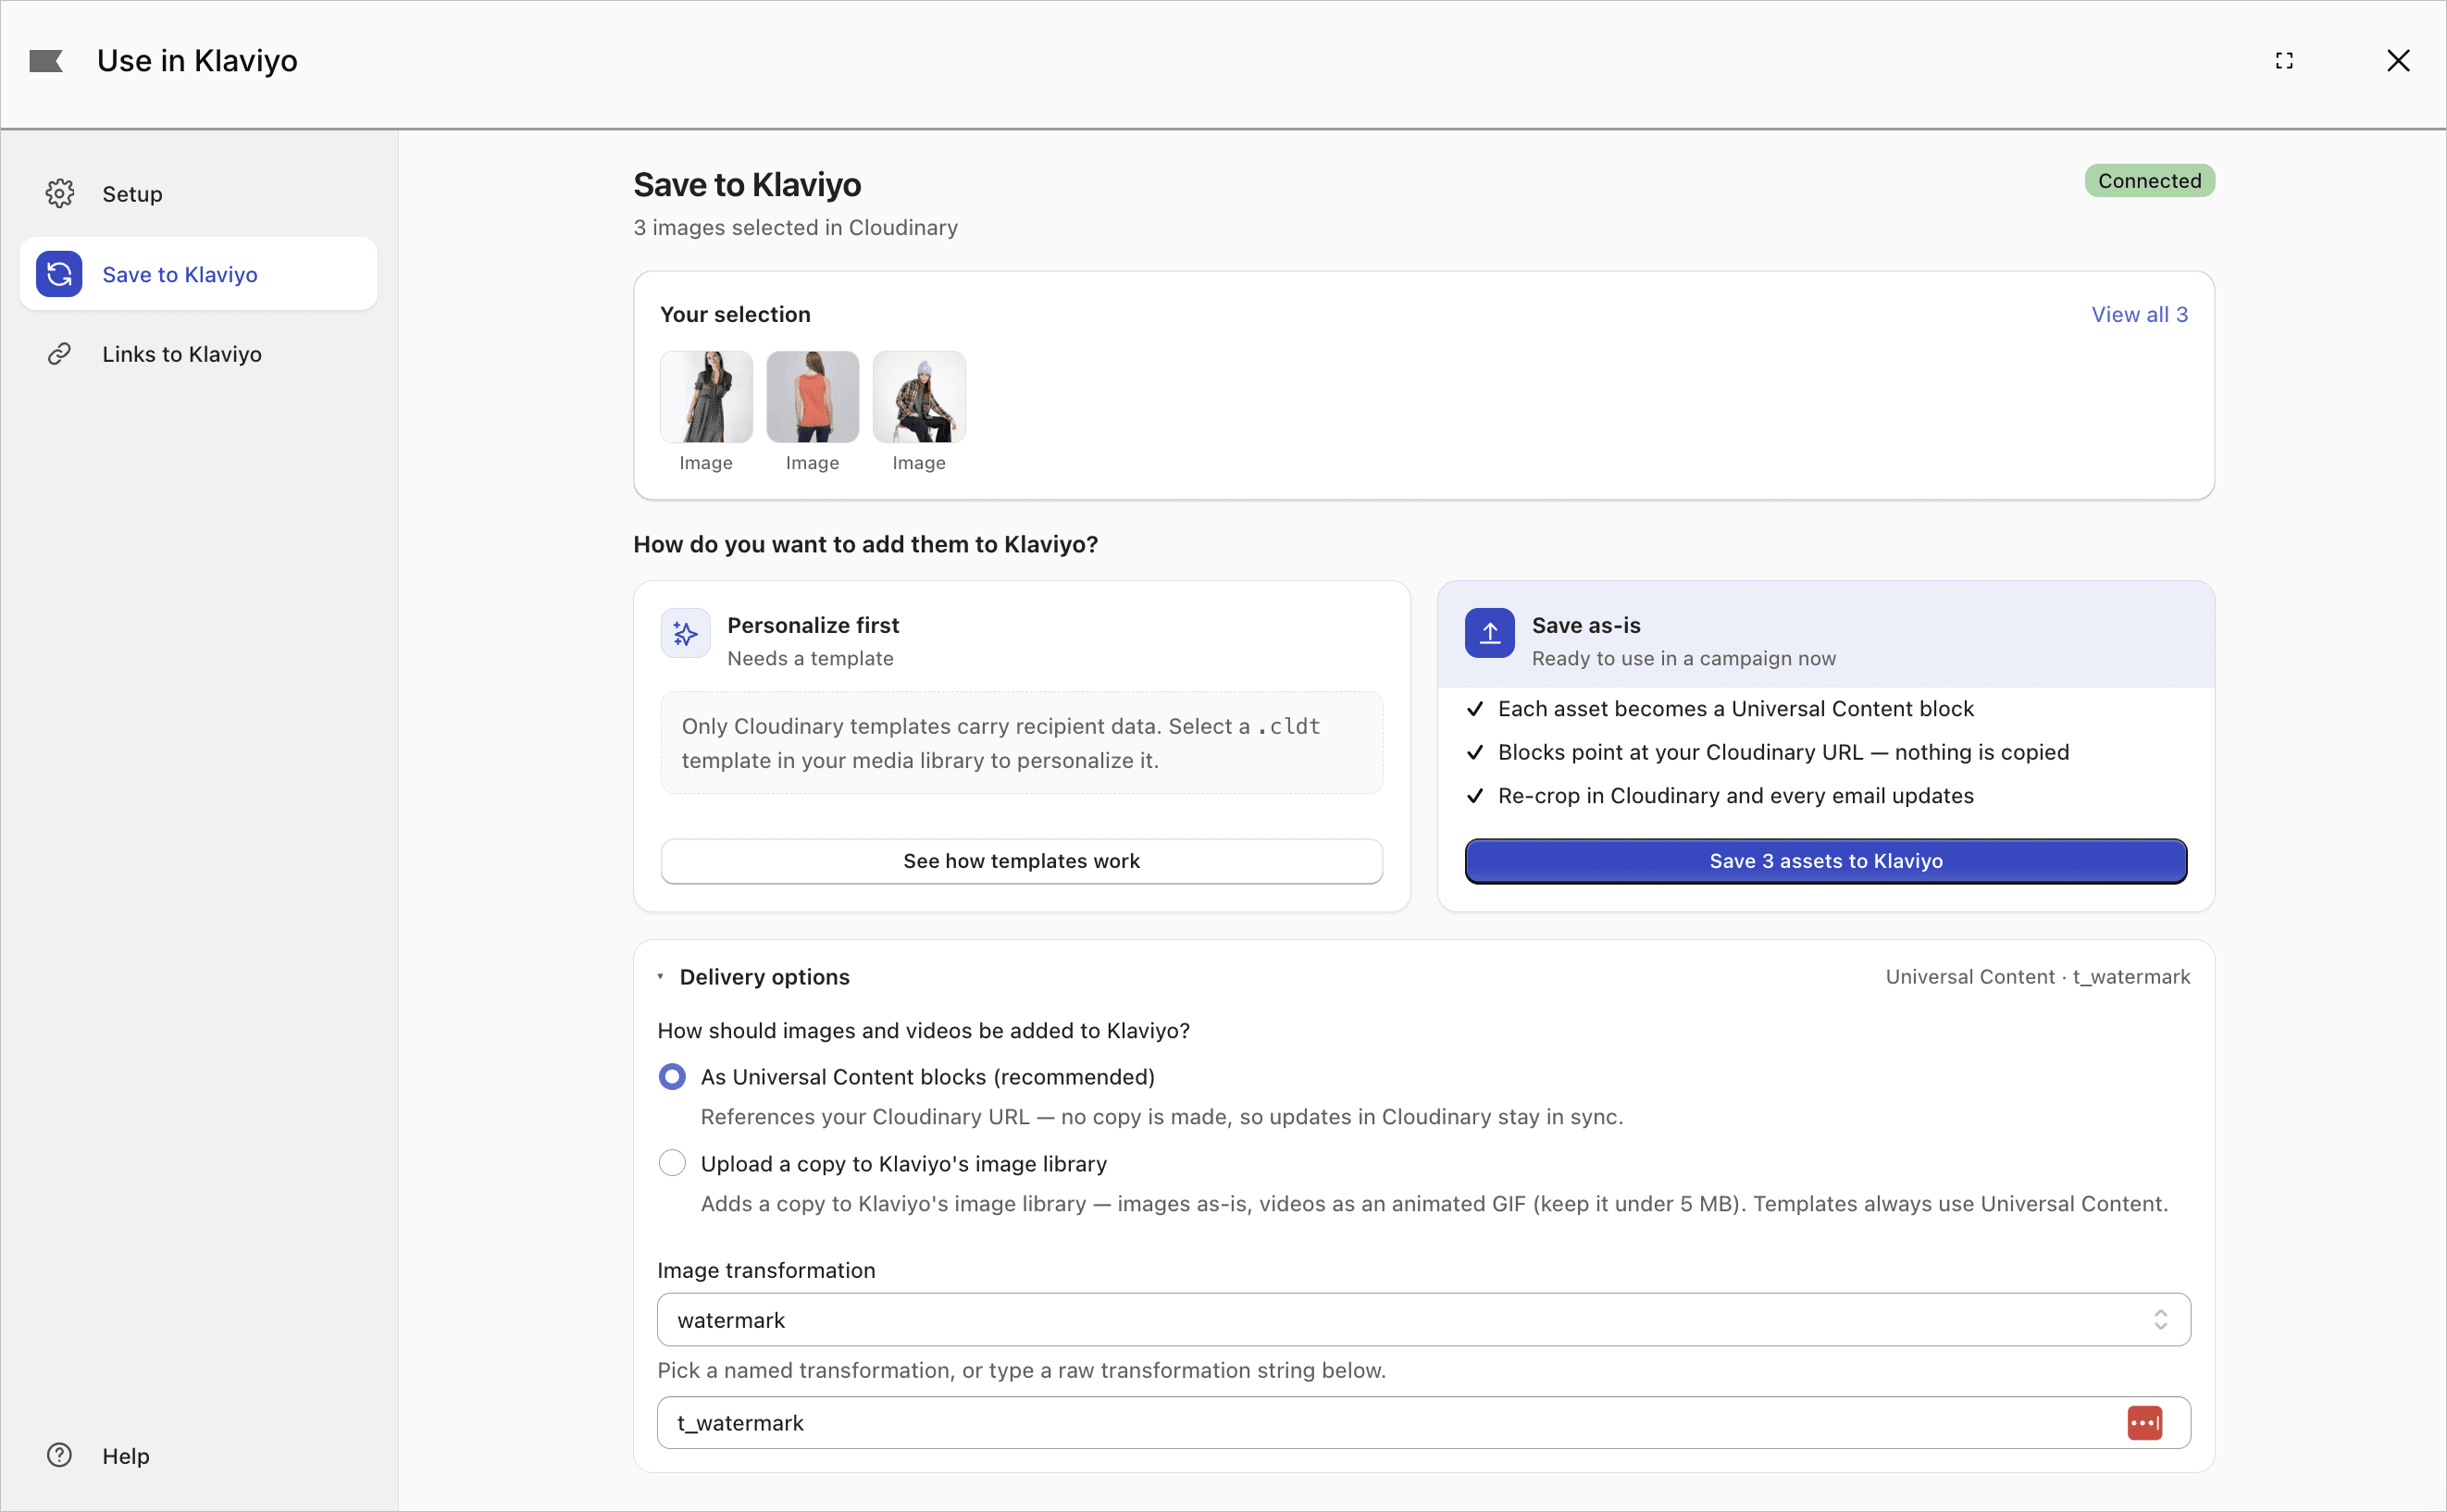
- Cloudinary saves images as a static reference to the asset's delivery URL, and saves videos with an animated WebP or GIF preview that links through to the full-quality video.
- To personalize dynamic images with Klaviyo data, see Create personalized content with dynamic images.
To manage a single Cloudinary asset in Klaviyo:
Select Use in Klaviyo from the (3-dots) options menu on its Manage page, or from the DAM Apps option in the asset's context menu.
-
Or, You can also click the Klaviyo Connect tab on the asset's Manage page, then click Add to image library, to add a single image or video to Klaviyo's image library.
NoteLike the Upload a copy to Klaviyo's image library option, this stores a separate copy in Klaviyo that doesn't update when you change the asset in Cloudinary. If the asset changes in Cloudinary after you add it to Klaviyo, the Klaviyo Content tab shows that the copy in Klaviyo is out of date, so you can add the current version.
Use Cloudinary content in campaigns and flows
Once you save a Cloudinary asset as a Universal Content block, add it to any campaign or flow email in Klaviyo like you would any other content block.
To add a Universal Content block to your email:
- Edit a campaign or flow email in Klaviyo.
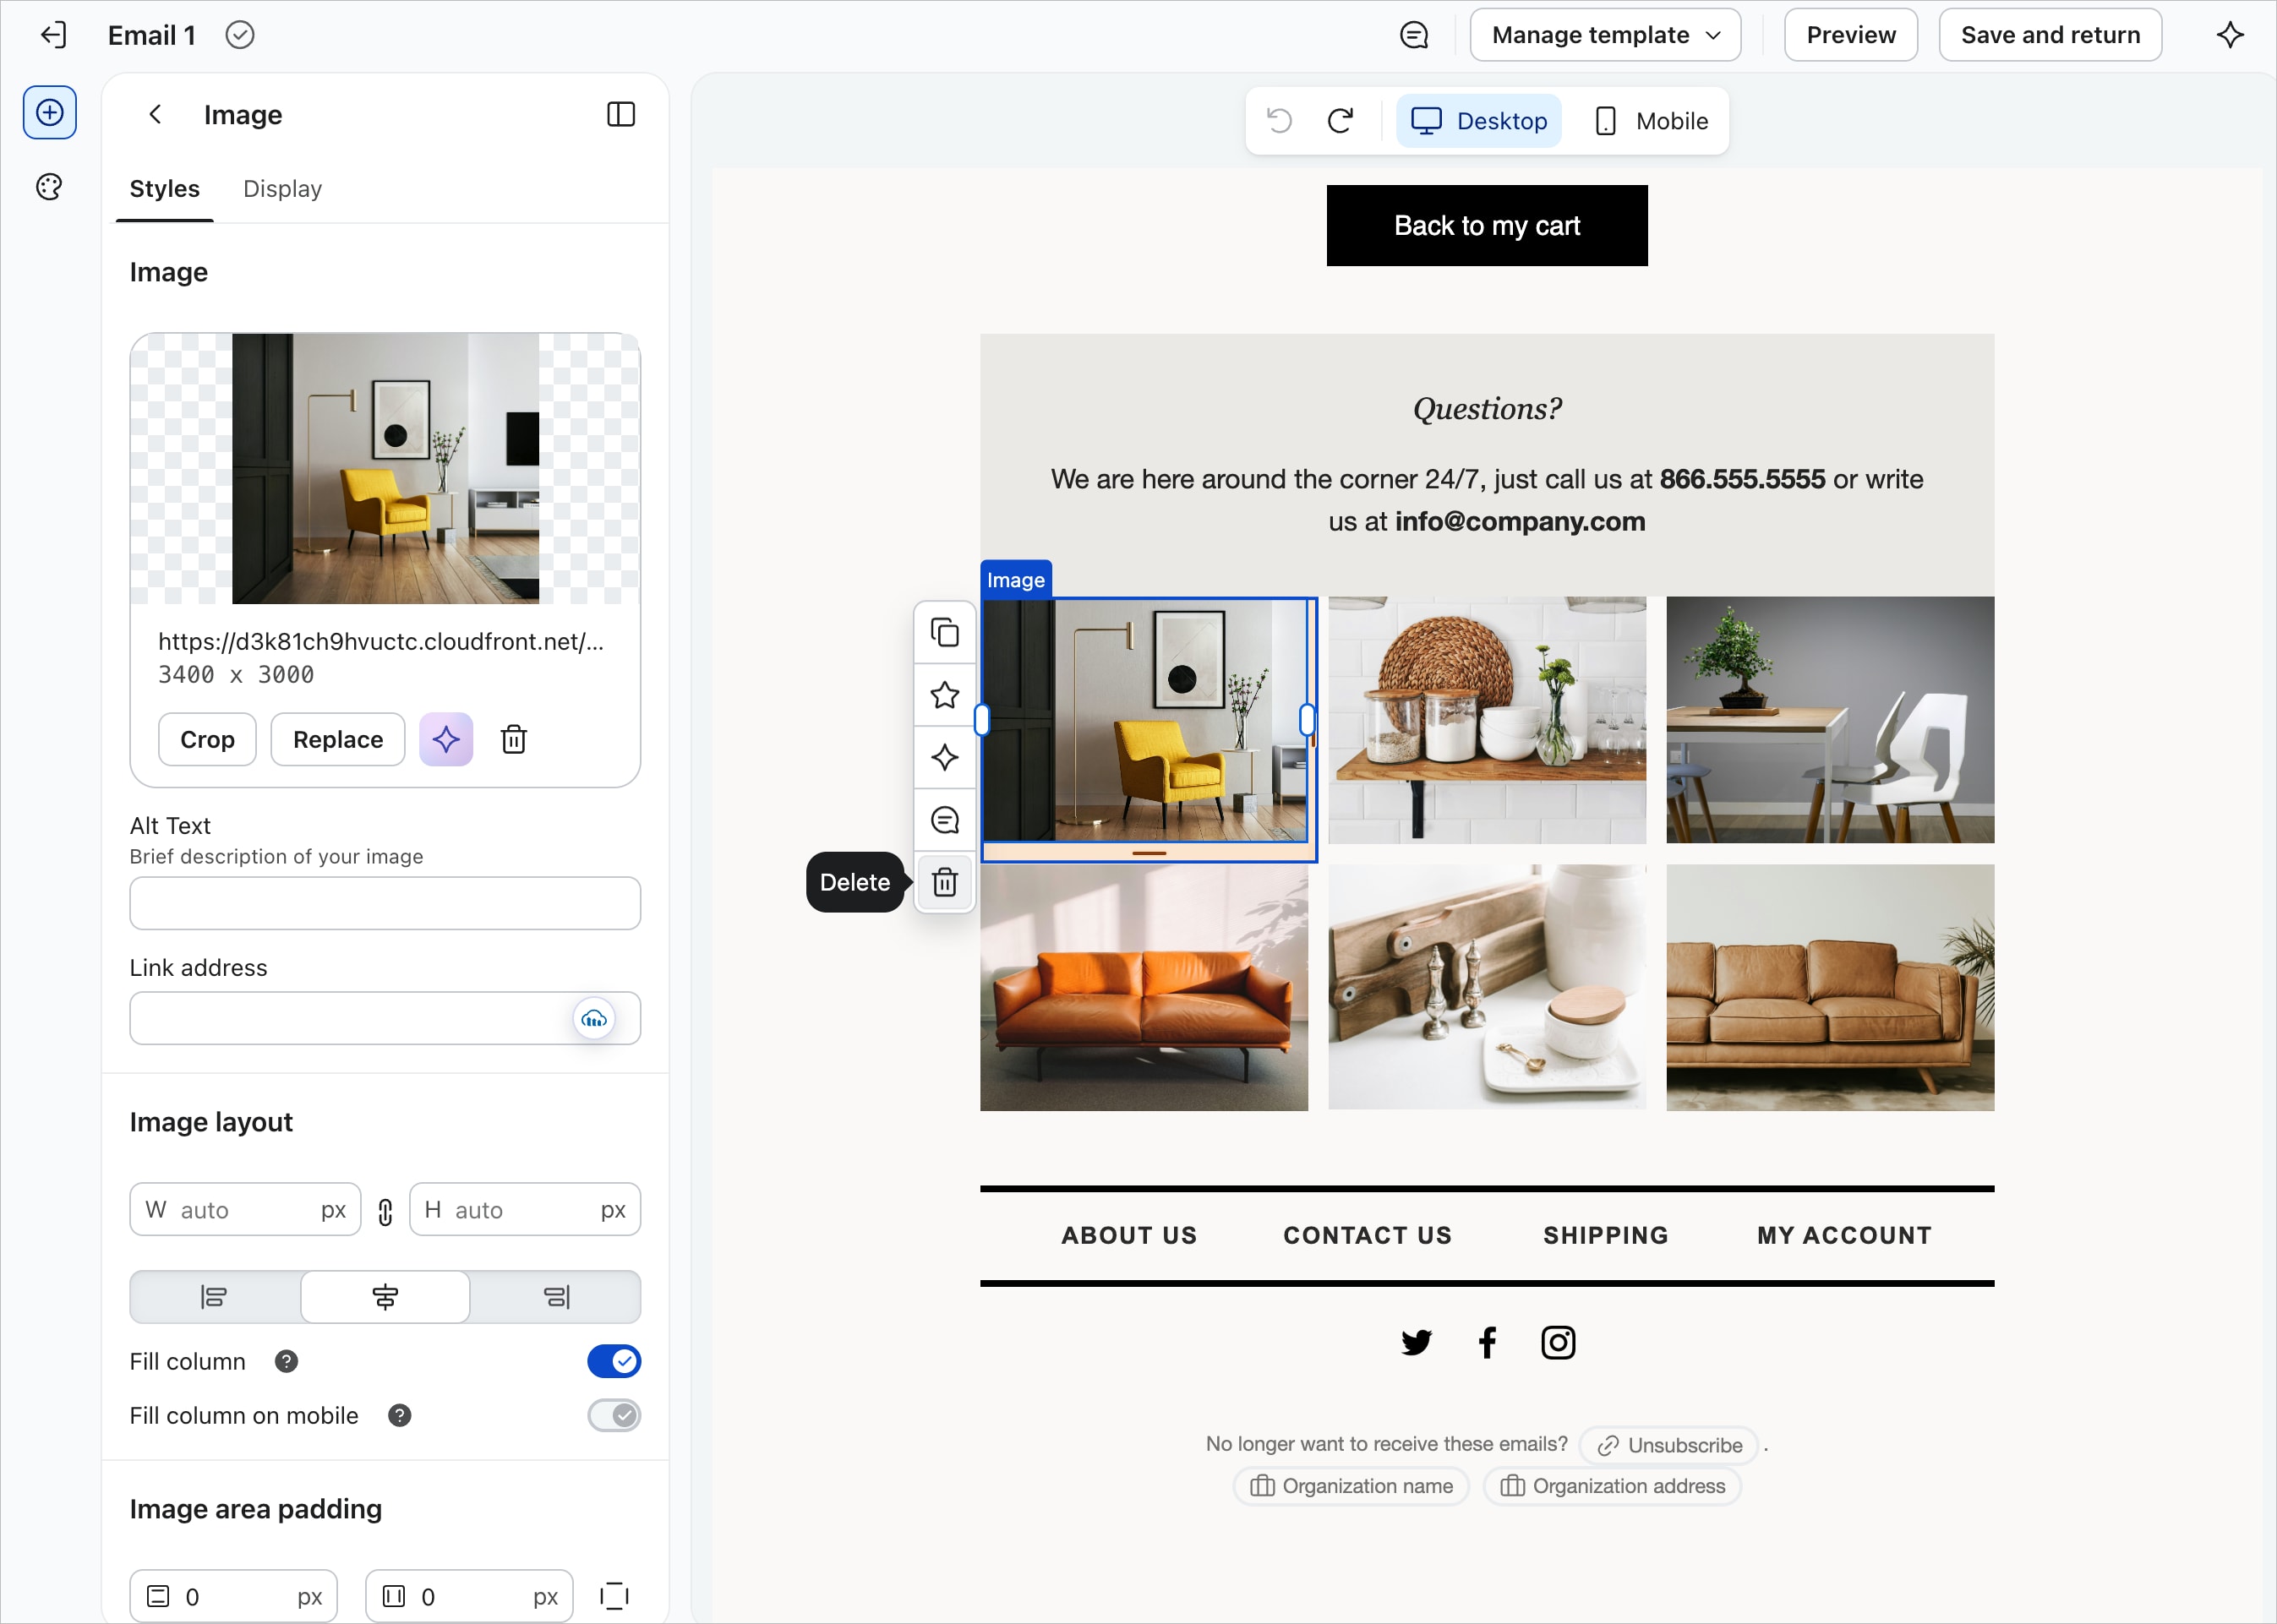
- Click the Add content icon to add your Universal Content block to the email.
 NoteIf the Universal Content block contains a dynamic image that uses event variables to personalize its content, see Create personalized content with dynamic images to see the full flow.
 - Drag the Universal Content block into your email where you want it to appear.
- Preview the email with a profile, or send a test, to verify the content renders as expected.

To replace an existing asset with a Universal Content block:
- Click the asset you want to replace and click the trash icon from its context menu.

- Click the Add content icon to drag a Universal Content block into your email.

- Drag the Universal Content block into the empty space.



Track assets saved to Klaviyo
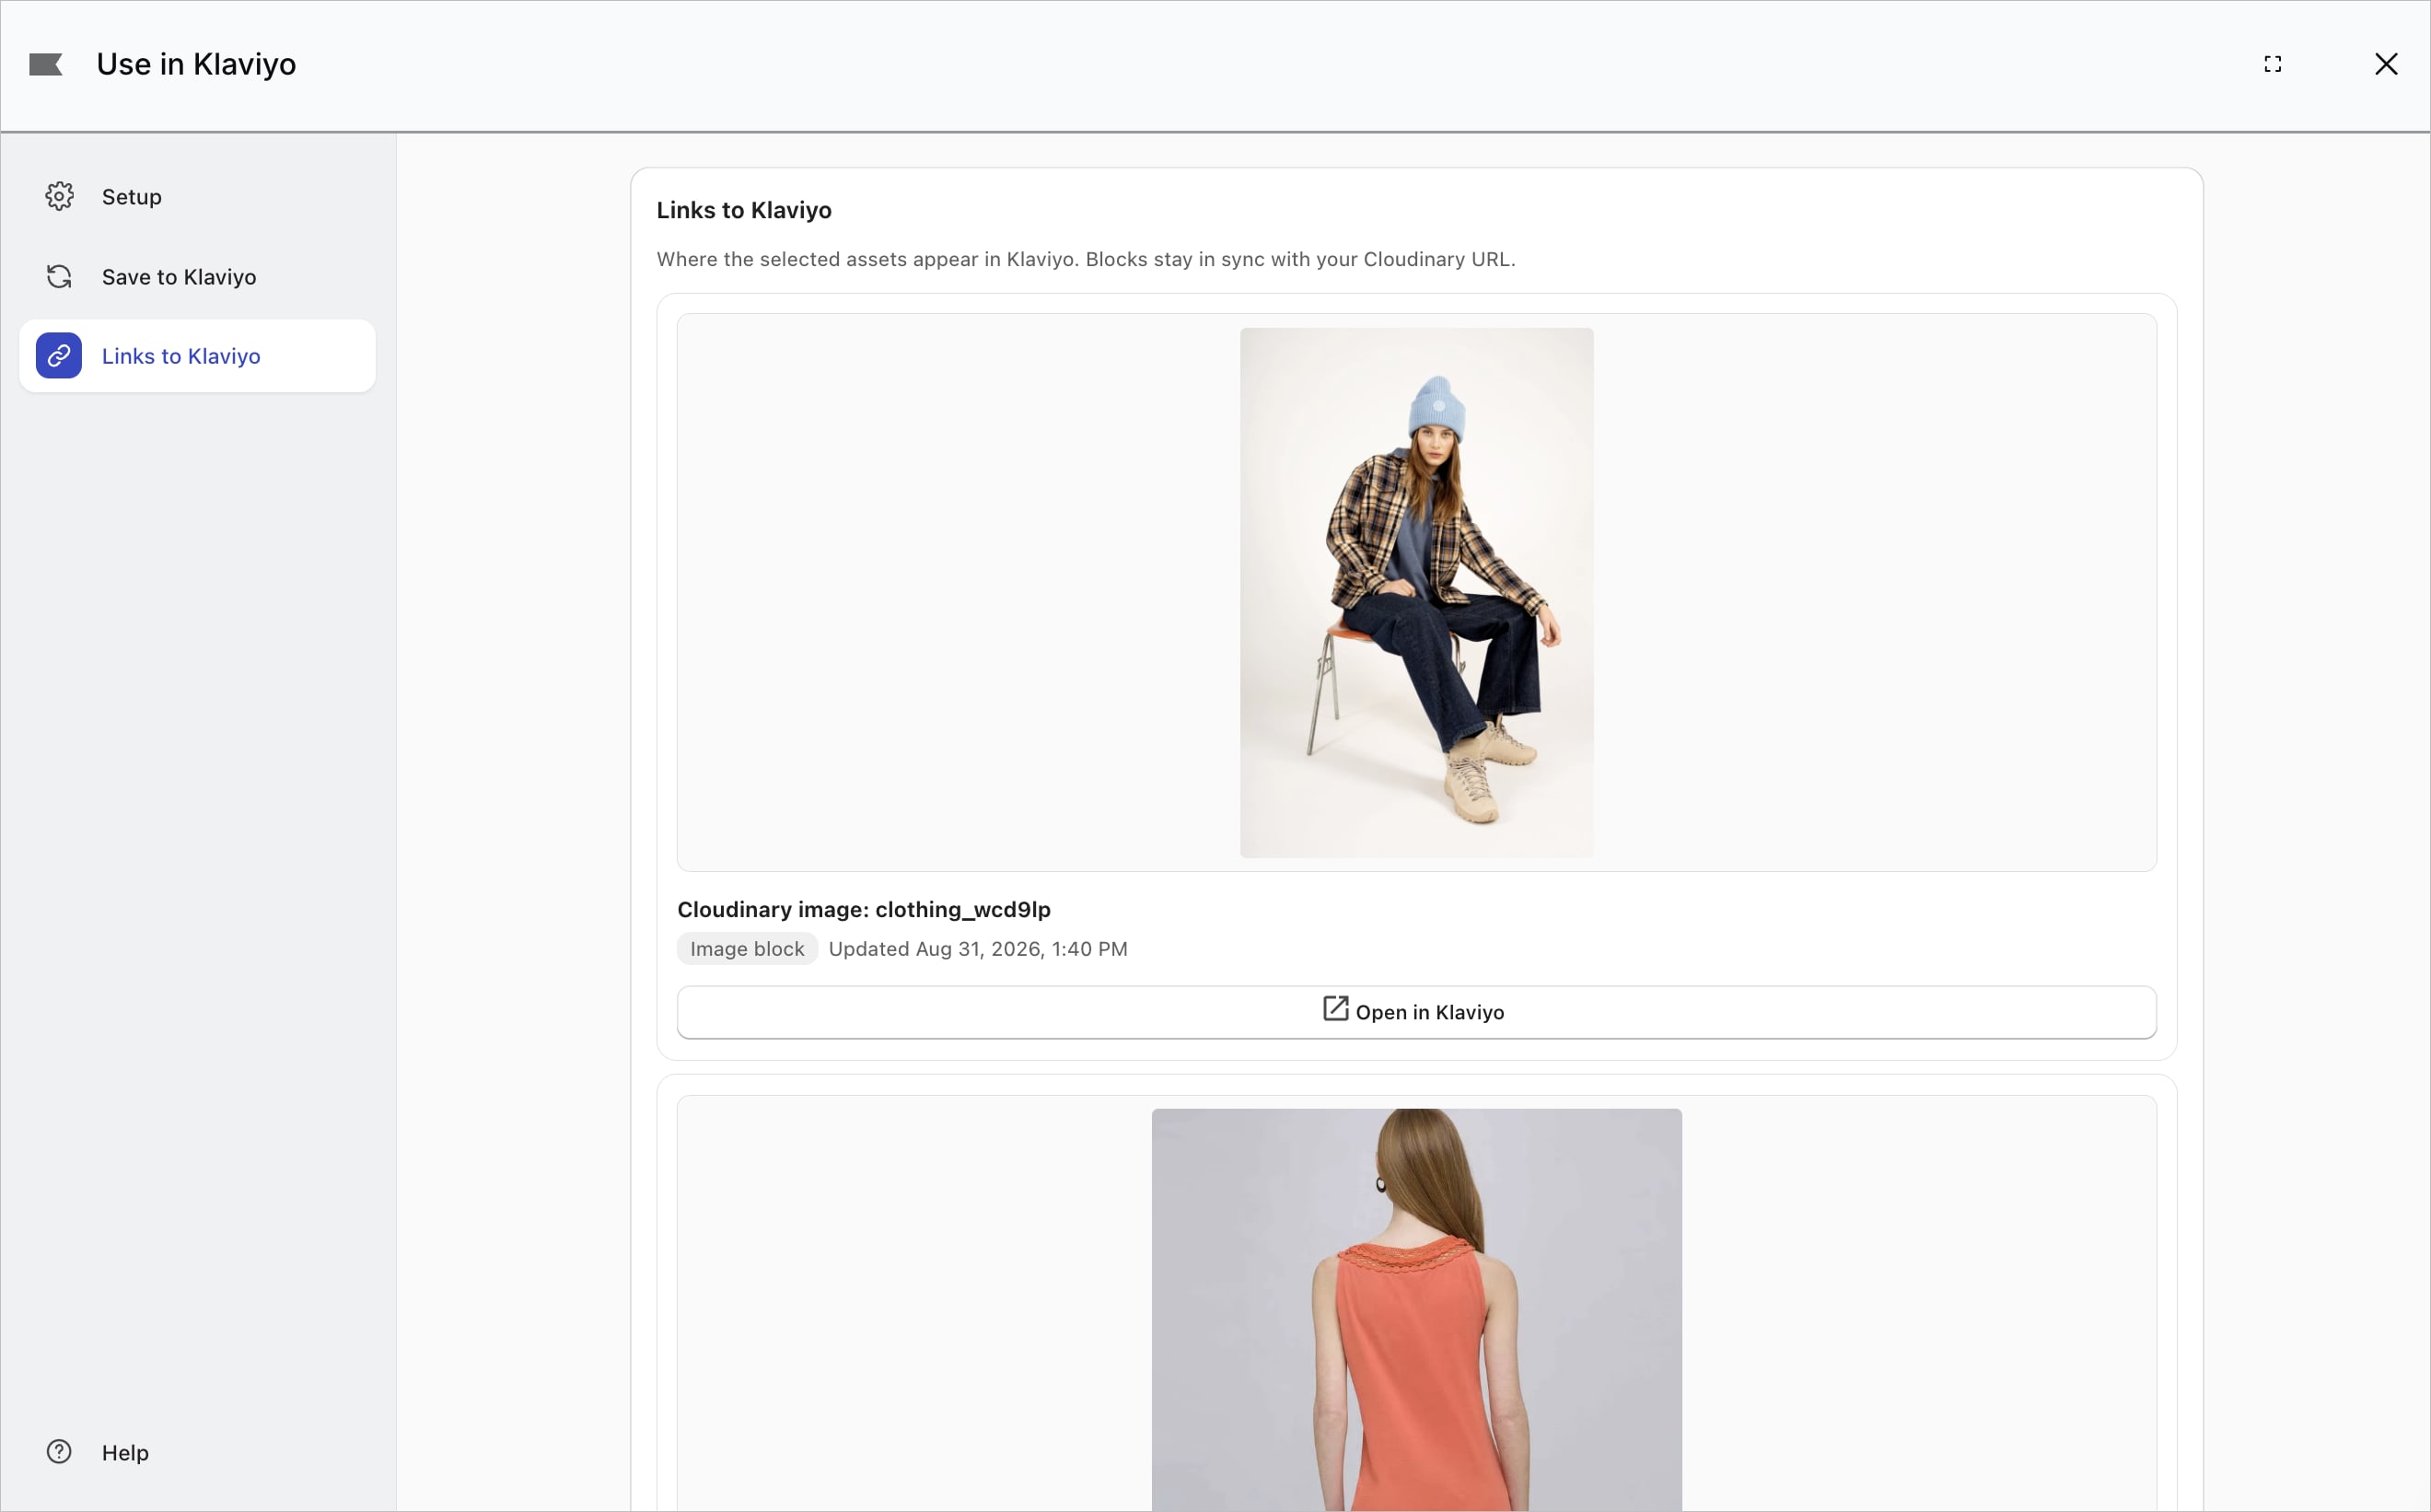
To see where Klaviyo uses a Cloudinary asset, select one or more assets already saved in Klaviyo and open the Links to Klaviyo tab. It lists the Universal Content blocks that reference the selected assets, along with block thumbnails, block type, and whether the block still exists in Klaviyo. Use Open in Klaviyo to jump directly to a block.
If a Universal Content block was deleted in Klaviyo, you can disconnect it, which removes the link between the Cloudinary asset and the block that no longer exists.
Create personalized content with dynamic images
Dynamic images let you create personalized visual content for your Klaviyo emails. A dynamic image is a Cloudinary template (.cldt) whose images, videos, and text you connect to Klaviyo profile or event data, then save as a Universal Content block. When you use the block in a campaign or flow, its content changes based on each recipient's data.
Follow the instructions below to create a dynamic image in Figma and personalize it with Klaviyo data.
If you only want to save existing images, videos, or already-built dynamic images to Klaviyo as-is, see Save assets to Klaviyo instead.
Create a dynamic image in Figma
Dynamic images let you design once, then swap dynamic elements, such as images, videos, and text, for personalization.
Use the Cloudinary Figma Plugin to create a dynamic image template, then save it to Cloudinary so you can personalize it with Klaviyo data.
- Make sure your Figma plugin is open and connected.
- Start with a design in Figma, for example the visual you want to send as a personalized abandoned cart or promotional image.
- Select the frame or artboard you want to export, then select the Dynamic Image tab.

- Define which layers become dynamic fields, the parts that change per recipient, and which layers stay flattened into the background image.
- Click Create template to save the template to your Cloudinary Media Library. Confirm uploading any custom fonts the design uses that aren't already in your Cloudinary account.

Personalize the template with Klaviyo data
The Universal Content block in Klaviyo stores the personalization, so it doesn't matter which side you work from. Edits you make in Cloudinary and edits you make in Klaviyo using the Cloudinary Chrome Extension apply to the same block, without overwriting each other or losing your work.
Open the personalization panel from either Cloudinary or Klaviyo:
-
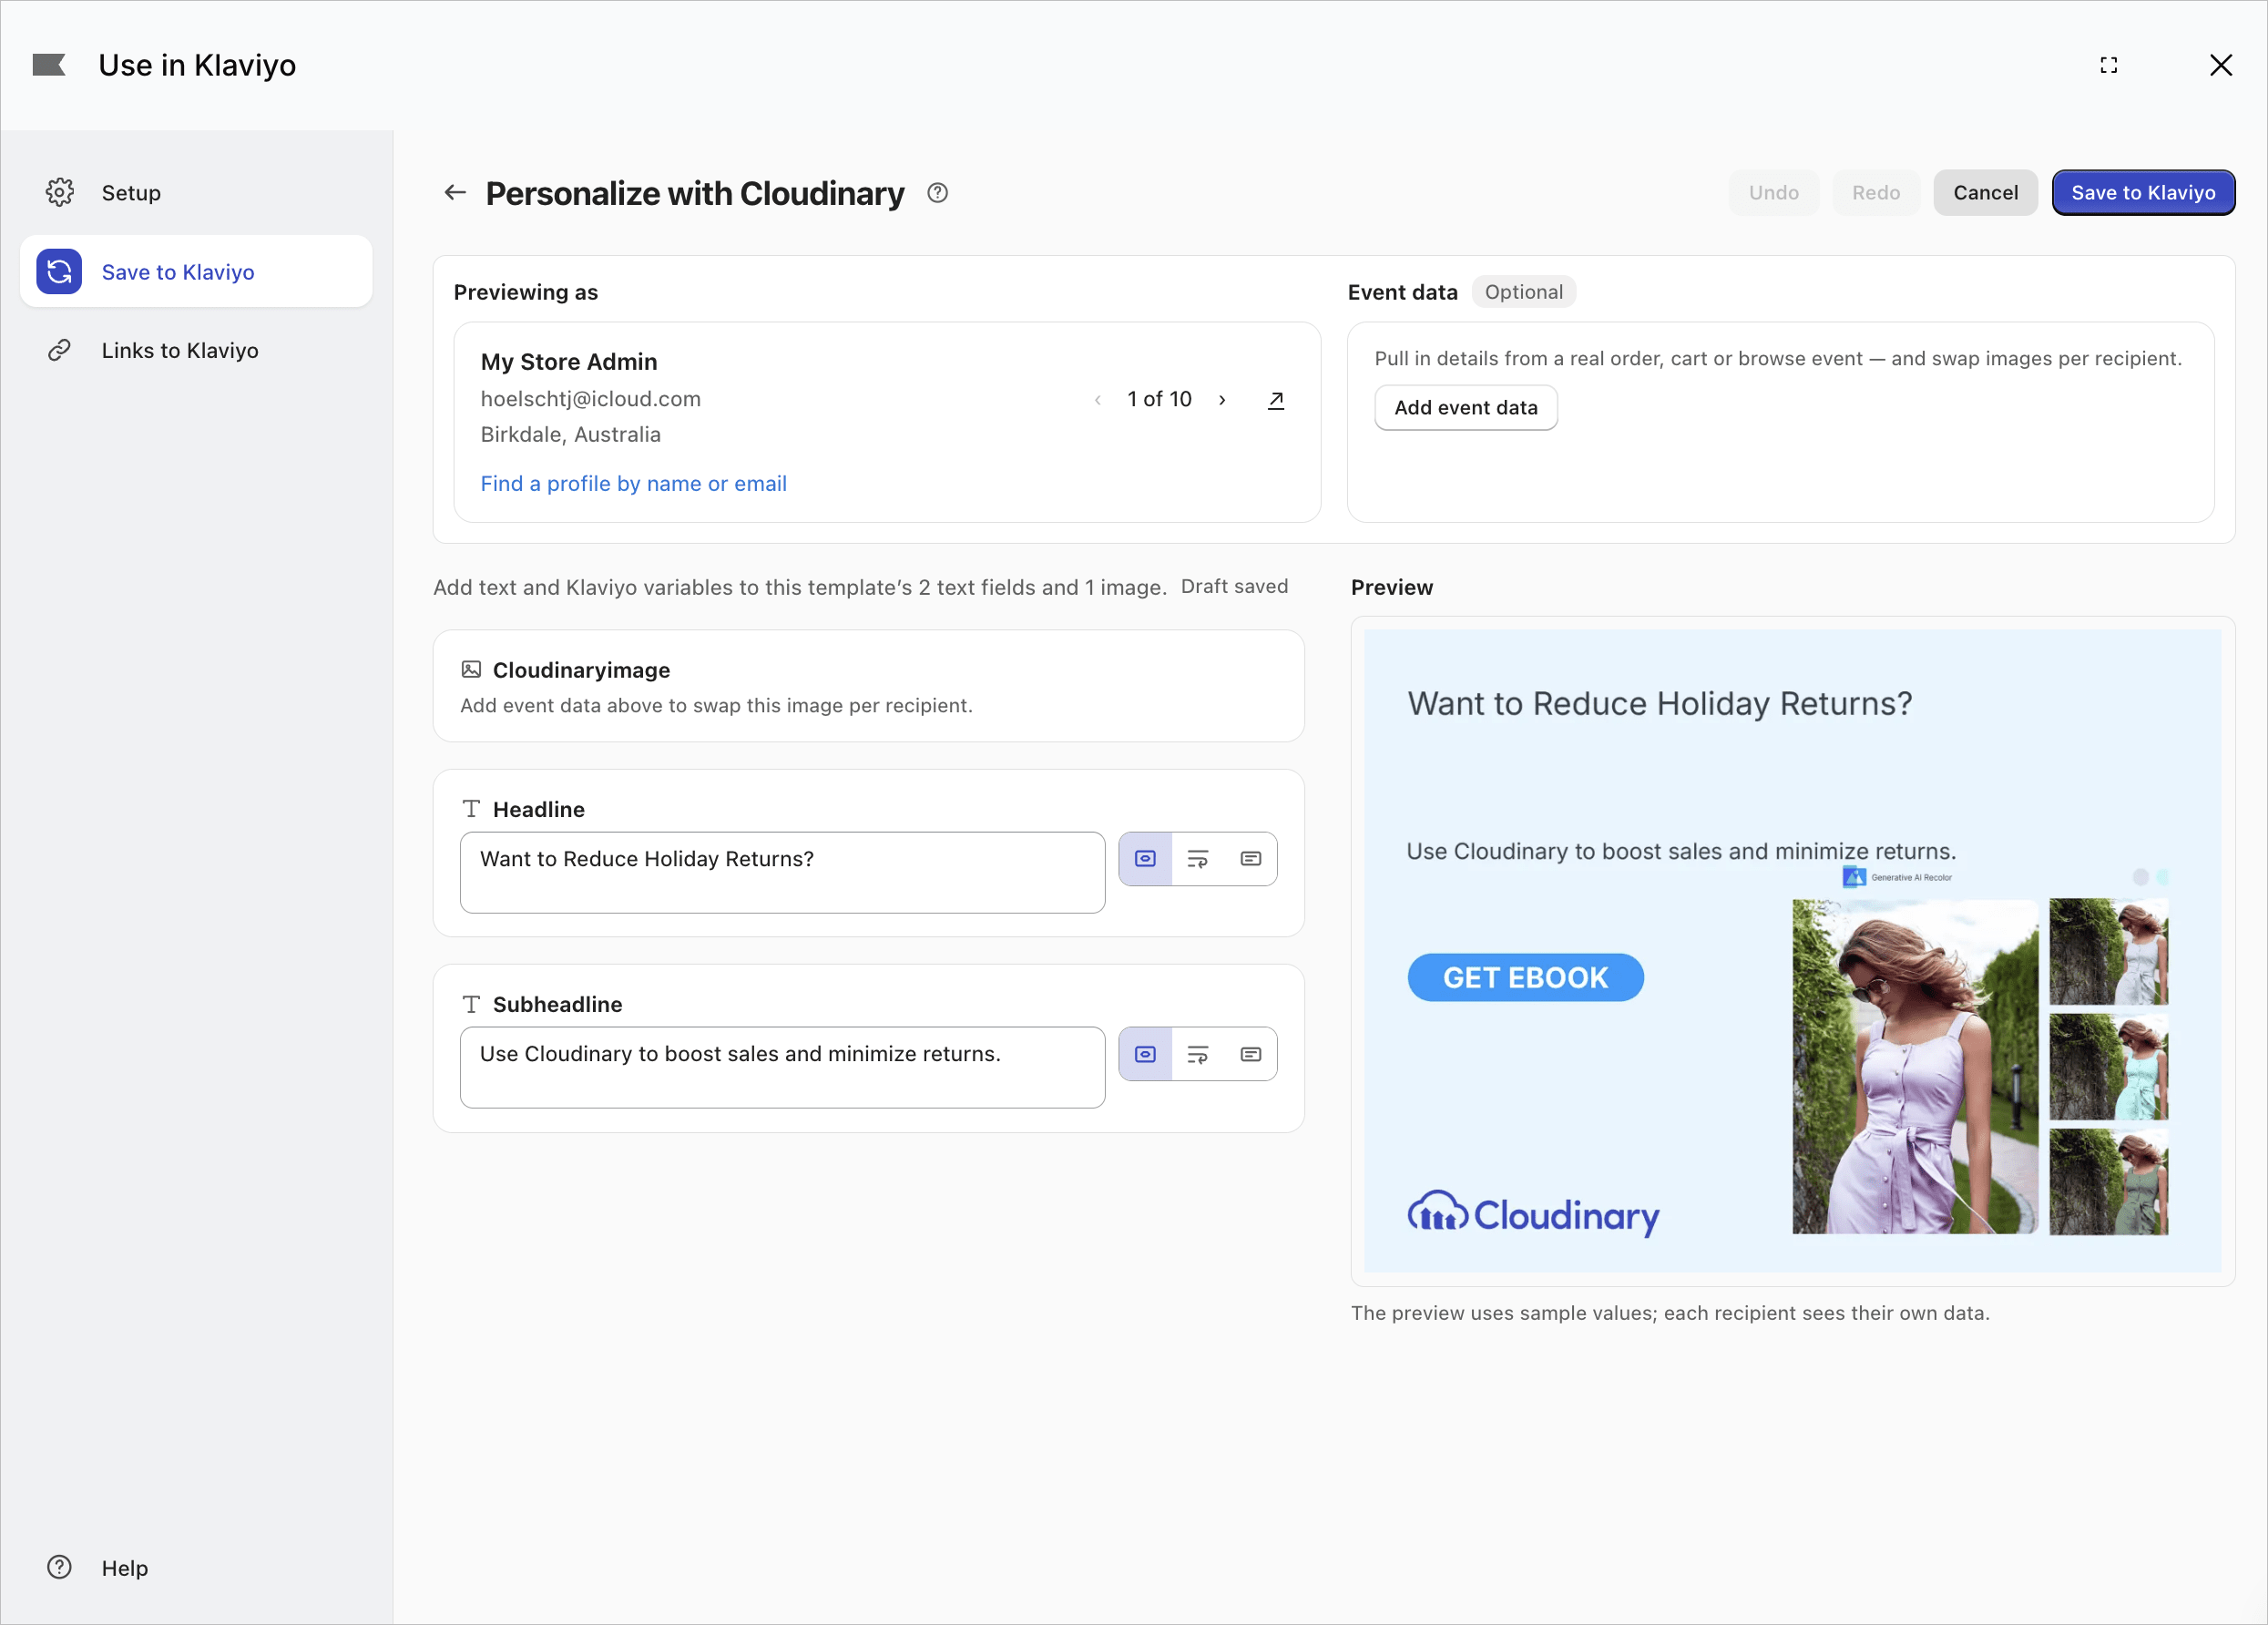
From Cloudinary: In the Media Library, select a single dynamic image and select Use in Klaviyo (see Save assets to Klaviyo). The Personalize with Cloudinary dialog opens.TipPersonalizing is the primary action offered after you send a template to Klaviyo. If the dialog box doesn't open by default, click Personalize this template.

-
From Klaviyo: ImportantPersonalizing dynamic images from within Klaviyo requires the Cloudinary Chrome Extension, which lets you personalize templates directly in Klaviyo, without switching to the Cloudinary Console.
- Edit the template's Universal Content block.
- In the left panel in the Image section, click Replace.
- Select the Dynamic image tab to personalize the selected Universal Content Block.


Once the panel is open:
- Click Add event data (from Cloudinary) or Event (from Klaviyo).
- Optionally Select an event to personalize against, such as Placed Order or Added to Cart. Selecting an event unlocks its fields, such as the ordered product's name or image, for binding in the next steps.TipYou don't need to select an event to bind fields to profile attributes, such as the recipient's first name.
- For each text field:
- Choose a fixed value, or type @ to select a profile attribute, an event field, or a coupon.
- Set the field's fallback text, used when a recipient has no value for the bound attribute or event field.
- Click a text formatting button to shrink the text to fit, wrap it, or truncate it with an ellipsis.
- For each image field:
- Select Use template image, or, if your dynamic image is bound to an event, select Event image - Image URL.
- Click the crop button to crop the image manually.
- Select a crop option: Auto to let AI choose the best crop, Face to crop around detected faces, or one of the directional crops.
- Review the live preview, which updates as you bind fields. In the Previewing as panel, select a Klaviyo profile to preview the template as a specific recipient, using their actual profile and event data.
- Click Save to Klaviyo to create the Universal Content block, or Update in Klaviyo if it's been saved before.

Use personalized content in a campaign or flow
- Add the saved Universal Content block to a campaign or flow email.ImportantIf you personalized against an event, send the email from a flow that matches the selected event so the event data is available.

- Preview the email with a profile, or test data, that has matching attributes to check the personalization.
- Send a test email to verify the personalization renders correctly for different recipients.

- For the general steps to add and preview a Universal Content block, see Use Cloudinary content in campaigns and flows.
- To see where Klaviyo uses a template's Universal Content block, see Track assets saved to Klaviyo.
Use the Cloudinary Chrome Extension
The Cloudinary Chrome Extension lets you select, save, and personalize Cloudinary assets directly in the Klaviyo email editor, without switching back to the Cloudinary Console.
Install the extension
- Install the Cloudinary Chrome Extension from the Chrome Web Store, or click Add to Chrome on the extension card in the app's Setup tab.
- Confirm the extension is active: once you install and enable it, the app's Setup tab shows an Extension active badge.
Use Cloudinary from the Klaviyo editor
When designing a campaign or flow email in the Klaviyo email editor, look for Cloudinary controls on image blocks, link blocks, and Universal Content HTML blocks.
You can use the Cloudinary Chrome Extension to add or replace images and videos in the following fields.
Add a dynamic image
- Click the Add content icon and add a Basic image block.
- Click Select image.
- Select the Dynamic image tab in the dialog box.
- Click the Cloudinary Chrome Extension icon to open the Cloudinary asset picker and Pick a template to import.

- Personalize the template (see Personalize the template with Klaviyo data).
- Click Save.

Add video content
- Click the Add content icon and add a Basic video block.
- Click the Cloudinary Chrome Extension icon to open the Cloudinary asset picker and select the video you want to import.


Video URLs are an exception. Because videos open in a browser tab rather than directly in the email, Klaviyo keeps the Cloudinary URL instead of creating a separate copy.
Troubleshooting
| Issue | Solution |
|---|---|
| Missing permissions notice. This can appear in any tab, most often the Setup tab or the personalization editor. |
Reconnect the app from the Setup tab. |
| No event fields or images available | Some custom metrics aren't supported for personalization. Try a standard event, or bind images from your Cloudinary Media Library instead. |
| Preview looks broken in Klaviyo | Klaviyo doesn't evaluate personalization in its own preview. Use the Cloudinary panel preview, or send a test email to verify rendering. |
| Preview looks broken in Cloudinary when event images are selected | Make sure Fetched URL isn't selected in the Restricted image types section of the product environment Security page of the Console Settings. |
| Extension not detected | Confirm you installed and enabled the extension in Chrome, then reload the Klaviyo editor tab. Check the Setup tab for the Extension active badge. |
| "Cloudinary DAM session token is missing" error. This appears as a notification or a red banner in the app, most often after clicking Disconnect Klaviyo on the Setup tab or when performing an action in the personalization editor. |
The app receives a Cloudinary session token only when it's launched from Cloudinary, so retrying the action won't help. Close the app, select your assets again in the Media Library, and reopen the app from the asset menu or bulk actions, then repeat the action. No work is lost, and your Klaviyo connection and saved content aren't affected. If the error persists, log out of Cloudinary, log back in, and reopen the app. |
Cloudinary Professional Services configuration support
The Klaviyo integration is part of Cloudinary's Standard Professional Services integration configuration package.
If you need assistance setting up this integration and you're on an Enterprise plan with a professional services package in your contract, Cloudinary's professional services can help you set it up as part of your contracted package.
Learn more: Cloudinary Professional Services packages
Error
Rate this page:
