As web developers, one of our primary goals is to deliver eye-catching and fast-loading media content on websites – and image format plays a pivotal role in this context.
AVIF, an offshoot of the AV1 video coding format, offers impressive compression capabilities but might not enjoy universal browser compatibility just yet. On the other hand, JPG, a tried-and-true format, enjoys excellent support and swift loading times, but its compression pedigree doesn’t quite match AVIF’s. You might find yourself needing to convert an AVIF file to JPG for wider acceptance – particularly for that high-quality, stunning home page image that everyone should see.
In the article ahead, we’ll walk you through a comprehensive guide on transforming AVIF to JPG – with crucial steps and effective optimization insights to make your media shine bright and load faster. It’s time to dive deeper into the art of image transformation!
In this article:
What is AVIF?
AVIF, which stands for AV1 Image File Format, is a modern image file format that utilizes the AV1 codec for image compression. It is highly efficient, producing significantly smaller file sizes compared to traditional formats like JPEG while maintaining the same image quality.
AVIF supports advanced imaging features such as Standard Dynamic Range (SDR), High Dynamic Range (HDR), and Wide Color Gamut (WCG), making it suitable for a wide range of image types. It can store both single images and image sequences. As a HEIF (High Efficiency Image File Format) conformant format, AVIF was first introduced by Netflix in 2018.
What is JPG?
JPG, which stands for Joint Photographic Experts Group, is a widely-used image file format. It is commonly used for saving photos and web graphics owing to its efficient compression capabilities. The format supports a 24-bit color palette and employs lossy compression, meaning that some quality is lost in order to reduce file size. This makes JPG files easier to transfer and download over the internet. The extent of the compression can affect the quality of the image; higher compression results in a greater loss of image quality.
Why Should I Convert AVIF to JPG?
When it comes to image formats, making a choice between AVIF and JPG isn’t always easy. AVIF, with its roots in the AV1 video codec, offers superior compression, but its browser compatibility falls short. JPG, on the other hand, while being well-supported and fast-loading, might not provide you with the compression ability AVIF does. But, why might developers need to flip the switch and convert AVIF files to JPG? Let’s look at the benefits and potential drawbacks:
Advantages
- Universal Compatibility. JPG has universal browser compatibility, enabling your imagery to be displayed on virtually any device.
- Quick Load Times. Because of its established presence, JPG images load swiftly. That means your users experience less delay.
- Ease of Editing. Many image processing tools have extensive support for JPG, making it easier to edit these files.
Disadvantages
- Potentially Lower Quality. When you convert from AVIF to JPG, you might face a drop in image quality due to different compression algorithms.
- Larger File Sizes. JPG files are typically larger than AVIF files. This disparity can slow down pages, especially when multiple images are involved.
Balancing these aspects will empower you to make an informed decision about image format conversions, and ultimately help optimize your media to create interactive, engaging, and fast-loading websites.
How To Convert AVIF to JPG
In recent years, AVIF has gained traction as an advanced and efficient image format known for its superior compression capabilities. However, as mentioned above, sometimes you might need to convert AVIF to JPG format for compatibility reasons or specific application requirements. Luckily, various user-friendly online converters simplify this process. Let’s take a look at some of the most popular tools that can help you convert your AVIF to JPGs.
Convertio
Convertio is a versatile online converter that supports various file formats, including AVIF to JPG conversions. Its intuitive interface and straightforward process make it an excellent choice for users seeking a hassle-free conversion experience.
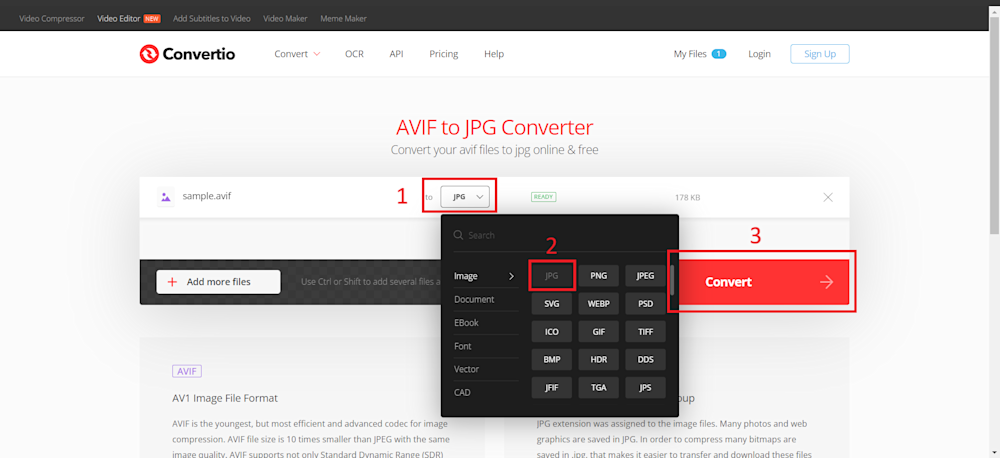
Converting your files to JPG is quite straightforward with Convertio. To convert your files, head to the Convertio website and drag and drop your AVIF file into the webpage. This redirects you to the conversion page, where you can now simply choose a conversion format. Finally, click the Convert button to convert your AVIF to JPG.
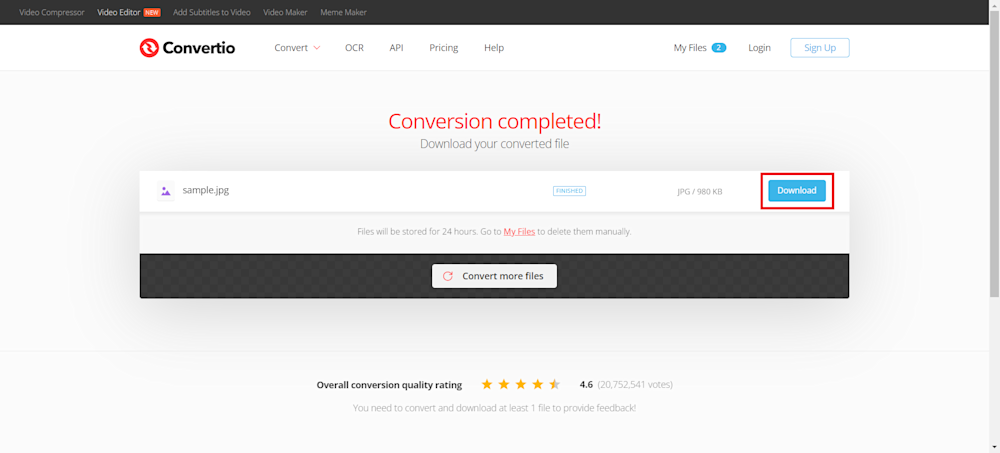
Once your conversion is completed, you can download your new JPG file by clicking on the Download button.
Pixelied
Pixelied is not just a converter but a comprehensive graphic design tool that allows users to edit and enhance images. It supports AVIF to JPG conversions while offering additional editing features, making it ideal for users looking to refine their images before conversion.
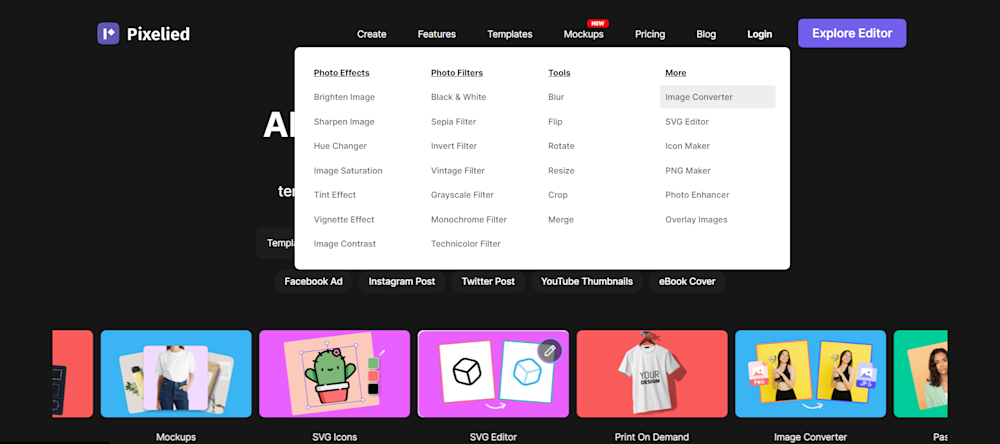
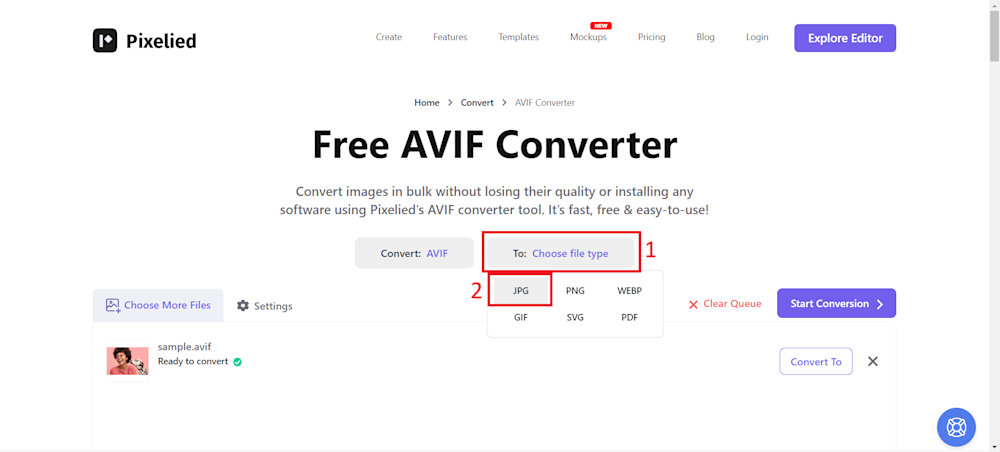
Pixelied makes it very easy to convert the format of your files. To convert your AVIF to JPG, head over to the Pixelied website. Hover over the Features tab and select the Image Converter.
Once your page has loaded, click on the Choose Files button to upload your AVIF file. Next, choose your conversion format, as shown below.
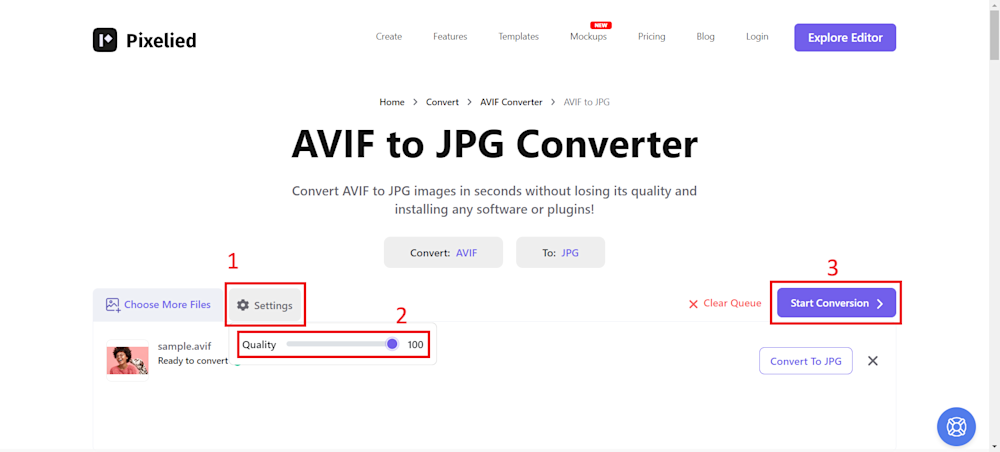
Optionally, if you want to convert your images with the highest quality setting, navigate to the Settings tab and drag the Quality slider to the max. Finally, click on the Start Conversion button to start the conversion process.
After a few minutes, your new JPG should be ready to download.
CloudConvert
CloudConvert is a cloud-based file conversion service that supports AVIF to JPG conversions. Its integration with cloud storage services simplifies the process, allowing users to convert files directly from their cloud accounts.
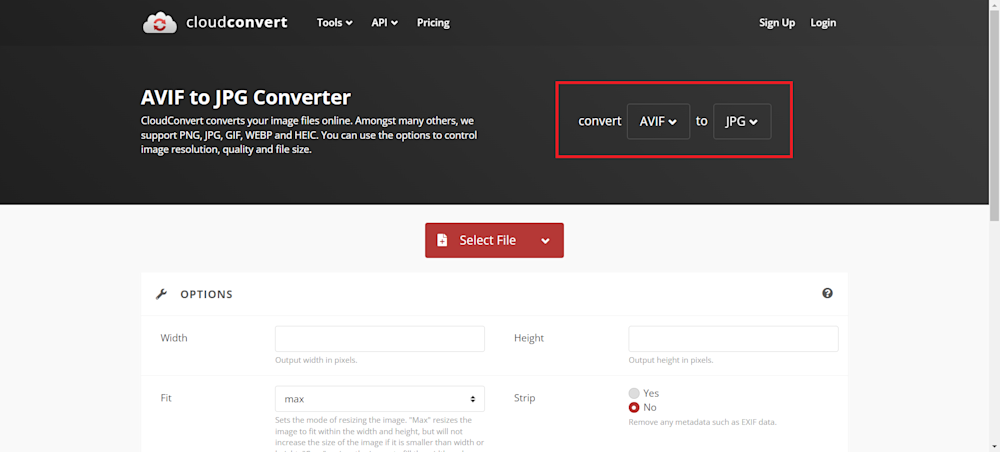
To convert your AVIF files to JPG, open the CloudConvert website and select your conversion tool using the drop-down menu.
Now, upload your file by clicking the Select File button and, finally, click the Convert button to convert your file.
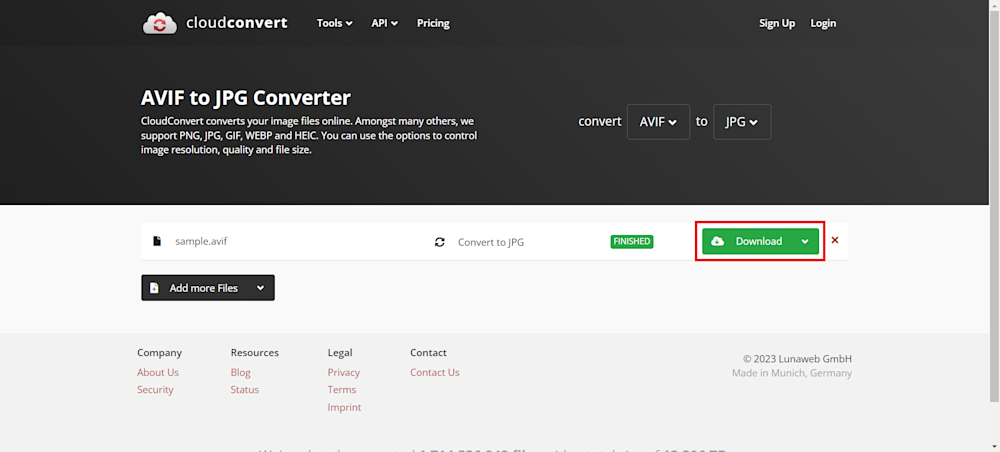
Once your file has been converted, you can download your new JPG using the Download button, as shown above.
Cloudinary
Cloudinary is a leading cloud-based media management platform that stands out for its versatile features and seamless user experience. With Cloudinary, users can effortlessly store, manage, and optimize various media assets, including images, videos, and documents.
One of its standout specialties lies in its robust image and video transformation capabilities. Cloudinary allows users to perform real-time, on-the-fly manipulations such as resizing, cropping, and format conversion, ensuring that media assets are optimized for different devices and platforms.
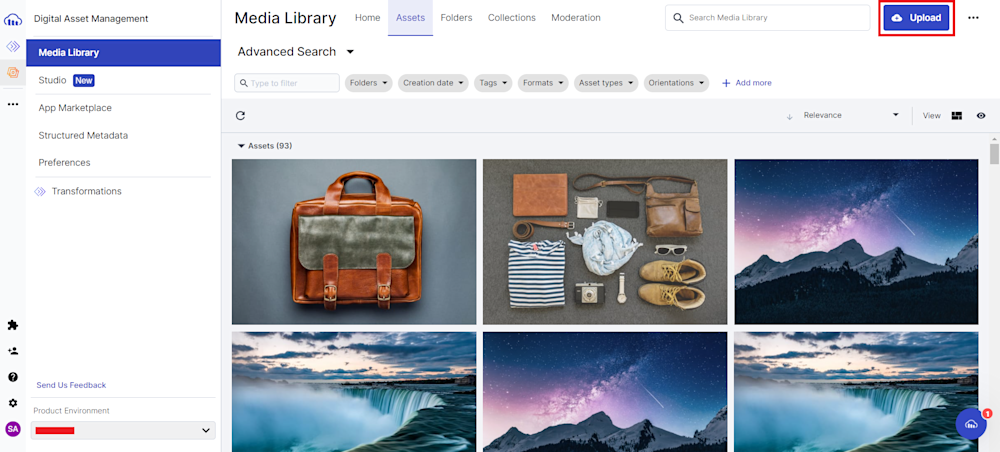
To convert AVIF files to JPG using Cloudinary, create an account on the Cloudinary website if you haven’t already. Once logged in, navigate to the Media Library tab and click Upload to add your AVIF file.
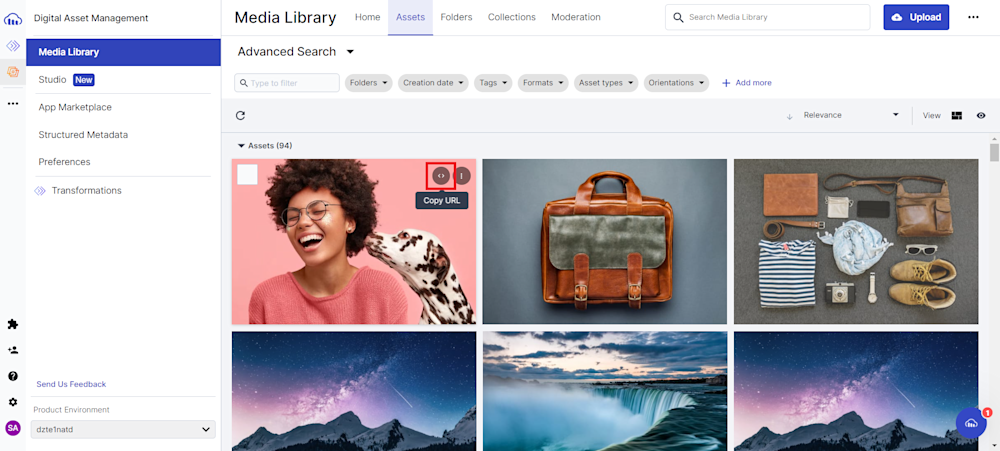
Once uploaded, click on the uploaded AVIF file to open the detailed view. Under the image preview, click on the <> button to copy the image URL.
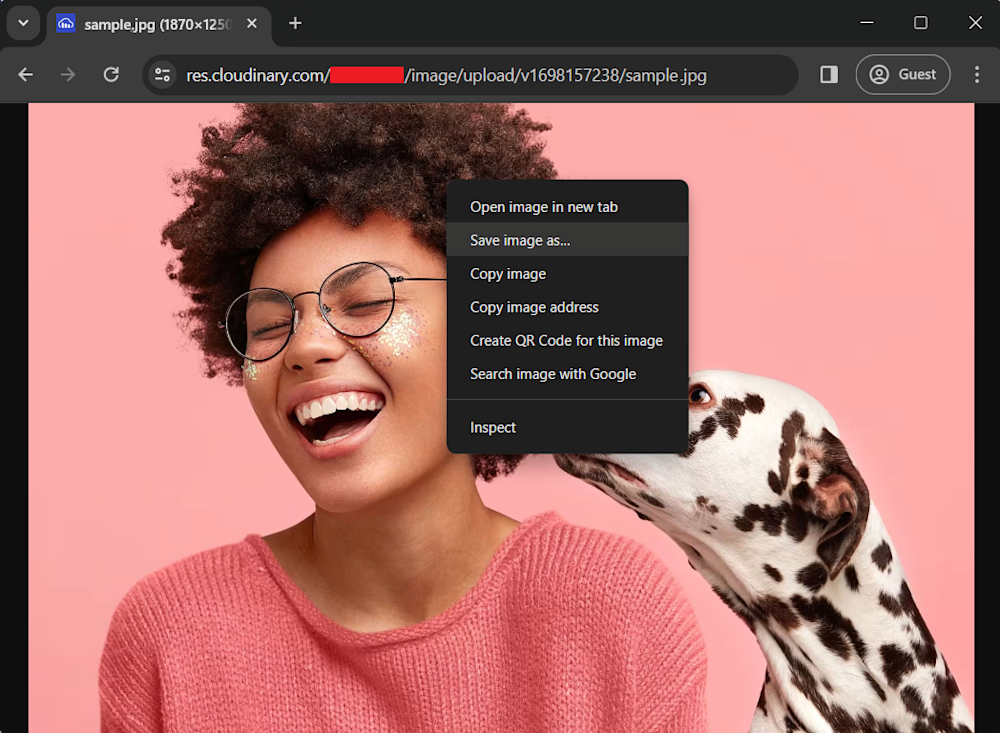
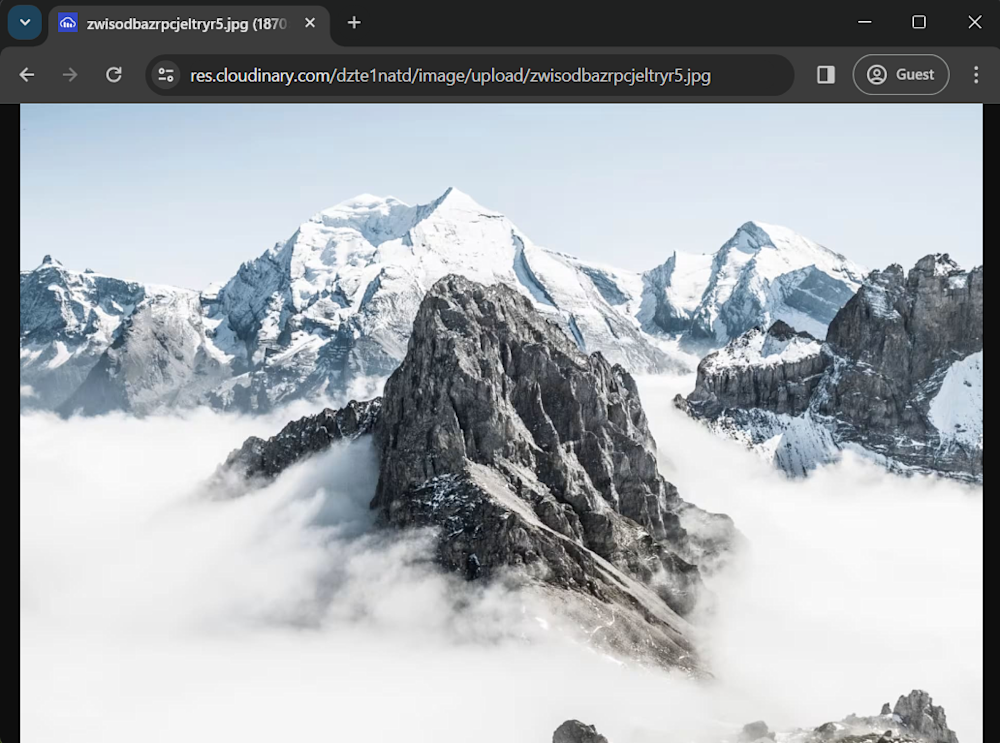
Now, open up a new browser tab, paste your URL, and replace the .avif file extension with .jpg. This triggers an automatic image transformation in the Cloudinary cloud, delivering you with a new JPG file.
Finally, download the JPG to your local device by right-clicking on the image and selecting Save As.
Pro Tip
Consider Cloudinary’s Digital Asset Management
Looking for a centralized location to manage all your media assets? Cloudinary’s Media Library makes it easy to upload, store, manage, and deliver images and videos efficiently.
AVIF to JPG Conversion in NodeJS
Cloudinary not only allows for console-based conversions but even has SDKs in several popular programming languages. So, there is a programmatic way of performing the conversion and URL retrieval steps automatically instead of manually performing these steps in a web browser.
The code starts by configuring the Cloudinary module with your account details. This is necessary to authenticate your requests with Cloudinary’s servers. You’ll need to replace the placeholders with your actual Cloudinary account details, which you can obtain after signing up for an account.
const cloudinary = require('cloudinary').v2;

// Configure Cloudinary with your account details
cloudinary.config({
  cloud_name: "your_cloud_name",
  api_key: "your_api_key",
  api_secret: "your_api_secret"
});
The code specifies the path to the AVIF image you:
const image_path = './path/to/avif/file';
Now, we will upload the AVIF image to Cloudinary and convert it to a JPG format. This is done asynchronously using Promises and the await keyword to make the code more efficient. The conversion is performed with the specified format set to "png". After the image is uploaded and converted, the code retrieves the URL of the converted JPG image from Cloudinary. The URL is printed to the console. Here’s the code:
async function uploadAndConvertImage() {
  try {
    const uploadResult = await cloudinary.uploader.upload(image_path, { resource_type: "image" });
    const public_id = uploadResult.public_id;
    const conversionOptions = { format: "jpg" };
    const imageUrl = cloudinary.url(public_id, conversionOptions);
    console.log(imageUrl);
  } catch (error) {
    console.error(error);
  }
}

uploadAndConvertImage();
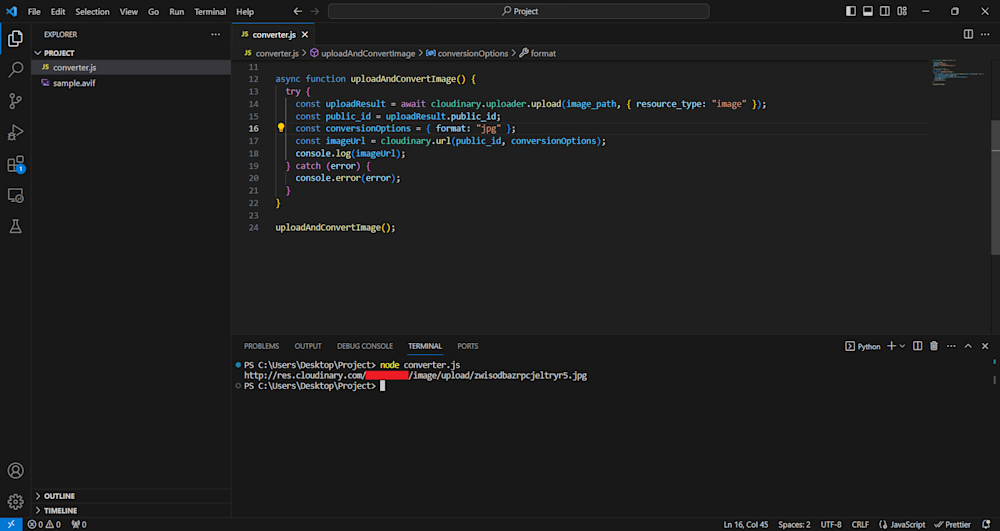
By running this code with your Cloudinary account credentials and the path to your AVIF image, you can automate the process of converting AVIF files to JPG, making it more efficient and suitable for batch processing multiple files. Here are the results:
Final Thoughts
In this guide, we’ve explored the process of converting AVIF images to JPG format. While several methods are available for this conversion, Cloudinary is a powerful solution that ensures efficiency and quality and offers optimization capabilities for your images. To unlock the full potential of your image conversions, we recommend considering Cloudinary as your trusted media management platform. Make your transition from AVIF to JPG seamless and efficient by signing up for Cloudinary today.
Converting AVIF to JPG becomes a seamless and advantageous process when you choose Cloudinary. It streamlines the conversion process, ensuring your AVIF images are effortlessly transformed into high-quality JPGs. With Cloudinary’s advanced image processing capabilities, you can trust that your images will retain quality without any hassle.
Take the next step in optimizing your media management by signing up for a Cloudinary account today. Experience the ease and efficiency of seamless image conversion and elevate your media management strategy. Sign up today and start transforming your images with Cloudinary.
Learn more:
