
There are many different file types available for images, each with its pros and cons. While the most common ones – JPEG and PNG, to name a few – dominate the world today, others have specific uses.
One of these file formats in particular, the Tag Image File Format (or TIFF for short), is used widely by graphic designers, photographers, and print industry professionals. It offers lossless images without any compression and can also operate as a container for multiple smaller JPEGs. And Cloudinary’s platform provides a powerful way to convert your pictures to and from any file format.
In this tutorial, we’ll create a simple script that takes an image from us and converts it to a TIFF file through the Cloudinary platform.
In this article:
Creating Our Application
We’ll be using Node for this project, so you should have some basic familiarity. The goal of this app is to be a simple process that can take a JPG image and convert it to a TIFF through Cloudinary’s platform. If you don’t already have a Cloudinary account, you can sign up for free.
First, we need to create a “jpg-to-tiff” folder and initialize npm to generate a package.json file.

Then, we’re going to install the required packages by running the following line of code:
npm i express cloudinary morgan dotenv express-formidable-v2
The packages installed using this line of code include:
- ExpressJs: A minimalist NodeJS framework for building RESTful APIs.
- Cloudinary: This allows easy integration with the Cloudinary platform.
- Express-formidable-v2: A NodeJS middleware for handling multipart/form-data (files like images and videos).
- Morgan: A NodeJS middleware used to log HTTP requests.
- Dotenv: Used to load environment variables from an .env file.
We also suggest you download and use nodemon, for ease of use with Node. While it is not required, having it while still working on the backend is nice, so the server restarts automatically when changes are made.
After we have our dependencies, we’ll create an index.js file and insert the following code:
const express = require("express");
const morgan = require("morgan");
const app = express();
require("dotenv").config();
const PORT = process.env.PORT || 4000;
app.use(morgan("dev"));
app.get("/", (req, res) => {
  res.send("Cloudinary Video Overlay Tutorial ");
});
app.listen(PORT, () => {
  console.log(`Server listening on port ${PORT}`);
});
If you installed nodemon as a dev dependency, you’ll need to add this line of code to the “scripts” section in package.json:
"dev": "nodemon index.js"

Now, we run the application. If you installed nodemon, use their command to start your server. Otherwise, use:
npm run dev

Setting Up Cloudinary
After that’s all done, we’ll need to integrate Cloudinary. If you don’t have an account, you can sign up for a free one to start. Then, log in and retrieve your Cloudinary cloud name, API key, and API secret from the dashboard:
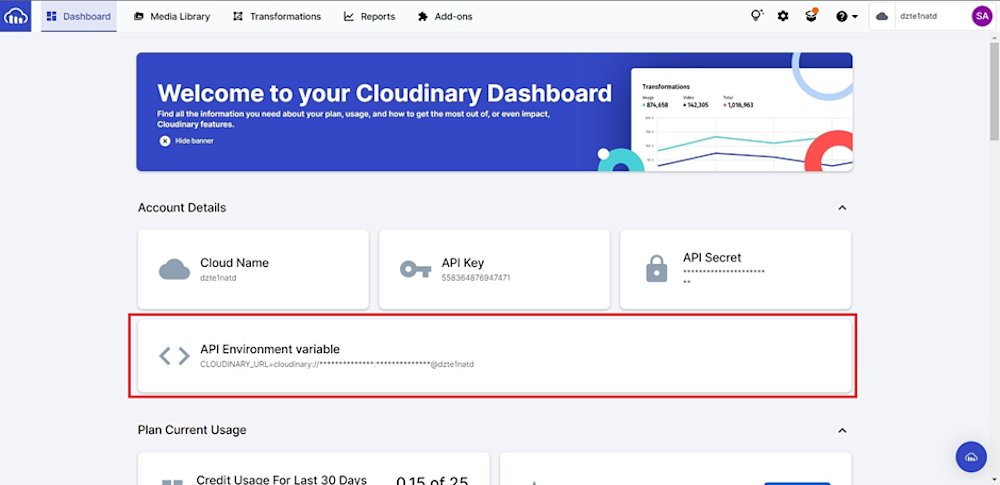
You’ll also need to create an .env file in the root folder and store the credentials as environmental variables. Then, create a “cloudinary.js” file with the following code:
const cloudinary = require(“cloudinary”).v2;
cloudinary.config({
  cloud_name: process.env.CLOUDINARY_CLOUD_NAME,
  api_key: process.env.CLOUDINARY_API_KEY,
  api_secret: process.env.CLOUDINARY_API_SECRET,
  secure: true,
});
After that’s set up, we’ll need to upload a picture to Cloudinary. For this tutorial, we’ll use a picture from pexels.com
In “cloudinary.js” in “config”, insert this code to upload the picture:
const cloudinaryImageUpload = (file) => {
  return new Promise((resolve, reject) => {
    cloudinary.uploader
      .upload(file)
      .then((result) => {
        resolve(result.public_id);
      })
      .catch((error) => {
        reject(error);
      });
  });
};
This is the code to convert jpg to tiff image format:
const pictureTransform = (img) => cloudinary.image(img, { format: "tiff" });
Then, create an UploadController.js file in “controllers” to retrieve the picture. This code will upload the picture to Cloudinary, and then convert it through their platform:
const pictureUpload = async (req, res) => {
  if (req.files !== undefined) {
    try {
      const pic = await cloudinaryImageUpload(req.files.picture.path);
      const transformedImage = pictureTransform(pic);
      res.status(200).json({
        sucess: true,
        picture: transformedImage,
      });
    } catch (error) {
      res.status(400).json({
        sucess: false,
        error,
      });
    }
  } else {
    res.status(400).json({
      sucess: false,
      error: "No image was uploaded",
    });
  }
};
Here’s what happens: we grab the path of the parsed image and upload it to Cloudinary using the “cloudinaryImageUpload” function in the “cloudinary.js” file. Then, the function returns the Public ID of the image, which is then sent to “pictureTransform” which changes the image to a .tiff.
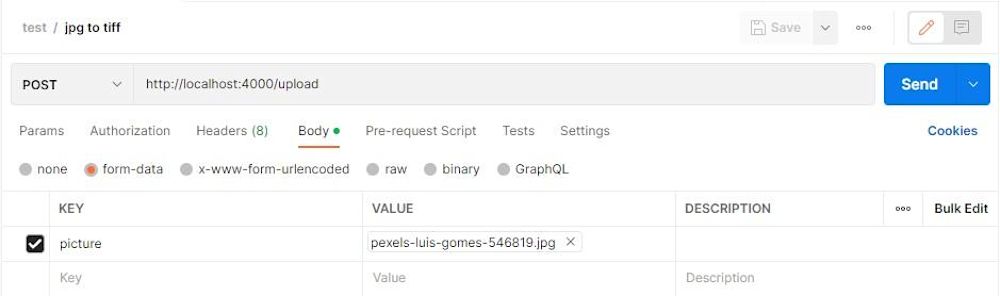
You can use Postman to send a request to the server and make sure it’s working. A request is sent to the “upload” route with the picture attached.
Afterwhile, you should get a “200” response and the link to the .tiff image included:


The Wrap-Up
Hopefully, this little tutorial gave you a good idea of how to use the Cloudinary platform to convert your images. With a little more elbow grease, you can easily set this app up to scale with a ton of images, so you can convert to your hearts content.
See what else Cloudinary can do for you and your teams. Sign up for free and take advantage of our Media Experience Cloud to kickstart your business’s visuals. Sign up today.

