Images have a significant role in modern web content and the choices we make around them can vastly influence our website’s performance and accessibility. Take TIFF and JPG, two commonly used formats in digital imaging – yet, each serves a distinct purpose.
TIFF, known for its high-quality output, excels in preserving details but may seem like overkill for the web. Its hefty size can be a deterrent, affecting your website’s load speed, a critical metric in SEO rankings and user experience. That’s where JPG steps in – it shines with its compatibility and smaller file size, making it a preferred format for web images.
Additionally, converting TIFF to JPG doesn’t always mean sacrificing quality. By leveraging lossless compression techniques, you can retain much of the original image data. Furthermore, modern tools, such as Cloudinary, even allow for automatic selection of the most efficient format based on the user’s device, browser, or connection.
For web developers consistently juggling between the need for high-quality images and superior website performance, converting TIFF to JPG could be a practical solution, a perfect blend of quality and efficiency. Stick around as we delve further into the intricacies of this process in the subsequent sections of this article.
In this article:
- What is a TIFF File?
- Difference between TIFF and TIF
- What is a JPG File?
- Ways to Convert TIFF to JPG
- Automatically Convert Tiff to JPG With Cloudinary
- Convert Tiff to JPG Using Cloudinary With Code
What is a TIFF File?
A TIFF file represents a high-resolution image format known for its remarkable quality and detail. Primarily, the Tagged Image File Format (TIFF) is appreciated for its lossless compression — a potent feature that ensures no detail is lost during the file’s compression process. This makes TIFF a popular choice among professionals involved in graphic design, photography, and digital art, where quality preservation is paramount.
However, the boon of overwhelming quality comes at the cost of larger file sizes, which might not be ideal for websites aiming for fast load times.
TIFF files can include 16-bit images, whereas JPGs only support 8-bit. This means that during the conversion process, TIFF images with a higher bit depth will automatically be reduced to 8-bit, which could affect the depth of color details.
Difference between TIFF and TIF
There is essentially no difference between TIFF and TIF. Both are acronyms for the same file format, Tagged Image File Format. The difference in spelling is mostly a matter of convention and does not indicate any variation in the file format itself. Some systems or software prefer the acronym TIF, while others prefer TIFF. Both files have the same capabilities and will work in the same way.
What is a JPG File?
The JPG file format is a popular option known for its extensive compatibility and smaller file size. Particularly, JPG (or JPEG) shines in creating manageable file sizes, making it a favorite among those who value efficiency and widespread accessibility. Thanks to its lossy compression, JPG files can be significantly smaller than their TIFF counterparts, offering quicker load times—a crucial factor in web development and SEO.
Well-suited for photographic content and a staple on the web, JPG’s ease of use and compatibility further cement its position as a go-to choice for many.
Ways to Convert TIFF to JPG
Converting TIFF to JPG format is fairly common, especially when you need to reduce file size or ensuring compatibility across platforms. There are several ways to do this, from basic software tools to online converters and specialized applications. Let’s look at the most popular tools people use to convert TIFF to JPG.
MS Paint
Microsoft Paint is often regarded as a simple, intuitive graphic editor and is readily available on Windows systems. While it might lack advanced features, it’s an excellent tool for basic image conversions.
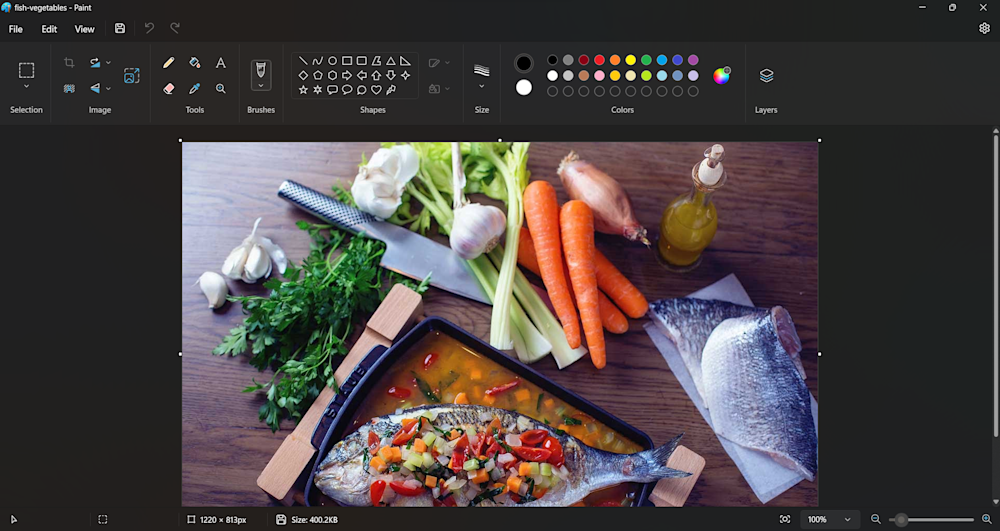
Converting your TIFF file with MS Paint is quite simple. Start by opening up your TIFF file in MS Paint.
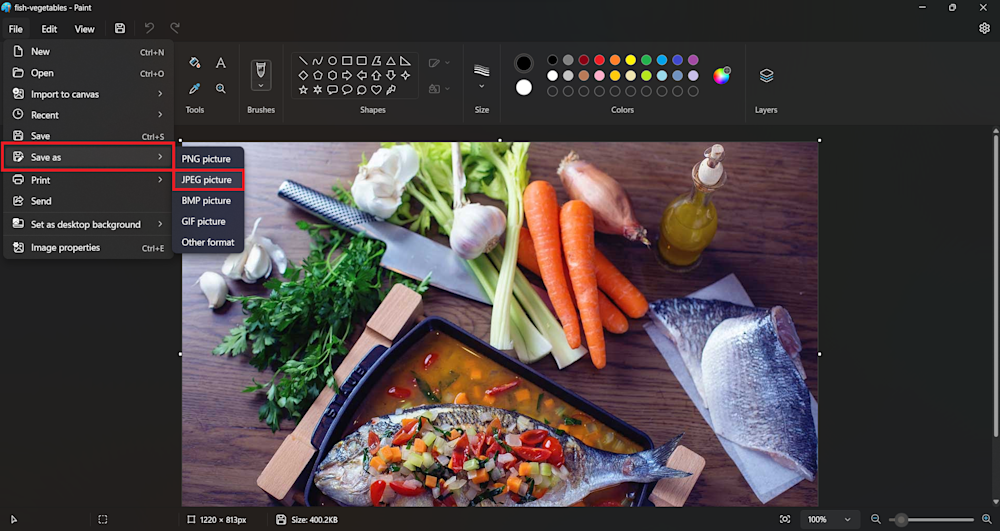
Now click on File in the top-left corner of your screen. Finally, select Save As > JPEG to save your image.
Adobe Photoshop
Adobe Photoshop is a professional-grade image editing software known for its extensive capabilities. While it offers complex tools, it’s equally effective in basic tasks like format conversion.
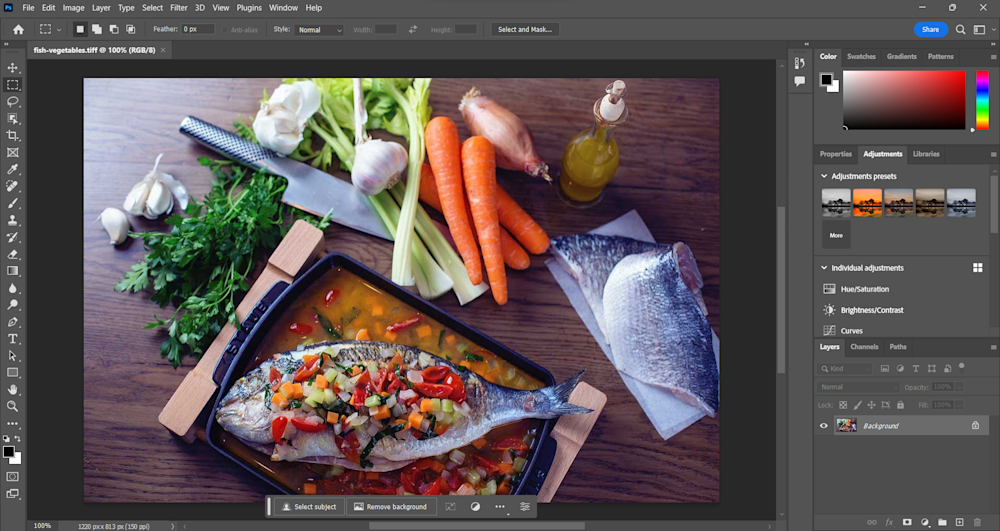
To convert your TIFF file, start by opening up your image in Photoshop.
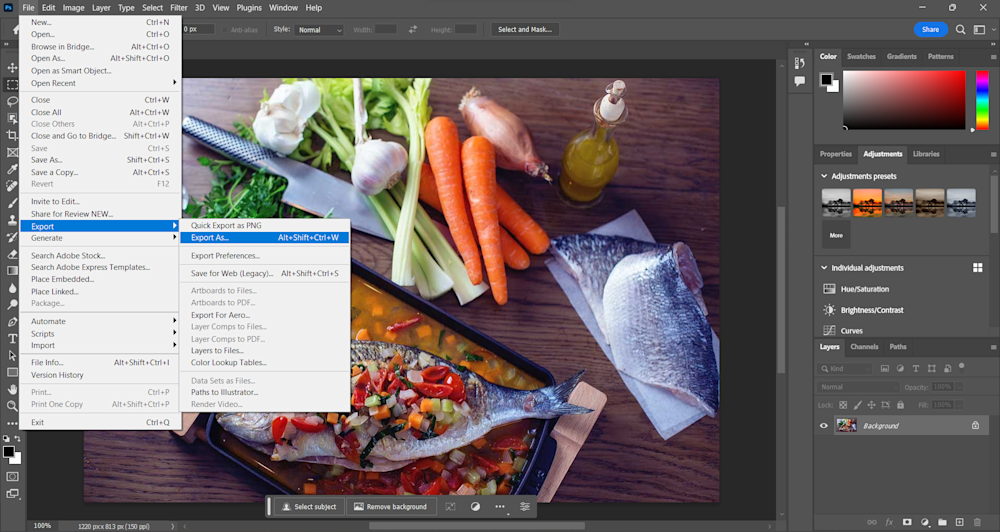
Next, click on File in the top-left corner and navigate to Export > Export As….
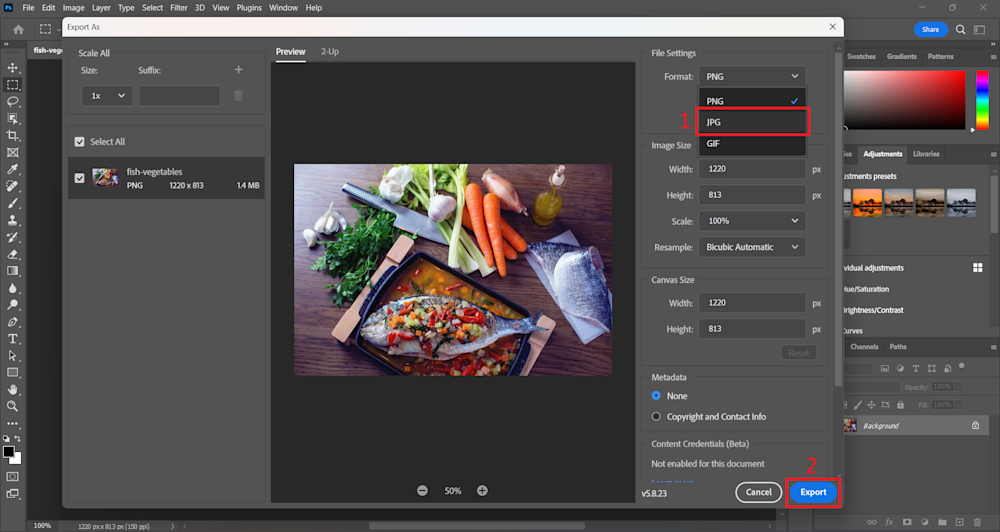
Finally, in the Export menu, select the JPG file format and click on Export to save your new JPG image.
XConvert
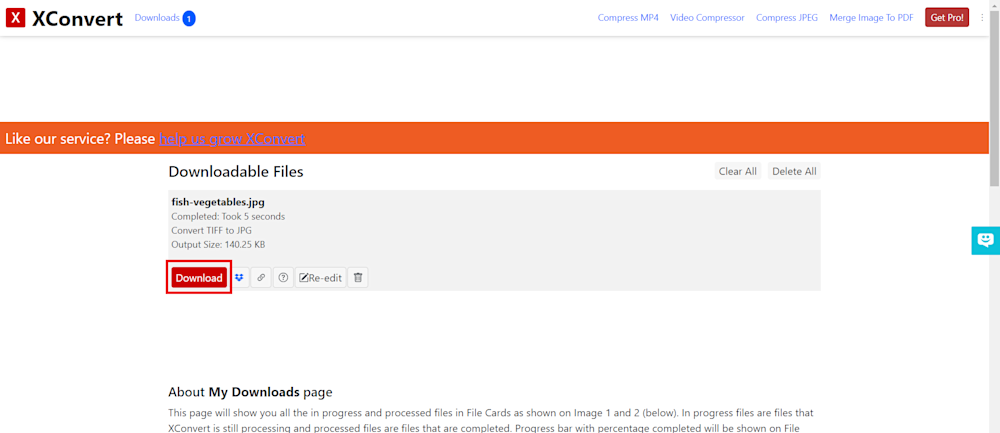
XConvert is a user-friendly web-based converter that supports multiple file formats, providing convenience to users of diverse file types. Its key advantages include the absence of software installation, enabling file conversion from any internet-connected device, and a straightforward interface designed for users with limited technical expertise, streamlining the conversion process.
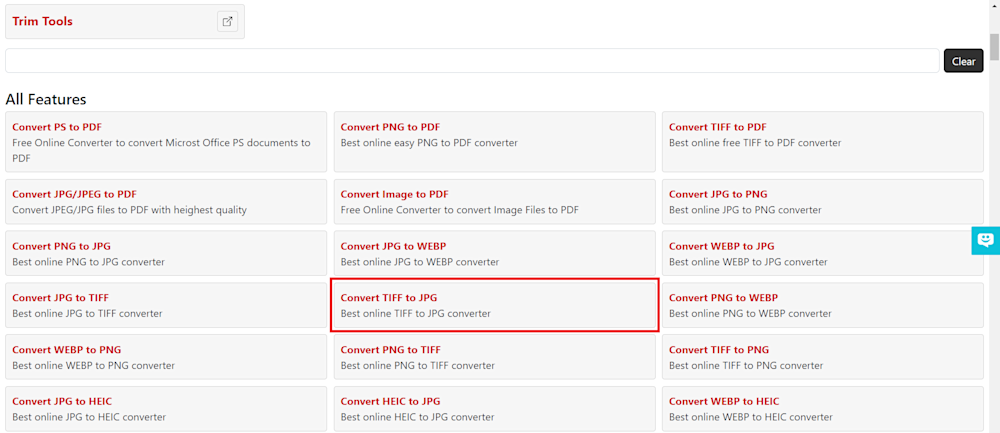
To convert your TIFF files, head over to XConvert and scroll down until you find the appropriate file converter.
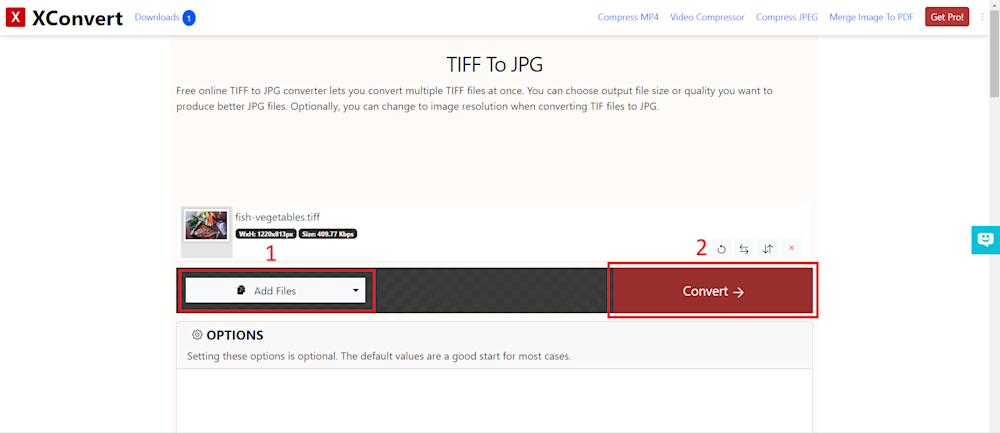
Now click on the Add Files button to upload your TIFF image. Finally, click on Convert to convert your file into a JPG.
The conversion process will take a few seconds to complete. Once finished, click on the Download button to save your new JPG file.
Zamzar
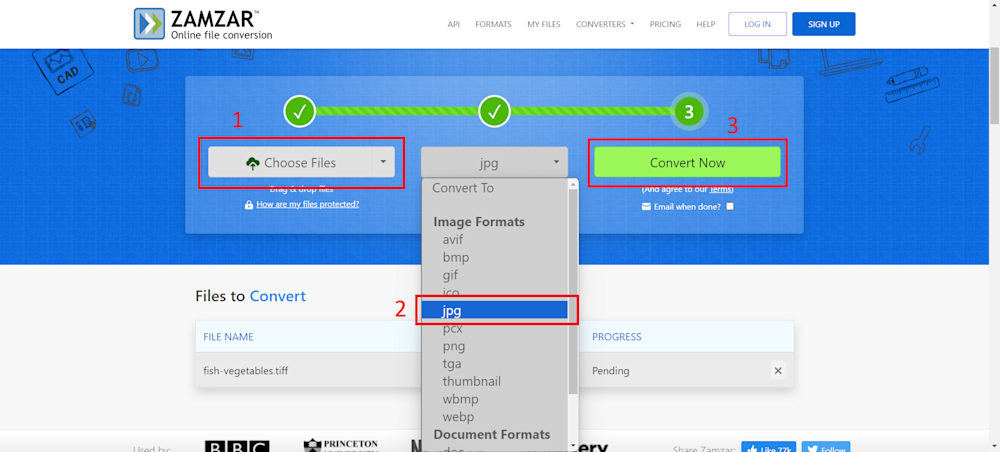
Zamzar is another free online conversion tool known for its reliable and efficient file conversion solutions. It offers a wide range of file conversions catering to diverse user needs beyond just images. One of its key advantages is the convenience it provides by delivering download links via email, allowing users easy access to their converted files.
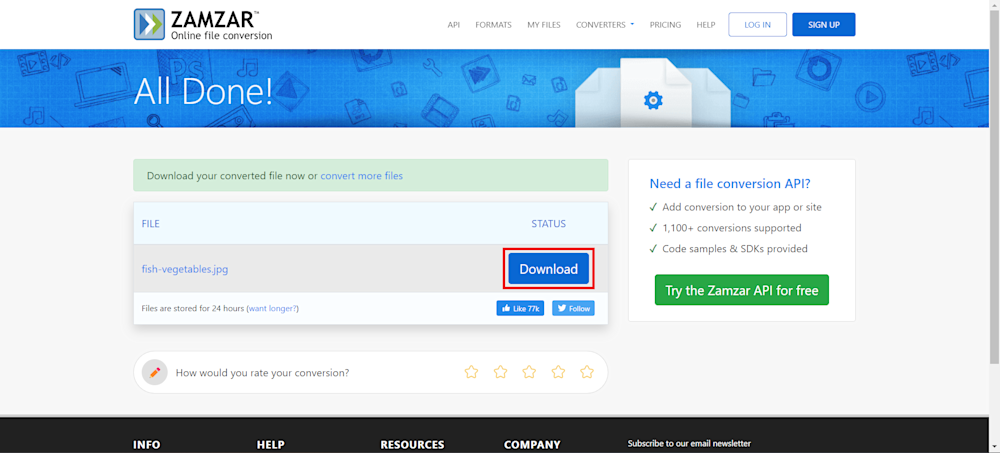
Like other conversion tools, Zamzar makes it quite easy to convert your files and follows a three-step process. To convert your files, launch their website and upload your TIFF file. Next, select JPG as the Convert To type, and finally, click on the Convert Now button to convert your file.
Finally, click on the Download button to download your new JPG file.
CloudConvert
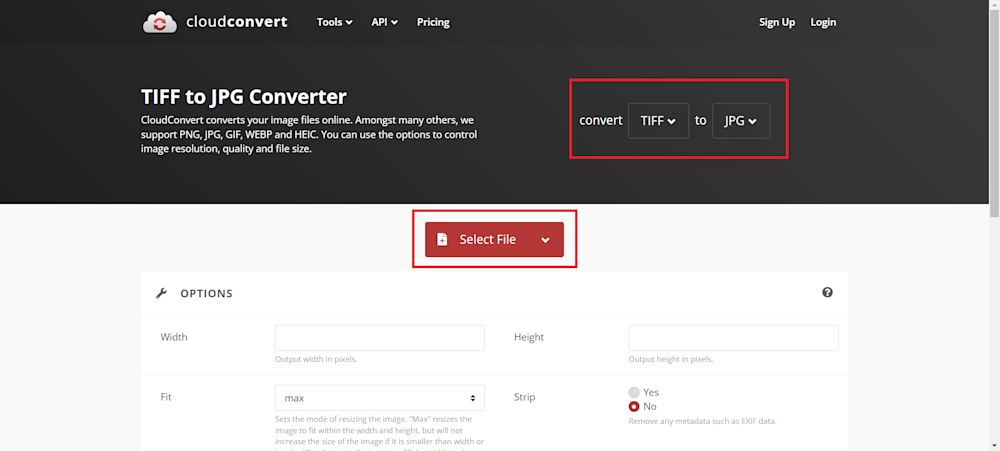
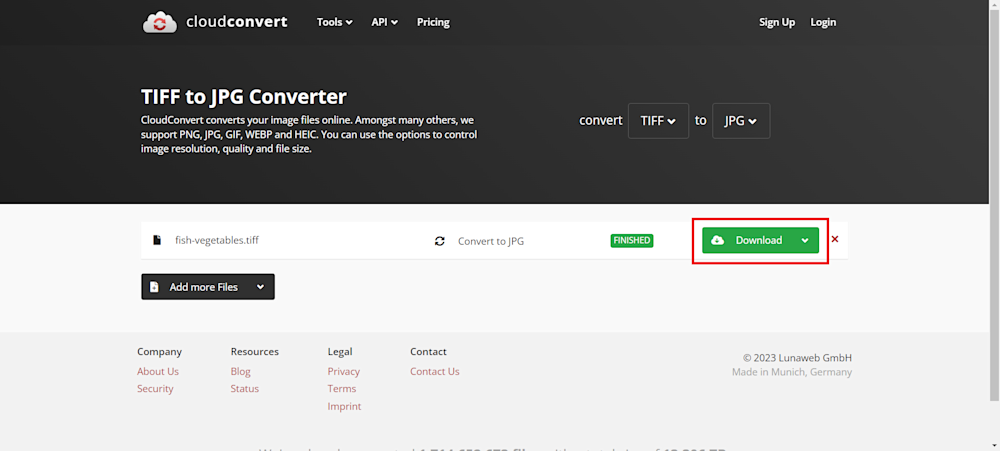
CloudConvert is an online converter due to its cloud-based nature, enabling users to perform conversions without burdening their local devices’ resources. Conducting conversions on remote servers frees up users’ computer resources and enables faster processing of large files. Additionally, It offers advanced options like setting width, height, and image quality and modifying other parameters before conversion.
To convert your TIFF to JPG with Cloudinary, select your conversion format from the drop-down menus. Now click on the Select File button to upload your TIFF file.
Next, click on the Convert button to start the conversion. Once your file has been converted, you can download your new JPG file using the Download button, as shown.
Convertio
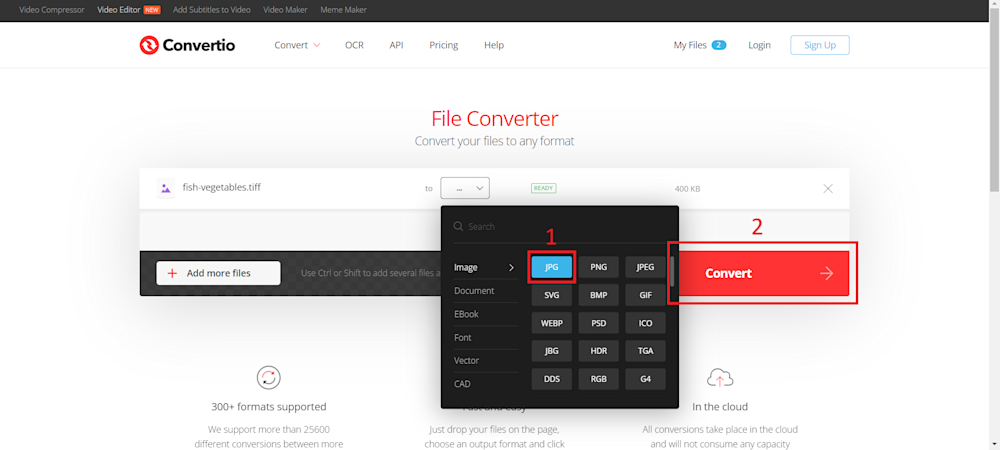
Convertio is another free, user-friendly online converter emphasizing simplicity for a hassle-free experience. Its intuitive interface makes the conversion process very simple, catering to users of all skill levels.
To convert your TIFF files, launch the Convertio website and drag and drop your file/files. Next, select the appropriate conversion format (TIFF) and click on Convert to start converting your file.
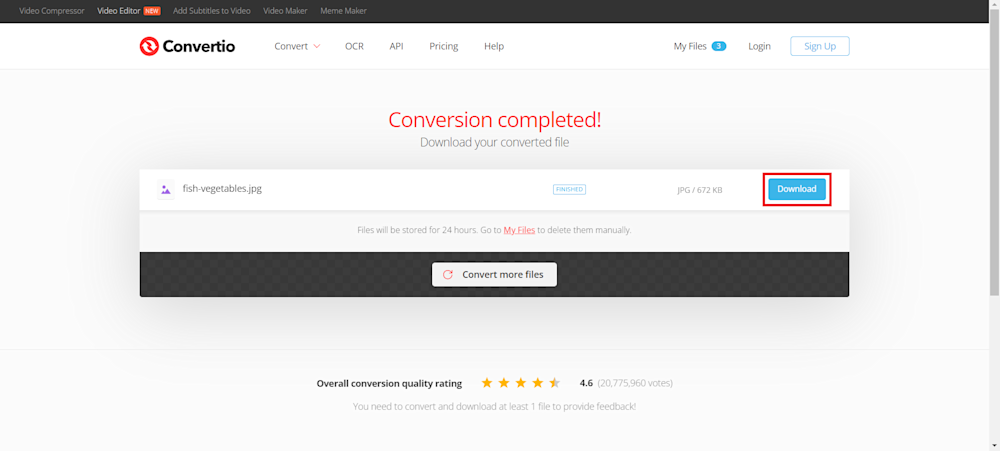
Once your file has finished uploading and converting, you will be redirected to a new page where you can download your new JPG file using the Download button.
FreeConvert
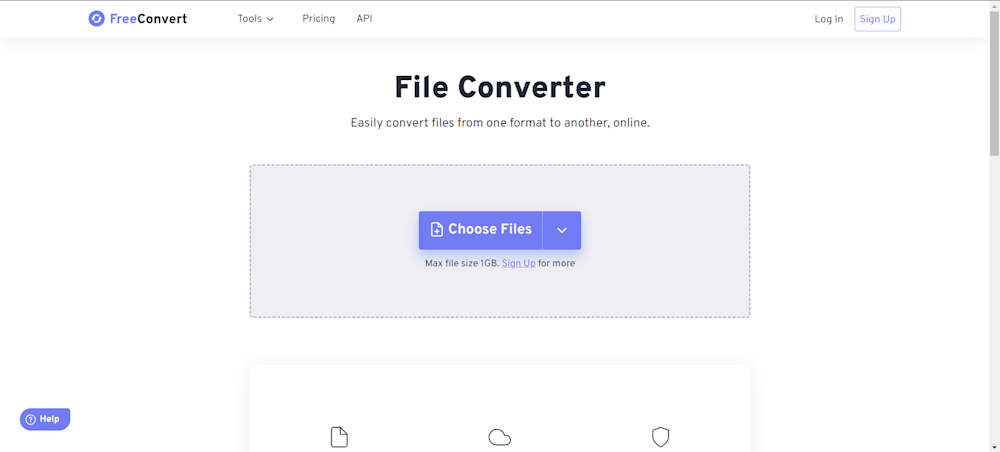
FreeConvert is a popular choice among budget-conscious users due to its commitment to offering free, high-quality conversion services. As the name implies, it provides its services without any charge, making it an attractive option for users seeking cost-effective solutions. One of its key advantages is the lack of registration requirements, allowing users to convert files without creating an account, ensuring a quick and straightforward experience.
Conversion with FreeConvert is very simple; start by clicking on the FreeConvert option and uploading your TIFF file using the Choose File button.
Next, select JPG as the output and click on the Convert button to start the conversion.
Finally, click the Download button to download your JPG image.
Other tools to Convert Tiff to JPG
ImageMagick
ImageMagick is a free, open-source software that supports reading, converting, and writing images in various formats. It is particularly powerful for batch processing, allowing developers to handle large quantities of images efficiently.
iLoveIMG
iLoveIMG is a user-friendly online tool for converting TIFF images to JPG. Its intuitive interface makes it an excellent choice for users with minimal technical expertise.
WinZip
WinZip, primarily known for file compression, also includes functionality for converting image formats, including TIFF to JPG. It is an effective solution for managing multiple files simultaneously.
Adobe Creative Cloud
Adobe Creative Cloud also offers a streamlined “Convert TIFF to JPG” feature, which integrates seamlessly with other Creative Cloud tools, making it a convenient choice for those already in Adobe’s ecosystem.
GIMP
The open-source GIMP editor provides another excellent alternative for converting TIFF to JPG. It offers a robust set of features for free, appealing to those looking for an open-source solution.
Automatically Convert Tiff to JPG With Cloudinary
Cloudinary is another cloud-based tool that allows you to convert your TIFF files into JPGs. It is an innovative platform that offers automatic optimization, ensuring efficient conversion and web-ready images. What sets Cloudinary apart from other conversion tools is its customizability. It allows its users to create advanced transformations, allowing you to resize, crop, and apply effects in real time.
If you want to use Cloudinary to convert your images, you can start by logging into your account. If you don’t have an account and want to follow this tutorial, sign up for a free account on the Cloudinary website.
Once you’ve logged in, head over to the Media Library tab and upload your TIFF files using the Upload button in your screen’s top-right corner.
Once your file is uploaded, search for your image in the Media library and click the <> button to copy your image URL.
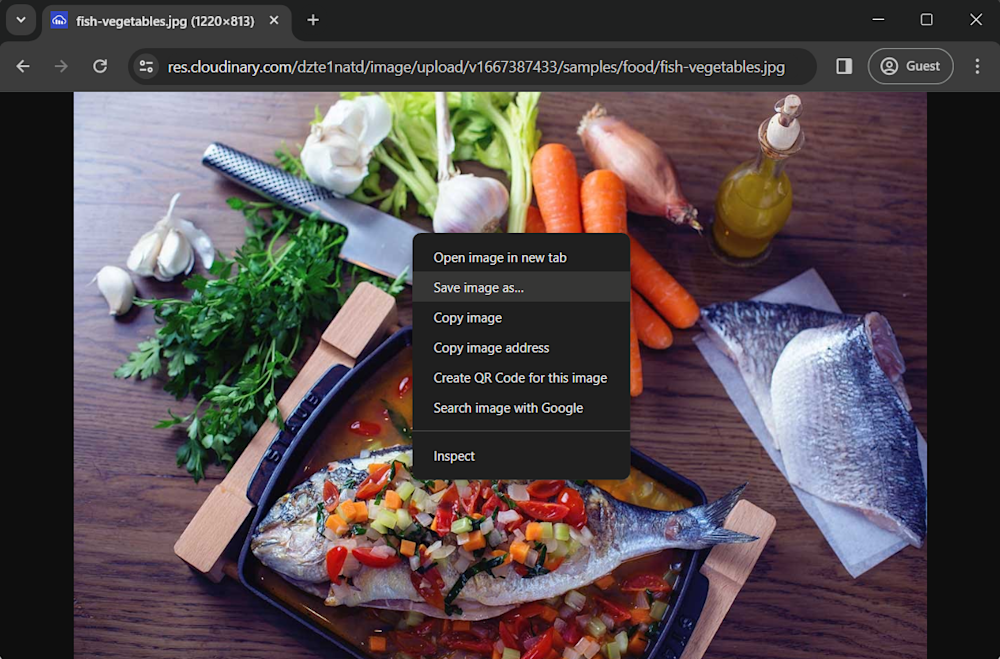
Now, open a new browser window and paste your url, but before you go to this url, remember to replace the .tiff file extension with .jpg. This will trigger an automatic file conversion in the Cloudinary cloud and deliver you with a new JPG. Finally, download your new JPG by right-clicking on the image and selecting Save As.
For Example:
From
https://res.cloudinary.com/name/image/upload/image.tiff
To
https://res.cloudinary.com/name/image/upload/image.jpg
Easy, right?
The best thing is that you are not only allowed to change to JPG but to other formats too. We recommend you to check all the supported image formats.
Pro Tip
Transform Images On-The-Fly
Manually transforming a large number of images can be tasking and time-consuming. Cloudinary allows you to easily transform your images on the fly to any required format, style and dimension, and apply effects and other visual enhancements.
Convert Tiff to JPG Using Cloudinary With Code
If you are looking to convert your images in bulk or want to host your images, Cloudinary offers SDKs and integrations for various programming languages and frameworks, making it easy to integrate Cloudinary into different types of applications. Let’s take a closer look at how you can convert your TIFF images using Cloudinary’s Node JS SDK.
Before we begin, you’ll need to have Node JS installed on your PC. if you don’t have it installed, you can download it from Node JS official website.
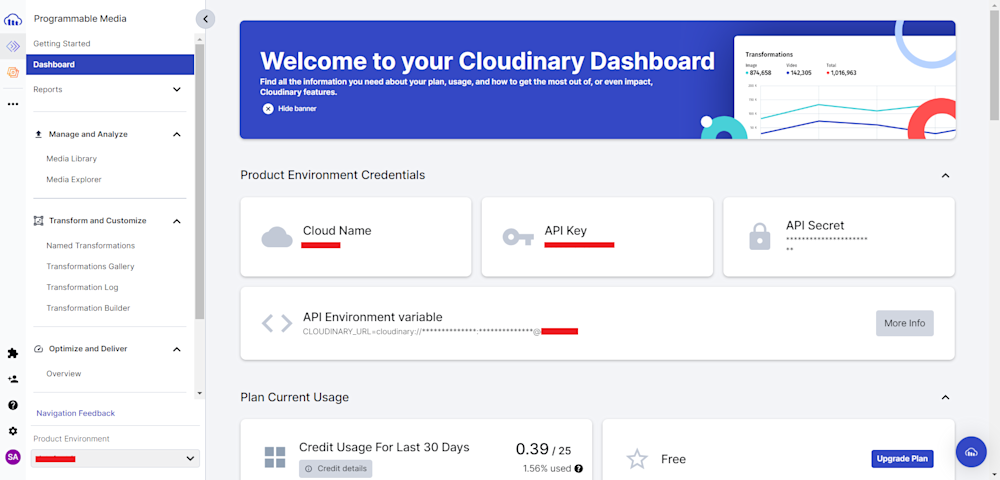
Next, log in to your Cloudinary account and retrieve your Product Environment Credentials.
Now, create a Node JS project in a directory of your choosing and install the Cloudinary Node JS SDK using npm:
npm install cloudinary
Create a .js file and start by configuring your Cloudinary SDK with your account credentials:
const cloudinary = require('cloudinary').v2;

cloudinary.config({
    cloud_name: "your-cloud-name",
    api_key: "your-api-key",
    api_secret: "your-api-secret"
});
Remember to replace your-cloud-name, your-api-key, and your-api-secret with your Cloudinary credentials.
Now create a variable in your project and add the path to the image:
// Path to the TIFF image
const image_path = 'sample.tiff';
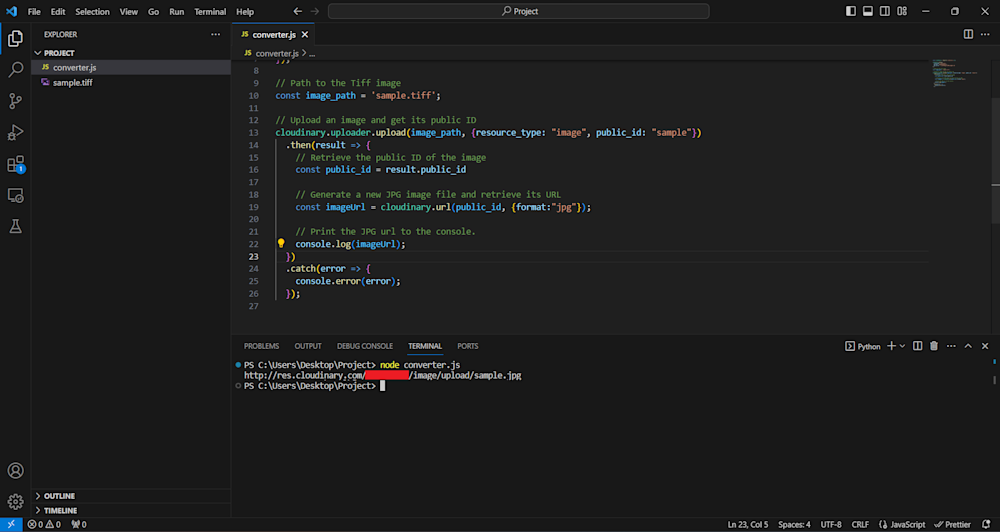
Next, use Cloudinary’s uploader method to upload the image, set the resource_type parameter as "image" and the public_id as "sample". Finally, retrieve the public ID of the image and use Cloudinary’s url method to generate a url for a new JPG image file:
// Upload an image and get its public ID
cloudinary.uploader.upload(image_path, {resource_type: "image", public_id: "sample"})
  .then(result => {
    // Retrieve the public ID of the image
    const public_id = result.public_id

    // Generate a new JPG image file and retrieve its URL
    const imageUrl = cloudinary.url(public_id, {format:"jpg"});

    // Print the JPG url to the console.
    console.log(imageUrl);
  })
  .catch(error => {
    console.error(error);
  });
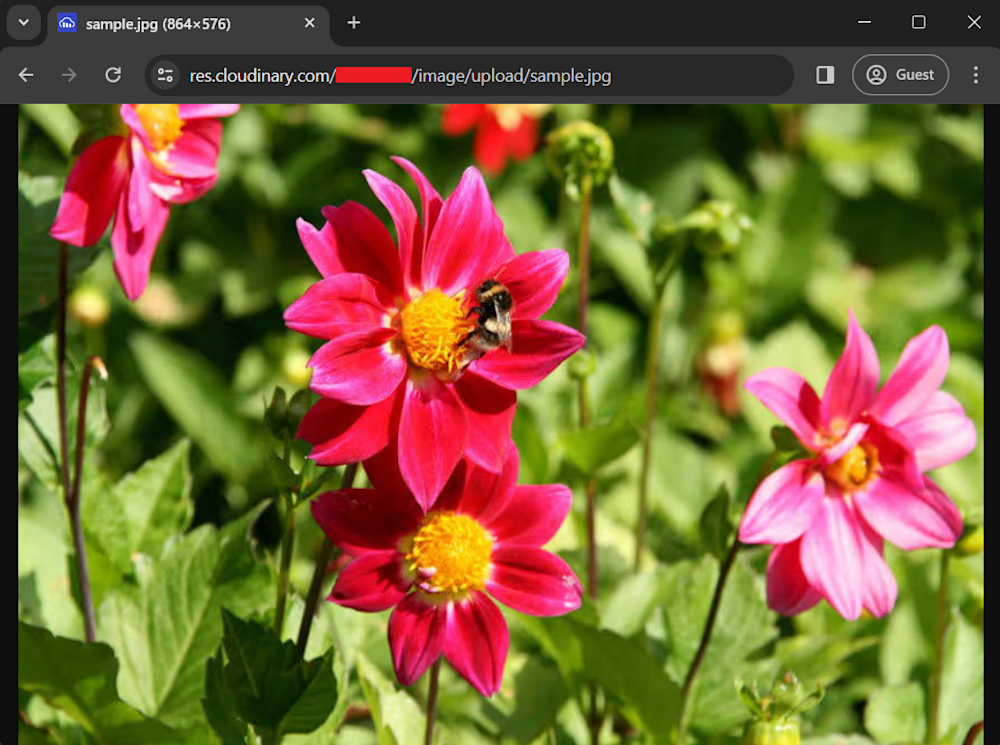
Here is what the results look like:
Wrapping Up
The ability to navigate between formats is a valuable asset. TIFF, with its superior detail retention, makes an excellent choice for high-quality image needs. However, its larger file size can slow down website load times — an essential metric in web performance. On the flip side, JPG offers outstanding compatibility and smaller file sizes, paving the way for a user-friendly and SEO-optimized website.
Developers seeking to strike the perfect balance between high quality and top performance should consider converting TIFF to JPG. As a leading media management platform, Cloudinary simplifies this conversion process, offering you the tools you need to manage and optimize your website media effortlessly.
So why wait? Start your journey towards seamless media management with Cloudinary right away!
Learn more:
