Have you ever wondered why your website feels sluggish? One of the culprits could be the size of the images you’re using. Ensuring your images are correctly sized and optimized in WordPress plays a significant role in creating an engaging and visually appealing online experience for your audience. Image size management not only improves your website’s load times but also enhances its overall performance and search engine rankings, resulting in a better user experience.
In this article, we’ll provide everything you need to know about managing and optimizing WordPress image sizes. We’ll break down the anatomy of WordPress image sizes, shed light on image compression techniques and tools, and share practical tips on how to set and manage image sizes effectively.
Understanding Default WordPress Image Sizes
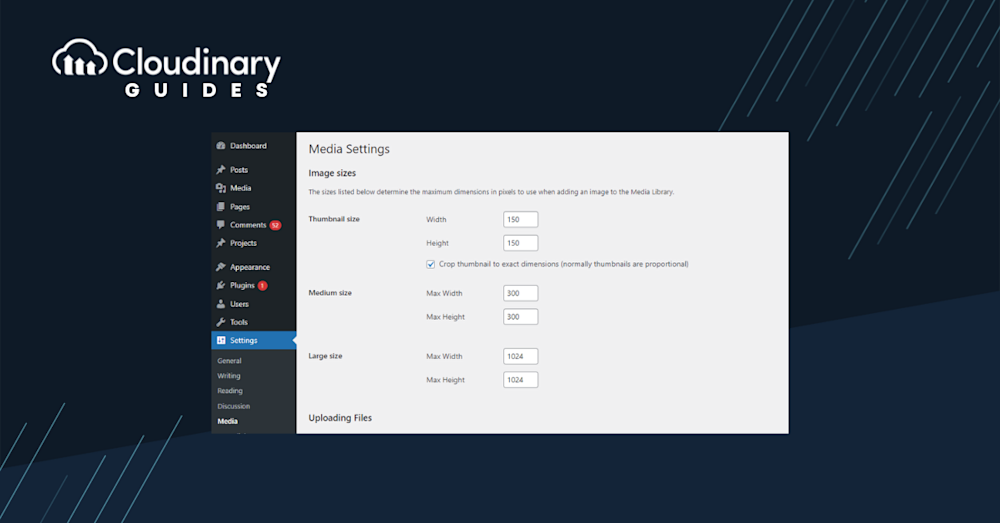
When you upload an image to WordPress, it doesn’t just save the original image. WordPress automatically creates four distinct image sizes:
- Thumbnail: Exactly 150 x 150 pixels.
- Medium: Capped at 300 x 300 pixels.
- Large: Up to 1024 x 1024 pixels.
- Full: This is the original size of your uploaded image.
These sizes are super handy. For instance, if you’re crafting a blog post and need a smaller image for a section, you don’t have to resize it manually. Pick the ‘Medium’ or ‘Thumbnail’ option, and WordPress does the heavy lifting.
But here’s a tip: You’re not stuck with these default sizes.
Head over to Settings > Media in your WordPress dashboard. Here, you can tweak the width and height of the thumbnail, medium, and large image sizes. Once adjusted, WordPress will automatically create scaled versions of each image using your new specifications. So, the next time you insert an image from the WordPress editor, you’ll have sizes tailored to your needs.
How to Display Full-Size Images in WordPress
Sometimes, you might want to showcase an image in all its glory. To display a full-size image, navigate to Media > Library. Find your image, click on it, and remove “-scaled” from the end of the image URL. Voila! You now have the original, unscaled image URL. Copy it, and you can add this high-resolution image anywhere on your WordPress site.
The Importance of Responsive Images
Did you know that more than 55% of website traffic comes from mobile devices? This fact alone points toward the necessity of responsive images. Simply put, responsive images are adaptable; they automatically adjust according to the screen size and resolution of the viewer’s device. This ensures optimal display and performance, preventing images from looking pixelated on larger screens or unnecessarily consuming bandwidth on smaller ones.
Whenever you upload an image, WordPress generates several different sizes. However, it can’t create and serve responsive images on the fly based on the specific display requirements of each device accessing your website. If you need a way to cater to a broader audience, you may need to look into tools like Cloudinary to create responsive images automatically.
The Role of Image Compression and Optimization
While it’s great to have high-resolution images, ensuring they’re optimized for the web is equally essential. Uncompressed images can be bulky, leading to longer load times and a subpar user experience, but compressing and optimizing your images? That’s where the magic happens.
Think of it this way: you want your website visitors to see beautiful, crisp images without waiting ages for them to load. Image compression reduces the file size without compromising much on quality.

The Pitfalls of Overlooking Image Optimization
Let’s get real for a moment. Overlooking image optimization can have tangible consequences. Slow-loading images can frustrate users, leading to increased bounce rates. And it’s not just about user experience; search engines take website speed into account when ranking sites. So, your SEO could take a hit if your images drag your site down.
Users expect websites to load in the blink of an eye. A delay of even a few seconds can distinguish between a user staying on your site or moving on to a competitor’s. So, while it might seem like a minor detail, optimizing your WordPress image sizes is crucial in ensuring your website’s success.
Best Practices for Image Selection and Upload
Choosing the right images and uploading them properly in WordPress is pivotal to enhancing your website’s visual appeal and performance. To help you navigate this, we’ve put together a list of best practices:
- Select High-Quality Images. Start with high-resolution images that look sharp and clear on all device types and sizes.
- Pay Attention to File Size. Huge files can slow down your website and create a less-than-optimal user experience, so aim to keep your images under 200KB.
- Choose the Appropriate File Type. JPGs are best for photographs or complex images with multiple colors, whereas PNGs are ideal for simple or transparent images. New image formats can also increase image quality without sacrificing size.
- Utilize WordPress Image Sizes. Use WordPress’s default image sizes (thumbnail, medium, large, and full-size) or set custom sizes per your requirements.
- Consider Third-Party Tools for True Responsiveness. For real-time image adaptation, consider integrating a solution like Cloudinary to handle genuinely responsive images.
Remember, optimizing your images isn’t an ‘extra’ or a luxury – it’s critical to delivering a great user experience and enhancing overall site performance.

Cloudinary: Your Secret Weapon for Image Optimization
While WordPress offers some excellent tools for managing image sizes, there’s always room for improvement. Cloudinary automates the image optimization process, making your site look and run better than ever.
Instead of manually compressing each image or relying on generic plugins, Cloudinary dynamically optimizes your images based on the end user’s device, browser, and other factors. The result? Faster load times, reduced bandwidth usage, and a better user experience.
But that’s not all. Cloudinary also offers tools for image transformations, overlays, and effects. Want to add a watermark to your images? No problem. Need to crop or resize on the fly? With the Cloudinary WordPress plugin, you can seamlessly sync your media library and leverage the power of Cloudinary without ever leaving your WordPress dashboard.
Summing It All Up
Managing WordPress image sizes is not a secondary concern; it’s integral to website performance, SEO, and user experience. Remember the synergy between image sizes and responsive design — though WordPress provides different image versions, it’s through responsive imagery that we can ensure an optimal viewing experience on all devices. Add to this the selection of the right image types and compression techniques, and you have a comprehensive image optimization strategy.
And if you’re seeking an advanced part of the solution, specifically for real-time responsiveness, consider something like Cloudinary. It doesn’t merely offer dynamic image resizing but a complete suite of image management capabilities.
So why not enhance your image strategy and overall web prowess? Try Cloudinary today and create a web where each image displayed is perfect. Remember, every image tells a story. And with Cloudinary by your side, you’re well-equipped to ensure you tell yours right.

