There are plenty of reasons you might want to upload a video to your WordPress site. Businesses thrive on video content, using it for advertising, engagement, and design elements. But, when it comes to WordPress, uploading a video comes with more complexity than you’d expect.
The Basics of Adding Videos to WordPress
When adding videos to WordPress, the first thing to understand is the difference between uploading and embedding. Uploading means the video file is stored directly on your site’s server and added to the media library. Embedding, however, pulls the video from a service like YouTube and displays it on your page through a link or code.
One reason many people choose embedding is performance. Because the video stays on an external platform, it doesn’t slow down your website or overload your server. This usually results in faster loading times for visitors.
Embedded videos also come with extra features that can help keep viewers engaged. Depending on the platform, you might get options like auto-generated captions, social sharing buttons, or advanced playback controls. These tools make it easier for people to interact with your content.
Uploading a video directly to WordPress has its uses, but embedding is often the smarter choice. It saves server space, improves performance, and gives you access to tools designed to make the viewing experience better.
Why Uploading Video Content Matters
Videos have become one of the most powerful tools for conveying information. They are engaging, easy to digest, and can significantly improve the user experience on your website. For businesses and bloggers using WordPress, incorporating videos into your site is not just a nice-to-have, but a necessity.
However, uploading videos to your WordPress site is not as straightforward as it may seem. There are several ways to upload videos, and each method can affect the performance, loading time, and overall user experience of your website. For example, uploading large video files directly to your WordPress media library can slow down your site, while embedding videos from third-party platforms like YouTube can sometimes lead to issues with video playback or responsiveness.
Can Uploading Videos Affect Your WordPress Site’s Performance?
Uploading videos directly to your WordPress Media Library stores the files on your server, which can quickly eat up storage space. Since video files are typically large, even a few uploads can significantly slow down your site’s performance.
This can lead to longer page load times and negatively impact your Core Web Vitals, which are key factors in your search engine rankings. A sluggish website not only hurts SEO but can also frustrate both new and returning visitors, potentially undermining the very engagement your video content was meant to drive.
Fortunately, you can avoid these issues by uploading your videos to a third-party video hosting platform. This approach offloads the file storage and bandwidth demands, allowing your videos to display smoothly on your site without compromising performance.
In this tutorial, we’ll walk you through different video upload methods so you can choose the one that works best for your site and content strategy.
Step-by-Step Guide to Uploading Videos
Method 1: Using WordPress to Upload a Video
First, you need to get to the heart of your WordPress site – the dashboard. This is where all the magic happens. The dashboard is your command center, from publishing posts to tweaking site settings.
1. Accessing the Media Library
Once you’re in the dashboard, look to the left-hand side. You’ll see a menu with various options. Find and click on ‘Media’. This will lead you to the Media Library, a repository of all the images, videos, and files you’ve ever uploaded to your site.
2. Adding a New Video
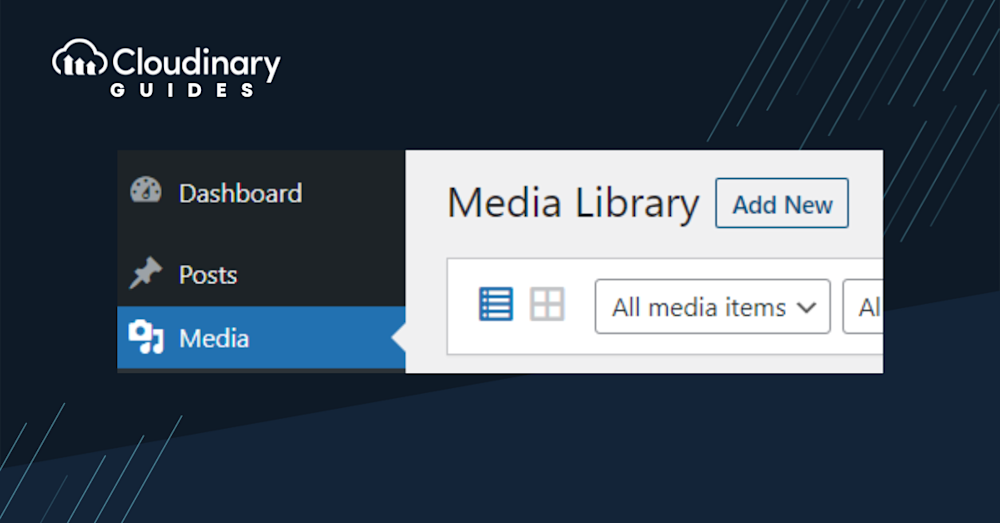
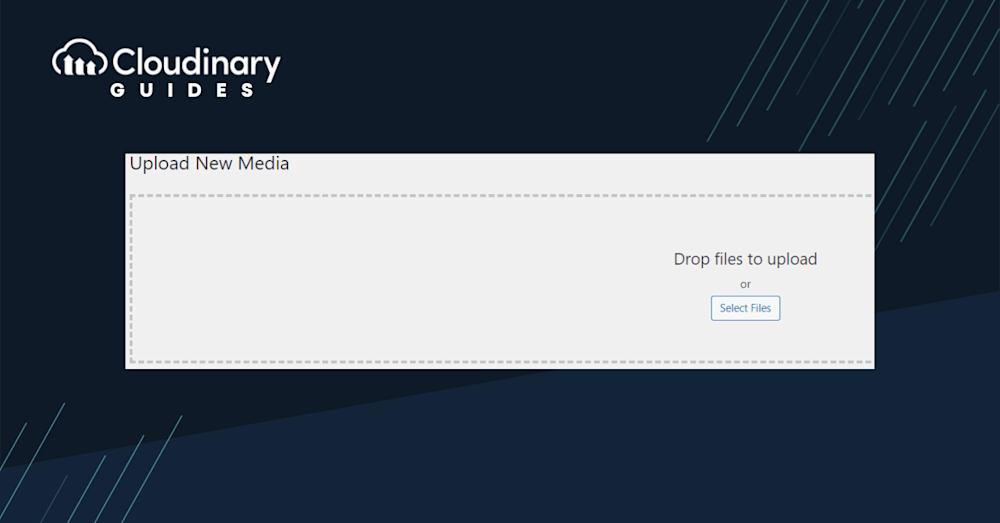
At the top of the Media Library page, you’ll notice an ‘Add New’ button. Clicking on this will open up the upload interface.
3. Uploading Your Video
Now, it’s time to get that video on your site. You have two options here:
- Drag and Drop. If your video file is handy, simply drag it into the designated box. It’s as easy as that!
- Select Files. If you prefer browsing your files, click ‘Select Files’. This will open up your computer’s file explorer. Navigate to where your video is stored, select it, and click ‘Open’.
4. Post-Upload Steps
Once your video has finished uploading, the screen will refresh, and you’ll see your video listed in the Media Library. But wait, there’s more to do! Embedding Options: WordPress offers a few ways to showcase your video. You can:
- Embed a media player to play the video directly on your site.
- Link directly to the media file, allowing users to download or view it in a new tab.
- Link to an attachment page, a dedicated page for your video.
Note: If your video isn’t playing correctly, it might be due to an incompatible file type. In such cases, consider converting your video to a more universally accepted format like MP4 before uploading.
Method 2: Hosting Content with an External Server
Another option for adding videos to WordPress is to use an external hosting server. This method can deliver strong performance and security, especially for large or high-traffic sites. However, it usually involves extra costs and can be more complicated to manage.
Running an external server often requires technical skills or help from a developer. Since most hosting platforms aren’t designed just for WordPress, they may not work as smoothly. You might need extra steps to embed the video or get the player to display correctly.
For many users, video hosting solutions that are designed to work with WordPress, like Cloudinary, are the more practical choice. They connect directly with the Media Library, include simple features for easier management, and are often more affordable than external servers.

Maximizing Video Performance on WordPress with Cloudinary
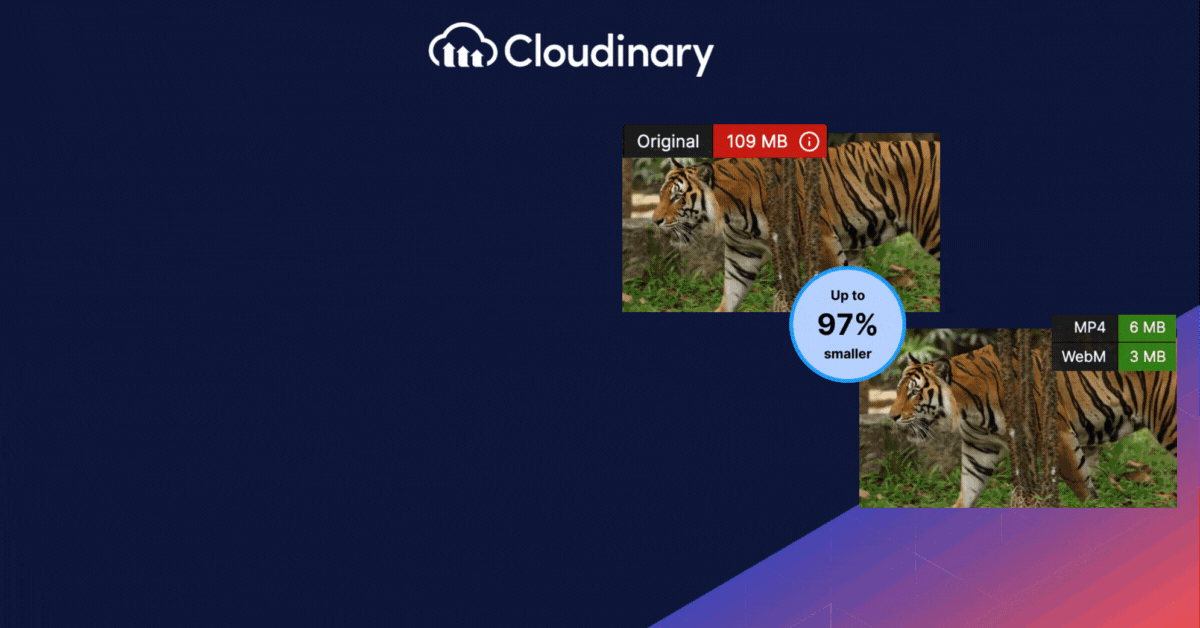
Working with video on WordPress can introduce several technical challenges. Large files often strain server resources, increase page load times, and create inconsistent playback across browsers and devices. These issues make it difficult to maintain both site performance and a reliable user experience.
Cloudinary’s WordPress Plugin addresses these limitations by handling video optimization and delivery outside of WordPress infrastructure. Videos are automatically transcoded, resized, and delivered in modern formats tailored to each device and connection. This allows developers to focus on building the site while ensuring videos load quickly and play smoothly.
Key features include:
- Automatic transcoding into multiple formats and resolutions
- Adaptive bitrate streaming for efficient playback
- Smart resizing and cropping to match layout requirements
- Global delivery via multiple built-in content delivery networks (CDNs)
- On-demand video transformations through simple parameters
- Analytics for monitoring performance and usage
By integrating Cloudinary into WordPress, teams gain a more scalable and maintainable workflow for serving video at high quality.
Wrapping It Up
While WordPress offers robust tools for video uploading to elevate your site’s video content truly, a dedicated solution like Cloudinary can make all the difference. It’s not just about uploading a video; it’s about delivering an unmatched viewing experience for your audience. With Cloudinary, you’re not just embedding videos; you’re embedding excellence.
So, the next time you think of adding a video to your WordPress site, remember that it can always be better with Cloudinary.
Frequently Asked Questions
Will hosting videos directly on my WordPress site affect performance?
Yes, uploading large video files directly to your WordPress Media Library can slow down your site. Since these files are stored on your server, they consume bandwidth and storage, which can negatively affect loading speed and overall user experience, especially on media-rich pages.
However, this issue can be avoided by using a video hosting and delivery solution like Cloudinary. Cloudinary stores and delivers video content from its optimized infrastructure, offloading the heavy lifting from your server and keeping your site performance smooth and reliable.
What is the most effective way to upload videos to WordPress?
One of the most efficient ways to upload and manage videos in WordPress is by using Cloudinary’s media optimization and delivery tools.
Cloudinary allows you to upload high-quality videos, transform them automatically (e.g., resizing, format conversion, adaptive bitrate streaming), and embed them seamlessly into your WordPress site, all without affecting server performance. Plus, Cloudinary’s global CDN ensures fast and reliable playback across all devices, without ads or interruptions.
Is it possible to use an uploaded video as a header in WordPress?
Yes, WordPress allows you to use video as a header element. You can achieve this using the Cover block, which supports background videos, or by using a plugin that enables video headers or backgrounds.
If you’re using Cloudinary, you can host and deliver the video from your Cloudinary account and embed it in your theme or block using the provided URL, ensuring performance and visual quality.

