Are you tired of waiting for your images to load on your WordPress website? Slow-loading images not only frustrate your visitors but also harm your search engine rankings. Luckily, there’s a solution: optimizing images on upload.
In this step-by-step guide, you’ll learn how to make your website lightning-fast by optimizing images right when you upload them to WordPress.
Option 1: Choose the Right Format
Before you even hit that “Upload” button, consider the image format you’re using. The optimal choice is WebP, especially for photographs and images with transparency. WebP excels at maintaining a remarkable balance between image quality and file size, paving the way for unparalleled optimization.
It’s also essential to consider other formats like JPEG and PNG, especially for websites. JPEGs are particularly useful due to their high color count and special compression techniques, which reduce file size without compromising clarity. Using the correct format is critical to balancing quality and performance.
Option 2: Resize Before Upload
A WordPress website can have many themes, layouts, and design elements that impact the optimal image dimensions. There isn’t a single recommended image size that fits all situations; however, these general guidelines can serve as a useful reference:
- Full-width banner or hero images: 1920 x 1080 pixels
- Feature images for blog posts: 1200 x 800 pixels
- Inline content images: 800 x 600 pixels
- Thumbnails or small icons: 150 x 150 pixels
Modern digital cameras and smartphones usually create large, high-resolution images. You can usually compress these images by at least 50% for your website without quality loss.
To check the size and dimensions of an image in WordPress, follow these steps in the Media Library:
- Navigate to the Media Library from your WordPress dashboard.
- Select the image thumbnail you want to review.
- A border will highlight the selected image, and a number will appear in the bottom-right corner.
- Click on the Edit button.
- The Edit Image panel will display the image’s file size and dimensions.
Option 3: Compress Your Images
Image compression is your best friend when it comes to optimizing images. WordPress offers various plugins that automatically compress images on upload. These plugins apply algorithms to remove unnecessary data from your images without sacrificing quality.
In addition to WordPress plugins, tools like Imagify can automatically resize and compress images. You can also increase the default JPEG compression limit with the SimpleJPEGQuality plugin for further optimization.
Option 4: Implement Lazy Loading
Lazy loading is a nifty technique that only loads images when a user scrolls to them. This significantly boosts the initial page loading speed. This is a great option if you have a significant number of images on your page. Otherwise, you won’t see any change in your site’s performance.
Option 5: Use a CDN
Utilizing a Content Delivery Network (CDN) can significantly speed up image delivery on your website. A CDN stores a copy of your images in multiple locations globally, ensuring faster access for users regardless of their location.
Option 6: Use A Photo Editing Tool
You can use Photoshop or other image editing tools to adjust height, width, and resolution according to the parameters of the wordpress image size suggested.
Option 7: Use A Smaller Version
Consider the alternative of uploading a smaller version directly. If an image spans 6000 pixels in width, opt for a 3000px wide version. This approach is beneficial because it reduces the initial image size, leading to quicker upload times and better overall page performance.
Cloudinary’s WordPress Plugin: A Better, More Efficient Solution
While WordPress offers plugins and solutions for image optimization, they often involve manual steps and multiple tools. This can be time-consuming and inefficient.
Enter Cloudinary, a comprehensive solution that takes image optimization to new heights. With Cloudinary’s seamless integration into WordPress, you can optimize images on upload effortlessly, without relying on multiple plugins or manual processes.
Image optimization for different devices and screen sizes can be a headache. Uploading multiple versions of the same image for responsiveness clutters your media library and complicates your workflow.
Cloudinary dynamically delivers the most suitable image size and format to each user’s device. By uploading a single high-quality image, Cloudinary takes care of resizing and formatting on the fly. This streamlines your workflow and ensures optimal performance across devices.
Manually updating and replacing images to improve optimization can be tedious and prone to errors. Cloudinary offers a single point of control for your images. You can apply optimizations, transformations, and updates centrally from the Cloudinary dashboard, without needing to dig into individual WordPress posts or pages.
How to Optimize Images on Upload with Cloudinary
Step 1: Create a Cloudinary Account
Simply sign up for a free account. It’s quick, and you’ll gain access to a powerful suite of image optimization tools.
Step 2: Installing the Cloudinary Plugin
Integrating Cloudinary with WordPress is simpler than you might imagine. Cloudinary offers a dedicated plugin tailored exclusively for WordPress, ensuring seamless integration of its powerful image optimization features.
Installing the Cloudinary plugin is easy, especially through WordPress’s own plugin page. Here’s a quick rundown:
- Log in to Your WordPress Dashboard. Access your WordPress admin panel by logging in with your credentials.
- Navigate to Plugins. On your dashboard’s left-hand side, locate the “Plugins” tab and click on it to access the Plugins page.
- Add New Plugin. At the top of the Plugins page, spot the “Add New” button. Click it to go to the plugin installation page.
- Select the Cloudinary Plugin. Now, use the search bar at the top and search for the Cloudinary plugin. Oce you find it, simply click “Install”!
- Activate the Plugin. After that, activate the plugin by clicking the “Activate Plugin” link. This will actually enable the Cloudinary plugin on your WordPress site.
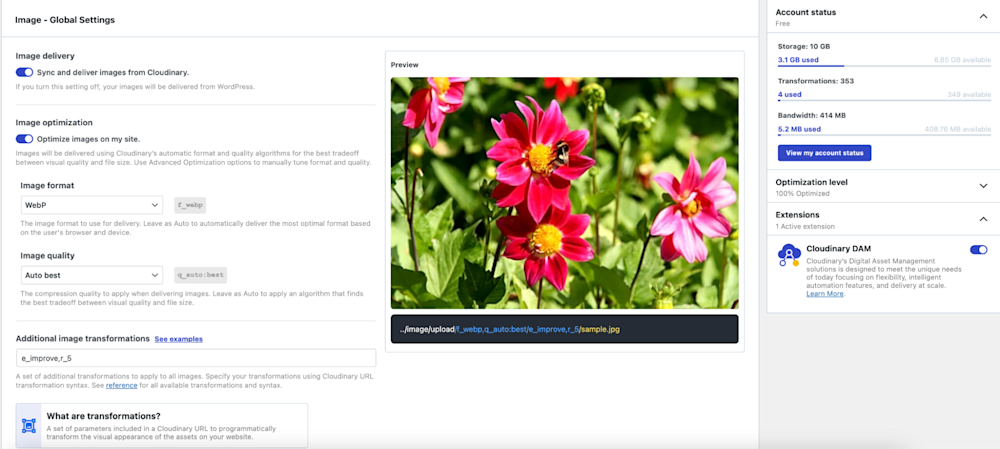
- Configure the Plugin Settings. Once installed, the Cloudinary plugin will begin optimizing your media automatically. You can also configure individual settings within the Plugin page itself, if you want deeper customization.
Step 4: Upload and Let Cloudinary Work Its Magic
Once installed, upload your images to WordPress as usual. The Cloudinary plugin detects new uploads and automatically optimizes them according to your preset configurations, making it all a hassle-free process.
With Cloudinary in action, you’ll experience the thrill of a faster website. Images will be delivered in the perfect size and format for every user, resulting in quicker load times and an improved user experience.
The Wrap-Up
Optimizing images on upload is no longer an optional task — it’s a necessity for maintaining a high-performing website. With the techniques outlined in this guide, you can optimize your images right from the start, ensuring faster loading times and happier visitors.
But why stop there? Take your image optimization game to the next level with Cloudinary. Its powerful capabilities streamline the process, leaving you with more time to focus on creating exceptional content and wowing your audience.
Say goodbye to slow-loading images and hello to a faster, more efficient website — your visitors will thank you.


