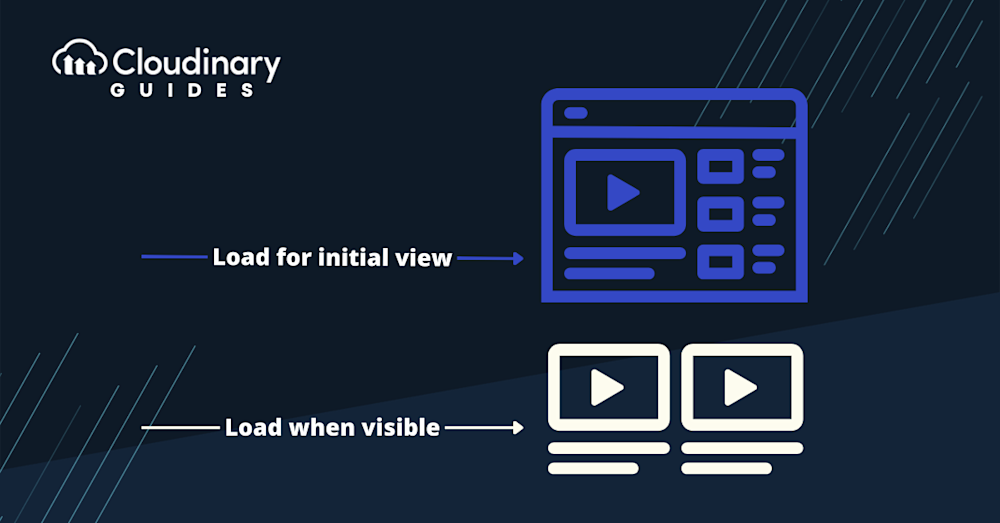
Imagine you’re visiting a website, and instead of waiting for every single image to load, the site only loads the images you can see. As you scroll down, more images load just in time for viewing. That’s lazy loading in action.
With lazy loading, your WordPress site can quickly load every media element. Instead, it smartly waits, loading images and other media only when necessary. This ensures a quicker page load time and reduces the strain on your server.
However, like all things, lazy loading has its pros and cons. On the upside, users experience quicker load times, which can lead to better user engagement and reduced bounce rates. On the downside, it can disrupt the user experience and even impact SEO if not implemented correctly.
Adding Lazy Load to Your WordPress Site
WordPress, being the versatile platform it is, offers multiple ways to implement lazy loading. Whether you prefer the ease of plugins or like to get your hands dirty with manual coding, there’s a solution for you. In the following sections, we’ll explore both these methods, ensuring your website benefits from the speed boost lazy loading offers.
Before diving in, remember the goal is to enhance user experience. So, always test changes on a staging site before making them live. This way, you ensure your users get the best experience possible.
Adding Lazy Load With a Plugin – WP Rocket Lazy Loading
One of the most popular and efficient ways to add lazy loading to your WordPress site is by using a plugin, and WP Rocket stands out in this arena. Once you’ve installed the plugin, this is how to get started:
- Navigate to Settings > WP Rocket > Media panel in your WordPress dashboard.
- Spot the LazyLoad section at the top of the page. Here, you’ll find an option that says “Enable for images.” Click on it and then hit “save changes.”
- Dive into the Lazy-loading Settings. Here, you have the flexibility to customize your lazy loading preferences. For instance, you can turn off lazy loading on all images or restrict it to post thumbnails of posts and pages.
Remember, while plugins like WP Rocket make the process seamless, ensuring that the settings align with your website’s needs is essential. Always test the functionality after implementation to ensure everything runs smoothly.
Adding Lazy Load Manually
While plugins offer a straightforward way to add lazy loading to your WordPress site, some prefer the control and flexibility of manual implementation. If you’re one of those who like to tinker with the code, this method’s for you.
To manually add lazy loading in WordPress, you’ll work with the loading attribute in your HTML. This attribute allows browsers to control the loading of off-screen images and iframes.
- Open your WordPress theme’s functions.php file.
- Add a function to filter the content and the loading=”lazy” attribute to your images.
- Ensure that the function runs every time a post or page is rendered.
Here’s the code to add to your functions.php
function add_lazyload($content) {
$content = str_replace('<img', '![]()
This code modifies the content of your posts and pages, adding the loading=”lazy” attribute to all images.
Always remember to back up your website before making any changes to the code. Once you’ve added the lazy loading manually, test your website to ensure images load as expected.
Pro Tip!
Improve Core Web Vitals with Cloudinary
If you want to improve your Core Web Vitals metrics and make your website faster, we recommend you to deliver responsive images. Cloudinary allows you to dynamically resize your images on the fly as needed, with added features such as size optimization and format conversion.
Lazy Loading Videos in WordPress
Just as with images, videos can significantly slow down your WordPress site. Thankfully, the lazy loading technique isn’t limited to just images; it can also be applied to videos.
To lazy load videos in WordPress:
- Instead of directly embedding a video, use a placeholder image.
- When a user clicks on the placeholder, the video loads and starts playing.
Several plugins can help with this, but if you’re going the manual route, the process involves a bit of JavaScript alongside the placeholder technique.
Lazy Loading in WordPress & SEO
When done right, lazy loading can work wonders for your site’s speed. But there’s a catch: if not implemented correctly, it can harm your SEO. Search engines might not crawl or index content set to load lazily, especially if it doesn’t load quickly enough during the crawl.
To ensure your WordPress lazy load implementation is SEO-friendly:
- Test your website with tools like Google’s Mobile-Friendly Test. This will show you what Googlebot sees when crawling your site.
- Ensure essential content isn’t set to load lazily. Key content should be immediately visible and accessible to search engines.
- Monitor your site’s performance and rankings. If you notice a drop, reconsider your lazy loading strategy.
Remember, the goal is a balance between speed and visibility. Your content should load quickly for users while remaining accessible to search engines.
Implement Lazy Loading with Cloudinary
Cloudinary offers an effortless way to implement lazy loading on your WordPress site. With its vast array of features, Cloudinary ensures that your media assets are optimized, responsive, and delivered with the best possible performance.
To get started with Cloudinary’s lazy loading:
- Sign up for a Cloudinary account and install the Cloudinary WordPress plugin.
- Navigate to the plugin settings and enable the ‘Lazy Loading’ feature.
- Customize the settings as per your site’s requirements. Cloudinary offers various loading effects, such as blur-up or fade-in, to enhance the user experience.
The beauty of using Cloudinary lies in its automation. It handles lazy loading and optimizes your images and videos, ensuring they’re delivered in the proper format, quality, and resolution based on the user’s device and browser.

Lazy Loading: Best Practices
Just knowing that lazy loading is an efficient tool isn’t enough. To truly harness its potential, we should follow its best practices. These few pointers provide the ‘what’ and, more importantly, the ‘how’ of maximizing its benefits.
- Selective Loading: Not all content is a good candidate for lazy loading. While images and videos can benefit greatly, overuse can lead to negative impacts, such as unnecessarily delaying above-the-fold content. Always be selective about what content you apply lazy loading to.
- Failure Considerations: Ensure your website can still function effectively if a user has JavaScript disabled. Using <noscript> tags can provide fallback content in such scenarios.
- Testing Effectiveness: Use performance tests to measure the impact of your lazy loading implementation. Google’s Lighthouse tool can be particularly handy in assessing the performance of your content in a lazy loading context.
- Responsive Design Compatibility: Ensure your lazy loading tool or method is compatible with responsive images to offer seamless experiences across different device sizes.
Remember, as with any tool, lazy loading is most powerful when used thoughtfully and strategically. So, embrace these best practices and set your WordPress site on a path of lightning speed and steadfast performance.
Stay Lazy, But Not Too Lazy
In the vast digital landscape of WordPress websites, every millisecond counts. Lazy loading is a powerful technique that, when implemented correctly, can significantly boost your site’s speed, enhance user experience, and improve SEO rankings. Whether you choose to go the plugin route, manually code it, or utilize a comprehensive solution like Cloudinary, the key is to balance speed and user experience.
Remember, while WordPress lazy load techniques are essential, they’re just one piece of the performance puzzle. Regularly monitor, test, and optimize to ensure your WordPress site remains top.

