Few things are as frustrating as hitting play on a video only to be greeted by the dreaded “Video Codec Not Supported” error. Whether you’re watching a movie, reviewing client footage, or testing a video in a web app, codec issues can completely halt your workflow.
The good news? Codec problems are usually solvable. From simple fixes like switching players to more advanced solutions like format conversion, there are plenty of ways to get your videos playing again. And with Cloudinary, you can automate the process, ensuring every viewer gets a format their device supports, without manual conversions or complex setup.
Key Takeaways
- Understand what a video codec is and why “Video Codec Not Supported” errors occur.
- Learn practical fixes for common codec issues.
- Explore platform‑specific solutions for Android and iPhone.
- See how Cloudinary can automatically prevent codec errors at scale.
In this article:
- What Exactly Does “Video Codec Not Supported” Mean?
- Troubleshooting 101: How to Correct Video Codec Errors
- Dealing With Video Codec Difficulties on Android/iPhone
- How to Prevent Future Video Codec Errors
What Exactly Does “Video Codec Not Supported” Mean?
A video codec is software or hardware that compresses and decompresses video files for storage and playback. Think of it as a translator between the raw video data and your screen. Without the correct codec, your device has no way to “interpret” the video file.
Common codecs include:
- H.264
- HEVC (H.265)
- VP9
- AV1
Each codec has its own advantages: some are more efficient, some produce higher quality at lower file sizes, and some are designed for specific devices or platforms.
When you see “Video Codec Not Supported,” it means your player doesn’t have the right decoder for the file. This can happen if the codec is very new (like AV1 on older devices), proprietary (like certain camera codecs), or simply missing from your player’s build.
Reasons for Video Codec Problems
Several scenarios can trigger codec issues, but let’s discuss the main ones:
- Uncommon or newer codecs: For example, recording a video on an iPhone in HEVC format and trying to play it on an older PC without HEVC support.
- Outdated media players: Old software may lack the latest decoding capabilities.
- Unsupported container formats: Even if the codec is supported, the container (like
.mkvor.mov) might not be. - Corrupted video files: Missing metadata or broken streams can prevent proper decoding.
These issues can occur during playback, editing, or even while trying to upload a video to a platform that enforces format restrictions.
Troubleshooting 101: How to Correct Video Codec Errors
Fixing codec issues often starts with the simplest solutions first. Let’s walk through them step‑by‑step.
Solution 1: Trying Various Media Players
Not all media players are created equal. Some, like Windows Media Player or QuickTime, support a limited set of codecs. Others, like VLC Media Player, come bundled with a vast library of codecs and can play almost anything you throw at them.
If you encounter a codec error, try opening the video in a different player. VLC is available for Windows, macOS, Linux, Android, and iOS, making it a versatile and popular fallback option.
Solution 2: Ensuring Your Media Player Is Up-to-Date
Even if you’re using a flexible video player like VLC, running an outdated version can cause playback problems. New codecs emerge regularly, and updates often include the latest decoding libraries.
Keeping your player up-to-date is also a security best practice, as updates often patch vulnerabilities in the software. On desktops, check your player’s About, Help, or Update section to confirm you’re on the latest release.
Many players also have an auto‑update option that you can enable to stay current without manual checks. On mobile devices, simply updating via the App Store or Google Play can resolve the issue.
Solution 3: Downloading and Installing Needed Video Codecs
Some desktop media players let you expand their capabilities by adding external codec packs. For instance, the K‑Lite Codec Pack for Windows can add support for dozens of additional formats, allowing your player to handle videos it couldn’t before. This is especially helpful if you frequently work with uncommon or older formats.
However, be mindful to only download codec packs from trusted sources to avoid malware. You should always verify you’re getting them from the official site.
Solution 4: Changing Video File Formats
If your player can’t handle the codec, you can convert the video to a more universally supported format like MP4 with H.264 video and AAC audio.
With Cloudinary, this can be done automatically by specifying a format in the delivery URL:
https://res.cloudinary.com/demo/video/upload/f_mp4/sample
This ensures that no matter the original format, the viewer gets a playable MP4 version instantly. This is especially useful for web apps or services where you don’t control the user’s device or player.
Solution 5: Repairing Damaged Video Files Using Specialised Applications
Sometimes, “Video Codec Not Supported” errors are caused by a corrupted video file rather than a missing codec. In such cases, repair tools like HandBrake, FFmpeg, or Stellar Repair for Video can attempt to reconstruct missing data, fix broken headers, or re‑encode the file into a playable format, but this isn’t a guarantee.
Cloudinary can also help. Uploading and re‑encoding a damaged video through Cloudinary can sometimes correct metadata or stream issues automatically, allowing the file to play correctly without manual repairs–though it’s still possible the video file is beyond repair.
Dealing With Video Codec Difficulties on Android/iPhone
The “Video Codec Not Supported” issue is particularly common on mobile devices because of platform‑specific limitations and licensing restrictions. A video that plays fine on a desktop may fail on a phone simply because the device doesn’t natively support the codec or container format.
- On Android: Some models ship without certain codecs to reduce licensing costs or because they target specific regional markets. As a result, videos encoded in formats like HEVC may not play out of the box. Installing a third‑party player such as VLC for Android or MX Player can often bypass this by including built‑in codec libraries.
- On iPhone: iOS offers excellent performance but supports a narrower range of codecs for stability and security. The most reliable choice for compatibility is MP4 (H.264 video with AAC audio). If a video won’t play, converting it to this format before transfer, or letting Cloudinary handle automatic format conversion, is the safest option.
How to Prevent Future Video Codec Errors
Codec problems are easier to prevent than to fix. Here’s how to avoid them in the future:
- Choose Universal Formats: Stick to widely supported options like MP4 with H.264 video and AAC audio when recording or exporting.
- Stay Current: Keep your media software updated to ensure you have the latest codec support and security patches.
- Test Across Environments: Preview videos on multiple devices before sending them to clients or publishing online.
- Automate Compatibility: Use Cloudinary to handle automatic conversion and optimization so you always deliver the best format for each device without manual intervention.
With Cloudinary, you can upload a video in almost any format, then convert it to a format of your choice or to one it finds most optimal. This ensures smooth playback on Android, iPhone, and desktop without creating multiple versions manually.
Before we begin, we need to retrieve our Cloudinary API credentials. To do this, head over to the Cloudinary website and log in to your account. If you don’t have an account already, you can sign up for free. Next, head over to the Dashboard tab and click on the Go to API Keys button. Here you will find your API credentials. Copy these as you will need them later.

Next, you need to make sure that you have Node.js installed on your system. If you don’t have Node already, head over to the official Node.js website and follow the instructions to complete your installation.
Now open up your project directory in a terminal and use npm to install the Cloudinary Node.js SDK:
npm install cloudinary
With our setup complete, we can begin using Cloudinary to optimize our video codec. To do this, we will start by creating a new JavaScript file in our project folder named convertVideo.js and add the following code:
const cloudinary = require('cloudinary').v2;

// Configure your Cloudinary account credentials
cloudinary.config({
  cloud_name: "your_cloud_name",     // From your Cloudinary dashboard
  api_key: "your_api_key",           // From your Cloudinary dashboard
  api_secret: "your_api_secret"      // From your Cloudinary dashboard
});
In this code snippet, we are simply importing and setting up our Cloudinary API. Remember to replace the configuration detail strings with your actual Cloudinary credentials.
Next, we will define the path to our source video and define a format to convert to:
// Path to the source video file
const sourceVideoPath = './assets/demo_video.avi'; // Update with your video file path
const targetFormat = 'mp4'; // Format to convert to
Finally, we will create a function that helps us upload and deliver our video in the best format for each device. We will first begin by defining the upload settings:
function convertAndUploadVideo() {
  const uploadSettings = {
    resource_type: "video",
    format: targetFormat,
    transformation: [
      { fetch_format: "auto", quality: "auto" } // f_auto + q_auto
    ]
  };
Here we are defining the resource type as video, while defining the format as mp4 (targetformat). We also define the transformation parameter with fetch_format and quality set as auto to help deliver the video in the most optimized format and quality for our device.
Finally, we use Cloudinary’s uploader.upload() function to upload our video to the Cloudinary cloud, and output the video URL in the terminal.
Here is what our complete code looks like:
const cloudinary = require('cloudinary').v2;

// Configure your Cloudinary account credentials
cloudinary.config({
  cloud_name: "your_cloud_name",
  api_key: "your_api_key",
  api_secret: "your_api_secret"
});

// Path to the source video file
const sourceVideoPath = './assets/demo_video.avi'; // Update with your video file path
const targetFormat = 'mp4'; // Format to convert to

// Upload, convert, and deliver in the best format for each device
function convertAndUploadVideo() {
  const uploadSettings = {
    resource_type: "video",
    format: targetFormat,
    transformation: [
      { fetch_format: "auto", quality: "auto" } // f_auto + q_auto
    ]
  };

  cloudinary.uploader.upload(sourceVideoPath, uploadSettings, (err, result) => {
    if (err) {
      console.error("Video upload/transcoding failed:", err);
    } else {
      const publicId = result.public_id;
      const optimizedUrl = cloudinary.url(publicId, { resource_type: "video", fetch_format: "auto", quality: "auto" });
      console.log('Optimized video available at:', optimizedUrl);
    }
  });
}

convertAndUploadVideo();
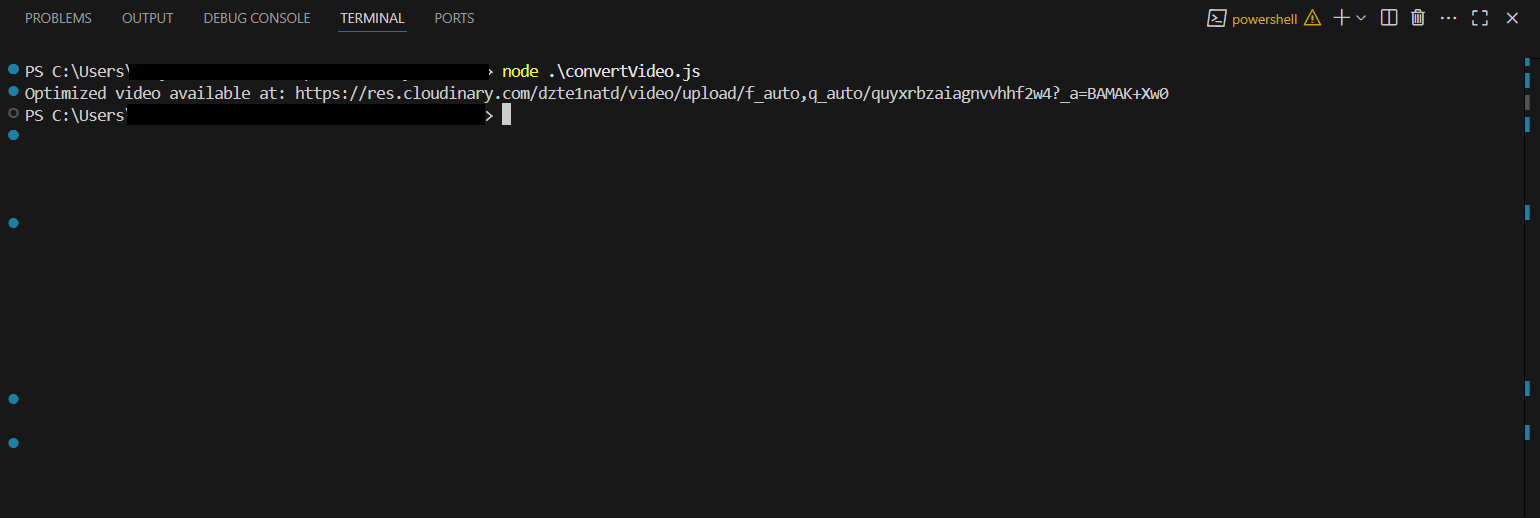
When you run this script, Cloudinary will upload your video, transcode it to MP4, and automatically deliver the most compatible format for each viewer’s device with optimal quality settings applied. Here is what our output looks like:
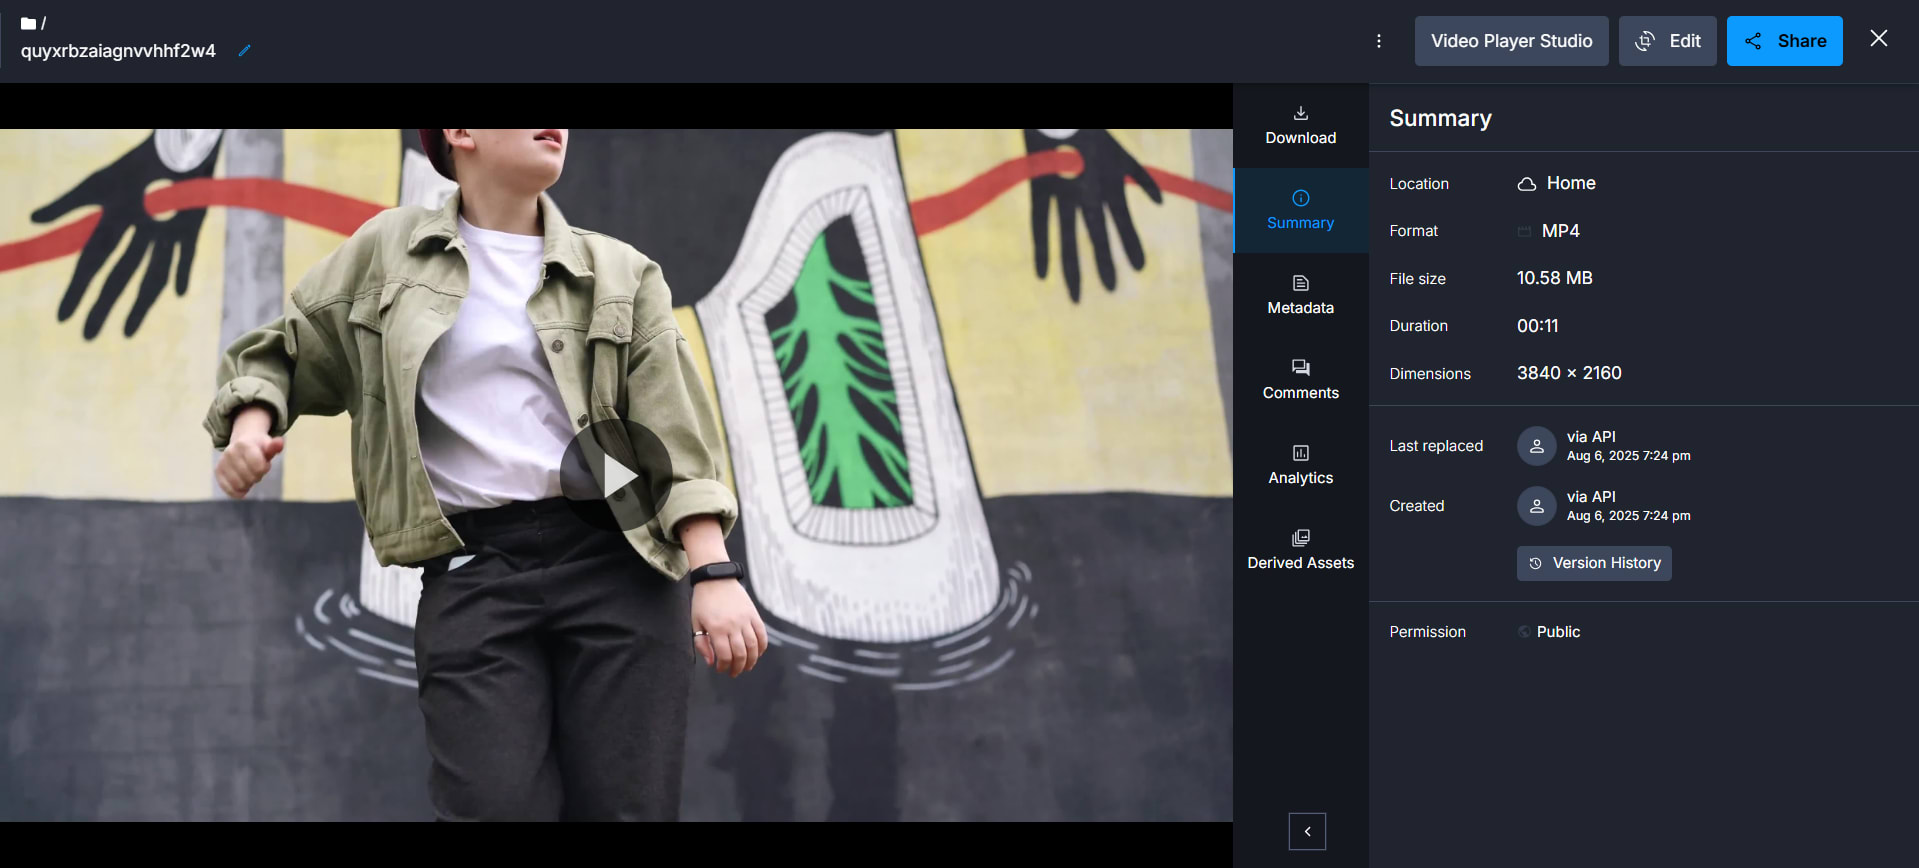
To see if our video has been uploaded, let’s first log in to our account and head over to the Media Library tab. Here we find that our video has indeed been uploaded:

We now open up the video and see that the video has been converted to an MP4 format.
For production workloads or large media libraries, this process can be automated at scale by integrating the same logic into your backend or media processing pipeline. That way, every uploaded video is converted and optimized instantly, ensuring consistent playback across your entire content catalog without manual intervention.
Wrapping Up
The “Video Codec Not Supported” error can be a roadblock, but it’s rarely a dead end. By understanding what codecs are, why these errors occur, and how to fix them, you can get your videos playing again quickly. Simple fixes like switching media players or updating software work in many cases, while format conversion offers a universal solution.
Start using Cloudinary in your workflow today and turn codec errors into a thing of the past. Sign up for a free account and see how effortless video delivery can be!
Frequently Asked Questions
Can I install new codecs on my phone?
No, but you can install a media player app that includes the necessary codecs.
Will converting my video reduce quality?
Some quality loss can occur, but using high‑bitrate settings and efficient codecs like H.265 minimizes it.
Can Cloudinary fix every codec error?
While it can’t repair severely corrupted files, it can convert videos to universally supported formats to prevent most playback issues.
Why does my video play on desktop but not on mobile?
Mobile browsers have stricter codec and container format requirements, so a format that works on desktop may fail on mobile without conversion.

