Did you know the global live streaming market is projected to hit $1 billion by 2027? From gaming tournaments and concerts to webinars and product launches, live streaming is transforming how we share and consume content.
JavaScript, with its native browser APIs and rich ecosystem, makes it possible to create real-time streaming applications that run on almost any device. In this tutorial, we’ll walk through the fundamentals of live streaming in JavaScript, explore popular protocols like HLS and RTMP, use the Media Source API, and see how Cloudinary can help you deliver smooth, optimized live experiences.
Key takeaways:
- Understand the basics of live streaming in JavaScript and its role in modern web apps.
- Learn how to build a simple live streaming setup with JavaScript.
- Explore HLS and RTMP protocols and how JavaScript can work with them.
- Optimize and enhance live streams using Cloudinary
In this article:
- What is Live Streaming?
- How to Set-Up Live Streaming with JavaScript
- About Streaming Protocols in JavaScript
- Using the Media Source API
- Choosing Video and Audio Formats for Your Live Stream
- Improving the Live Streaming Experience Using Cloudinary
- Wrap Up: Maximizing JavaScript Live Streaming
What is Live Streaming?
Live streaming is the real-time transmission of video and audio over the internet to multiple viewers simultaneously. Unlike pre-recorded video, it delivers media as it’s captured, with minimal delay.
Some common use cases for live streaming include Gaming (Twitch, YouTube Live), Events (sports, conferences), and Education (online classes, workshops). The goal is to deliver high-quality video/audio with low latency, ensuring viewers feel like they are part of the action.
How to Set-Up Live Streaming with JavaScript
JavaScript supports live streaming through browser APIs and integration with streaming servers. You’ll typically need:
- A video source (such as a camera or a pre-encoded live feed).
- A streaming server (like OBS Studio).
- A player in the browser to receive and display the stream.
Building Your First Live Stream App with JavaScript
Creating a live stream player in JavaScript doesn’t have to be complicated. At its core, you need just three things: a video element in your HTML, the URL to your live stream (usually an HLS .m3u8 file), and a way to make sure it plays smoothly across browsers. Safari and iOS devices can handle HLS natively, but for most other browsers, you’ll need a helper library like hls.js to bridge the gap.
In this example, we’ll set up a minimal, browser-friendly player that can display any live stream, whether it’s coming from your own media server, a CDN, or a service like Cloudinary, without locking you into a specific platform:
<!-- Include HLS.js from CDN -->
<script src="https://cdn.jsdelivr.net/npm/hls.js@latest"></script>

<!-- Your video element -->
<video id="live-player" controls autoplay muted style="width: 100%; max-width: 640px;"></video>

<script>
  // Replace with your HLS stream URL
  const hlsStreamURL = 'https://example.com/path/to/your/stream.m3u8';

  const video = document.getElementById('live-player');

  if (Hls.isSupported()) {
    // Initialize HLS.js
    const hls = new Hls();
    hls.loadSource(hlsStreamURL);
    hls.attachMedia(video);
    hls.on(Hls.Events.MANIFEST_PARSED, function () {
      video.play();
    });
  } else if (video.canPlayType('application/vnd.apple.mpegurl')) {
    // Native support (Safari, iOS)
    video.src = hlsStreamURL;
    video.addEventListener('loadedmetadata', function () {
      video.play();
    });
  } else {
    console.error('This browser does not support HLS playback.');
  }
</script>
Let’s break down what we are doing:
- First, we load the
hls.jslibrary from the CDN, as some browsers do not support HLS natively. - Next, we add a fallback for native playback for Safari/iOS devices, as they can play
.m3u8directly. - Finally, we add our video with controls and autoplay our video. We also mute our video as it is often required for autoplay to work in browsers.
With this simple script, we can start streaming videos directly in our browsers.
About Streaming Protocols in JavaScript
There are two main protocols that dominate live streaming in JavaScript workflows: HLS and RTMP.
How HTTP Live Streaming (HLS) and JavaScript Work Together
HLS, developed by Apple, splits the stream into short chunks and serves them over HTTP.
- Pros: Reliable under changing network conditions; plays natively on Safari/iOS; works in most browsers with
hls.js. - Cons: Slightly higher latency than RTMP.
Understanding Real-Time Messaging Protocol (RTMP) and JavaScript
RTMP was designed for Flash but remains the standard for sending video from an encoder to a streaming server.
- Pros: Low latency for contribution streams.
- Cons: Can’t be played directly in browsers; usually converted to HLS or DASH for playback.
Using the Media Source API
For advanced developers, the Media Source Extensions (MSE) API allows you to feed media segments directly into an HTML5 <video> element. Instead of relying on a predefined file URL, you can dynamically append video and audio chunks as they’re received, enabling features like custom buffering strategies, adaptive bitrate streaming, or ultra-low latency playback.
You should consider using MSE when you need complete control over how your stream is handled in the browser. It’s also a good fit for low-latency streaming setups where minimal delay is critical, as well as for browser-based encoders or mixers that generate and push media segments directly in real time.
However, if your goal is simply to play back standard HLS or DASH streams, MSE may add unnecessary complexity. In those cases, libraries like hls.js or dash.js are far easier to implement and handle most of the heavy lifting for you.
Choosing Video and Audio Formats for Your Live Stream
The formats you choose can make or break your live streaming experience. The right combination ensures your viewers get smooth playback, clear visuals, and reliable performance. While H.264 (video) and AAC (audio) are the most universally supported pairing, newer codecs like VP9 or AV1 can give you better compression and lower bitrates, if you’re willing to manage compatibility trade-offs.
How to Pick the Best Video and Audio Formats
There rarely is a best video file format, with most of them having specific tradeoffs for quality or performance. Use the guidelines below to choose formats that strike a balance between broad compatibility, playback quality, and bandwidth efficiency:
- Aim For Compatibility First: Use H.264 for video and AAC for audio so the stream works on virtually every browser and device.
- Add Modern Codecs For Optimization: Offer VP9 or AV1 renditions to support lower bitrate without sacrificing visual quality.
- Consider Your Audience’s Devices: Prioritize formats that match your viewers’ typical hardware and network conditions (mobile vs. desktop, fast vs. constrained networks).
- Test Before Going Live: Verify playback across multiple browsers, OS versions, and connection speeds, and prepare fallbacks (transcoding or alternative streams) for unsupported clients.
Improving the Live Streaming Experience Using Cloudinary
Cloudinary provides a fully managed live streaming service that can receive RTMP streams and deliver them as HLS to any device.
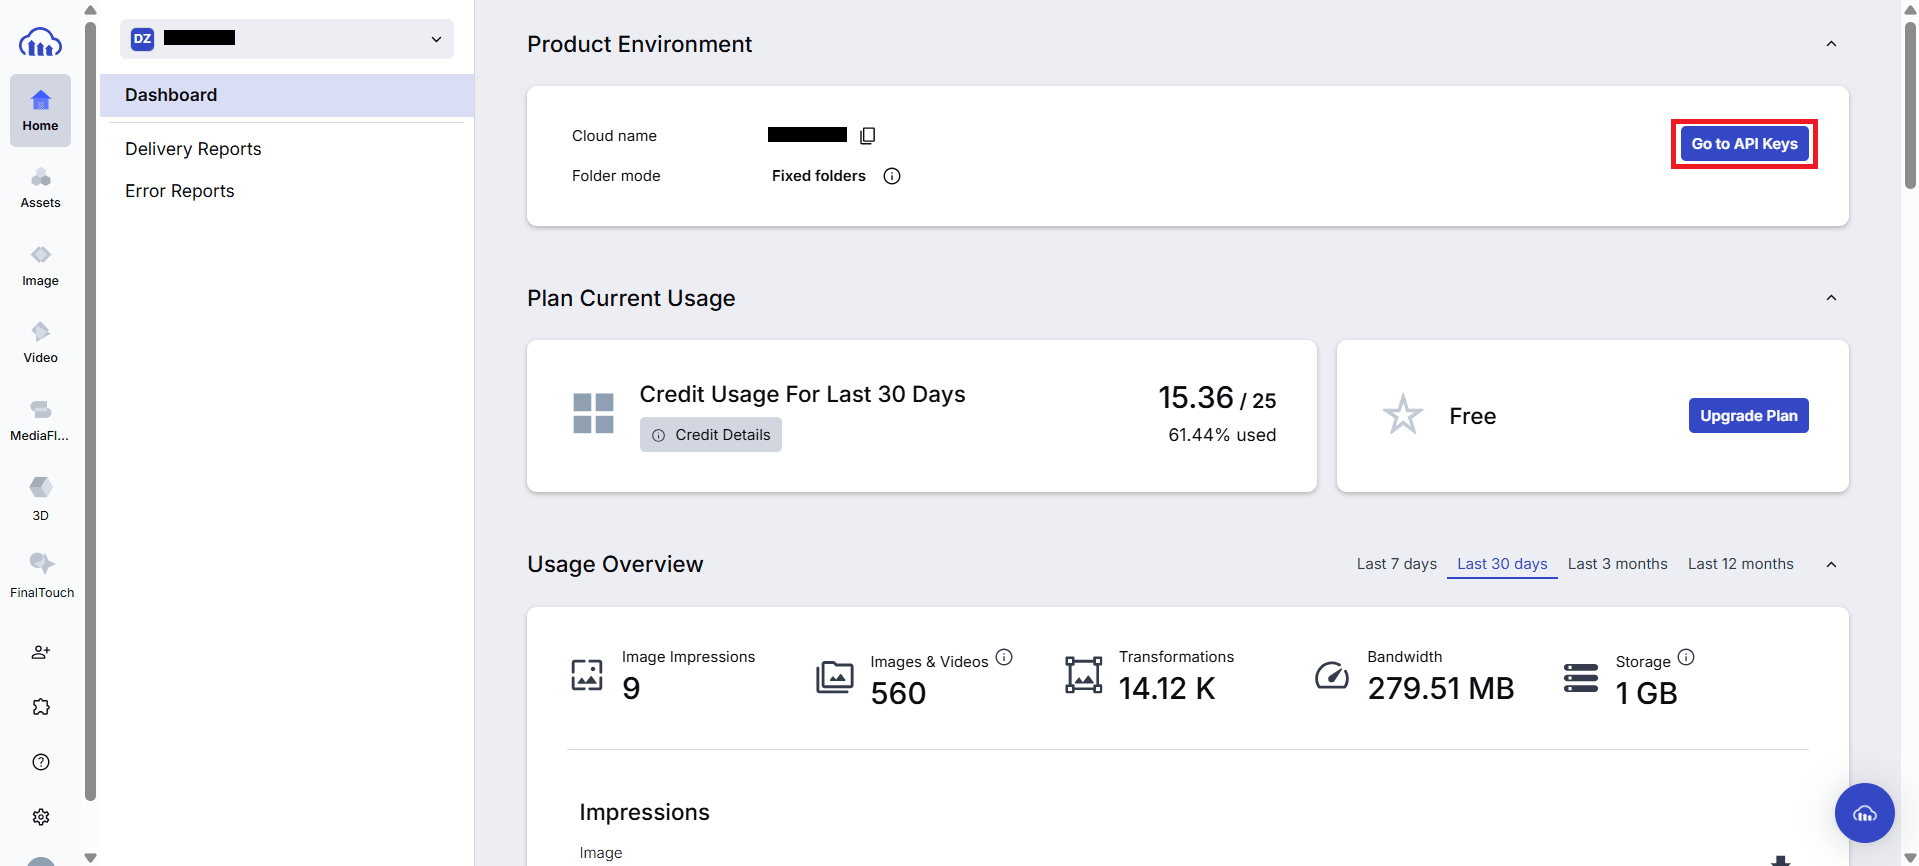
Before we begin, you will need to sign up for a Cloudinary account. So, head over to Cloudinary and sign up for a free account. Next, we need to retrieve our API credentials, so open up Cloudinary and log in to your account.
Once you log in, you will be greeted with your Dashboard. Here, click on the Go to API Keys button, and copy your Cloud Name, API key, and API secret – we will need them later.
Create a Live Stream
Option A: Using the Cloudinary Console
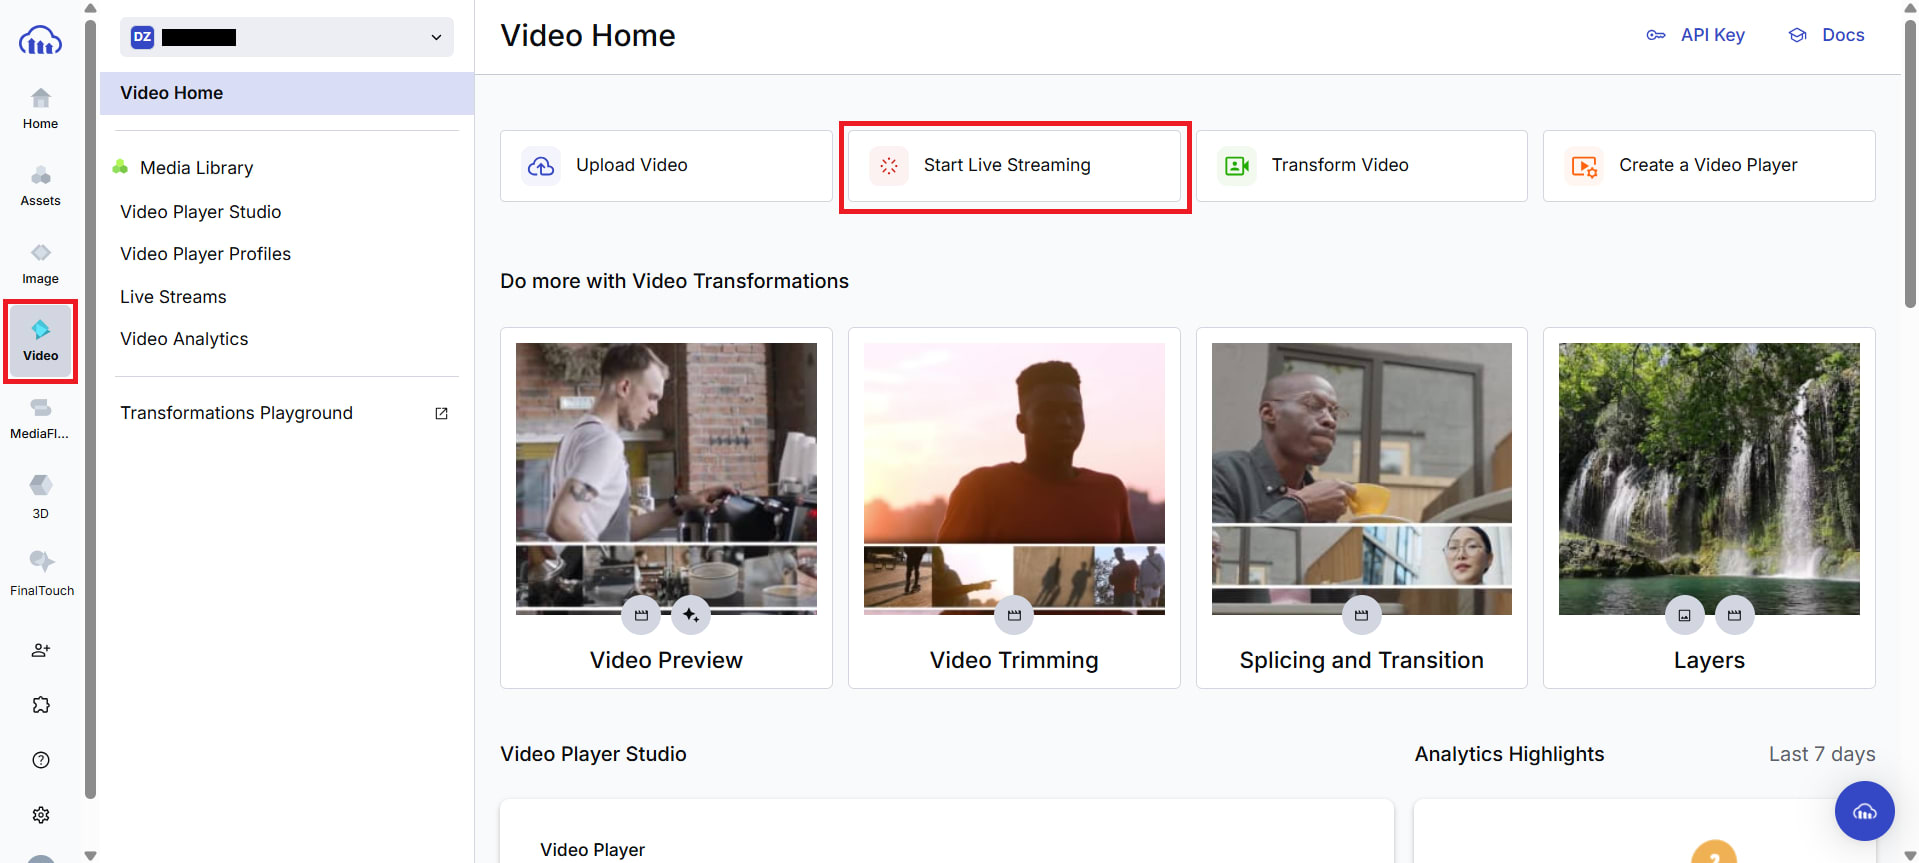
The Cloudinary Console makes it very easy to set up and start your live streams. To start your stream, navigate to Video on the left menu panel and then click on Start Live Streaming.
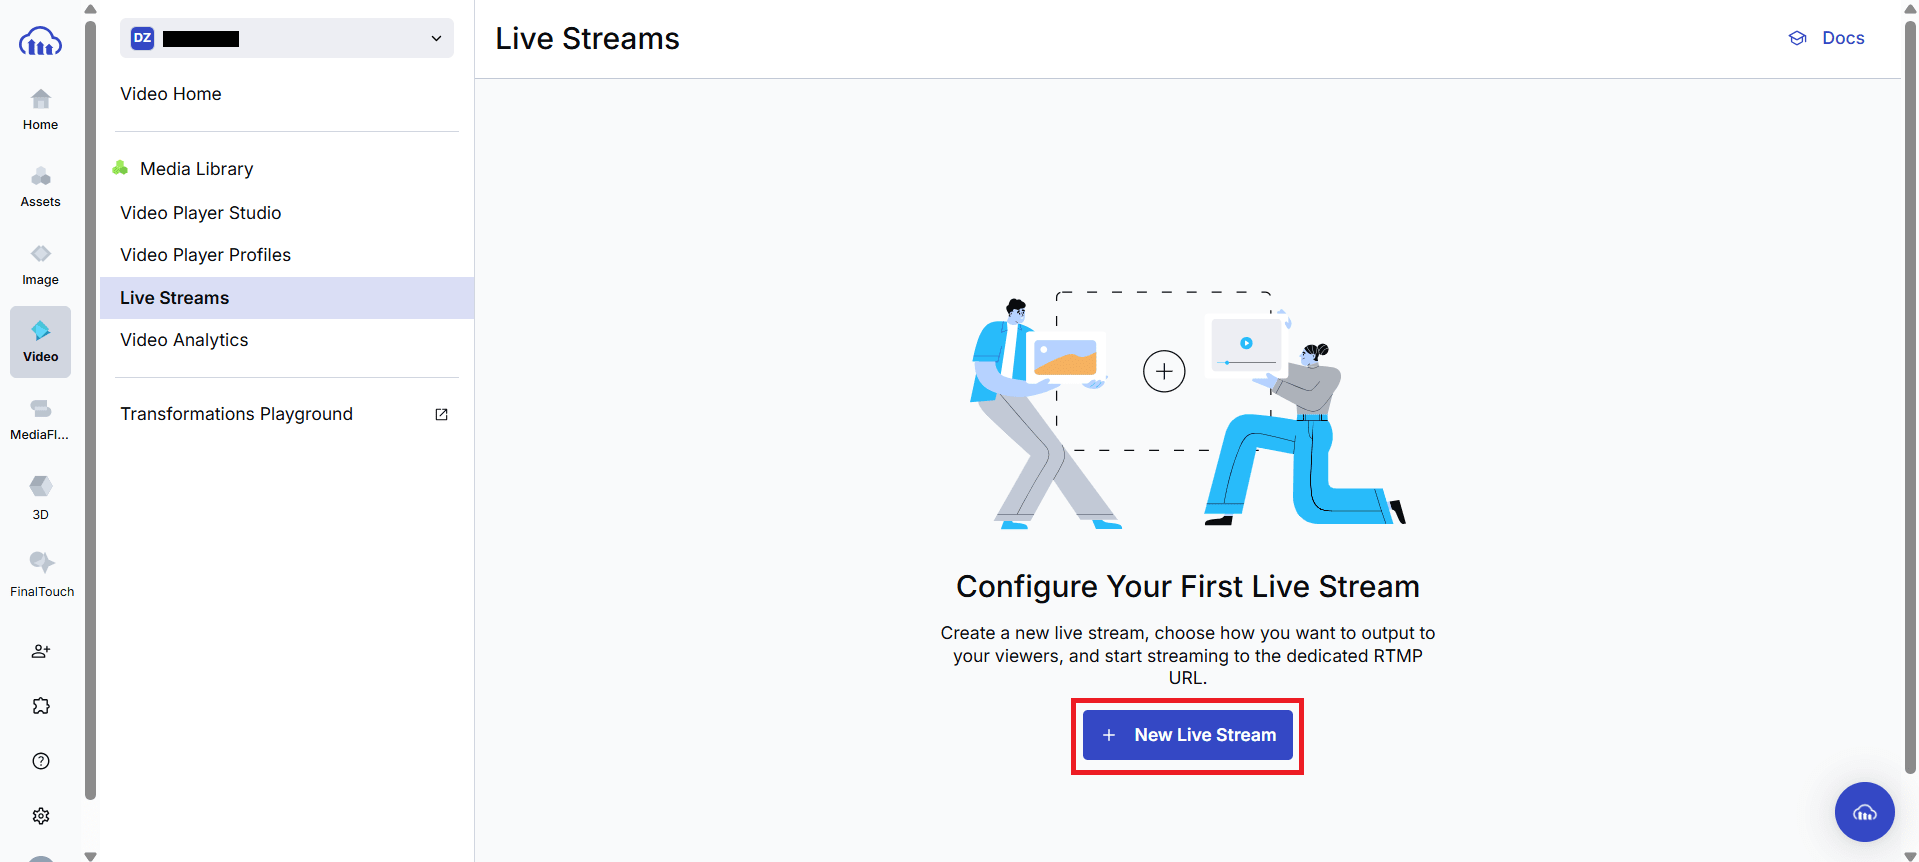
Now, click on the New Live Stream button to start your live stream. You can name it whatever you like, and adjust the idle timeout if needed. For now, we will name our live stream as Demo.
Once your live stream is created, Cloudinary will provide you with these important values:
- RTMP input URI (e.g.,
rtmp://live.cloudinary.com/...) - Stream Key (a unique token)
- HLS output URL (ends with
.m3u8)
Keep a note of these values – we’ll use them when connecting your encoder or embedding the stream.
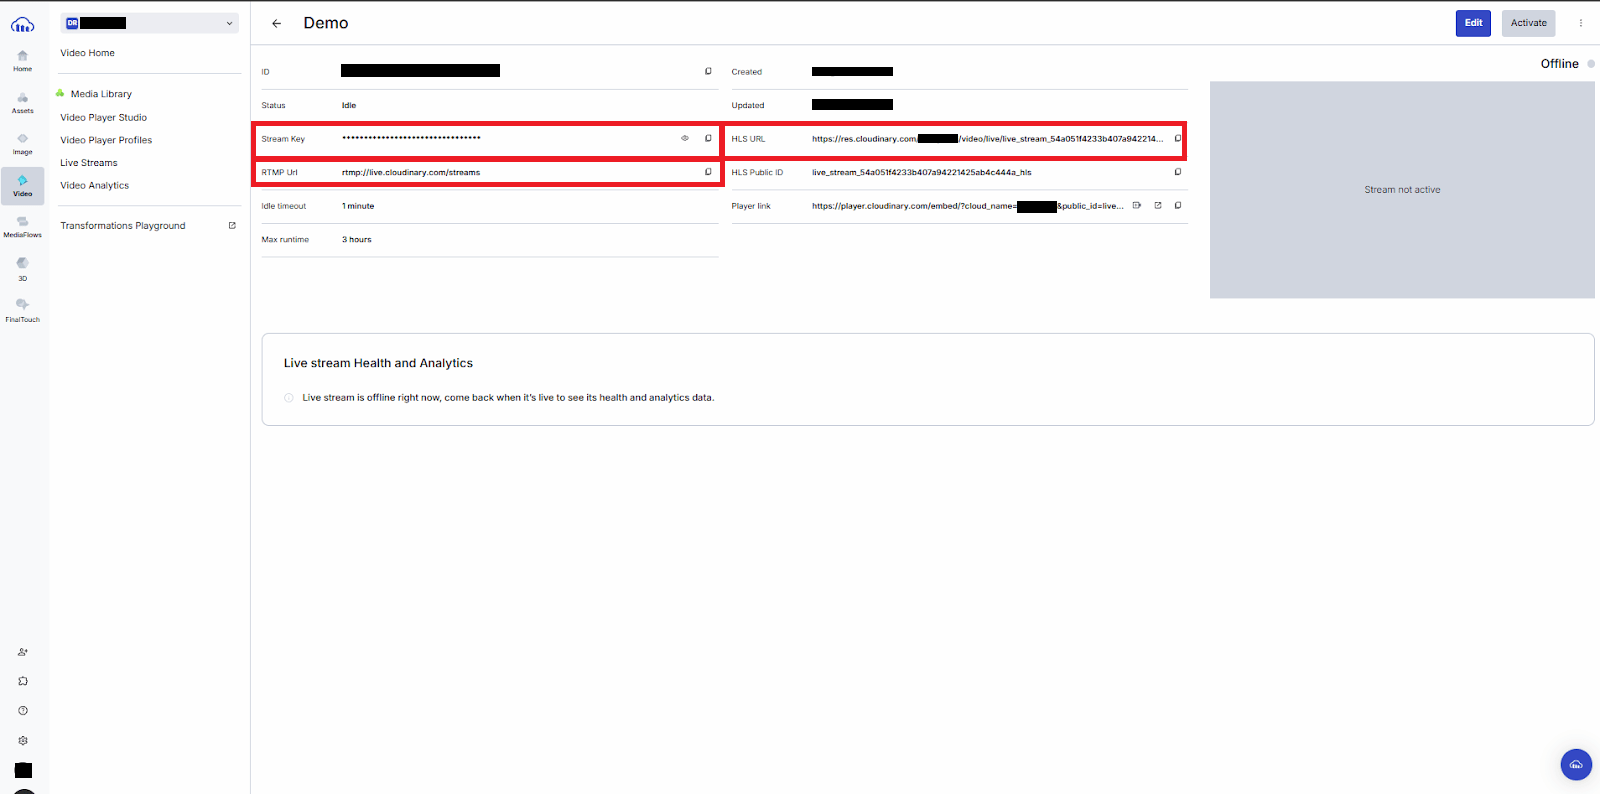
Note that our stream status is currently showing “idle.” Once we start streaming, the status will change to “live”.
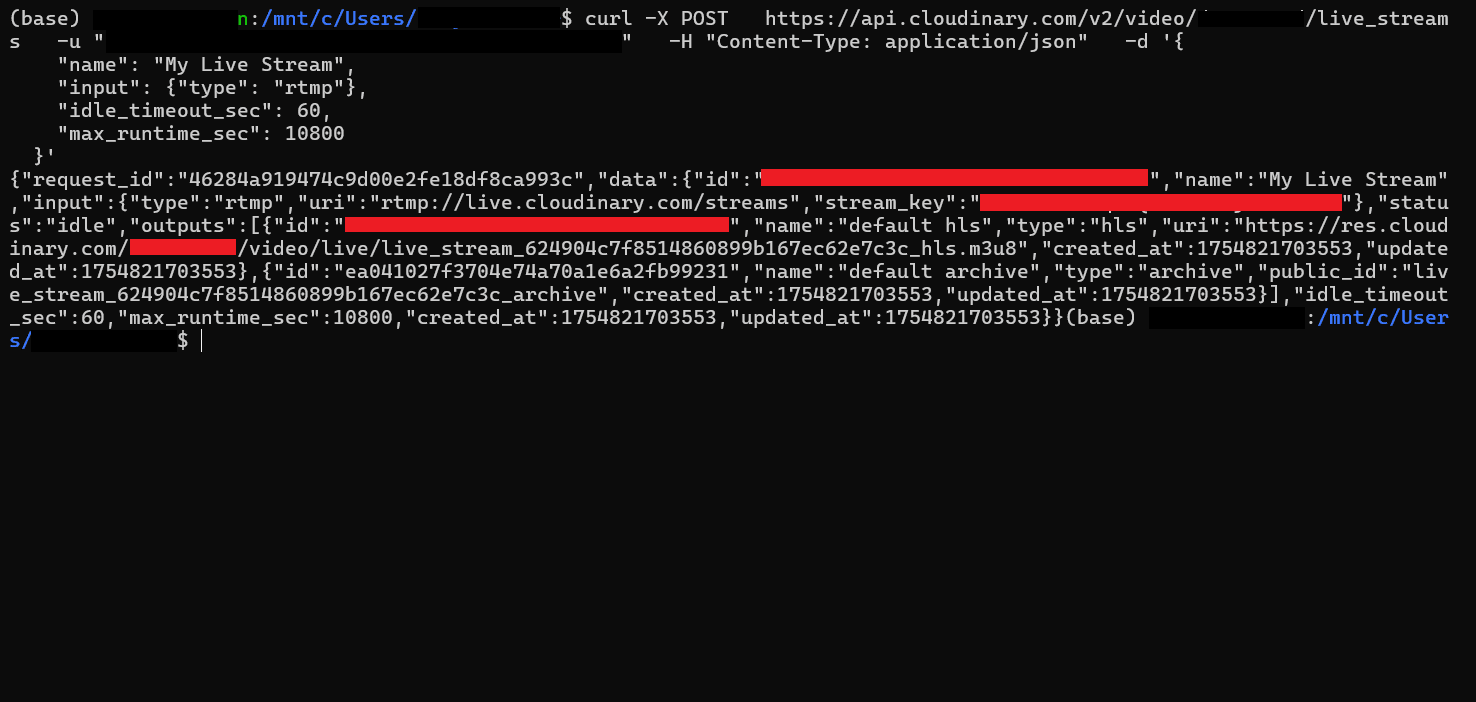
Option B: Use the Cloudinary API
You can use the Cloudinary console to create your live streams; however, if you prefer to create them programmatically, Cloudinary has you covered. Cloudinary enables developers to programmatically create streams using POST commands, allowing them to automate their workflows.
To create a stream, all you need to do is run the following POST command:
curl -X POST \
  https://api.cloudinary.com/v2/video/{YOUR_CLOUD_NAME}/live_streams \
  -u "API_KEY:API_SECRET" \
  -H "Content-Type: application/json" \
  -d '{
    "name": "My Live Stream",
    "input": {"type": "rtmp"},
    "idle_timeout_sec": 60,
    "max_runtime_sec": 10800
  }'
Remember to replace YOUR_CLOUD_NAME, API_KEY, and API_SECRET with your actual Cloudinary credentials.
Note: In the Cloudinary Live Streaming docs, {token} refers to your API key and secret combined and base64-encoded. Using curl -u "key:secret", you can handle the encoding automatically. To do it manually, start by encoding your API key and secret as follows:
echo -n "YOUR_API_KEY:YOUR_API_SECRET" | base64
Next, using the resulting token from the echo command, replace the -u "key:secret" in the curl command with the following:
-H "Authorization: Basic {token}"
Once you run your command, your API response will include the RTMP server URI, stream key, and HLS playback endpoint, just like the Console method.
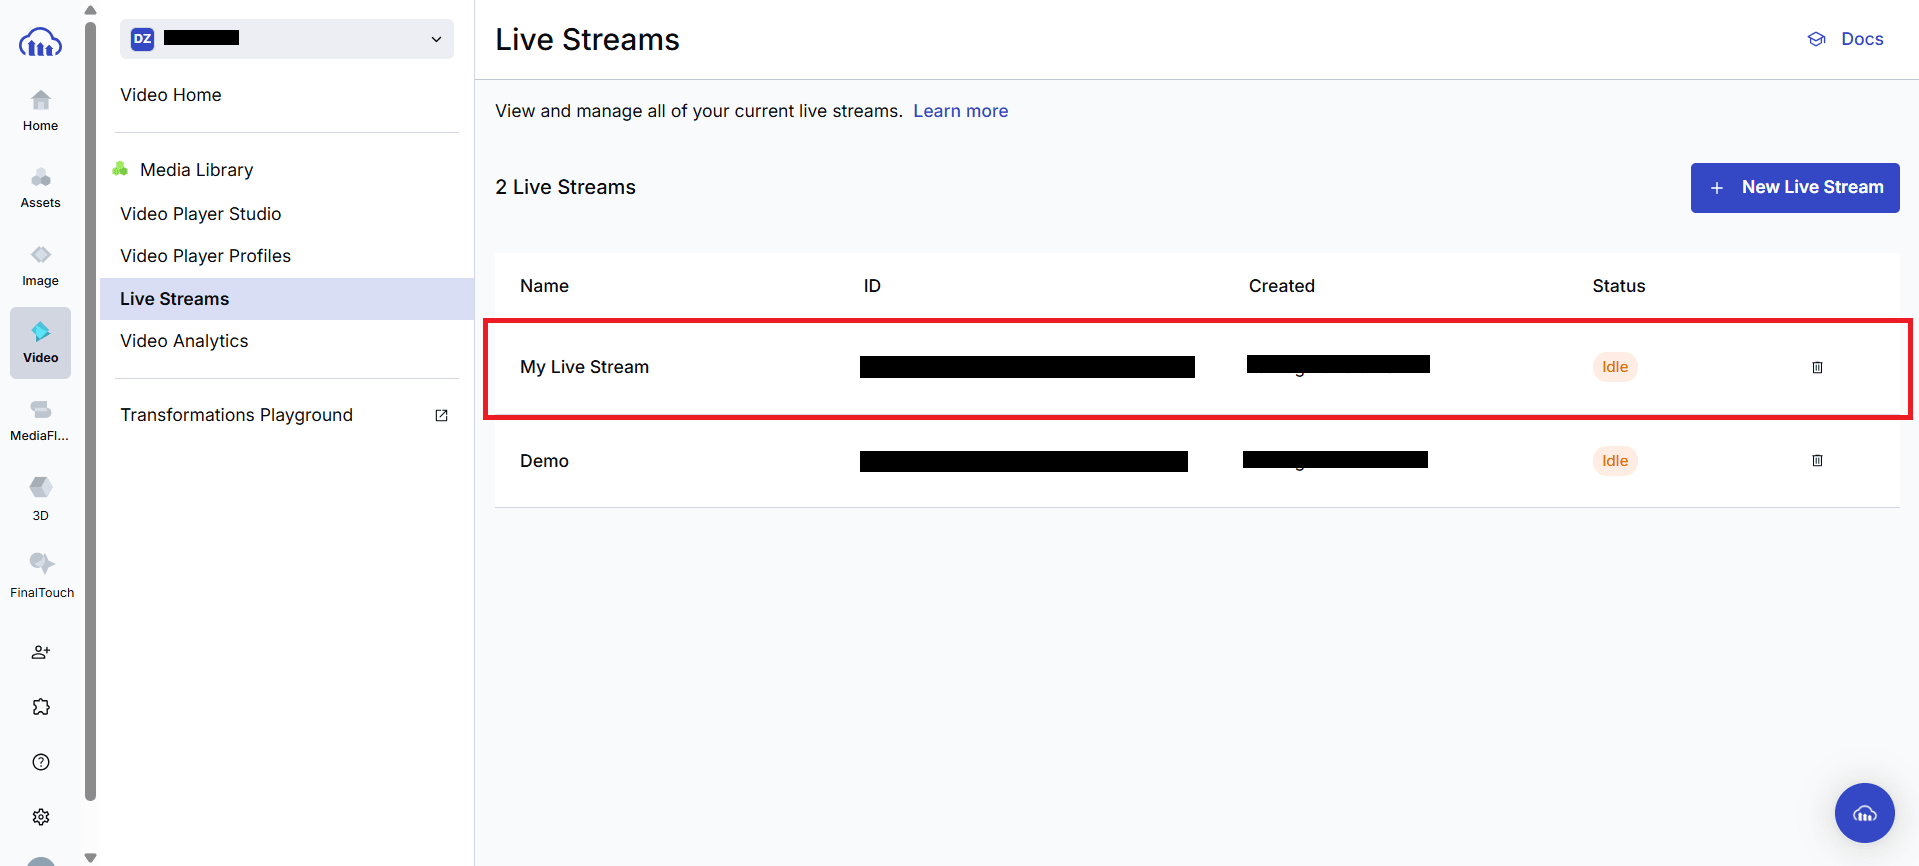
You can confirm the stream’s creation by checking the Live Streams tab in your Cloudinary account.
Configure OBS
Now that our live stream is set up, all we need to do is start streaming. To do this, we will need an RTMP client such as OBS and stream to the input.uri provided in the live stream response.
So let’s begin by downloading and installing the OBS client on our computer. Once installed, open up OBS Studio, head over to the Settings tab.
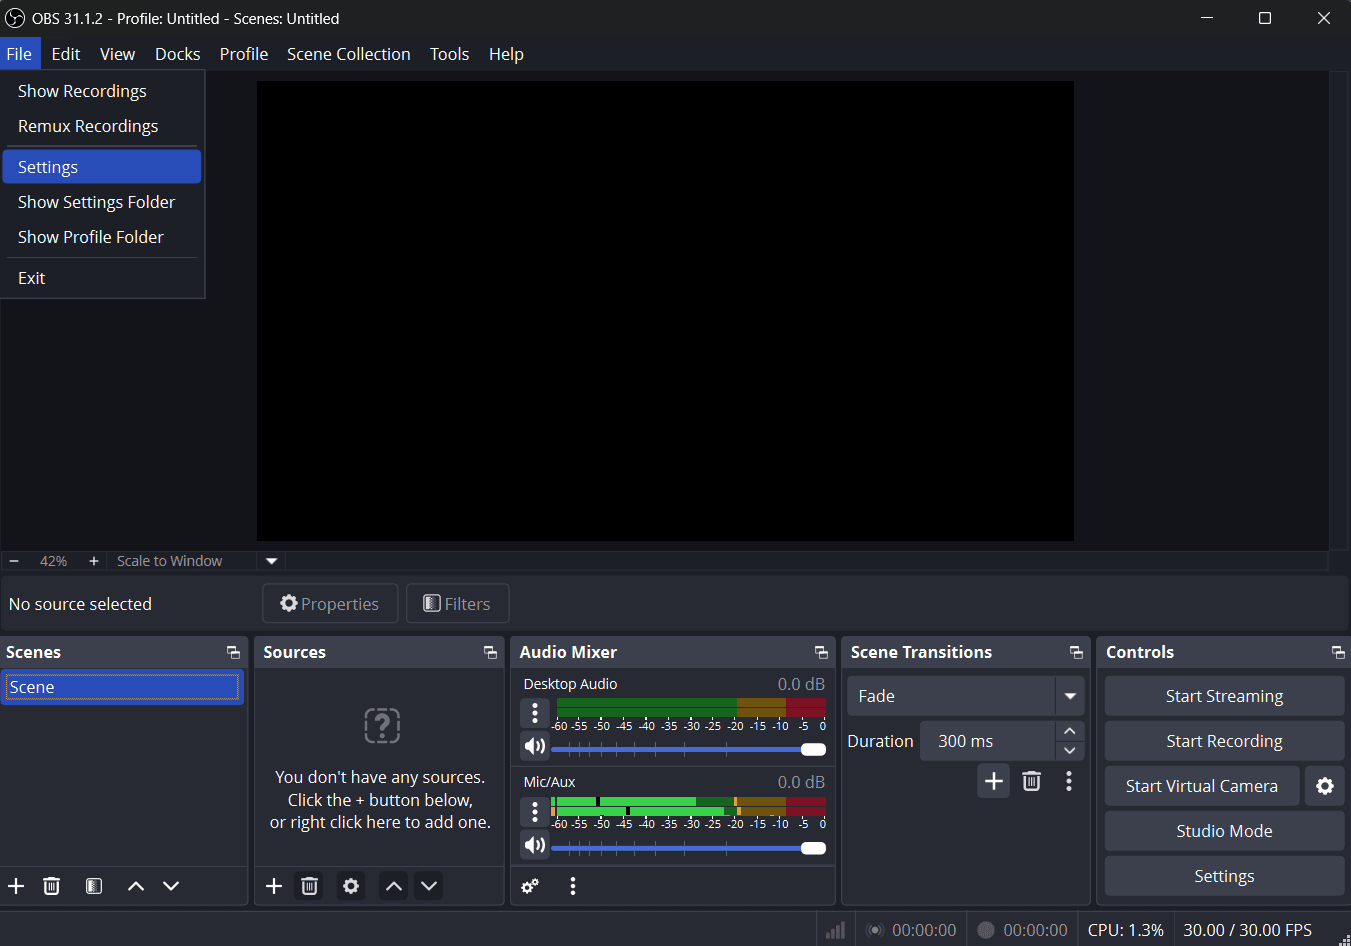
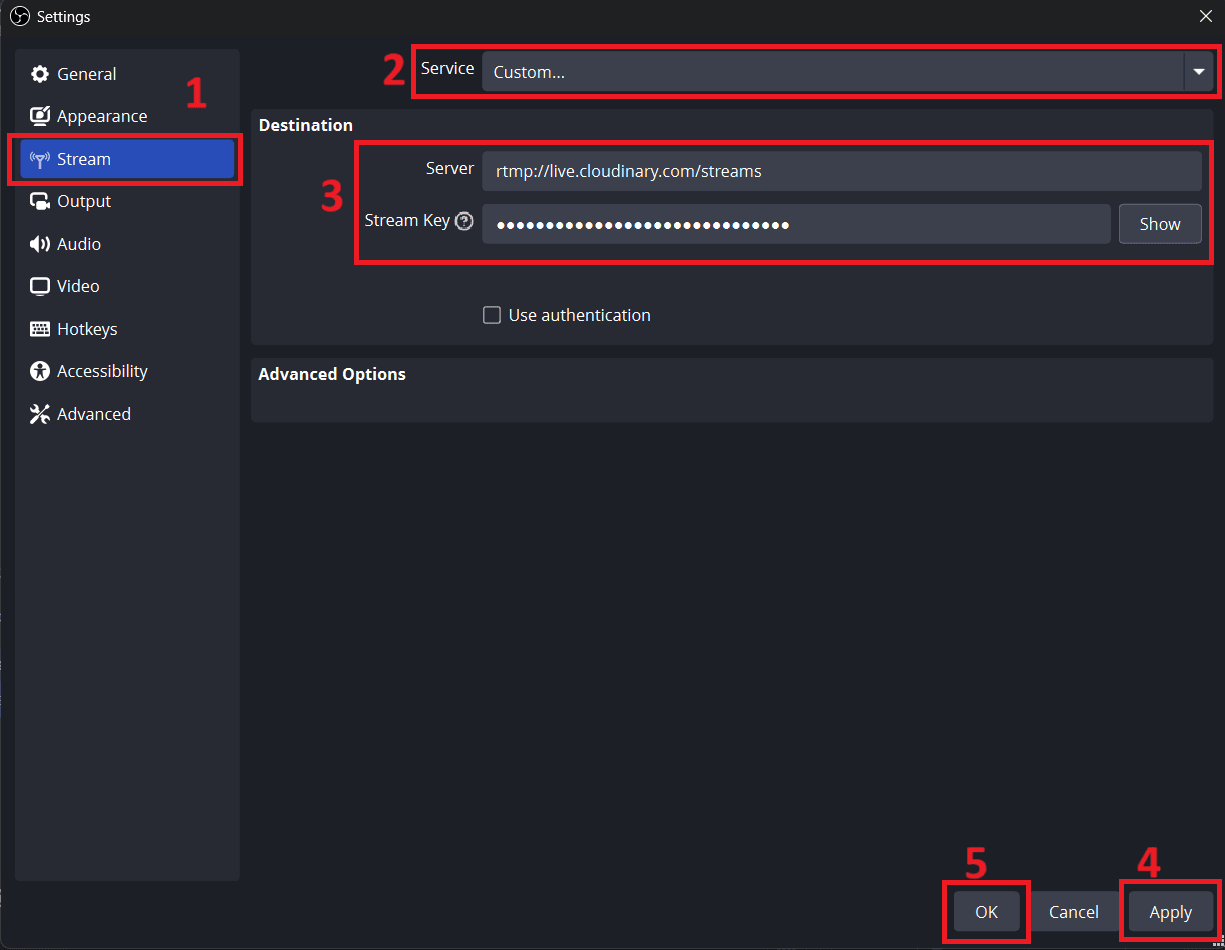
Next, head to the Stream tab, select the Service as Custom, add in your RTMP URL in the Service input, and add in your Cloudinary Stream key. Once this is completed, click on Apply and then Ok to save your changes.
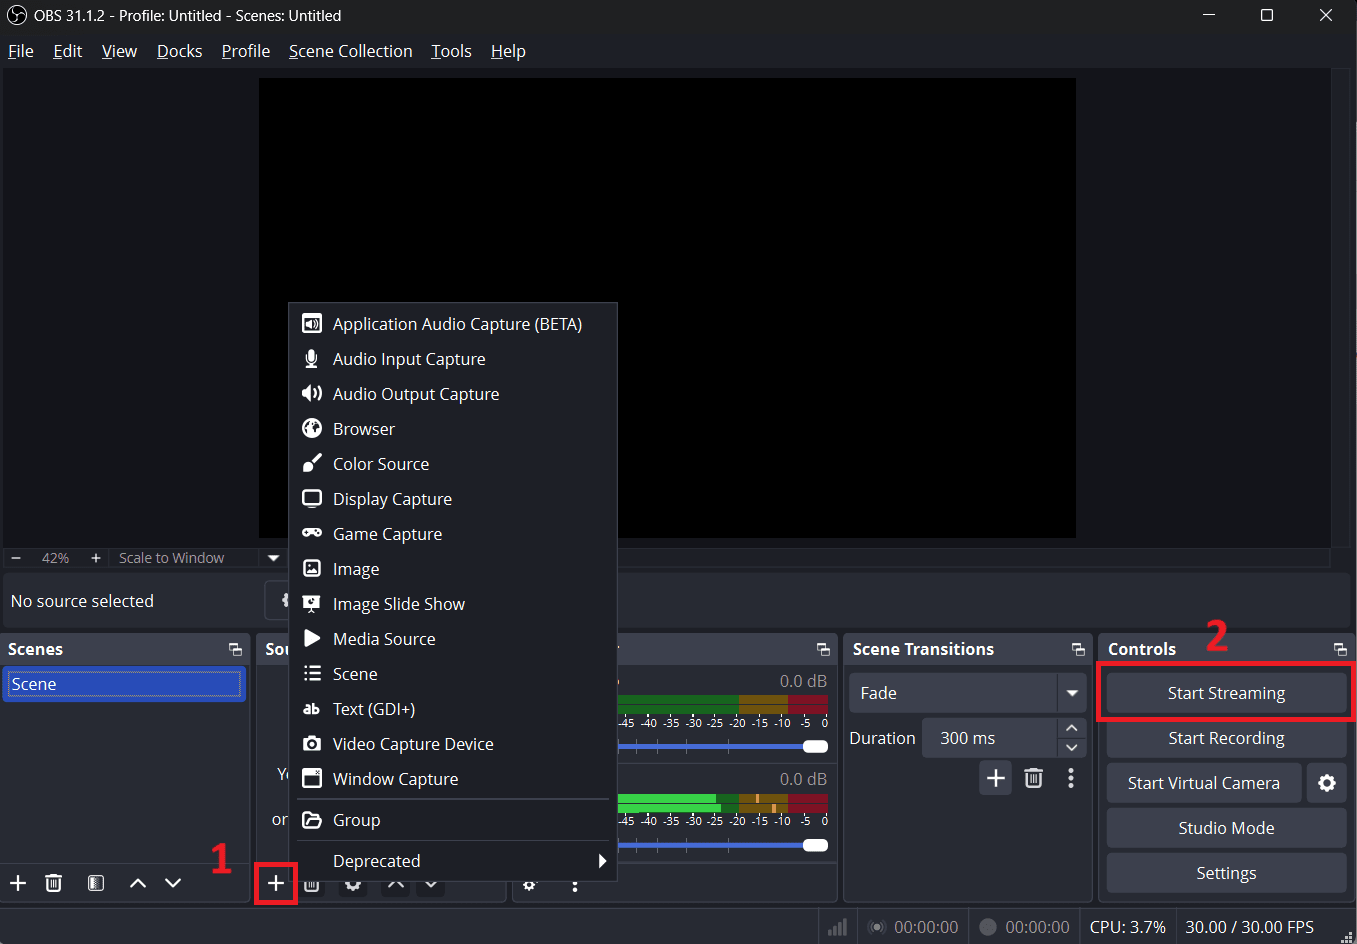
Now, click on the + button in your Source tab and select the type of media you want to stream. For now, we will be streaming elephants.mp4 from the Cloudinary demo cloud. Once you’ve selected your media, click on the Start Streaming button to start your streaming.
Now, head over to your Cloudinary account and check your stream. If your stream shows “idle,” don’t worry, it usually takes a moment to go from “idle” to “live.”
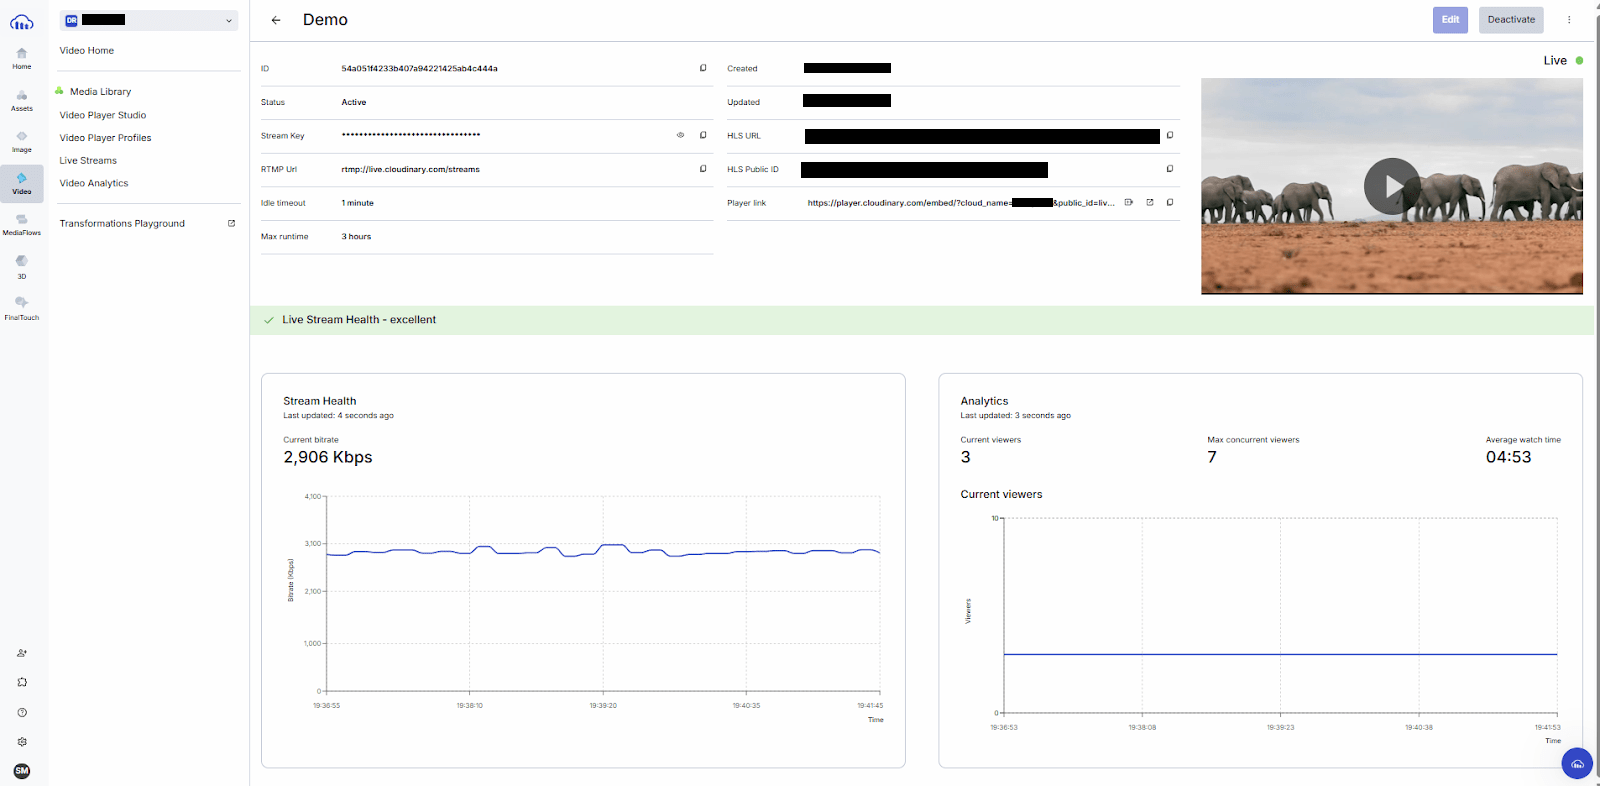
Once your stream starts running, the Cloudinary Console provides real-time metrics such as viewer count, stream duration, and connection status, great for monitoring performance during broadcasts.
Embedding Your Stream on Your Site
Once your live stream is running, the next step is to make it accessible to your audience. Cloudinary provides two simple ways to embed your stream on a website. You can either use the Cloudinary Video Player for a fully customizable experience or embed it instantly using a lightweight iframe.
Option A: Self-hosted Cloudinary Video Player4
The Cloudinary Video Player gives you complete flexibility over the look, feel, and functionality of your live stream. Here is what our code looks like:
<link rel="stylesheet" href="https://cdn.jsdelivr.net/npm/cloudinary-video-player/dist/cld-video-player.min.css"/>
<script src="https://cdn.jsdelivr.net/npm/cloudinary-video-player/dist/cld-video-player.min.js"></script>
<video id="live-player" class="cld-video-player cld-fluid vjs-live" controls></video>
<script>
  const player = cloudinary.videoPlayer('live-player', {
    cloudName: 'YOUR_CLOUD_NAME',
    sourceTypes: ['hls']
  });
  player.source('live_stream_{stream_id}_hls', { type: 'live' });
</script> " />
Here, we start by including the player’s stylesheet and JavaScript library, which load the necessary styles and scripts to render the player in the browser. The <video> element with the cld-video-player and cld-fluid classes acts as the placeholder for our live stream, ensuring it scales responsively to fit different screen sizes.
In the script section, the cloudinary.videoPlayer() method initializes the player by linking it to the video element and providing configuration options. The cloudName property identifies our Cloudinary account, while sourceTypes: ['hls'] specifies that the stream will be delivered via HLS for adaptive playback. Finally, the player.source() call sets the source of the video to your live stream using its public ID format live_stream_{stream_id}_hls, with {stream_id} replaced by the actual stream ID provided by Cloudinary.
This approach gives you full control and makes your player responsive and adaptive.
Option B: Quick Embed via Iframe
If you need to get your stream online immediately without setting up a custom player, the iframe method offers a fast and reliable solution. An <iframe> works like a window into an existing player hosted by Cloudinary, requiring only the correct URL parameters to display your live video. The cloud_name parameter connects the embed to your Cloudinary account, while the public_id points to your live stream’s HLS source.
The player[source_types][]=hls ensures HLS delivery, and player[type]=live tells the player to treat the content as a live stream. Here is what the code looks like:
<iframe
  src="https://player.cloudinary.com/embed/?cloud_name=YOUR_CLOUD_NAME&public_id=live_stream_{stream_id}_hls&player[source_types][]=hls&player[type]=live"
  width="640" height="360" frameborder="0" allow="autoplay; fullscreen">
</iframe>
All you need to do is simply replace YOUR_CLOUD_NAME and {stream_id} with your own details, and your live video will be playable instantly. Since the iframe is self-contained, you do not need to add any additional styles or scripts, making it perfect for quick sharing, embedding in CMS platforms, or including on pages where you don’t need advanced customization.
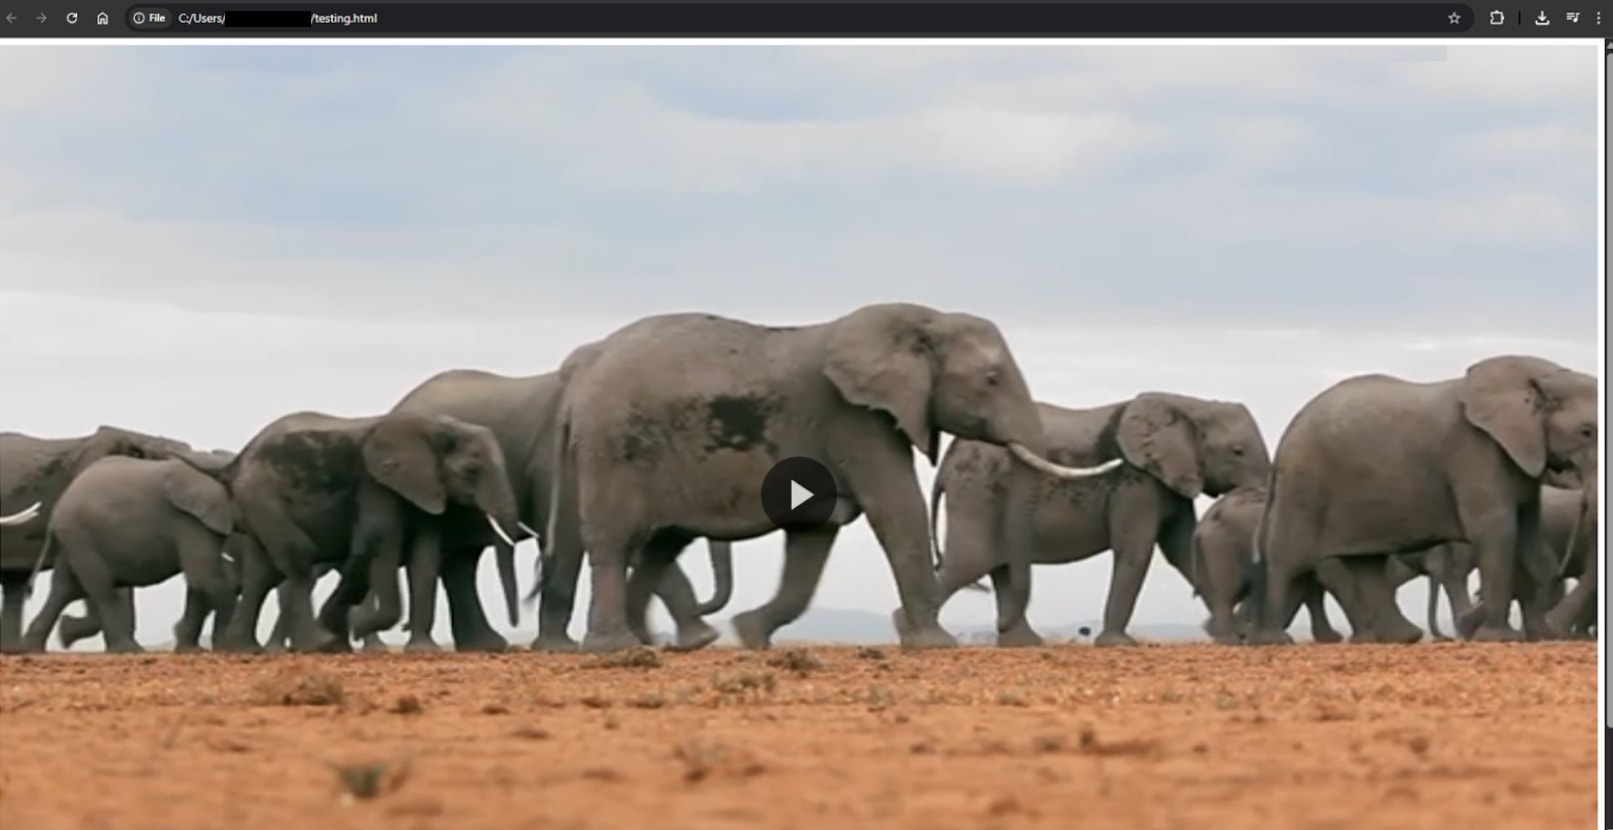
Here is what our stream looks like:
Wrap Up: Maximizing JavaScript Live Streaming
Live streaming in JavaScript is no longer niche; it’s a core way people connect, learn, and entertain in real time. With JavaScript, you can build streams that work across devices, integrate seamlessly into websites, and scale to reach audiences anywhere.
We’ve covered how to set up streams using both JavaScript and Cloudinary, explored HLS and RTMP protocols, embedding options, and tips for choosing the right video/audio formats. The formula for success is simple: prepare well, pick the right formats, and make your streams easy to access.
Create a free Cloudinary account and launch your first stream today! Embed it, share it, and start engaging your audience in real time.
FAQs
Can I live stream directly from my browser without a streaming server?
Not quite. While JavaScript APIs like getUserMedia() can capture video and audio, you’ll still need a streaming server or service (like Cloudinary) to deliver your stream reliably to multiple viewers.
What’s the difference between HLS and RTMP?
HLS (HTTP Live Streaming) is the standard for browser playback and works by splitting video into small chunks over HTTP. RTMP (Real-Time Messaging Protocol) is older, optimized for sending streams from encoders to servers, but it’s not supported directly in browsers. Most modern setups use RTMP for ingest and HLS for playback.
Can I stream pre-recorded content as if it’s live?
Yes. Tools like OBS Studio let you schedule and stream pre-recorded videos to your RTMP endpoint, making them appear live to viewers. This is great for planned events where you want a “live” experience without recording in real time.

