
Videos are one of the most commonly used digital assets online, whether for tutorials, product demos, or social media platforms. As a developer, if you’re developing a video upload platform, for example, it’s common practice to show users a preview to confirm that they have selected the right video before uploading. A video preview can also grab viewers attention, increasing clickthrough rates and boosting engagements.
These video previews are also known as thumbnails – a small image that represents the video and gives users a quick idea of what to expect.
Key takeaways:
- How to use PHP to generate and serve thumbnails from videos with and without FFmpeg
- How to serve thumbnails directly in the browser
- Scaling things up using services like Cloudinary
In this article:
- Using HTML Canvas to Generate Thumbnail in PHP
- Generating Thumbnails With FFmpeg in PHP
- Scaling with Cloudinary
Using HTML Canvas to Generate Thumbnail in PHP
The HTML <canvas> element is a container for graphics elements including raster images, 2D and 3D animations, and more.
This section explains how the canvas element captures preview images (thumbnails) from videos uploaded by users through an HTML input field.
- The user uploads a video through the input element (
input type="file") - Once the video has been selected, we use JavaScript to seek a random point in the video and display it on a hidden canvas element.
- Finally, we convert the canvas drawing into an image file, effectively generating a thumbnail.
Now let’s see how this works using code.
Create a file named index.php and add the following code to it:
<?php
?>
<!DOCTYPE html>
<html>

<head>
    <title>Thumbnail Generator</title>
    <script src="https://cdn.tailwindcss.com"></script>
</head>

<body class="bg-gray-100 font-sans p-6 md:p-10">

    <h2 class="text-2xl md:text-3xl font-bold mb-4">Upload a Video to Generate Thumbnail</h2>

    <form>
        <input type="file" id="videoUpload" accept="video/*" class="
            block w-1/2 text-sm text-gray-700
            file:mr-4 file:py-2 file:px-4
            file:rounded-full file:border-0
            file:text-sm file:font-semibold
            file:bg-blue-50 file:text-blue-700
            hover:file:bg-blue-100
            cursor-pointer
        ">
    </form>

    <video id="video" controls style="display:none;"></video>
    <canvas id="canvas" style="display:none;"></canvas>

    <h3 class="text-xl font-semibold mt-6 mb-2">Generated Thumbnail:</h3>
    <img id="thumbnail" src="https://placehold.co/400x225/E5E7EB/4B5563?text=Thumbnail%20Will%20Appear%20Here"
        alt="Thumbnail will appear here"
        class="mt-4 border-2 border-gray-300 max-w-full md:max-w-md rounded-lg shadow-lg">
    <script>
        const fileInput = document.getElementById("videoUpload");
        const video = document.getElementById("video");
        const canvas = document.getElementById("canvas");
        const thumbnail = document.getElementById("thumbnail");

        fileInput.addEventListener("change", function (event) {
            const file = event.target.files[0];
            if (!file) return;

            const url = URL.createObjectURL(file);
            video.src = url;
            video.load();

            video.addEventListener("loadedmetadata", function () {
                // Seek to a random point in the video
                const randomTime = Math.random() * video.duration;
                video.currentTime = randomTime;
            }, { once: true });


            video.addEventListener("seeked", function () {
                // Draw the video frame on canvas
                const w = video.videoWidth;
                const h = video.videoHeight;
                canvas.width = w;
                canvas.height = h;
                const ctx = canvas.getContext("2d");
                ctx.drawImage(video, 0, 0, w, h);

                // Convert canvas to image and set as thumbnail
                const dataURL = canvas.toDataURL("image/jpeg");
                thumbnail.src = dataURL;

                // Free memory
                URL.revokeObjectURL(url);
            }, { once: true });
        });
    </script>

</body>
</html>
This is what the page looks like:
When you select a video, you should see the thumbnail generated as shown below:
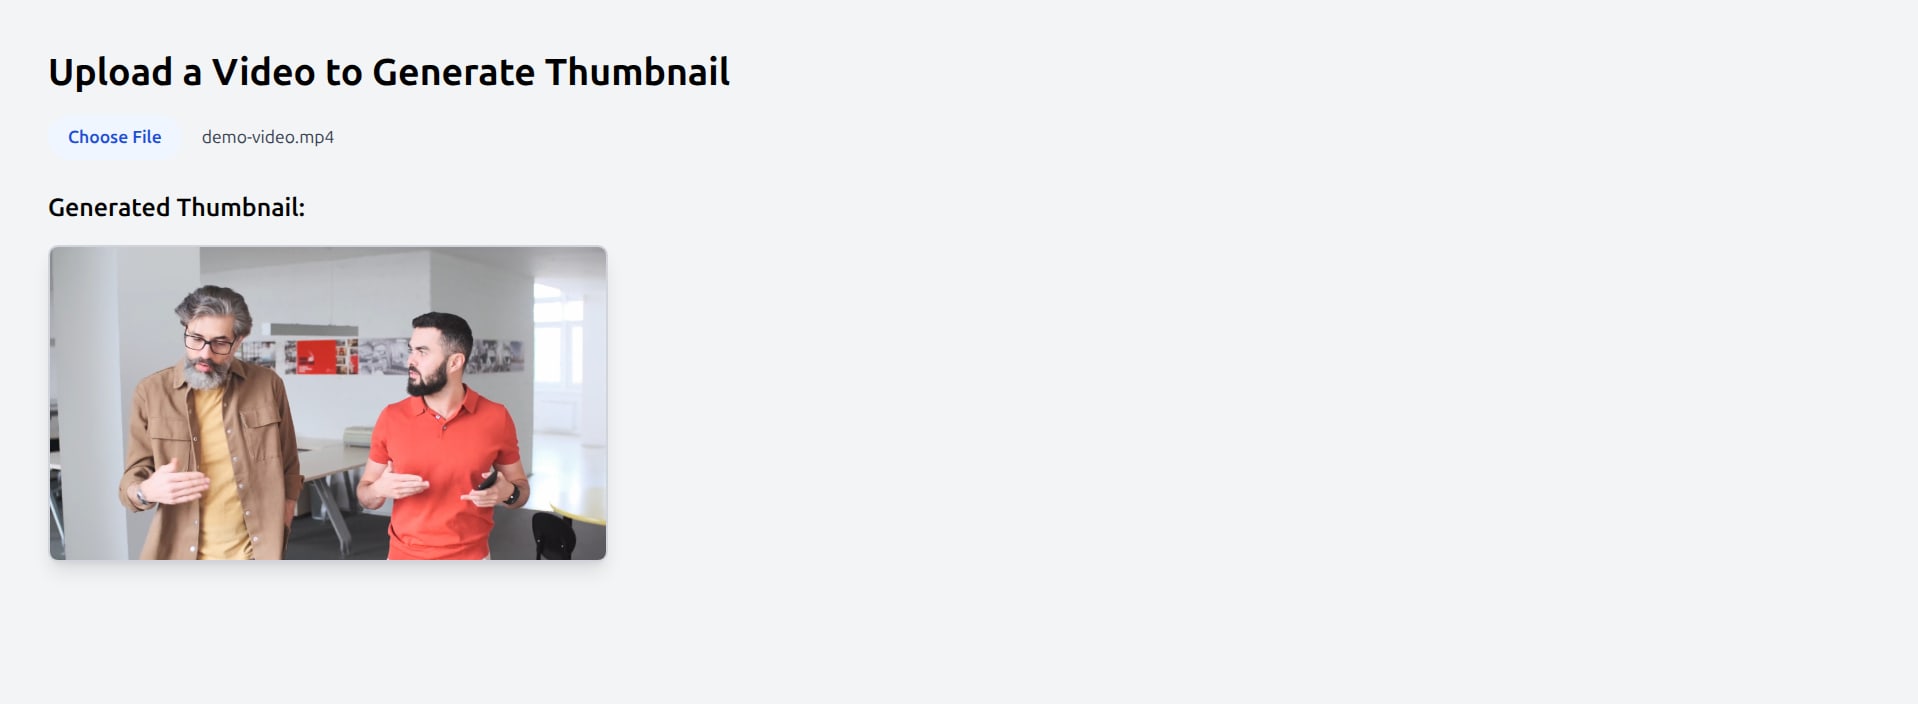
In the above example, our code generates the thumbnail by randomly selecting a point in the video. We can rewrite our code so users can manually choose which point of the video they want to capture for the thumbnail.
Create Slider to Select a Video Frame for The Thumbnail
To create a slider, we’ll use the input element with a type of ‘range’ <input type="range">, which allows us to select a numeric within a range of values.
Replace the code in index.php with the following:
<?php
?>
<!DOCTYPE html>
<html>
<head>
    <title>Thumbnail Generator</title>
    <script src="https://cdn.tailwindcss.com"></script>
</head>
<body class="bg-gray-100 font-sans p-6 md:p-10">

    <h2 class="text-2xl md:text-3xl font-bold mb-4">Upload a Video to Generate Thumbnail</h2>

    <form>
        <input type="file" id="videoUpload" accept="video/*" class="
            block w-1/2 text-sm text-gray-700
            file:mr-4 file:py-2 file:px-4
            file:rounded-full file:border-0
            file:text-sm file:font-semibold
            file:bg-blue-50 file:text-blue-700
            hover:file:bg-blue-100
            cursor-pointer
        ">
    </form>

    <video id="video" controls style="display:none;"></video>
    <canvas id="canvas" style="display:none;"></canvas>

    <div id="controls" style="display:none;" class="mt-6 flex flex-col md:flex-row items-start md:items-center space-y-4 md:space-y-0 md:space-x-4">
        <label for="timeSlider" class="text-sm font-medium text-gray-700">
            Select Frame (seconds): <span id="timeLabel" class="font-bold w-4 text-gray-900">0</span>s
        </label>
        <div class="flex items-center space-x-2 w-full md:w-auto">
            <input type="range" id="timeSlider" min="0" value="0" step="0.1" class="w-full h-2 bg-gray-200 rounded-lg appearance-none cursor-pointer">
            <button type="button" id="captureBtn" class="px-8 py-2 bg-blue-600 text-white text-sm font-medium rounded-full hover:bg-blue-700 transition-colors">
                Generate Thumbnail
            </button>
        </div>
    </div>

    <h3 class="text-xl font-semibold mt-6 mb-2">Generated Thumbnail:</h3>
    <img id="thumbnail"
         src="https://placehold.co/400x225/E5E7EB/4B5563?text=Thumbnail%20Will%20Appear%20Here"
         alt="Thumbnail will appear here"
         class="mt-4 border-2 border-gray-300 max-w-full md:max-w-md rounded-lg shadow-lg">

    <script>
        const fileInput = document.getElementById("videoUpload");
        const video = document.getElementById("video");
        const canvas = document.getElementById("canvas");
        const thumbnail = document.getElementById("thumbnail");
        const controls = document.getElementById("controls");
        const timeSlider = document.getElementById("timeSlider");
        const timeLabel = document.getElementById("timeLabel");
        const captureBtn = document.getElementById("captureBtn");

        let videoURL = null;

        fileInput.addEventListener("change", function(event) {
            const file = event.target.files[0];
            if (!file) return;

            if (videoURL) {
                URL.revokeObjectURL(videoURL); // Clean up previous URL
            }

            videoURL = URL.createObjectURL(file);
            video.src = videoURL;
            video.load();

            video.addEventListener("loadedmetadata", function() {
                // Set slider max to video duration
                timeSlider.max = video.duration.toFixed(1);
                timeSlider.value = 0;
                timeLabel.textContent = "0";
                controls.style.display = "flex";
            }, { once: true });
        });

        timeSlider.addEventListener("input", function() {
            timeLabel.textContent = this.value;
        });

        captureBtn.addEventListener("click", function() {
            const time = parseFloat(timeSlider.value);
            if (isNaN(time)) return;

            video.currentTime = time;

            video.addEventListener("seeked", function captureFrame() {
                // Draw the video frame on canvas
                const w = video.videoWidth;
                const h = video.videoHeight;
                canvas.width = w;
                canvas.height = h;
                const ctx = canvas.getContext("2d");
                ctx.drawImage(video, 0, 0, w, h);

                // Convert canvas to image and show
                const dataURL = canvas.toDataURL("image/jpeg");
                thumbnail.src = dataURL;

                // Remove listener to avoid multiple triggers
                video.removeEventListener("seeked", captureFrame);
            });
        });
    </script>

</body>
</html>
This is what the page looks like now:
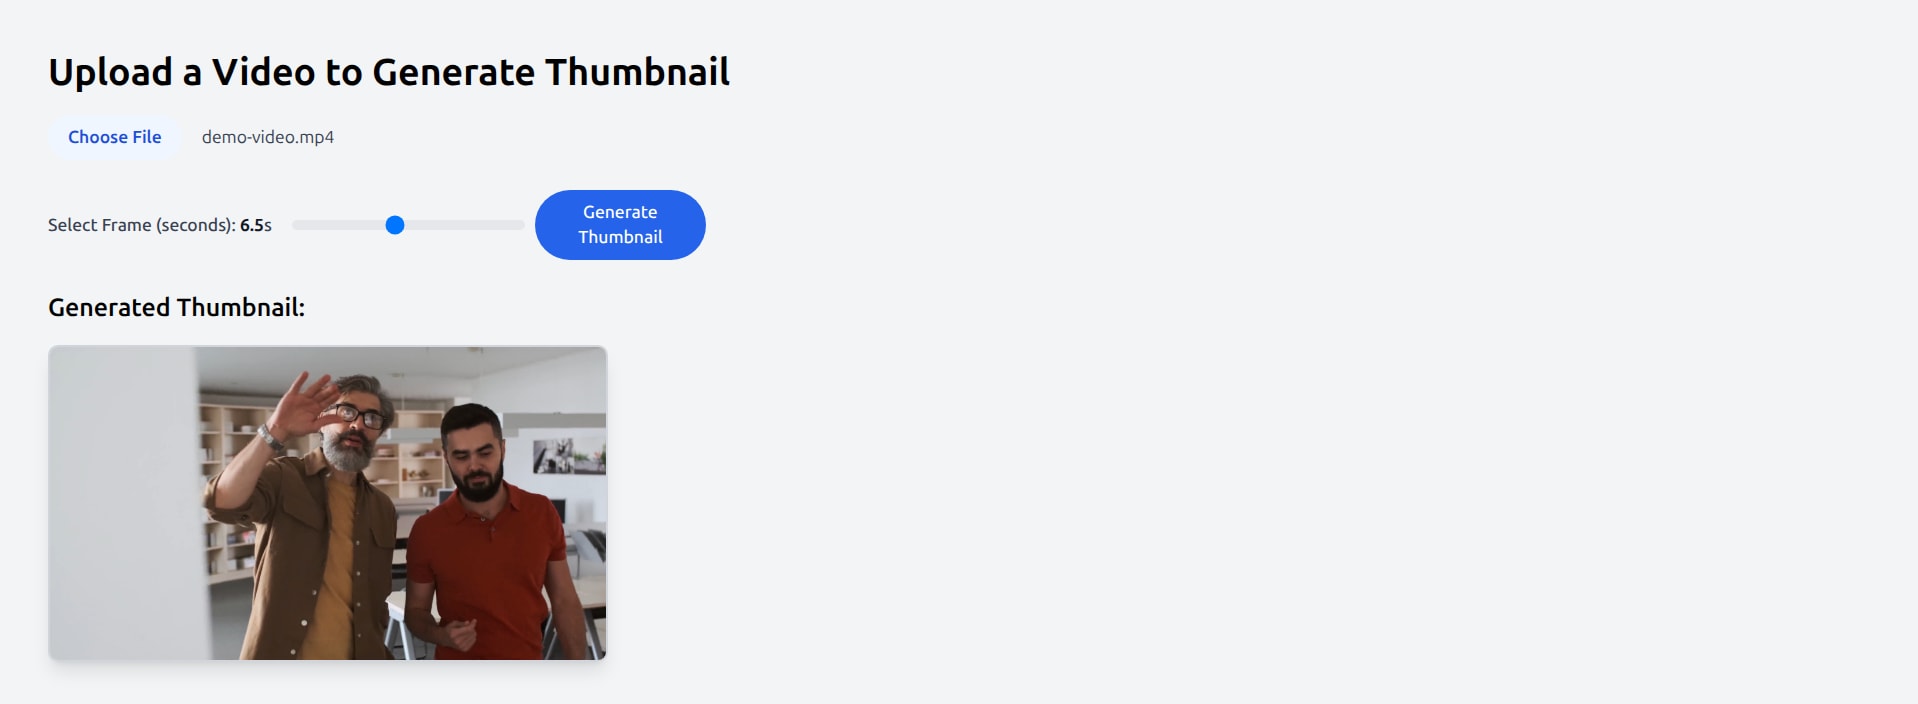
With this, users can select any frame in the video to use as a thumbnail.
Generating Thumbnails With FFmpeg in PHP
In the previous example, we showed how to generate thumbnails on the client side in a PHP application. But there are instances where you might want to do this on the server side. One of the most common ways to create thumbnails on the server side in PHP is by using FFmpeg.
FFmpeg is a free and open-source multimedia framework that consists of several libraries and tools for processing audio and video files, including decoding, encoding, transcoding, streaming, and playback. FFmpeg is originally written in C, however, it has wrappers and bindings in other programming languages, including PHP, that make it widely used by developers.
To use FFmpeg in PHP, we’ll install the PHP-FFMpeg library using composer.
composer require php-ffmpeg/php-ffmpeg
Note: FFmpeg itself must also be installed and accessible from the command line on your server or computer. You can download and install it for your OS by following the instructions on the official page.
Next, we’ll
Create a file called generate.php and add the following code to it:
<?php

require 'vendor/autoload.php';

use FFMpeg\FFMpeg;
use FFMpeg\Coordinate\TimeCode;

$ffmpeg = FFMpeg::create();

try {
    // Open the video file
    $video = $ffmpeg->open('sample-video.mp4');

    // Specify the frame to capture in seconds
    $frame = $video->frame(TimeCode::fromSeconds(5));

    // Save the frame as a thumbnail
    $frame->save('thumbnail.jpg');

    echo "Thumbnail generated!";
} catch (\FFMpeg\Exception\RuntimeException $e) {
    echo "An error occurred: " . $e->getMessage();
}
To serve the generated thumbnail to the user, you can output the thumbnail as an image file directly from the server or embed the thumbnail dynamically in your HTML.
For example, if the thumbnails are stored in a folder like uploads/thumbs/, you can embed them dynamically in HTML as follows:
<?php
$thumbDir = 'uploads/thumbs/';
$thumbnails = glob($thumbDir . "*.jpg");
?>
<!DOCTYPE html>
<html>
<head>
    <title>Video Thumbnails</title>
</head>
<body>
    <h2>Generated Thumbnails</h2>
    <div style="display: flex; flex-wrap: wrap; gap: 10px;">
        <?php foreach ($thumbnails as $thumb): ?>
            <img src="<?php echo $thumb; ?>" alt="Video Thumbnail" width="200">
        <?php endforeach; ?>
    </div>
</body>
</html>
Scaling with Cloudinary
So far, we’ve looked at how to generate thumbnails in two different ways: using the HTML <canvas> element, and using FFmpeg. However, the canvas method does not save the generated image automatically, making it difficult to use in other workflows. Likewise in the second method, running FFmpeg on your own server can quickly become slow, expensive, and hard to manage, especially if you’re building an app that handles a large amount of video files.
Cloudinary is a cloud-based media management solution that handles uploading, storing, transforming, and delivering images and videos. One of its most useful features is the ability to generate thumbnails on the fly using simple URL-based transformations.
To generate thumbnails from a video using Cloudnary, the video must have already been to Cloudinary. You can learn more about uploading videos to Cloudinary using the PHP SDK in this quickstart guide.
Once a video has been uploaded to Cloudinary, you’ll need its public URL to add transformations to it to generate the thumbnail.
Let’s take this URL as an example:
https://res.cloudinary.com/demo/video/upload/docs/walking_talking.mp4
Using Cloudinary’s transformation parameters, we can generate a thumbnail from the video at a specific point using the start offset qualifier (so in URLs). The following example generates a thumbnail from the video frame at 8.5 seconds from the start:
https://res.cloudinary.com/demo/video/upload/so_8.5/docs/walking_talking.jpg
Note: If you wish to save the thumbnail in a different format, you can simply change the file extension at the end of the URL.
Thumbnail generation is not the only thing you can do with Cloudinary. You can also use it to add text or image overlays, apply filters and effects, and perform various transformations. You can read more about image transformations in the documentation.
Wrapping Up
Creating a video thumbnail in PHP can take a few different approaches. In this article, we’ve shown you different methods you can use to create thumbnails from videos, depending on your use cases. For small apps, client-side generation using the canvas element or server-side generation using FFMpeg might be enough. For more robust workflows, Cloudinary will give you the simplicity and scalability you need.
If you haven’t already, sign up for a free Cloudinary account now and start exploring its endless possibilities
Frequently Asked Questions
Can I generate multiple thumbnails from the same video?
Yes, you can. For instance, using PHP-FFmpeg, you can call the frame() method multiple times at different timecodes. For example, you might capture frames at 5 seconds, 15 seconds, and 30 seconds, then save each as a separate image.
Can I use the HTML Canvas to generate thumbnails for large videos?
While technically possible, the client-side approach may struggle with very large video files or videos on devices with slow CPUs. The canvas method should only be used for generating a temporary preview or a user-selected frame before the final video upload, especially when dealing with small to medium-sized files, as it avoids burdening the server with initial processing.

