
You may be surprised to learn that jQuery, a long-standing JavaScript library that’s been around for over 17 years, is used by over 77% of all websites, according to W3Techs. It’s loved by developers for its simplicity in handling HTML documents, creating animations, and managing events.
In this article we’ll use the power of jQuery and the versatility of Cloudinary, a cloud-based service that provides an end-to-end image and video management solution. We’ll create an image gallery that’s not just a static collection of images but a dynamic user experience.
In this article:

Implementing a Responsive Photo Gallery Using jQuery
Before we can begin creating a photo gallery, you will need some basic knowledge of HTML, CSS, and JavaScript/jQuery to follow this tutorial. Additionally, you will need a Cloudinary account. If you don’t already have one, you can sign up for a free one.
Next, you’ll need to upload your images to Cloudinary. You can do this manually through the dashboard or programmatically using Cloudinary’s API, which offers various SDKs for popular programming languages like JavaScript, Python, and Ruby.
To upload your images, log into your Cloudinary account. Here, you will see the Media Library Dashboard. Next, navigate to the Assets tab, which shows all your assets on the cloud. Finally, click the Upload button in the top-right corner to upload new assets.
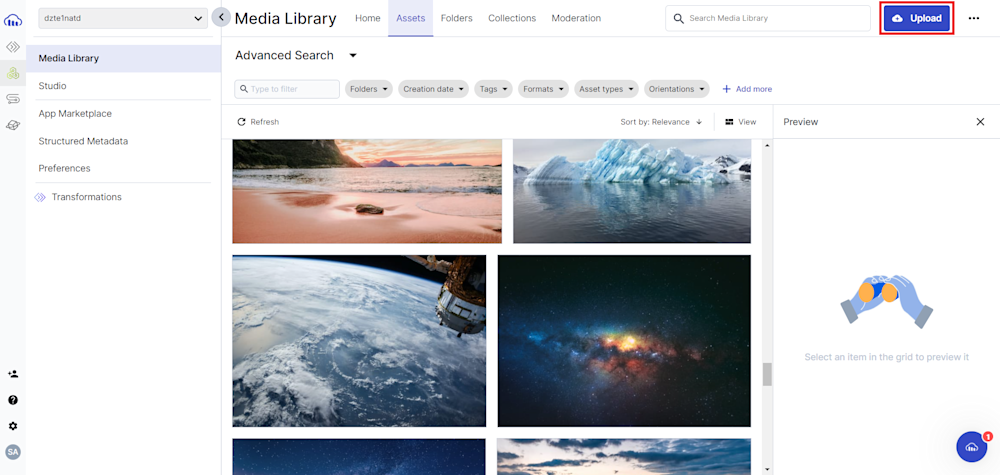
Once your images are uploaded, navigate your pictures should appear in the Assets tab.
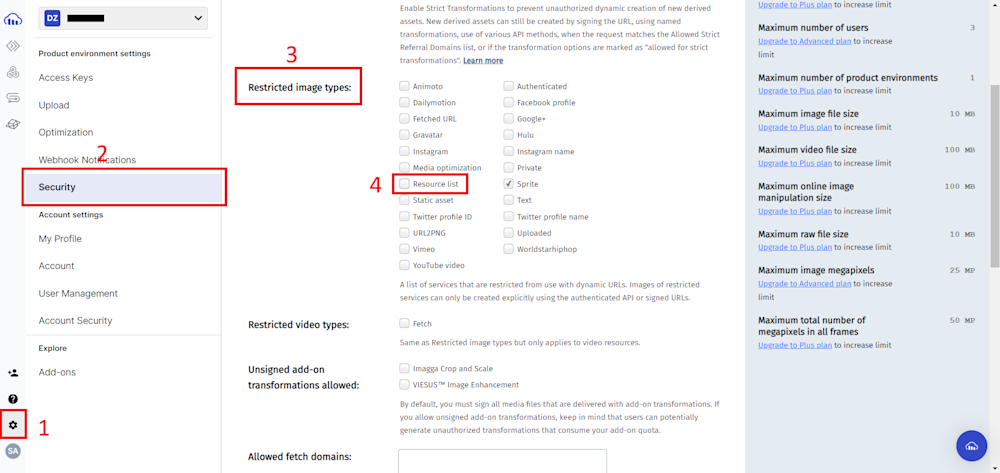
Finally, you will need to set up Cloudinary to allow resource list deliveries. This will allow us to retrieve JSON lists of all the resources available in the Cloudinary cloud.
To do this, head over to your Cloudinay account settings. Navigate to the Security tab and scroll down to find the “Restricted image types.” We will unselect the Resource list checkbox and click Save to save our settings.
With this, we are ready to begin creating our photo gallery.
Step 1: Setting Up HTML Structure
The first step to creating a basic photo gallery would be to create a new HTML file and set up the basic structure by including the HTML5 doctype declaration and opening and closing the html, head, and body tags.
<!DOCTYPE html>
<html>
  <head>
    <title>My Cloudinary Images</title>
  </head>
  <body>
  </body>
</html>
Let’s start by adding the JQuery library so that we can add logic to our project. You can do this by adding a script tag inside the project’s head tag.
<script src="https://ajax.googleapis.com/ajax/libs/jquery/3.5.1/jquery.min.js"></script>
Next, in the body tag, we will create a header that will display the title of our project. To do this, start by defining a header tag inside the body tag. Next, create a div element and define its class as "container" which will later help us in styling. We will also define an h1 tag where we will display our heading as “My Image Gallery.”
Here is what our body looks like so far:
<body>
    <header>
        <div class="container">
            <h1>My Image Gallery</h1>
        </div>
    </header>
</body>
Now, below the header, we will define our main tag. We want to create an image gallery containing all the images with a specific tag in the Cloudinary cloud. Since we do not know the exact number of pictures displayed, we will have to define some code that will dynamically populate our HTML with images.
Before writing our code, we need to set our HTML up to accept dynamic HTML creation. We will begin by creating a div inside the container and define its class as "container" as well. Next, we will define an input tag, allowing users to search for a specific tag in their cloud. We then define a button and an unordered list, which will be used to populate our HTML.
Here is what our body looks like:
<body>
    <header>
        <div class="container">
            <h1>My Image Gallery</h1>
        </div>
    </header>
    <main>
        <div class="container">
            <!-- Add an input field for the tag -->
            <input type="text" id="tagInput" placeholder="Enter tag">
            <button onclick="loadTagImages()">Load Images</button>
            <ul class="images" id="imageList">
                <!-- Add images here programmatically in script.js -->
            </ul>
        </div>
    </main>
</body>
To finish our HTML, we will add a script file called script.js that contains the main logic behind our loadTagImages() function. We will also link a CSS file that helps us style our HTML page.
HTML code:
<!DOCTYPE html>
<html>

<head>
    <title>My Cloudinary Images</title>
    <!-- Linking a style sheet for visual appeal -->
    <link rel="stylesheet" href="style.css">

    <!-- JS file containing our main code -->
    <script src="script.js"></script>

    <!-- JQuery -->
    <script src="https://ajax.googleapis.com/ajax/libs/jquery/3.5.1/jquery.min.js"></script>
</head>

<body>
    <header>
        <div class="container">
            <h1>My Image Gallery</h1>
        </div>
    </header>
    <main>
        <div class="container">
            <!-- Add an input field for the tag -->
            <input type="text" id="tagInput" placeholder="Enter tag">
            <button onclick="loadTagImages()">Load Images</button>
            <ul class="images" id="imageList">
                <!-- Add images here programmatically in script.js -->
            </ul>
        </div>
    </main>
</body>

</html>
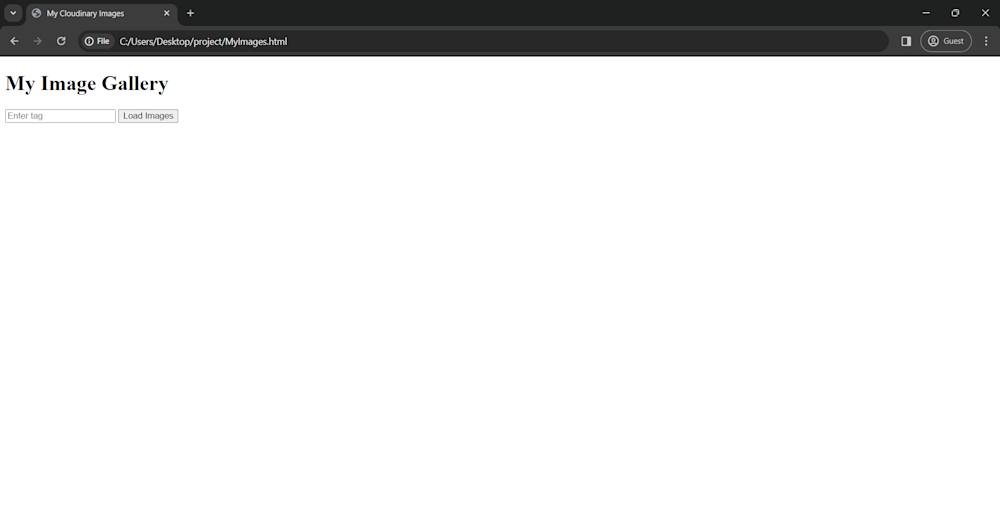
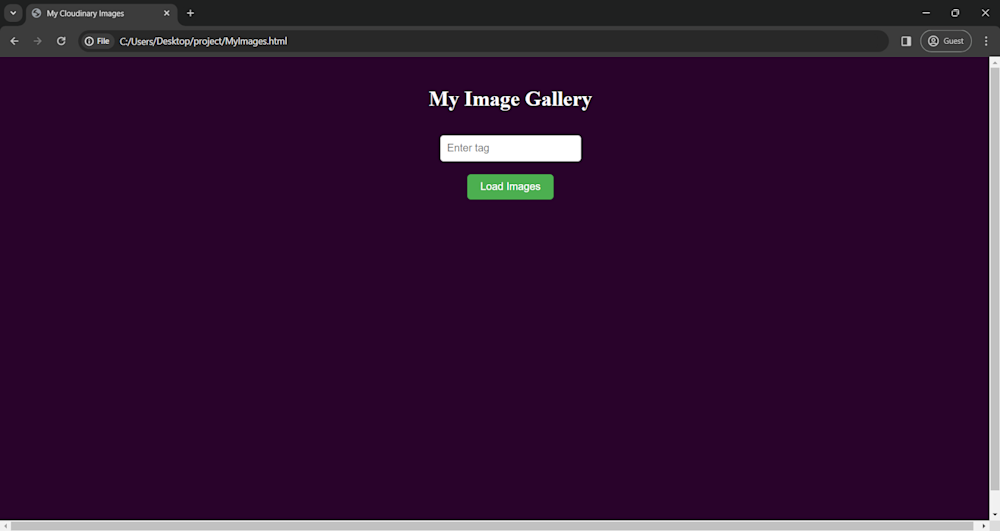
Here is what our page looks like:
Step 2: Styling With CSS for Responsive Design
With this, our webpage is ready, and we can add our styling using CSS. To do this, create a new file called styles.css in your project directory and add the following code:
body {
    padding: 0;
    width: 100%;
    min-height: 100vh;
    display: grid;
    grid-template-rows: auto 1fr;
    justify-content: center;
    background: hsl(297, 87%, 9%);
    color: #fff;
}

img {
    max-width: 100%;
    height: auto;
}

a {
    color: inherit;
}

header {
    padding: 1em 0;
    margin-bottom: .5em;
    font-size: 1em;
    font-weight: 500;
    margin: 0;
}

header>div {
    display: flex;
    flex-direction: column;
    align-items: center;
}

.container {
    width: 100%;
    max-width: 1024px;
    padding: 0 1em;
    margin: 0 auto;
    display: flex;
    flex-direction: column;
    align-items: center;
}

.images {
    list-style: none;
    padding: 0;
    margin: 0;
    display: grid;
    grid-template-columns: repeat(auto-fill, minmax(200px, 1fr));
    grid-gap: 3em;
}

.imageTitle {
    font-size: 1.4em;
    margin: .4em 0 0;
}

#tagInput {
    padding: 10px;
    font-size: 16px;
    border-radius: 5px;
    border: 1px solid #ccc;
    margin-bottom: 20px;
}

button {
    padding: 10px 20px;
    font-size: 16px;
    background-color: #4CAF50;
    color: white;
    border: none;
    border-radius: 5px;
    cursor: pointer;
    margin-bottom: 20px;
}

button:hover {
    background-color: #45a049;
}
This basic CSS style sheet just adds some color and interactivity to our page and adjusts our layout so that our images will render properly in set rows and columns.
Step 3: Implementing JQuery for Interactive Features
Now that our webpage is ready, we need to add functionality to our project. For this, we will create a new JavaScript file called script.js in our project folder. Next, open up the file and create a function called loadImages(). This function takes in a single parameter called imageArray, which contains the image URL as well as the public ID of our images. It then displays each image in the array on our HTML page:
// Function to load images into a list
function loadImages(imageArray) {
    // Get the list element and clear it
    var list = $('#imageList');
    list.empty();

    // Iterate over each image in the array
    $.each(imageArray, function(i, image) {
        // Create a new list item for each image
        var listItem = $('<li>').attr('key', image.title.toLowerCase());

        // Create a div for the image
        var imageDiv = $('<div>');

        // Create an img element for the image
        var img = $('<img>').attr({
            src: image.src,
            alt: image.title,
            width: 1364, // Set the image width
            height: 1705 // Set the image height
        });

        // Create a h3 element for the image title
        var title = $('<h3>').addClass('imageTitle').text(image.title);

        // Append the img to the imageDiv
        imageDiv.append(img);
        // Append the imageDiv and title to the listItem
        listItem.append(imageDiv).append(title);
        // Append the listItem to the list
        list.append(listItem);
    });
}
Here, we create a list item tag and add the image title as the key. We then create an imageDiv element and create an image tag defining the src, alt, width, and height attributes. Finally, we create an h3 tag to display the image title. We then simply add this to the imageList in our HTML document.
Now that we have a way to display our images, we need a way to retrieve them from the Cloudinary cloud. We will do this by defining a function called loadTagImages().
The loadTagImages() function works by calling the Cloudinary API to retrieve a list of tagged images in JSON format by searching for them on the Cloudinary cloud. The JSON file contains a list of all images along with their public IDs and URLs. It then retrieves the URL of each image and their public IDs and stores them in an array called images. Once finished, it calls the loadImages() function to display the images on the HTML page.
Here is what our complete script.js file looks like:
// Function to load images based on the tag
function loadTagImages() {
    // Define your array of image URLs and titles
    var images = [];

    // Replace 'demo' with your cloud name
    var cloudName = 'your_cloud_name';

    // Fetch the tag from the input field
    var tag = document.getElementById('tagInput').value;

    // URL to fetch images from Cloudinary
    var url = 'https://res.cloudinary.com/' + cloudName + '/image/list/' + tag + '.json';

    $.getJSON(url)
        .done(function(data) {
            // Loop through each image
            $.each(data.resources, function(i, image) {
                var imageUrl = 'https://res.cloudinary.com/' + cloudName + '/image/upload/' + image.public_id + '.' + image.format;

                // Add image to array
                images.push({ src: imageUrl, title: image.public_id });
            });

            // Call the function to load images
            loadImages(images);
        })
        .fail(function(jqxhr, textStatus, error) {
            // Handle error
            var err = textStatus + ", " + error;
            console.log("Request Failed: " + err);
            alert("Failed to load images. Please check the tag and try again.");
        });
}

// Function to load images into a list
function loadImages(imageArray) {
    // Get the list element and clear it
    var list = $('#imageList');
    list.empty();

    // Iterate over each image in the array
    $.each(imageArray, function(i, image) {
        // Create a new list item for each image
        var listItem = $('<li>').attr('key', image.title.toLowerCase());

        // Create a div for the image
        var imageDiv = $('<div>').addClass('imageImage');

        // Create an img element for the image
        var img = $('<img>').attr({
            src: image.src,
            alt: image.title,
            width: 1364, // Set the image width
            height: 1705 // Set the image height
        });

        // Create a h3 element for the image title
        var title = $('<h3>').addClass('imageTitle').text(image.title);

        // Append the img to the imageDiv
        imageDiv.append(img);
        // Append the imageDiv and title to the listItem
        listItem.append(imageDiv).append(title);
        // Append the listItem to the list
        list.append(listItem);
    });
}
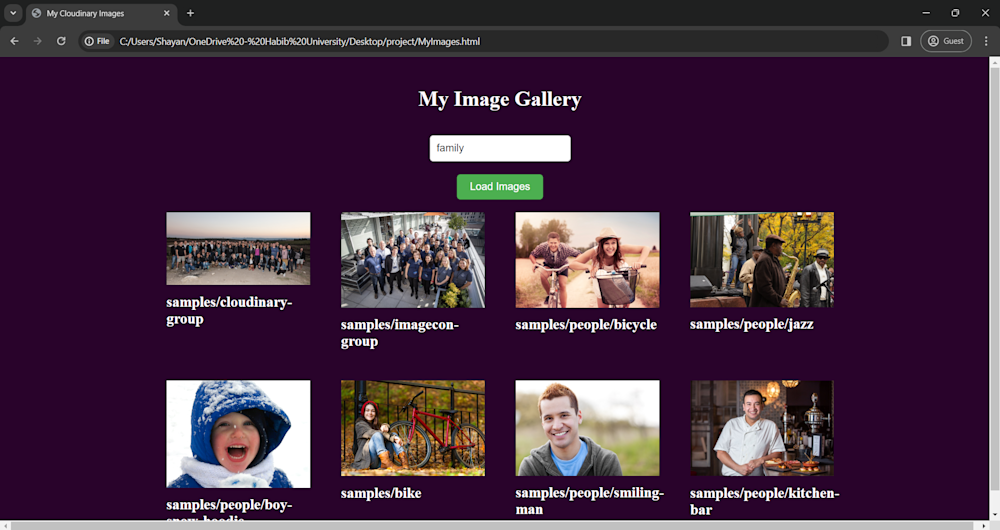
With this, our photo gallery is now ready. Here is what our completed webpage looks like:
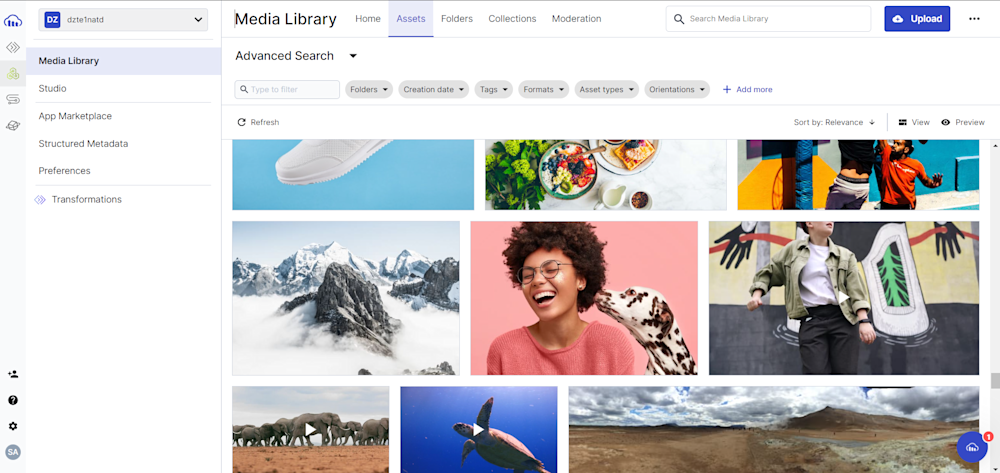
Now, simply search for an image tag in your cloudinary cloud. We can now view images based on tags from our uploads images like the tag "family" as shown below:
In case such a tag does not exist, the user will be given an error message communicating this.
Wrapping Up
In this article, we have navigated through the process of creating a dynamic photo gallery using jQuery and Cloudinary. As we’ve seen, jQuery simplifies HTML document handling, event management, and animation creation, making it a valuable tool for any web developer.
But let’s not forget about Cloudinary. Beyond providing a platform for managing images, Cloudinary offers a multitude of transformation options, optimization features, and delivery methods. With Cloudinary, you can add multiple tags to images, make them responsive, optimize image sizes for different devices, transform images by applying filters and effects, and deliver them efficiently through various content delivery networks.
Take your digital experience to the next level with Cloudinary’s powerful media optimization tools. Sign up for free today!
More from Cloudinary:
jQuery Sliders: How to Cut Image Size by 96.3 Percent
Top 7 jQuery Sliders and Three Ways in Which to Create Your Own

