
Enhancing images with text is a powerful way to improve communication in today’s digital world. From social media posts and business flyers to creative projects like meme generators, combining text with visuals can make your content more engaging and effective.
In Python, this can be achieved using the Python Imaging Library (PIL), now maintained as Pillow. Pillow is a versatile image processing library that allows you to perform a wide range of operations, such as opening and editing images, saving them in different formats, creating new images, rotating, and more.
In this guide, we’ll explore how to add text to images using Pillow, as well as how to accomplish the same task with Cloudinary, a cloud-based platform for image and video management. Let’s dive in!
In this article:
- Prerequisites and Things to Consider
- Adding Text to Images with Pillow
- Adding Text to Images with Cloudinary
Prerequisites and Things to Consider
Before you proceed, we assume that you’re equipped with the following:
- A Python installation on your computer. If you don’t, visit the official Python website at python.org to download the installer for your OS.
- A solid background in Python
As a note, here’s how PIL’s text method works:
Syntax: obj.text( (x,y), Text, font, fill)
Parameters:
- (x, y): This X and Y denotes the starting position(in pixels)/coordinate of adding the text to an image.
- Text: The text that we want to add to the image.
- Font: specific font type and font size that you want to use.
- Fill: Fill is for to give the font color for your text.

Adding Text to Images with Pillow
Pillow is a fork of Python Imaging Library, a free and open-source image manipulation and processing library with support for manipulating and working with many image file formats.
Step 1 – Setting up the Project
Like any other Python project, starting a new project in a virtual environment is usually a good idea. First of all, create a new directory for the project and run the code below to create a virtual environment:
python3 -m venv env
source env/bin/activate
Step 2 – Installing Necessary Libraries
The major library we’ll be using in this part of the tutorial is Pillow. If you haven’t already installed it, you can do so using pip:
pip install Pillow
Step 3 – Import Pillow and Load the Image
Next, create a main.py file in the project and add the following code to it:
from PIL import Image, ImageDraw, ImageFont

# Load the image
image = Image.open("wallpaper.jpg")

# Create a drawing context
draw = ImageDraw.Draw(image)
The ImageDraw.Draw module from Pillow lets us create a drawing context on the opened image. Now, we can use the draw object to perform various drawing operations on the image, such as drawing lines, shapes, and text.
NOTE: You’ll need to upload an image in the root directory that you want to render the text on. In the code above, we used an image file named wallpaper.jpg.
Step 4 – Defining the Text and Position
# ...
# Define the text properties
font = ImageFont.truetype("/usr/share/fonts/truetype/dejavu/DejaVuSans-Bold.ttf", 36)
text = "Hello, World!"
position = (50, 50)

# Add text to the image
draw.text(position, text, font=font)

# Save or display the modified image
image.save("output.jpg")
The ImageFont.truetype module loads TrueType and OpenType font types from a file and lets you specify a font size. The draw.text method renders text on the image. Its parameters define the position, text, and font for rendering characters on the image.
NOTE: To prevent errors and for the text to render correctly, we have to specify an absolute path to the font we want to use in rendering the text. In our case, we used a system font located on our computer. Alternatively, you can copy the font file or download a font from the internet and place it in the project–just make sure you link to the font properly.
And here’s the output of the generated image:
Step 5 – Modifying the Text Styles
If you look at the output image above, you’ll notice that the rendered text looks bland. We can get creative and edit the image further to our taste by adding CSS-like styles.
For example, to center the rendered text, we can simply modify our code to the following:
from PIL import Image, ImageDraw, ImageFont

# Load the image
image = Image.open("wallpaper.jpg")

# Create a drawing context
draw = ImageDraw.Draw(image)

# Define the text properties
font = ImageFont.truetype("/usr/share/fonts/truetype/dejavu/DejaVuSans-Bold.ttf", 36)
text = "Hello, World!"
text_color = (255, 255, 255)

# Calculate the position to center the text
text_length = draw.textlength(text, font)
x = (image.width - text_length) / 2
y = image.height / 2

# Add text to the image
draw.text((x, y), text, fill=text_color, font=font)

# Save or display the modified image
image.save("output.jpg")
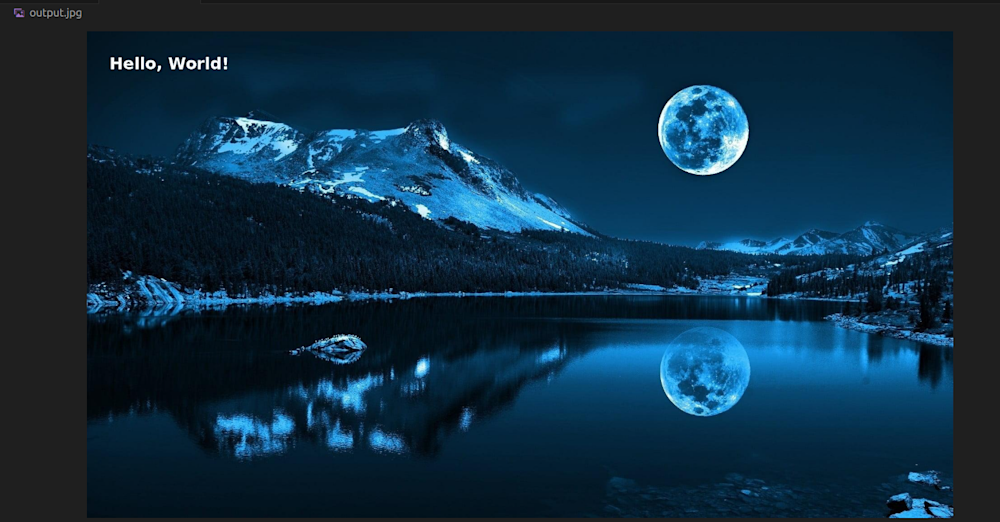
Now we can see the text rendered in the center of the image as follows:

Adding Text to Images with Cloudinary
Pillow is great, really. But it might be a nightmare for beginners with no advanced Python expertise. However, adding text to images with Cloudinary is much easier than using other solutions like Pillow.
For instance, Cloudinary provides many battery-included features like adding dynamic text to any image on the fly and using any of the hundreds of Google Fonts available. You can even use your own custom font, apply a myriad of text styling options, and explore many other customizations you can play with!
In this section, we’ll walk you through how you can use Cloudinary to add text to images.
Step 1 – Setting up the Application
Create a new directory for the project and initialize a virtual environment. Next, run the following command to install the necessary packages for the project:
python3 -m pip install fastapi cloudinary python-multipart
pydantic-settings python-dotenv uvicorn[standard]
Here’s a description of the packages we are installing.
- FastAPI: A Python framework for creating web servers and APIs.
- python-multipart: A Python library for handling multipart/form-data POST requests.
- python-dotenv: Loads key-value pairs from a
.envfile and make them available as environment variables. - pydantic-settings: A Python library that provides a way to manage application settings and configurations using Pydantic models.
- Cloudinary: A cloud-based service offering a complete solution for managing images and videos. It provides functions including uploading, storing, manipulating, optimizing, and delivering images.
- Uvicorn: An ASGI web server implementation in Python.
Step 2 – Creating the Server
Create a file named main.py in the root directory and add the code below to it to create the application server:
from fastapi import FastAPI
app = FastAPI()
@app.get("/")
async def root():
    return "App is working!"
Run uvicorn main:app --reload to start up the server.
Step 3 – Adding Environment Variables
In order to gain access to the features of Cloudinary using the Python SDK, we need to provide our environment credentials so we can access the service programmatically. You’ll find your own environment credentials in your Cloudinary dashboard.
Next, create a .env file in the root of the project and add your credentials as follows:
CLOUDINARY_API_KEY =
 <YOUR_CLPOUDINARY_API_KEY>CLOUDINARY_CLOUD_NAME =
 <YOUR_CLOUDINARY_CLOUD_NAME>CLOUDINARY_API_SECRET =
 <YOUR_CLOUDINARY_API_SECRET>
Step 4 – Writing the Code
In main.py, change the entire code to the following:
# Import the necessary packages
from fastapi import FastAPI
from fastapi import FastAPI, File, UploadFile
from pydantic_settings import BaseSettings
import cloudinary
import os

app = FastAPI()

# Configure environment variables
class Settings(BaseSettings):
    CLOUDINARY_CLOUD_NAME: str
    CLOUDINARY_API_KEY: int
    CLOUDINARY_API_SECRET: str
    class Config:
        env_file = ".env"

settings = Settings()

# Load in the environment variables
config = cloudinary.config(cloud_name = settings.CLOUDINARY_CLOUD_NAME, api_key = settings.CLOUDINARY_API_KEY, api_secret = settings.CLOUDINARY_API_SECRET)

import cloudinary.uploader
import cloudinary.api

# Function to upload the image to Cloudinary and apply the text overlay
async def cloudinary_upload(file):
    imageURL =  cloudinary.uploader.upload(file, transformation=[
  {'color': "white", 'overlay': {'font_family': "Arial", 'font_size': 80, 'text': "Hello, Cloudinary!"}},
  {'flags': "layer_apply"}
  ])
    return imageURL

# Endpoint to upload the file to the server
@app.post("/upload")
async def create_image(image: UploadFile = File(...)):
    os.makedirs("images", exist_ok=True)
	# Save the uploaded image to disk
    file_location = f"images/{image.filename}"
    with open(file_location, "wb+") as file_object:
        file_object.write(image.file.read())

    result = await cloudinary_upload(file_location)

	# Get the URL of the transformed image
    imageURL = result["secure_url"]

    return f"Link to the image with text overlay: {imageURL}"

@app.get("/")
async def root():
    return "App is working!"
Step 5 – Trying It Out
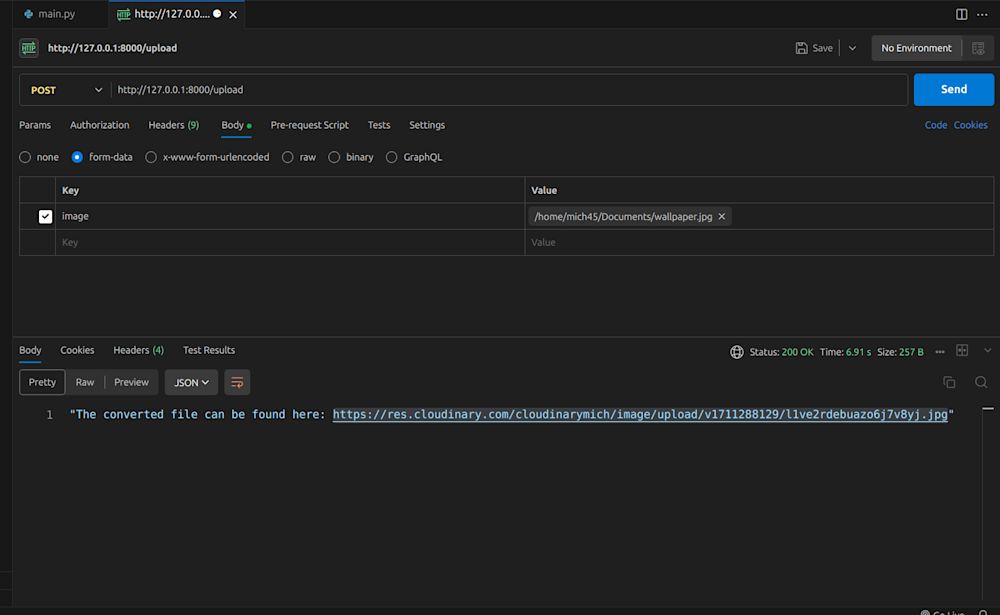
Now, let’s use the Postman extension in VS Code to try out our code. To do this, set your “requests” parameters in the Postman extension as shown below:
Here’s the image output when we paste the generated link into the browser:
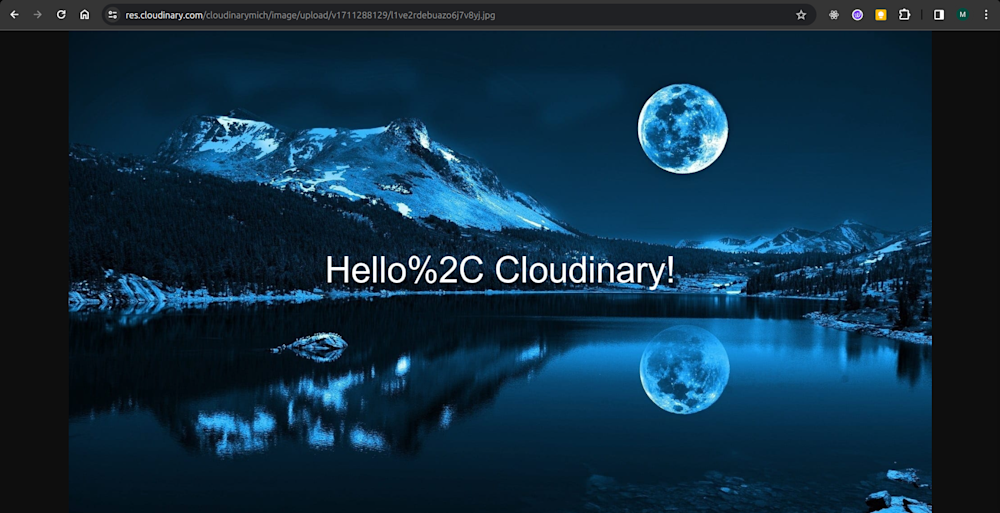
The text was rendered, yay! But wait, that’s not how we expected it to turn out – the comma in the text was rendered as %2C. Text strings containing special characters need to be escaped before we can add them as layers on images.
Let’s modify our code to fix that.
# ...import urllib.parse
# ...def escape_special_characters(text):
    special_characters = [
    '!', '@', '#', '$', '%', '^', '&', '*', '(', ')',
    '-', '_', '=', '+', '\\\\', '|', '{', '}', ';', ':', '/', '?', '.', '>']
# Escape each special character in the text
for char in special_characters:
        if char in text:
            text = text.replace(char, urllib.parse.quote(char))
    return text
async def cloudinary_upload(file):
    input_text = "Hello, Cloudinary!"    text  =  escape_special_characters(input_text)
    imageURL =  cloudinary.uploader.upload(file, transformation=[
  {'color': "white", 'overlay': {'font_family': "Arial", 'font_size': 80, 'text': text}},
  {'flags': "layer_apply"}
  ])
    return imageURL
# ...
In the code above, we defined an escape_special_characters function that escapes special characters in the text we want to add to the image. The function uses the urllib.parse.quote() function in the urllib.parse Python module to convert any special character added in the text to its UTF-8 encoded value.
Now, we can be sure that Cloudinary will render the text correctly.
Wrapping Up
In this article, we showed you how to add text to images using Pillow, a popular image manipulation tool built with Python. We also walked you through how you can accomplish the same thing using Cloudinary, a cloud-based media management platform.
To learn more about adding text to images, please check out adding layers to images and text transformation reference in the Cloudinary documentation.
Optimize, transform, and manage your media assets like a pro with Cloudinary. Sign up for free today!

