
As the digital revolution tightens its grip on the world, organizations and individuals always look for new methods to differentiate their online presence. Drop shadows in graphic design are one excellent approach to making products pop by adding depth. And thanks to the advent of AI, you can make this process easier than ever.
So in this post, we’ll examine AI drop shadows and how you can add shadows to images with Cloudinary, a cloud-based image and video management platform. We’ll review applications of AI-generated drop shadows and provide step-by-step directions on how to add realistic shadows to images on a large scale through the Cloudinary API.
In this article:
- What is AI Drop Shadow?
- When Do You Need to Add Drop Shadow?
- Using Cloudinary for AI Drop Shadow
- How to Drop Shadow in Millions of Images Automatically?
What is AI Drop Shadow?
AI drop shadow is a technique used within photo editing to produce the appearance of a shadow cast by an object. People leverage AI to add shadow to images, giving a sense of depth and making an object appear to float over the background. AI is used to make these shadows more realistic, where computer software evaluates an object’s shape, position, and lighting conditions and generates a shadow that looks to be thrown by the object.
Image and video processing, augmented/virtual reality, and graphic design are just a few uses for AI drop shadow technology. Designers may create more visually appealing and engaging content by employing AI algorithms to create more realistic and precise drop shadows.
When Do You Need to Add Drop Shadow?
Drop shadows are often used in graphic design and visual media to add depth and visually differentiate an object from its surroundings. Here are a few examples:
- To create a sense of depth and dimension. When you create a drop shadow, you can make an object appear to float above a background. This can cause an image or design to appear more three-dimensional and visually appealing.
- To highlight or emphasize an object. Adding a drop shadow can make an object stand out from its surroundings. This is beneficial when you want to direct the viewer’s attention to a specific design aspect.
- To improve readability. Drop shadows can also enhance text readability. Applying a faint drop shadow may make a text element stand out from the backdrop and be easier to read.
- To create a sense of continuity: Drop shadows can help give continuity and unity when using several elements in a design. You may connect and create a more uniform look by applying a consistent drop shadow to all the elements in a design.
Drop shadows, in general, can be a handy tool in a designer’s toolbox for producing more aesthetically appealing and engaging designs. However, they must be used sparingly and carefully, as misuse can result in cluttered and distracting designs.
Cloudinary’s image management capabilities allow it to automatically add shadow to images, which can be especially beneficial in cost optimization. You can add shadow to images utilizing Cloudinary’s AI-powered image editing capabilities without ever needing to open a photo editor.
Using Cloudinary for AI Drop Shadow
Before we can use AI Drop Shadow on our images, we must create a Cloudinary account. You can sign up and create a free account if you don’t have one.
In addition, you’ll also need Node.js installed on your computer. If you don’t have Node.js, you can install it free from Node’s official site.
Using Cloudinary, you can modify your images either during the uploading process to the cloud or when retrieving them by generating a new version. Let’s start by creating a Node.js script that helps us upload our assets to the Cloudinary cloud.
Step 1: Setting up the Environment
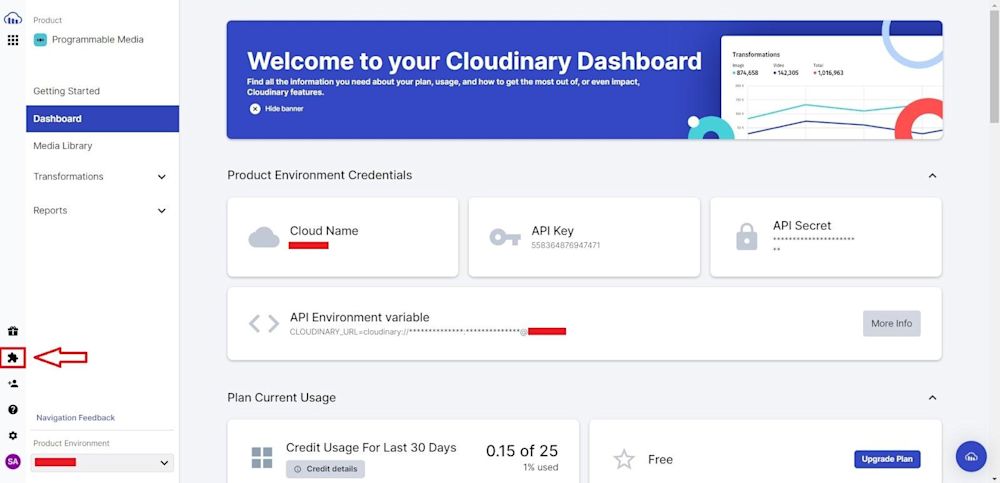
Before adding the shadow effect to our images, we need access to our cloud. This is done through the environment variables in your Cloudinary account. So head on over to Cloudinary and log in. Next, navigate to the Dashboard tab. Here you will see your environment variable:
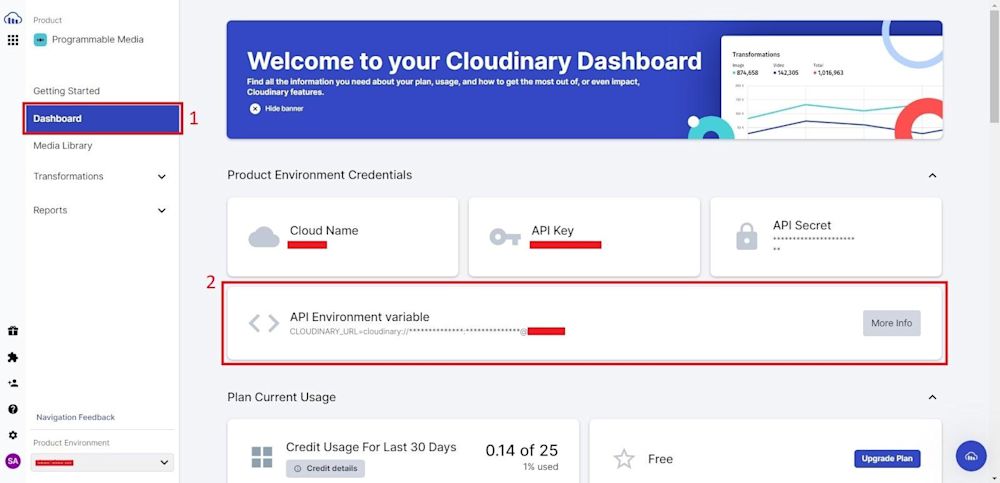
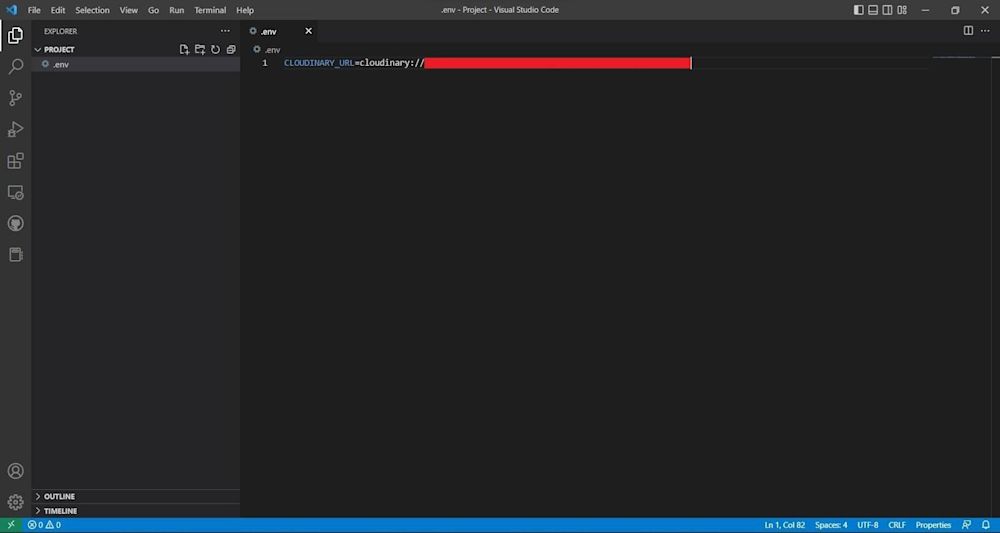
Next, copy the environment variable and store it in your clipboard. Open up a sample project directory and create an empty file with the .env extension. Open up the file and paste your environment variable:
Finally, we need to set up a way to call the Cloudinary API and authenticate our API requests. This will be done through the Cloudinary Node.js SDK and the dotenv library. To install these, open up your terminal and install the libraries using the following commands:
npm install dotenv
npm install cloudinary
With this, we are ready to make API calls to our Cloudinary cloud.
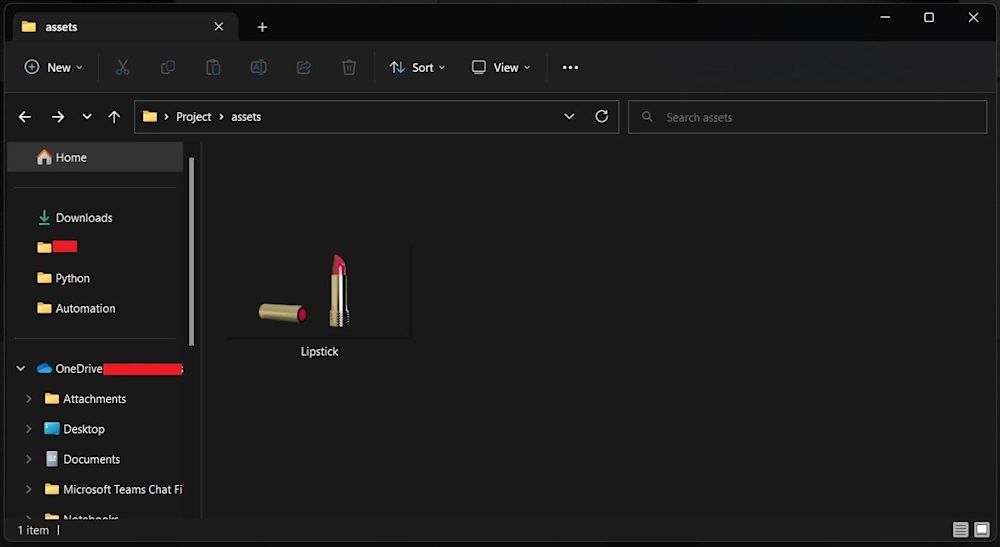
Step 2: Uploading Images to the Cloud
Next, create an assets folder in your project directory and add the images you want to upload:
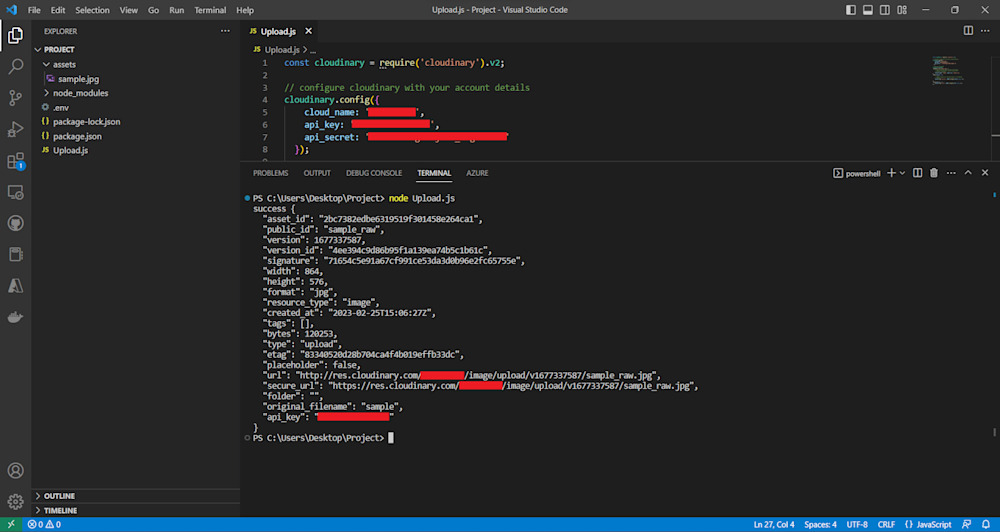
Now open up the project directory in the IDE of your choice and create a new file named Upload.js. Open up the file and import Cloudinary as well as dotenv:
// Reads the Cloudinary Environment variable
require("dotenv").config();

// Using V2 of Cloudinary Node JS SDK
const cloudinary = require("cloudinary").v2;

// Picking up env and configuring
console.log(cloudinary.config().cloud_name);
Next, call the Cloudinary upload API with the image you want to upload. Here we are defining two extra parameters to our image: resource_type and public_id.
The resource_type parameter, as the name suggests, helps us explicitly define the type of asset we intend to upload. By default, it’s defined as an image. The public_id parameter is a unique identifier that helps us keep track of our resources on the Cloudinary cloud. Defining it explicitly will help us keep track of our resources:
// Calling upload API
cloudinary.uploader
.upload("assets/Lipstick.png", {
    // Specifying the resource type of the image
    // image is the default resource type even if
    // you don't specify
    resource_type: "image", public_id: "Lipstick_raw",
})
.then((result) => {

    // JSON.stringify will provide output in a formatted
    // string
    console.log("success", JSON.stringify(result, null, 2));

})
.catch((error) => {
    console.log("error", JSON.stringify(error, null, 2));
});
Here is what our final code looks like:
// Reads the Cloudinary Environment variable
require("dotenv").config();

// Using V2 of Cloudinary Node JS SDK
const cloudinary = require("cloudinary").v2;

// Picking up env and configuring
console.log(cloudinary.config().cloud_name);

// Calling upload API
cloudinary.uploader
.upload("assets/Lipstick.png", {
    // Specifying the resource type of the image
    // image is the default resource type even if
    // you don't specify
    resource_type: "image", public_id: "Lipstick_raw",
})
.then((result) => {

    // JSON.stringify will provide output in a formatted
    // string
    console.log("success", JSON.stringify(result, null, 2));

})
.catch((error) => {
    console.log("error", JSON.stringify(error, null, 2));
});
Now you can simply run the code using Node:
node Upload.js
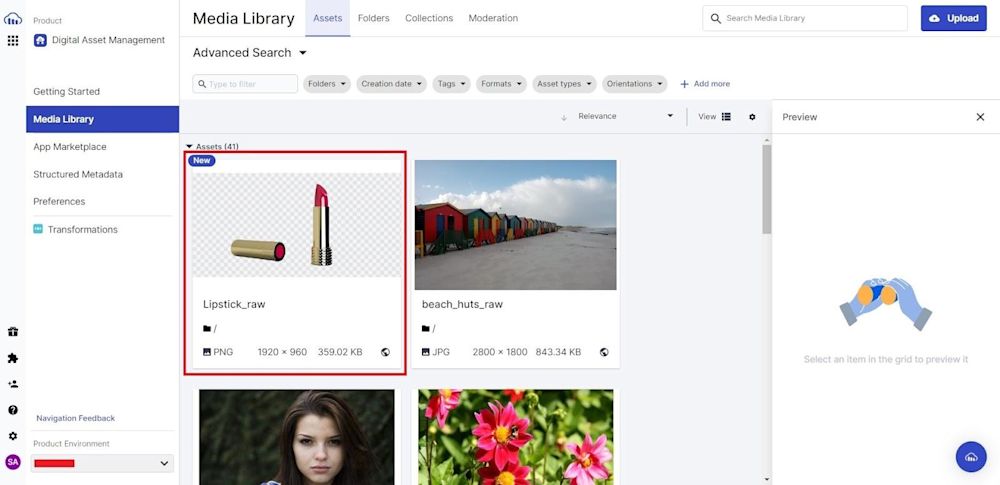
To verify your upload, you can either follow the URL given in the terminal output or head to the Media Library tab on Cloudinary:
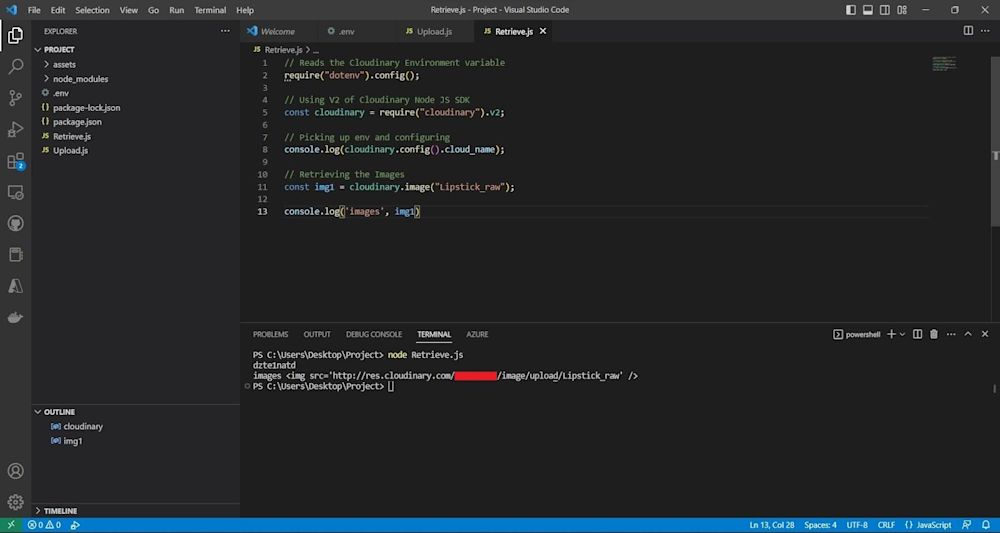
Step 3: Retrieving Our Image from the Cloud
Now that we have our image in the cloud let’s retrieve it. Create a new file named Retrieve.js in our projects folder. We’ll use the same libraries, so you can call them in the new file. Next, call the Cloudinary API using the .image method with the public_id of our image:
// Reads the Cloudinary Environment variable
require("dotenv").config();

// Using V2 of Cloudinary Node JS SDK
const cloudinary = require("cloudinary").v2;

// Picking up env and configuring
console.log(cloudinary.config().cloud_name);

// Retrieving the Images
const img1 = cloudinary.image("Lipstick_raw");

console.log('images', img1)
Running the code yields the following output and image:
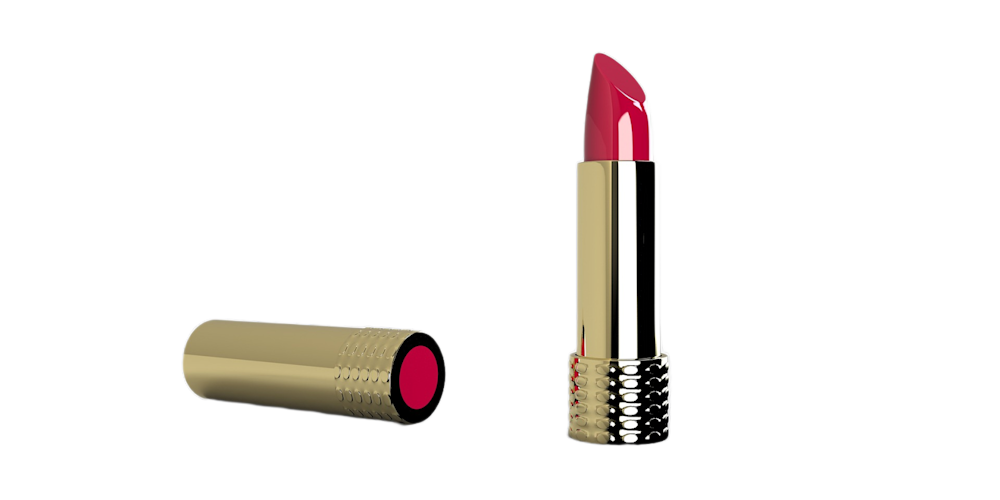
Step 4: Adding AI Drop Shadow Effect
Now that we have our image in the cloud, let’s use AI Drop Shadow to add shadow to images intelligently. This can be done by specifying the effect in the Cloudinary API.
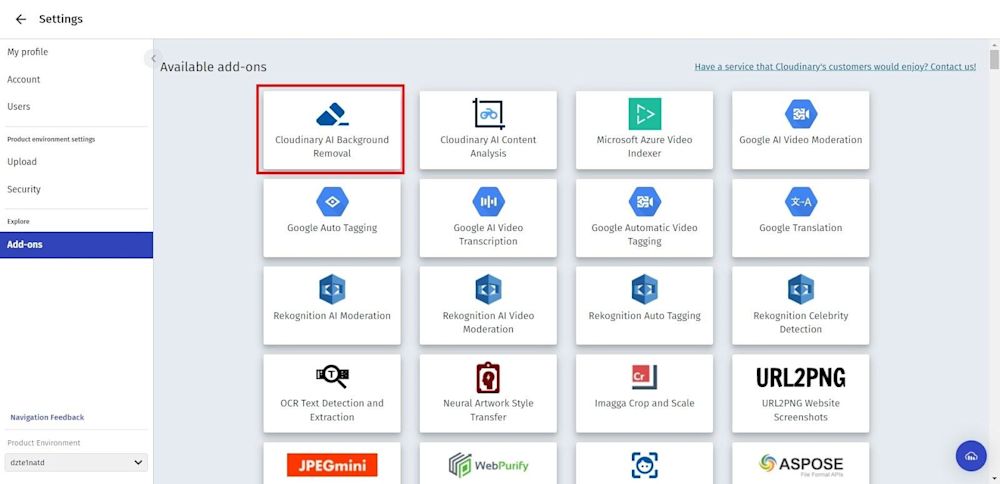
But before modifying the code above, we’ll need an active subscription to AI Background Removal (don’t worry, it’s still free). Head over to your Cloudinary account and navigate to the Add-on tab:
Select the Cloudinary AI Background Removal add-on:
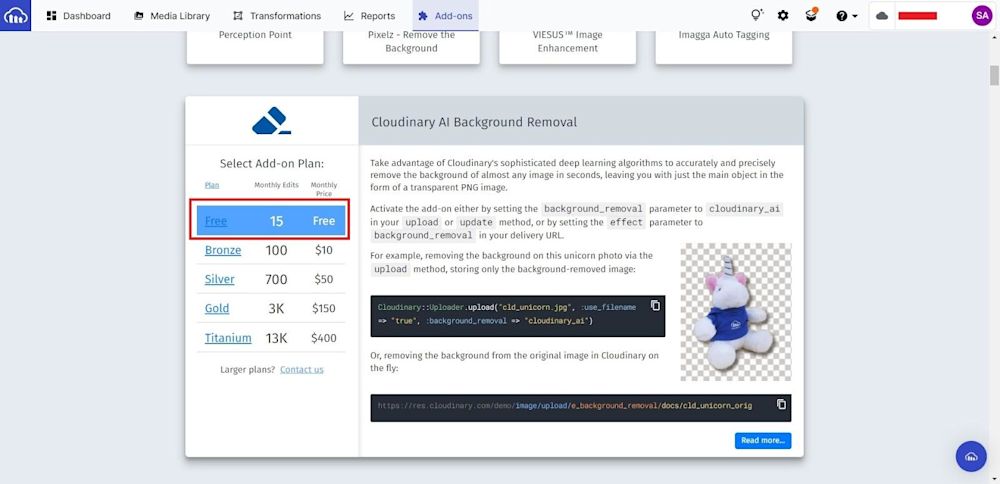
Finally, select the plan you want to choose. For this tutorial, we will be using the Cloudinary AI Background Removal free plan:
Now, let’s modify our retrieval code by adding our AI Drop Shadow effect:
// Retrieving the Images
const img1 = cloudinary.image("Lipstick_raw", {effect: "dropshadow:azimuth_220;elevation_40;spread_20"});
Here we define the dropshadow effect with an azimuth of 220 degrees, and an elevation of 40 degrees, with a spread of 20%. Running the code yields the following image:

How to Drop Shadow in Millions of Images Automatically?
Now that you know how to transform a single image, you can now take advantage of Cloudinary’s API to automatically add shadow to pictures in bulk. Cloudinary also allows you to apply multiple transformations to your images at scale by listing them.
To automatically add a drop shadow to multiple images, select the pictures you want to transform. The Cloudinary Media Library tab offers an easy way to access your photos. For this specific task, we will be transforming the images highlighted in the image below:
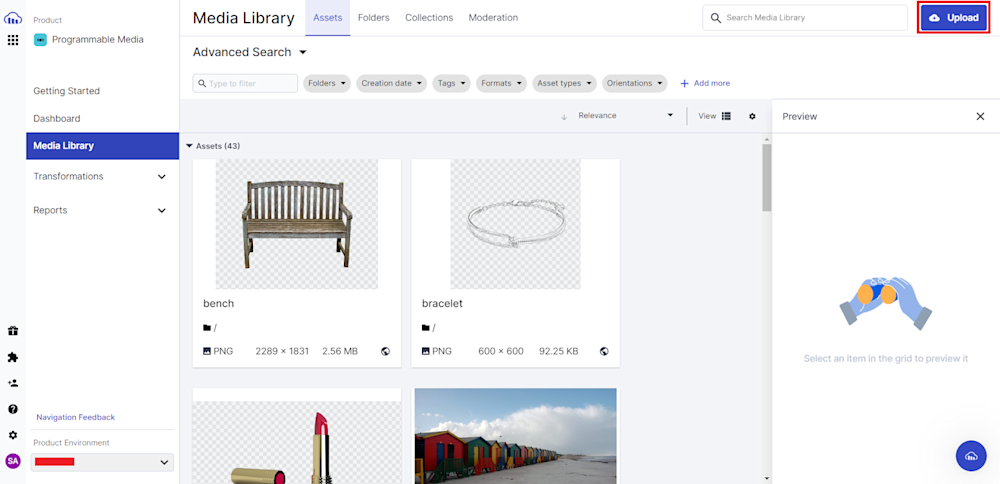
Here, we can see the public_id of our images as bench, and bracelet. We can simply call the Cloudinary API for these images:
// Retrieving the Images
const img1 = cloudinary.image("bench", {effect: "dropshadow:azimuth_215;elevation_45;spread_50"});
const img2 = cloudinary.image("bracelet", {effect: "dropshadow:azimuth_210;elevation_60;spread_10"})
Finally, log the results using console.log:
console.log('images', img1)
console.log("images", img2)
Here is what our final code and rendered images look like:
// Reads the Cloudinary Environment variable
require("dotenv").config();

// Using V2 of Cloudinary Node JS SDK
const cloudinary = require("cloudinary").v2;

// Picking up env and configuring
console.log(cloudinary.config().cloud_name);

// Retrieving the Images
const img1 = cloudinary.image("bench", {effect: "dropshadow:azimuth_215;elevation_45;spread_50"});
const img2 = cloudinary.image("bracelet", {effect: "dropshadow:azimuth_210;elevation_60;spread_10"})

console.log('images', img1)
console.log("images", img2)


Automating applying drop shadows to photographs over manual photo editing is one way that Cloudinary’s AI drop shadow feature can help you save time and money.
Final Thoughts
AI drop shadows can greatly enhance the visual appeal of a design and make your photos stand out from the crowd. With Cloudinary’s AI capabilities, generating and implementing high-quality drop shadows has become easier and more accessible. By following the steps outlined in this article, designers can use this powerful tool to create more engaging and eye-catching designs.
You now understand how simple it is to automatically add shadow to images using Cloudinary. And the best part is that you can get started with a free Cloudinary account today. Cloudinary also provides SDKs for backend, frontend, and mobile development.
More from Cloudinary:

