WordPress powers nearly 43% of the internet, making it one of the most popular platforms for businesses worldwide. With so many sites built on WordPress, keeping your website optimized is critical to ensuring strong performance. While WordPress includes some built-in optimization features, one of the most effective steps you can take yourself is resizing your images.
High-quality visuals enhance your site’s appearance, but large image files can slow down page load times and hurt user experience. In fact, even a one-second delay in load time can reduce conversions by up to 7%. Since image size refers to the width and height in pixels, images left at their original, oversized dimensions often weigh down your site.
By resizing images, you can significantly improve site speed, SEO, and user experience (UX). To unlock these benefits, it’s important to understand how resizing works and choose the right method for your website. In this guide, we’ll show you just how impactful image resizing can be and how simple it is to implement.
In this article:
- Resizing Images in WordPress
- What’s the Process for Defining Custom Image Sizes in WordPress?
- The Best Methods for Resizing Images in WordPress
- Benefits of Using a Plugin to Resize Images
- What is the Best Plugin for Image Resizing in WordPress?
- Cropping vs. Resizing: How to Choose the Right Method
- Speeding Up Image Resizing with Cloudinary
Resizing Images in WordPress
The easiest way to resize an image in WordPress is to use one of the platform’s default image sizes. By default, WordPress provides three options:
- Thumbnail: 150 × 150 px
- Medium: Up to 300 px (width and height)
- Large: Up to 1024 px (width and height)
To resize an image using these defaults:
- Open the Media Library, select your image, or upload a new one.
- Insert the image into a page or post.
- Click the image to show the Settings panel.
- Under Resolution, use the drop-down menu to choose a size.
- Click Save to apply your changes.
If the default sizes don’t fit your needs, you have two options:
- Set custom dimensions: Best if you only need specific sizes for one or two images.
- Edit or add default sizes: Ideal if you frequently need custom dimensions for many images, both now and in the future.
What’s the Process for Defining Custom Image Sizes in WordPress?
- Open the Media Library and choose an image (or upload a new one), then insert it into a post or page.
- Click the image to bring up the Settings panel.
- In the panel, locate the Width and Height options.
- Enter your preferred dimensions in the corresponding fields.
- Click Save Changes to apply your new settings.
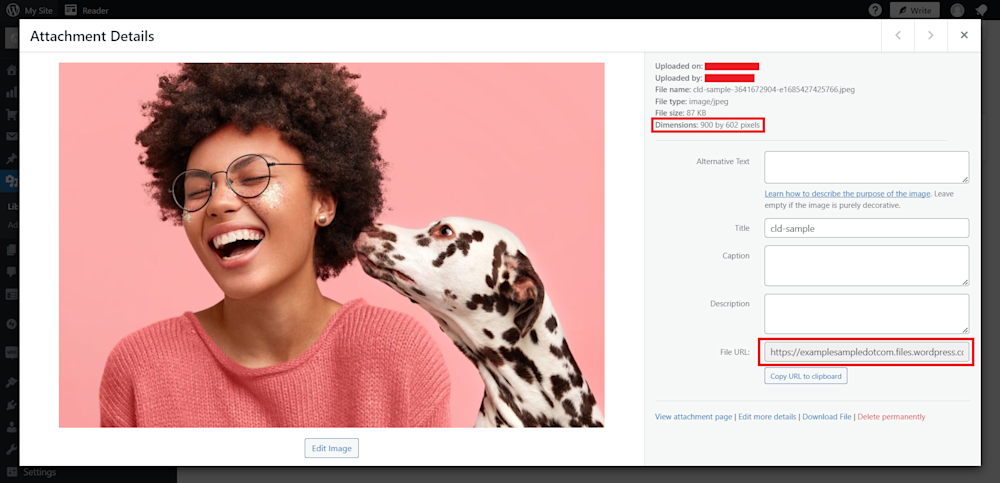
Resizing Images in the Media Library of WordPress
Resizing images in WordPress can be done quickly through the built-in Media Library. Here’s how:
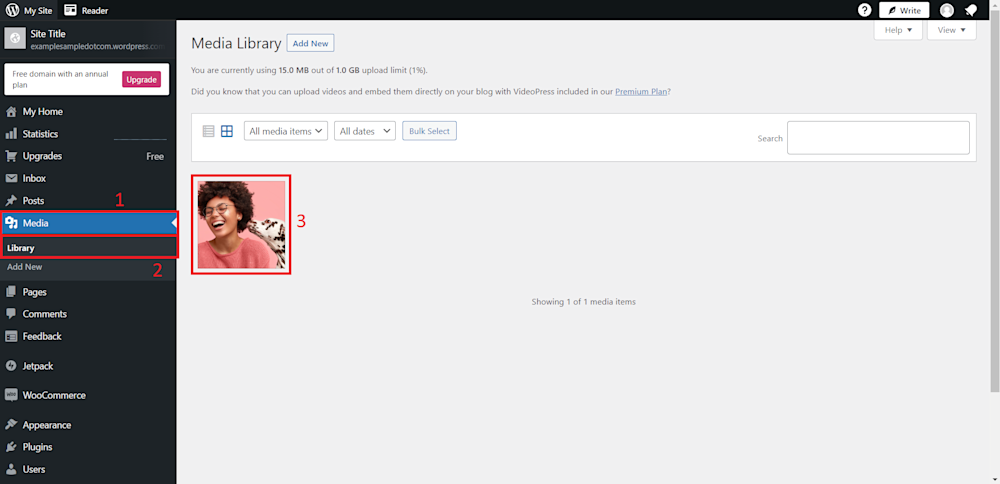
- Log in to your WordPress site and open the Media Library.
- Select the image you want to resize (or upload a new one).
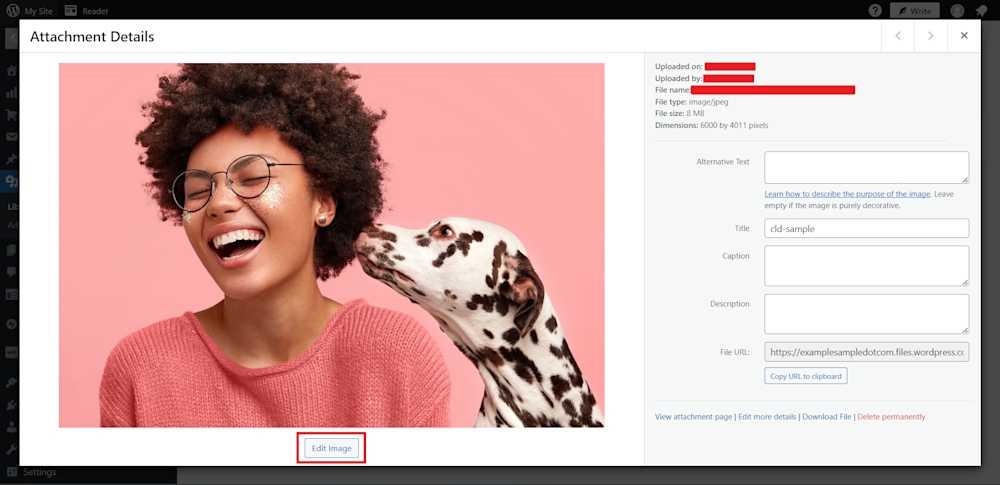
3. Click Edit Image.
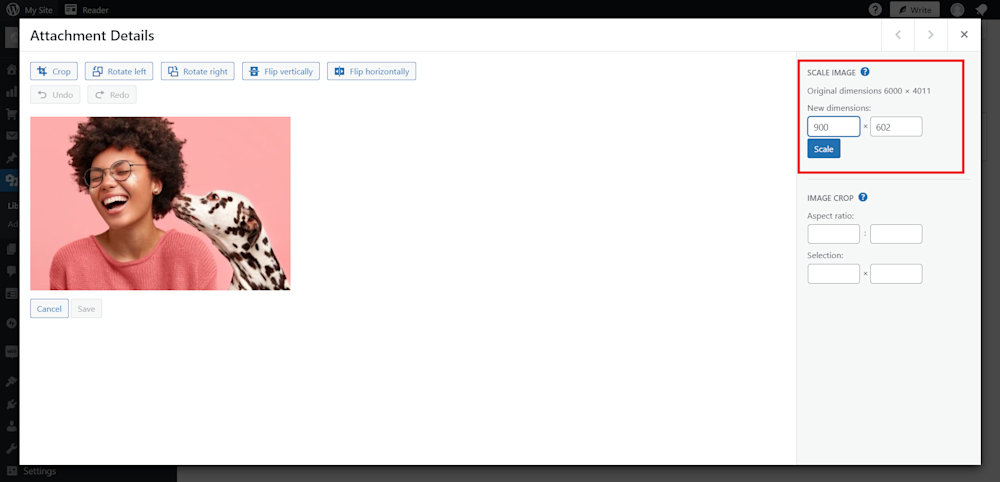
4. Under Scale Image, enter your desired dimensions.
- If you enter only the width, WordPress automatically adjusts the height to maintain the aspect ratio (and vice versa).
Example: set the width to 900px to match your content area.
5. Click Scale to apply changes.
6. Review the resized image on the details page or copy its new URL for use.
The Best Methods for Resizing Images in WordPress
WordPress offers several methods for resizing images, and the right choice depends on your site’s design and how many images you need to adjust. Here are the main options:
- Image Settings Panel: After inserting an image into a post or page, click on it to open the Settings panel. This is a quick solution for resizing individual images already in use.
- Media Library Edit Panel: From the Media Library, you can select an image and adjust its size. Best for resizing images that have already been uploaded.
- Image Resizing Plugins: Plugins provide extra flexibility and automation. We’ll cover a few popular options below and explain how to choose the right one.
- Custom Code (CSS): Developers can use custom CSS to resize specific images within posts or pages. This gives precise control over individual elements.
- Theme Customization: Some WordPress themes include settings for image sizes, ensuring consistent visuals across your site.
Benefits of Using a Plugin to Resize Images
Using a plugin for image resizing offers several key benefits:
- Faster workflow: Batch processing and automation make it easy to resize multiple images quickly and efficiently.
- Optimized performance: Many plugins focus on page speed, ensuring your images are compressed and optimized to improve core web performance metrics.
- Flexible customization: Create custom thumbnail sizes and adjust dimensions to fit your site’s unique design needs.
- Consistent visuals: Maintain uniform image sizes across your entire website with minimal effort.
- Responsive design support: Automatically deliver properly sized images for different screen sizes and devices, improving the user experience.
What is the Best Plugin for Image Resizing in WordPress?
1. Image Optimization Plugins
General-purpose optimization plugins, such as Cloudinary, Smush, ShortPixel, or EWWW Image Optimizer, can resize, compress, and optimize images automatically. These tools are often cost-effective and ensure your images are balanced between quality and performance.
- Compression control: WordPress automatically compresses JPEGs to 82% quality by default, but optimization plugins give you full control to adjust quality levels as needed. Reserve higher quality for key visuals, and compress less critical images to boost performance.
- Performance benefits: By reducing file sizes without sacrificing clarity, these plugins help maintain fast-loading pages and improve Core Web Vitals.
- Additional enhancements: Pairing image optimization with a Content Delivery Network (CDN) ensures faster global delivery and smoother performance.
2. Image Resize Plugins for Galleries and Specialized Needs
For sites with specific image requirements, such as professional photography, art portfolios, or e-commerce, dedicated gallery plugins are a better choice.
Cloudinary goes beyond traditional plugins by offering a complete media management and optimization platform. It’s ideal for businesses and e-commerce sites that need scalable, automated control over images and videos.
Key features include:
- Dynamic resizing & cropping: Automatically adjust images to any dimension, aspect ratio, or focal point on the fly.
- AI-driven optimization: Compresses and delivers images at the optimal format and quality for each device and browser.
- CDN delivery: Built-in global CDN ensures fast, reliable media delivery anywhere in the world.
- Responsive design support: Serve images tailored to each screen size, improving mobile experiences.
- Automation at scale: Perfect for websites with thousands of images, eliminating the need for manual resizing.
⚠️ Pro tip: Even when using gallery plugins, always compress or optimize your original full-size images before uploading them. While Cloudinary trims thumbnails efficiently, uploading massive original files can still drag down performance.
Cropping Images in WordPress
Cropping an image in WordPress is a quick process. Here’s how:
- Go to the Media Library and select the image you want to edit.
- Click Edit.
- Drag your cursor over the image to create a crop area.
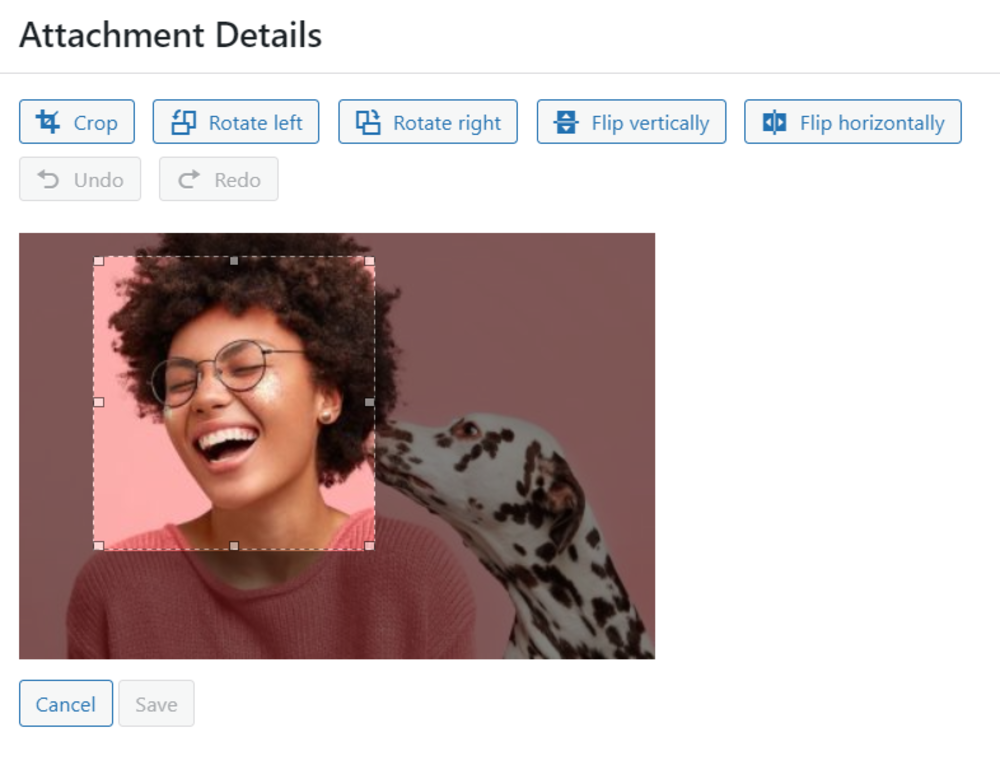
4. Adjust the crop by dragging the corners or moving the selection box until you’re satisfied with the composition.
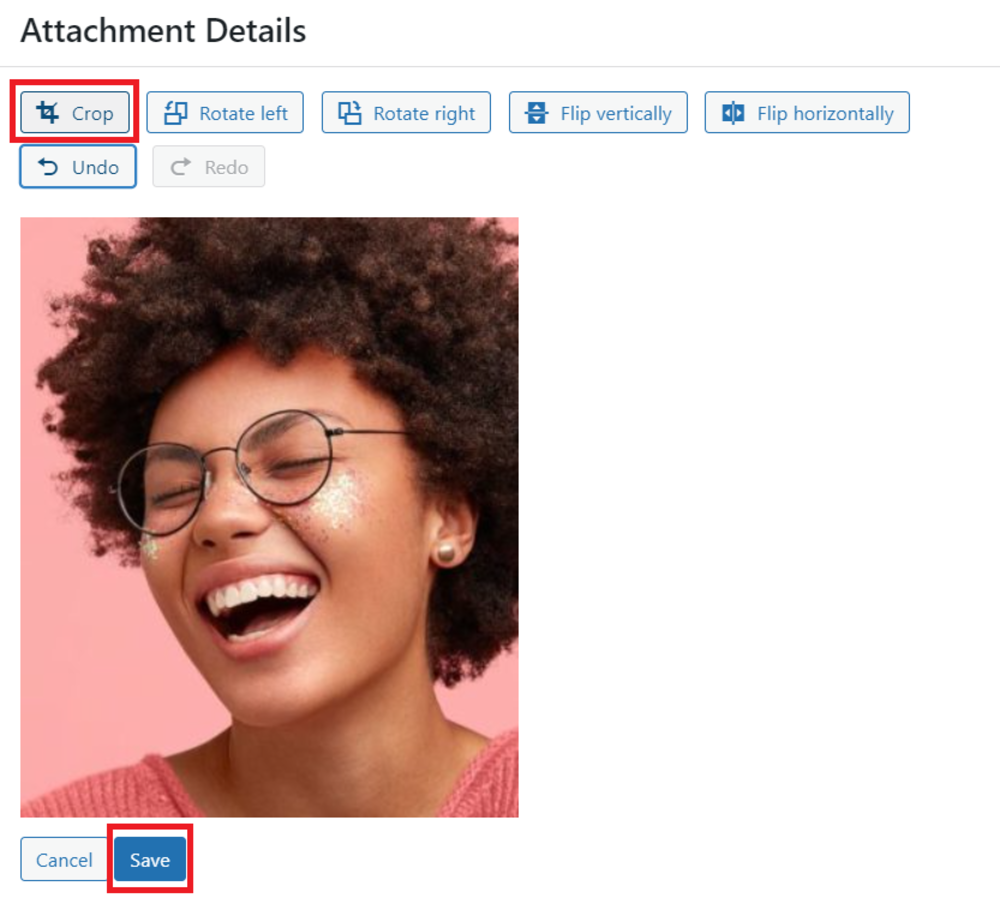
5. Select Crop to confirm.
6. Click Save to apply your changes
To refine or reposition the cropped area within the image, you can simply click and drag the boxes to set your crop. Move the area around the image until you are satisfied with the composition. Once you have achieved the desired area, click Crop, which will also enable the save button. Finally, click Save.
Cropping vs. Resizing: How to Choose the Right Method
Resizing Images
Pros:
- Preserves the whole image: Resizing adjusts dimensions without cutting out any part of the picture.
- Maintains aspect ratio: Dimensions can be scaled while keeping proportions intact, avoiding distortion.
- Smaller file sizes: Resized images often load faster and take up less storage space.
- Quick and efficient: Ideal for processing multiple images at once since it’s a fast adjustment.
Cons:
- Loss of detail: Shrinking images too much can reduce sharpness and fine details.
- No composition changes: Resizing doesn’t let you remove distractions or reframe the subject.
Cropping Images
Pros:
- Refines composition: Cropping lets you cut out unwanted areas and emphasize key subjects.
- Focuses attention: By eliminating distractions, cropping directs the viewer’s eye to what matters most.
Cons:
- Removes original content: Any part of the image outside the crop area is lost.
- Aspect ratio risks: Cropping without care may distort the image.
- File size variations: Depending on resolution, cropped images may not always be smaller.
Speeding Up Image Resizing with Cloudinary
Cloudinary offers an indispensable tool for optimizing and managing your website’s media assets with its WordPress Plugin. Plus, it gets rid of all these manual steps when it comes to resizing images within WordPress. Here’s what Cloudinary can do for you:
- Enhanced Site Performance. By optimizing your site’s performance and improving page load times, it can improve your user experience and helps boost your Google page rankings, Core Web Vitals, and Lighthouse scores.
- Automated Features: Cloudinary’s plugin offers a range of automated features, such as advanced auto-responsive delivery, customizable lazy loading, and fast CDN delivery of assets. You can deliver engaging visual experiences while optimizing image and video quality, resizing and cropping using AI, and applying transformations and effects.
- Seamless Integration. With Cloudinary, you can enjoy seamless integration within your WordPress environment. It offers compatibility with popular page builders and provides end-to-end support for WooCommerce, making it suitable for various use cases, whether personal or business-related.
- Plug-and-Play Solution. Getting started with the Cloudinary plugin is a breeze. Its intuitive onboarding wizard lets you quickly set up and automate your image, video, and visual media workflows. The true plug-and-play nature of the solution ensures that you can start delivering optimized and responsive media immediately.
- Insights and Metrics. Cloudinary’s dashboard provides valuable insights into optimization metrics and data usage, empowering you with the information you need to make informed decisions. Say goodbye to surprises and have full visibility into your media optimization efforts.
Closing the Book
Mastering the art of resizing images in WordPress opens up possibilities for enhancing your website’s visual appeal and performance. With the seamless integration of Cloudinary’s plugin, you can effortlessly resize, crop, rotate, flip, and optimize your images, ensuring they look stunning on every device and load lightning-fast. Don’t settle for subpar visuals or slow-loading pages.
Sign up for Cloudinary today and witness the transformative impact of perfectly resized images in WordPress.
Learn more:

