Did you know that almost 64% of developers prefer using JavaScript to create interactive web components? One such example is a photo gallery. JavaScript is then used to add interactivity to the gallery, such as dynamically loading images. The use cases are endless, from e-commerce websites showcasing product images to photographers displaying their portfolios.
This article is designed to guide you through creating a dynamic and interactive photo gallery using JavaScript and Cloudinary assets. For this, we will make an HTML webpage with a collection of elements, often including img tags for the images and div elements for grouping and styling.
In this article:

How to Create an Attractive Photo Gallery Using JavaScript
To follow along in this tutorial, you will need to have a foundational understanding of HTML, CSS, and JavaScript/jQuery. Additionally, to display your images in your photo gallery, you will need to have a Cloudinary account, which you can sign up for here.
After that, the next step requires you to upload some images to Cloudinary. This can done either manually through the Cloudinary dashboard or programmatically using Cloudinary’s API, which provides SDKs compatible with most popular programming languages. For this tutorial, we’ll upload our images through the Cloudinary dashboard.
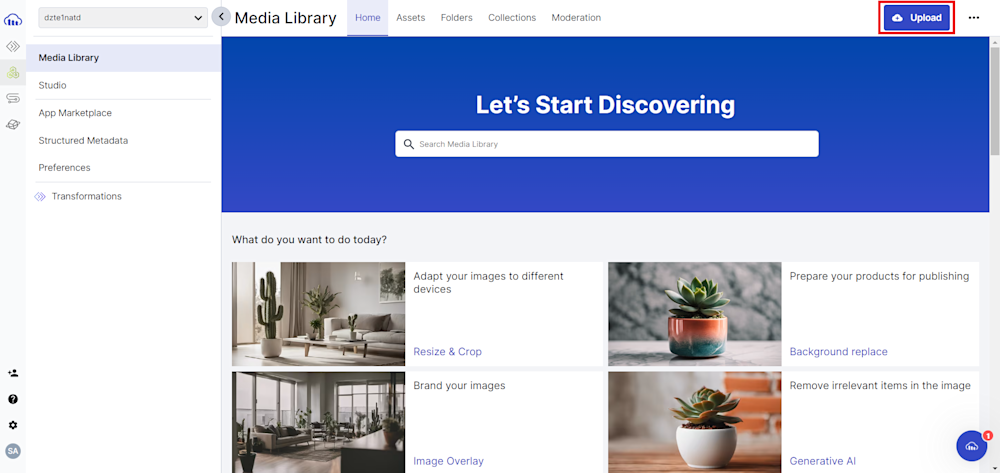
To do this, log in to your Cloudinary account and navigate to the Media Library Dashboard. Here, click the Upload button in the top-right corner.
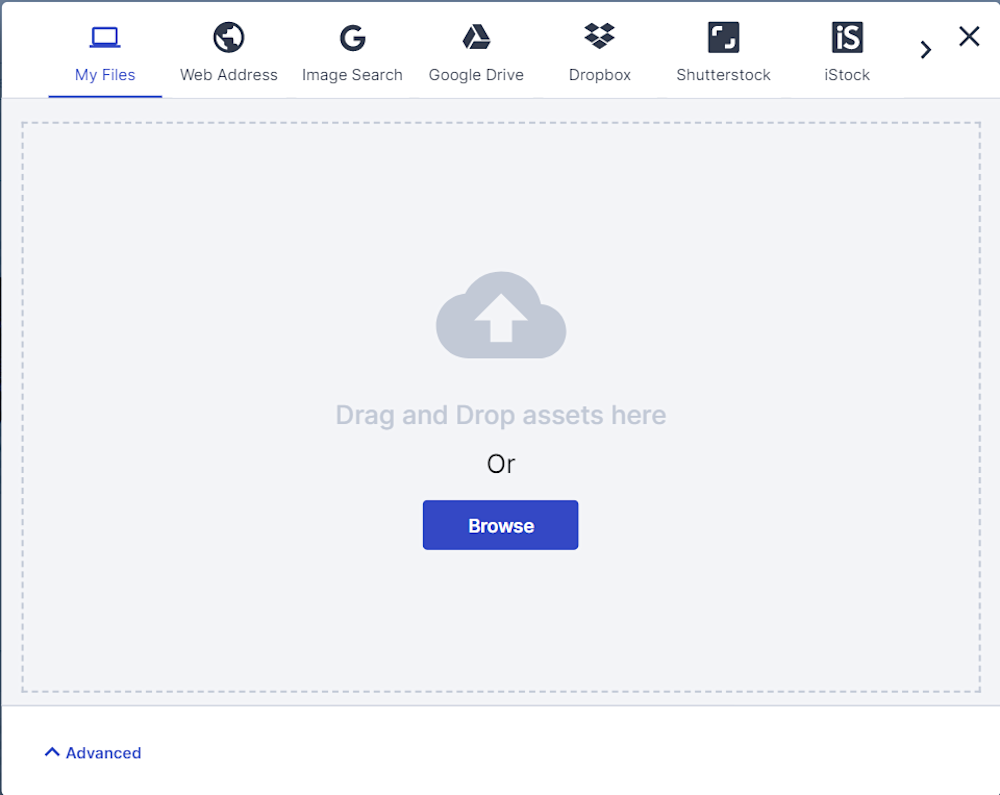
Next, drag and drop an image file or click Browse to select the assets you want to upload.
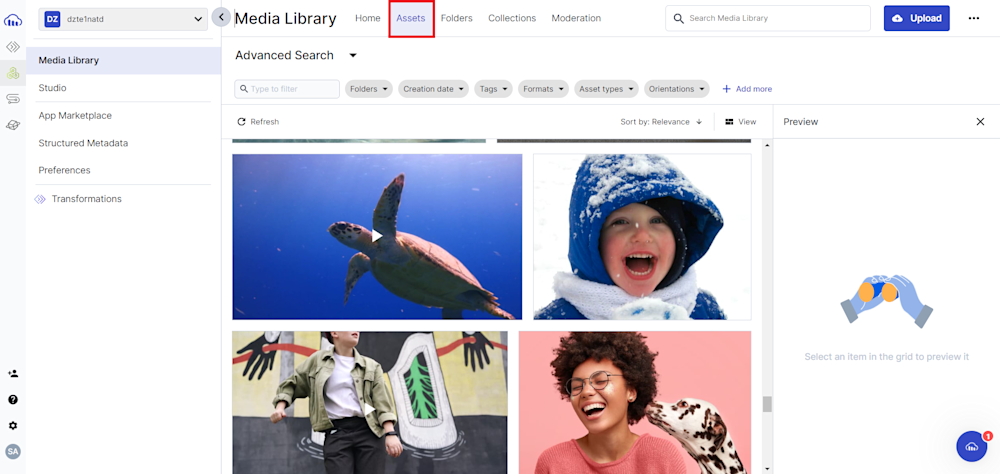
Once your images have finished uploading, you can proceed to the Assets tab to verify whether your photos were uploaded successfully.
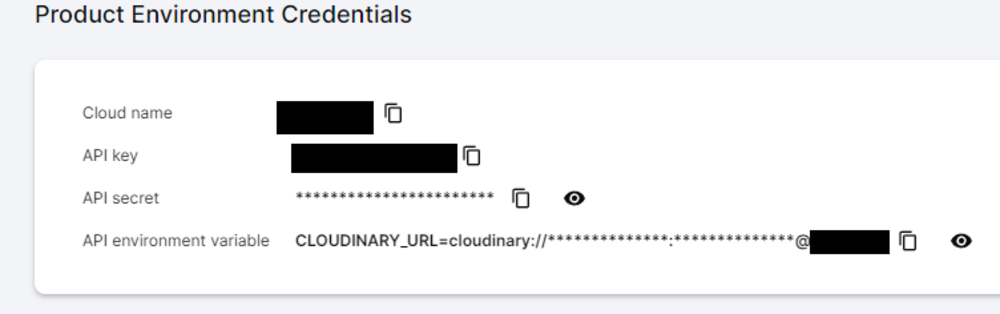
Next, we will need our cloud name to retrieve our images from the cloud. To retrieve these, click the Programmable Media button at the top left corner of your screen and go to the Dashboard tab. Here, you will see your Cloudinary API credentials. Copy your Cloud Name to your clipboard, as we’ll need it later.
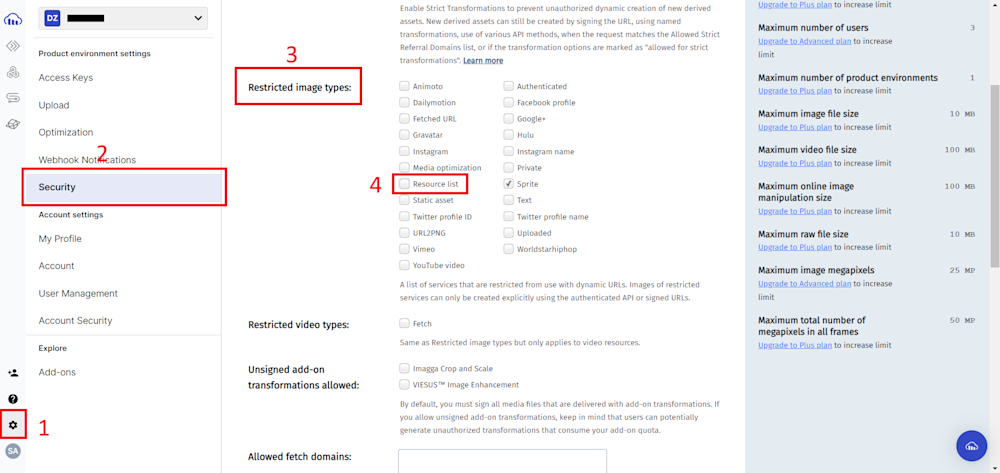
Lastly, it’s essential to configure Cloudinary to allow resource list deliveries. This configuration helps us retrieve JSON lists containing information on specified resources accessible within your Cloudinary cloud.
So go to your settings, navigate to the Security tab, and scroll down to find the “Restricted image types.” We will ensure the Resource list checkbox is unselected and save our settings.
With this, we are ready to begin coding our photo gallery webpage.
Structuring Your HTML and CSS for JS Photo Gallery
The first step in creating a photo gallery involves creating an HTML file for your project. So start creating a simple HTML file by including a simple HTML5 doctype declaration, opening/closing html, head, and body tags:
<!DOCTYPE html>
<html>
  <head>
    <title>My Cloudinary Images</title>
  </head>
  <body>
  </body>
</html>
Next, let’s add a title to our photo gallery. To do this, we will create a title tag inside the head tag in our HTML file. This title will appear in the browser’s title bar or the page’s tab.
Then, we will define our page title, which will show up on the page using the header tag inside the body of our HTML. Nested in this, we will create a div belonging to the container class, which will be defined later in our CSS, and then inside this element, we will create our heading (h1) tags.
Here is what our HTML file looks like so far:
<!DOCTYPE html>
<html lang="en">

<head>
    <title>Photo Gallery with JS & Cloudinary</title>
</head>

<body>
    <header>
        <div class="container">
            <h1>My Cloudinary Photo Gallery</h1>
        </div>
    </header>
</body>

</html>
Next, we need to create a place in our HTML for our images. To do this, we will define a main element inside our body tags. The main will contain a div element belonging to the container class.
In this element, we will make an unordered list called imageList. This list belongs to the images class and will be populated with our images. Here is what our body tag looks like:
<body>
    <header>
        <div class="container">
            <h1>My Cloudinary Photo Gallery</h1>
        </div>
    </header>
    <main>
        <div class="container">
            <ul class="images" id="imageList">
                <!-- Images will be added here dynamically -->
            </ul>
        </div>
    </main>
</body>
Before finishing our HTML file, we need to add CSS style to our page. To do this, create a new file called style.css and add the following code:
* {
    box-sizing: border-box;
    margin: 0;
    font-family: 'Segoe UI', Tahoma, Geneva, Verdana, sans-serif;
    font-size: large;
}

body {
    padding: 0;
    width: 100%;
    min-height: 100vh;
    display: grid;
    grid-template-rows: auto 1fr;
    justify-content: center;
    background: #4d1a78;
    color: #fff;
}

h1 {
    font-size: x-large;
}

img {
    max-width: 100%;
    height: auto;
    transition: all .2s ease-in-out;
    opacity: 1;
}

img:hover {
    transform: scale(1.2);
    opacity: 0.8;
    border: 5px solid #bbcaed;
}

a {
    color: inherit;
}

header {
    display: flex;
    flex-direction: column;
    align-items: center;
    padding: 1em 0;
    margin-bottom: .5em;
    font-size: 1em;
    font-weight: 500;
    margin: 0;
}

.container {
    width: 100%;
    max-width: 1024px;
    padding: 0 1em;
    margin: 0 auto;
}

.images {
    list-style: none;
    padding: 0;
    margin: 1em;
    display: grid;
    grid-template-columns: repeat(auto-fill, minmax(200px, 1fr));
    grid-gap: 3em;
}

.imageTitle {
    margin: .4em 0 0;
}
We have used img:hover to define a hover animation over our images.
Finally, we need to link our style.css to our HTML document. We will create a link tag and add the directory of our style.css file to the href. We will also link in our JS file called script.js, which we will define later.
Here is what our complete HTML file looks like:
<!DOCTYPE html>
<html lang="en">

<head>
    <title>Photo Gallery with JS & Cloudinary</title>
    <link rel="stylesheet" href="style.css">
    <script src="script.js"></script>
</head>

<body>
    <header>
        <div class="container">
            <h1>My Cloudinary Photo Gallery</h1>
        </div>
    </header>
    <main>
        <div class="container">
            <ul class="images" id="imageList">
                <!-- Images will be added here dynamically -->
            </ul>
        </div>
    </main>
</body>

</html>
Now, our webpage appears as follows:

Incorporating JS to Bring the Photo Gallery to Life
Now that our webpage is ready, we need to add functionality to our project. We will create a new JavaScript file called script.js in our project folder for this. Next, we will start by creating an empty list called images that will store the public ID of our images, as well as their URLs. We will create a variable for our cloud name, the tag of our images, and our Cloudinary URL to retrieve our resource list:
var images = [];

// Replace 'demo' and 'logo' with your cloud name and tag
var cloudName = 'your_cloudName';
var tag = 'animal';

// URL to fetch images from Cloudinary
var url = 'https://res.cloudinary.com/' + cloudName + '/image/list/' + tag + '.json';
Next, we will use fetch to get a JSON response that retrieves information regarding all our assets marked with the project tag. The fetch function creates a response, which we convert to a JSON format.
Next, for each element in the response, we create an image URL and store it in the images array along with the image’s public ID. We then load our images into our HTML file using the loadImages() function, which we will define later.
Here is what our code looks like so far:
var images = [];

// Replace 'demo' and 'logo' with your cloud name and tag
var cloudName = '...';
var tag = 'animal';

// URL to fetch images from Cloudinary
var url = 'https://res.cloudinary.com/' + cloudName + '/image/list/' + tag + '.json';

fetch(url)
    .then(response => response.json())
    .then(data => {
        // Loop through each image
        data.resources.forEach(image => {
            var imageUrl = 'https://res.cloudinary.com/' + cloudName + '/image/upload/' + image.public_id + '.' + image.format;

            // Add image to array
            images.push({ src: imageUrl, title: image.public_id });
        });

        // Call the function to load images
        loadImages(images);
    })
    .catch(error => console.error('Error:', error));
Next, we create a function called loadImages(), which takes in our imageArray as a parameter. It then runs a for loop for each element in the array and retrieves its public ID and image URL.
It then creates a list item using the li tag, creates a div element inside the li tag, and then adds to our image using the img tag. Finally, the function adds an h3 tag to display the public ID of our image before appending all these elements to the HTML file.
Here is what our complete script.js file looks like:
var images = [];

// Replace 'demo' and 'logo' with your cloud name and tag
var cloudName = ...;
var tag = 'animal';

// URL to fetch images from Cloudinary
var url = 'https://res.cloudinary.com/' + cloudName + '/image/list/' + tag + '.json';

fetch(url)
    .then(response => response.json())
    .then(data => {
        // Loop through each image
        data.resources.forEach(image => {
            var imageUrl = 'https://res.cloudinary.com/' + cloudName + '/image/upload/' + image.public_id + '.' + image.format;

            // Add image to array
            images.push({ src: imageUrl, title: image.public_id });
        });

        // Call the function to load images
        loadImages(images);
    })
    .catch(error => console.error('Error:', error));

// Function to create and append the list items
function loadImages(imageArray) {
    // Get the list element from the HTML.
    const list = document.getElementById('imageList');

    // Loop through each image in the array.
    imageArray.forEach((image, index) => {
        // Create a new list item for each image.
        const listItem = document.createElement('li');
        // Set a key attribute for the list item using the image title, converted to lowercase.
        listItem.setAttribute('key', image.title.toLowerCase());

        // Create a div to hold the image.
        const imageDiv = document.createElement('div');
        // Add a class to the div for styling purposes.
        imageDiv.className = 'imageImage';

        // Create an img element for the image and set attributes.
        const img = document.createElement('img');
        img.src = image.src;
        img.alt = image.title;

        // Create a h3 element for the image title and set attributes.
        const title = document.createElement('h3');
        title.className = 'imageTitle';
        title.textContent = image.title;

        // Append the img element to the imageDiv.
        imageDiv.appendChild(img);
        // Append the imageDiv and title to the listItem.
        listItem.appendChild(imageDiv);
        listItem.appendChild(title);

        // Append the listItem to the list.
        list.appendChild(listItem);
    });
}
With this, our photo gallery is now ready. This is what our final webpage looks like:

We can even change the tag in the script.js file to change the output images. If we change the tag to 'family' then we’ll view a different set of images:
Wrapping Up
Congratulations on completing the tutorial on creating an interactive photo gallery using JavaScript and Cloudinary assets. We’ve learned how to not only display images but also make them dynamic, thereby enhancing the user experience.
Cloudinary is a powerful media API for webpages like the one we created above. It enables developers to efficiently manage, transform, optimize, and deliver images and videos through multiple CDNs. This platform offers a plethora of options beyond displaying and tagging photos. Features like image optimization, transformation, and delivery can significantly elevate your applications’ performance and user experience.
Take your digital experience to the next level with Cloudinary’s powerful media optimization tools. Sign up for free today!
More from Cloudinary:

