Android is a powerful platform for creativity and innovation, and developers have a grand stage to shape unique user experiences. In this article, we delve into creating an image overlay app—a tool that allows users to layer images on top of one another for distinct visuals. By doing so, users can effectively heighten their content for social media, design projects, or just lighthearted fun!
Getting Started with Image Overlay on Android
Diving into the world of Android development can be incredibly exciting, especially when manipulating images. Creating an image overlay app is a perfect venture for developers who aim to provide users with a tool to superimpose one image over another, effectively enhancing their visual content for social media, projects, or just for fun.
At its core, overlaying images involves the art of blending, where one image is placed on top of another, allowing certain parts of the base image to stay visible. This is commonly achieved through the use of transparency or blending modes.
In this article:
Step-by-Step Guide to Creating an Image Overlay in Android
Let’s go over a start-to-end example of how to create an app in Android with Java that uses Cloudinary, a media asset management platform, to overlay an image over another image.
Prerequisites
Before we can add an overlay to an asset, we need to create an account on Cloudinary. So head on over to Cloudinary and sign up for free. For this tutorial, we will need our Cloudinary API credentials.
To get these credentials, log in to your Cloudinary account, open the Programmable Media button at the top left corner of your screen, and go to the Dashboard tab. Here, you will see your Cloud Name, API Key, and API Secret. Copy these, as we will need them later.

For this tutorial, we will create an Android script. To do so, you must install Android Studio. If you don’t have it installed, you can download the latest version from the Android Studio website.
With this, we can start creating our Android Studio project.

Creating an Android Studio Project
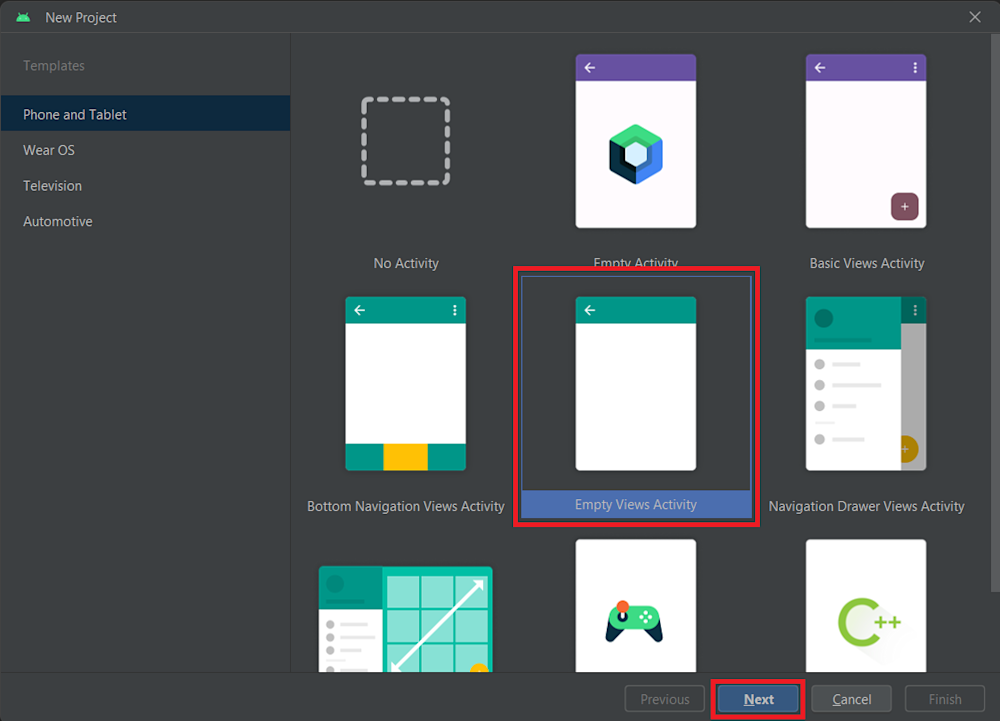
Now open Android Studio and start by selecting an Empty Activity project. Click on Next to navigate to the next window.
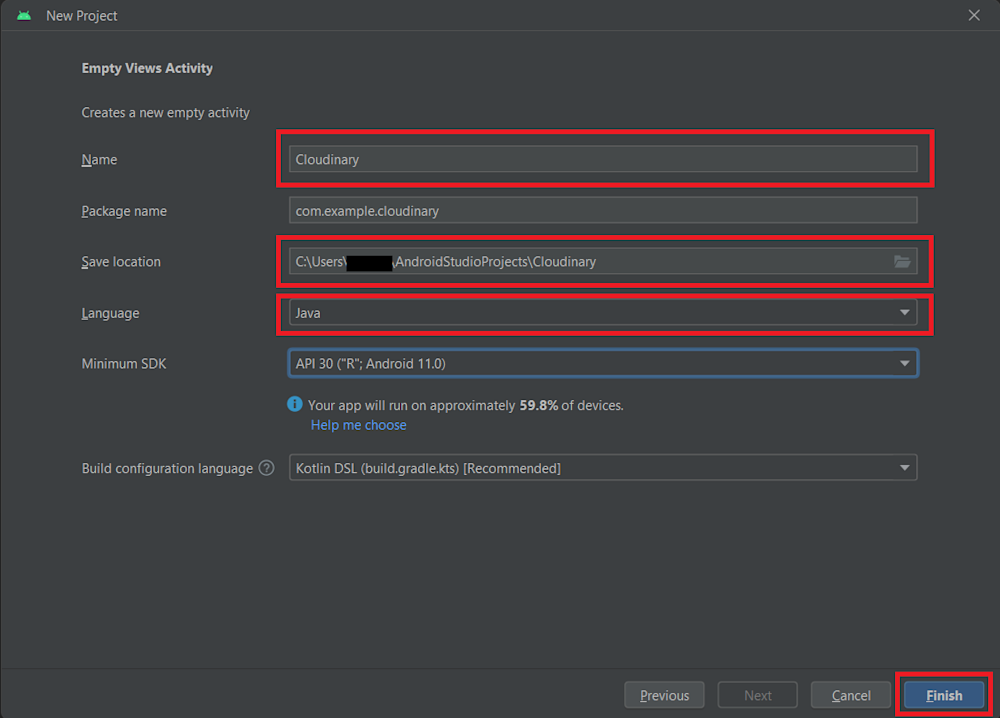
Next, rename your project to your liking. Here, we have named our project Cloudinary. Now select the directory where you want to save your project. Next, select Java as the project language. Optionally, you can select the Minimum SDK requirement for your project. You can change the requirements to your liking, but for this project, we keep the selection as default.
Finally, click on Finish to finish setting up your project.
It will take some time to build your Gradle and download the requirements, but your project should open once completed.
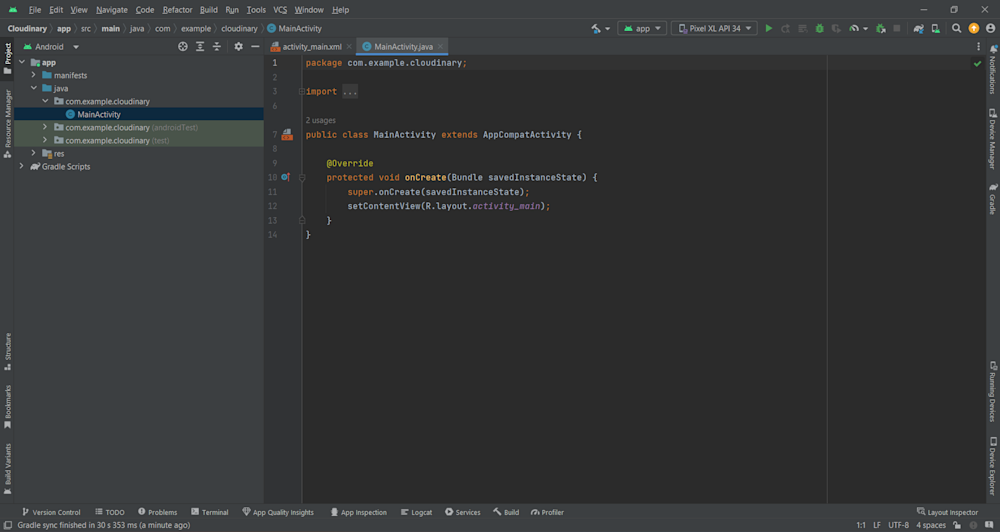
With this, we can start setting up our project.
Setting Up the Necessary Modules
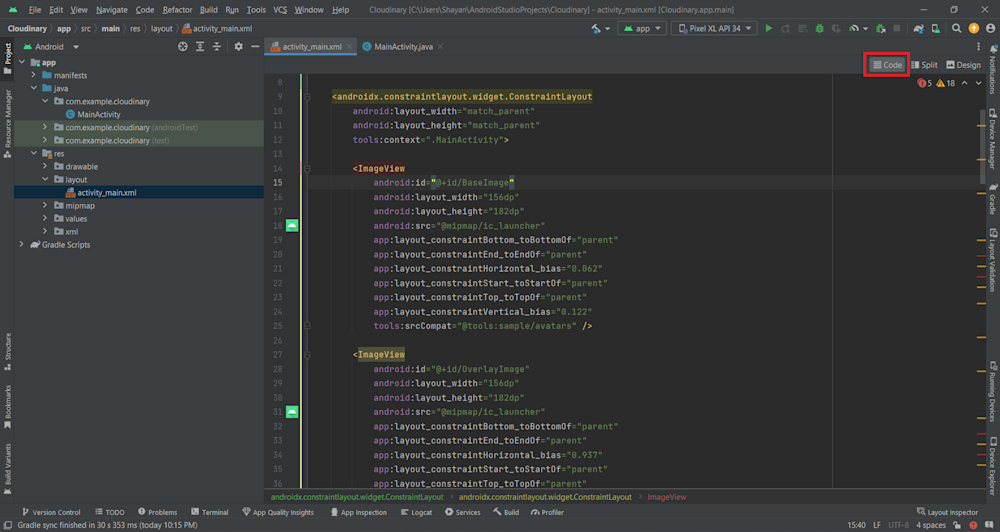
Let’s start by adding some Image holders to the project. To do this, navigate to activity_main.xml, located in the res/layout folder. This will open your main app screen. Here, we will add a few ImageView objects to display the images the user wants to select. We will also add TextView objects to help the user understand the purpose of each ImageView object.
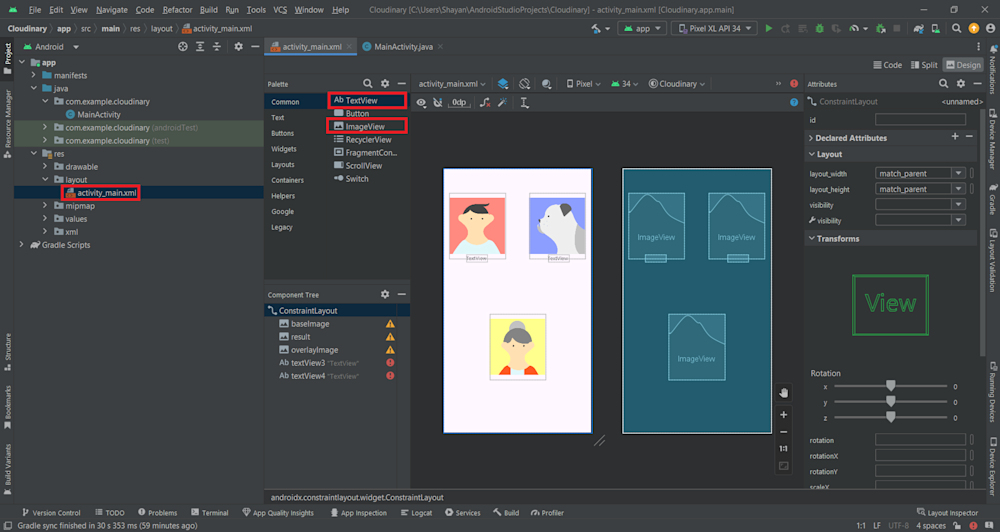
Now, to rename our object, we need to select each object and click on the Code button located in the top-right corner of the screen. This will open up the XML file for the app. Here, we can change the text and variable names of our objects to our liking:
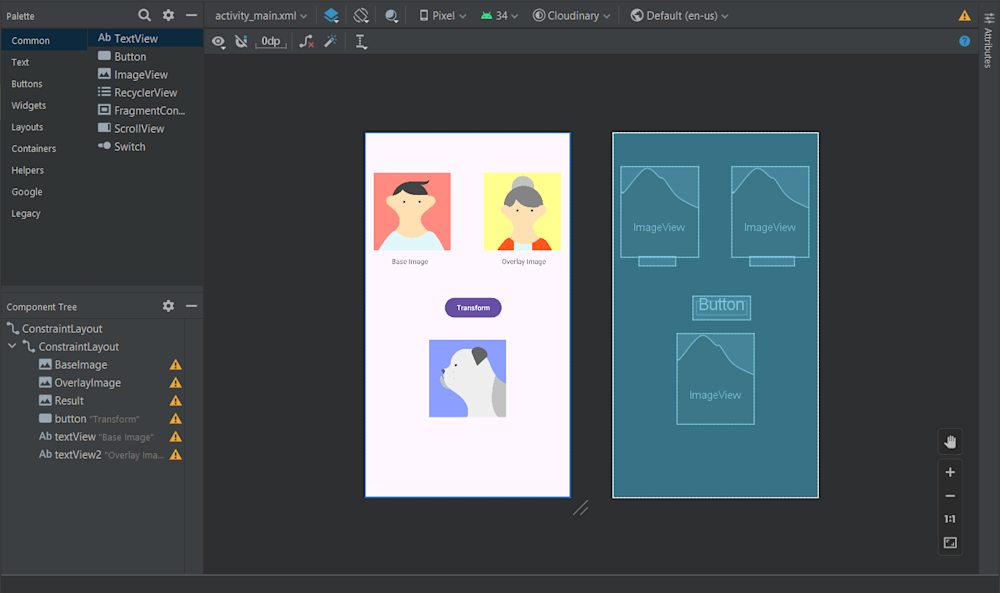
Next, we will add a button to run the Android overlay transformation for each image and show the result in the bottom ImageView. Here is what our app looks like:
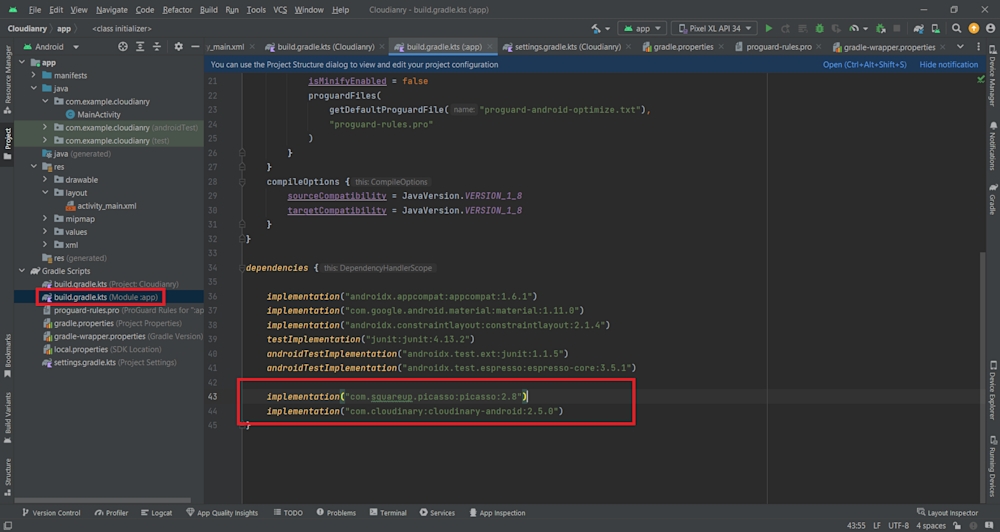
Finally, head over to the build.gradle file and add in your imports. For this project, we will be using Picasso, a powerful image downloading and caching library for Android, as well as the Cloudinary Android SDK:
implementation("com.squareup.picasso:picasso:2.8")
implementation("com.cloudinary:cloudinary-android:2.5.0")
Here is what our gradle file looks like:
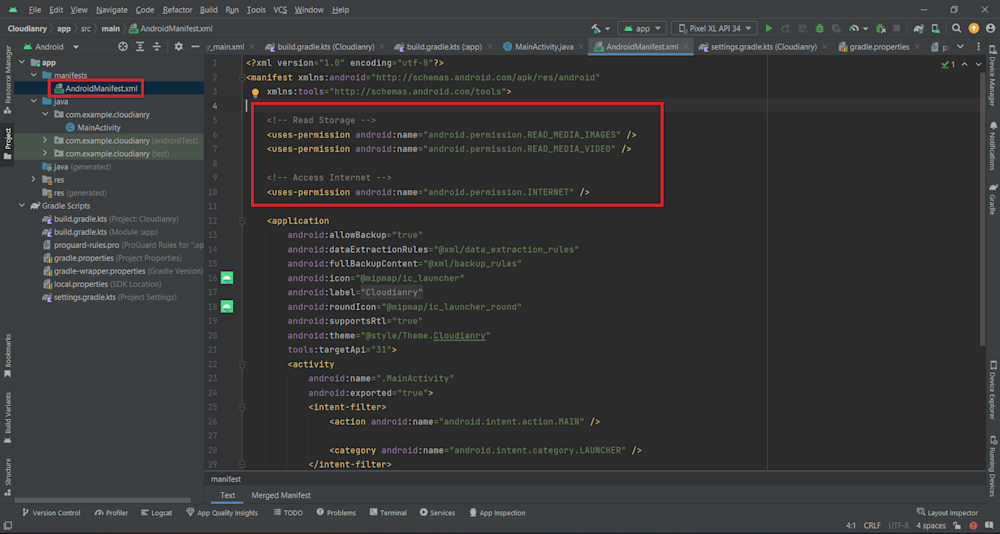
Finally, head over to the AndroidManifest.xml file and add in permissions for reading image and video files along with accessing the internet:
<!-- Read Storage -->
<uses-permission android:name="android.permission.READ_MEDIA_IMAGES" />
<uses-permission android:name="android.permission.READ_MEDIA_VIDEO" />

<!-- Access Internet -->
<uses-permission android:name="android.permission.INTERNET" />
Here is what our AndroidManifest.xml file looks like:
Programmatically Creating an Android Studio App
With the setup out of the way, we can start coding our project. Let’s first head over to MainActivity.java, located in the com.example.cloudinary folder of our project. In the MainActivity class, we will create several new environment variables that will serve as placeholders for the program:
public class MainActivity extends AppCompatActivity {

   private static final String TAG = "Upload ###";

   private static int IMAGE_REQ=1;
   private Uri imagePath;
   private Uri imagePath2;
   Map config = new HashMap();

   private ImageView BaseImage;
   private ImageView Result;
   private ImageView OverlayImage;
   private Button button;
...
The 3 ImageView variables display the base image, overlay image, and resulting image. The Uri variables help us store the path of our base and overlay images. The button variable refers to our transform button. The HashMap() configures our Cloudinary API. Finally, the TAG variable will find our debug statements in our code.
Now that our variables are set up, we can start working on our onCreate function. Let’s start by retrieving our objects from our XML file. We will do this by using the findViewById() function:
@Override
protected void onCreate(Bundle savedInstanceState) {
   super.onCreate(savedInstanceState);
   setContentView(R.layout.activity_main);

   BaseImage=findViewById(R.id.BaseImage);
   Result=findViewById(R.id.Result);
   OverlayImage=findViewById(R.id.OverlayImage);
   button=findViewById(R.id.button);
...
Next, we will call a function called initConfig(), which we will define later. We will also add an on-click function to our base and overlay images using the setOnClickListener(). These functions will call a requestPermission() function, which we will also define later:
@Override
protected void onCreate(Bundle savedInstanceState) {
   super.onCreate(savedInstanceState);
   setContentView(R.layout.activity_main);

   BaseImage=findViewById(R.id.BaseImage);
   Result=findViewById(R.id.Result);
   OverlayImage=findViewById(R.id.OverlayImage);
   button=findViewById(R.id.button);

   initConfig();

   BaseImage.setOnClickListener(v -> {
       requestPermission(BaseImage);
       Log.d(TAG, ": "+"request permission");
   });
   OverlayImage.setOnClickListener(v -> {
       requestPermission(OverlayImage);
       Log.d(TAG, ": "+"request permission");
   });
...
Finally, we define an on-click function for the button:
       button.setOnClickListener(v -> {

           MediaManager.get().upload(imagePath).option("public_id", "baseimage").dispatch();
           MediaManager.get().upload(imagePath2).option("public_id", "overlayimage").dispatch();

//            String url = MediaManager.get().url().transformation(tr).generate("newimage");
//
           String url = MediaManager.get().url().transformation(new Transformation()
                   .overlay(new Layer().publicId("overlayimage")).chain()
                   .flags("layer_apply")).generate("baseimage");

           Log.d("URL", url);

           Picasso.get()
                   .load(url)
                   .into(Result);
       });
Here, we start by using Cloudinary’s MediaManager to upload the base and overlay images to the Cloudinary cloud with public IDs defined as baseimage and overlayimage, respectively. Next, we use the MediaManager’s .transform() method to generate a new overlay transformation. Finally, we print this transformation to the console and use Picasso to display this new image in the resulting ImageView.
Here is what our final OnCreate function looks like:
   @Override
   protected void onCreate(Bundle savedInstanceState) {
       super.onCreate(savedInstanceState);
       setContentView(R.layout.activity_main);

       BaseImage=findViewById(R.id.BaseImage);
       Result=findViewById(R.id.Result);
       OverlayImage=findViewById(R.id.OverlayImage);
       button=findViewById(R.id.button);

       initConfig();

       BaseImage.setOnClickListener(v -> {
           requestPermission(BaseImage);
           Log.d(TAG, ": "+"request permission");
       });
       OverlayImage.setOnClickListener(v -> {
           requestPermission(OverlayImage);
           Log.d(TAG, ": "+"request permission");
       });

       button.setOnClickListener(v -> {

           MediaManager.get().upload(imagePath).option("public_id", "baseimage").dispatch();
           MediaManager.get().upload(imagePath2).option("public_id", "overlayimage").dispatch();

//            String url = MediaManager.get().url().transformation(tr).generate("newimage");
//
           String url = MediaManager.get().url().transformation(new Transformation()
                   .overlay(new Layer().publicId("overlayimage")).chain()
                   .flags("layer_apply")).generate("baseimage");

           Log.d("URL", url);

           Picasso.get()
                   .load(url)
                   .into(Result);
       });

   }
Now that we’ve completed our OnCreate function, let’s define our initConfig() function.
The initConfig() function is a simple private void function used to configure our Cloudinary API. We simply use the config hashmap to define our Cloudinary API credentials. We then use this hashmap to initialize our MediaManager. Here is what our function looks like:
   private void initConfig() {

       config.put("cloud_name", "your_cloud_name");
       config.put("api_key","your_api_key");
       config.put("api_secret","your_api_secret");
//        config.put("secure", true);
       MediaManager.init(this, config);
   }
Next, we will define the requestPermission() function.
The requestPermission() function works as its name. It triggers an Android System request to the user, requesting permission to access user files and internet usage. If the permission is granted, the function calls in a selectImage() function. Here is what our function looks like:
private void requestPermission(ImageView img) {
   if(ContextCompat.checkSelfPermission(MainActivity.this, Manifest.permission.READ_MEDIA_IMAGES)
           == PackageManager.PERMISSION_GRANTED)
   {
       selectImage(img);
   }else
   {
       ActivityCompat.requestPermissions(MainActivity.this,new String[]{
               Manifest.permission.READ_MEDIA_IMAGES
       },IMAGE_REQ);
   }

}
Now let’s define the selectImage() function.
We first define a new private ImageView called img, which will indicate which image (either base or overlay) is selected. We then create a new intent inside the function. Intents are used to define abstract descriptions of operations that need to be performed. Here, we use the intent to launch an activity, which we will define next.
private ImageView selectedImage;
private void selectImage(ImageView img) {
   Intent intent=new Intent();
   intent.setType("image/*");// if you want to you can use pdf/gif/video
   intent.setAction(Intent.ACTION_GET_CONTENT);
   selectedImage = img;
   someActivityResultLauncher.launch(intent);
}
Finally, we define our activity as follows:
ActivityResultLauncher<Intent> someActivityResultLauncher = registerForActivityResult(
       new ActivityResultContracts.StartActivityForResult(),
       new ActivityResultCallback<ActivityResult>() {
           @Override
           public void onActivityResult(ActivityResult result) {
               if (result.getResultCode() == Activity.RESULT_OK) {
                   // There are no request codes
                   Intent data = result.getData();
                   if (selectedImage == OverlayImage)
                   {
                       imagePath2 = data.getData();
                       Picasso.get().load(imagePath2).into(selectedImage);
                   }
                   else
                   {
                       imagePath=data.getData();
                       Picasso.get().load(imagePath).into(selectedImage);
                   }
               }
           }
       });
Here, the activity is simply used to define our image paths. If the selected image in the img variable is the Android overlay image, we populate imagePath2 with its actual system path, and we do the same for the base image.
With this, our code is now complete. Here is what our MainActivity.java looks like:
package com.example.cloudinary;

import androidx.activity.result.ActivityResult;
import androidx.activity.result.ActivityResultCallback;
import androidx.activity.result.ActivityResultLauncher;
import androidx.activity.result.contract.ActivityResultContracts;
import androidx.appcompat.app.AppCompatActivity;
import androidx.core.app.ActivityCompat;
import androidx.core.content.ContextCompat;

import android.Manifest;
import android.app.Activity;
import android.content.Intent;
import android.content.pm.PackageManager;
import android.net.Uri;
import android.os.Bundle;
import android.util.Log;
import android.widget.Button;
import android.widget.ImageView;

import com.cloudinary.Transformation;
import com.cloudinary.android.MediaManager;
import com.cloudinary.transformation.Layer;
import com.squareup.picasso.Picasso;

import java.util.HashMap;
import java.util.Map;

public class MainActivity extends AppCompatActivity {

   private static final String TAG = "Upload ###";

   private static int IMAGE_REQ=1;
   private Uri imagePath;
   private Uri imagePath2;
   Map config = new HashMap();

   private ImageView BaseImage;
   private ImageView Result;
   private ImageView OverlayImage;
   private Button button;

   @Override
   protected void onCreate(Bundle savedInstanceState) {
       super.onCreate(savedInstanceState);
       setContentView(R.layout.activity_main);

       BaseImage=findViewById(R.id.BaseImage);
       Result=findViewById(R.id.Result);
       OverlayImage=findViewById(R.id.OverlayImage);
       button=findViewById(R.id.button);

       initConfig();

       BaseImage.setOnClickListener(v -> {
           requestPermission(BaseImage);
           Log.d(TAG, ": "+"request permission");
       });
       OverlayImage.setOnClickListener(v -> {
           requestPermission(OverlayImage);
           Log.d(TAG, ": "+"request permission");
       });

       button.setOnClickListener(v -> {

           MediaManager.get().upload(imagePath).option("public_id", "baseimage").dispatch();
           MediaManager.get().upload(imagePath2).option("public_id", "overlayimage").dispatch();

//            String url = MediaManager.get().url().transformation(tr).generate("newimage");
//
           String url = MediaManager.get().url().transformation(new Transformation()
                   .overlay(new Layer().publicId("overlayimage")).chain()
                   .flags("layer_apply")).generate("baseimage");

           Log.d("URL", url);

           Picasso.get()
                   .load(url)
                   .into(Result);
       });

   }

   private void initConfig() {

       config.put("cloud_name", "...");
       config.put("api_key","...");
       config.put("api_secret","...");
//        config.put("secure", true);
       MediaManager.init(this, config);
   }

   private void requestPermission(ImageView img) {
       if(ContextCompat.checkSelfPermission(MainActivity.this, Manifest.permission.READ_MEDIA_IMAGES)
               == PackageManager.PERMISSION_GRANTED)
       {
           selectImage(img);
       }else
       {
           ActivityCompat.requestPermissions(MainActivity.this,new String[]{
                   Manifest.permission.READ_MEDIA_IMAGES
           },IMAGE_REQ);
       }

   }

   // Select the image from the gallery
   private ImageView selectedImage;
   private void selectImage(ImageView img) {
       Intent intent=new Intent();
       intent.setType("image/*");// if you want to you can use pdf/gif/video
       intent.setAction(Intent.ACTION_GET_CONTENT);
       selectedImage = img;
       someActivityResultLauncher.launch(intent);

   }


   // You can do the assignment inside onAttach or onCreate, i.e, before the activity is displayed
   ActivityResultLauncher<Intent> someActivityResultLauncher = registerForActivityResult(
           new ActivityResultContracts.StartActivityForResult(),
           new ActivityResultCallback<ActivityResult>() {
               @Override
               public void onActivityResult(ActivityResult result) {
                   if (result.getResultCode() == Activity.RESULT_OK) {
                       // There are no request codes
                       Intent data = result.getData();
                       if (selectedImage == OverlayImage)
                       {
                           imagePath2 = data.getData();
                           Picasso.get().load(imagePath2).into(selectedImage);
                       }
                       else
                       {
                           imagePath=data.getData();
                           Picasso.get().load(imagePath).into(selectedImage);
                       }

                   }
               }
           });
}
Running the Android Overlay Application
Now, all we need to do is run our app. To do this, simply click on the Play button at the top-right corner of your screen. This will launch your Android emulator and run your App.
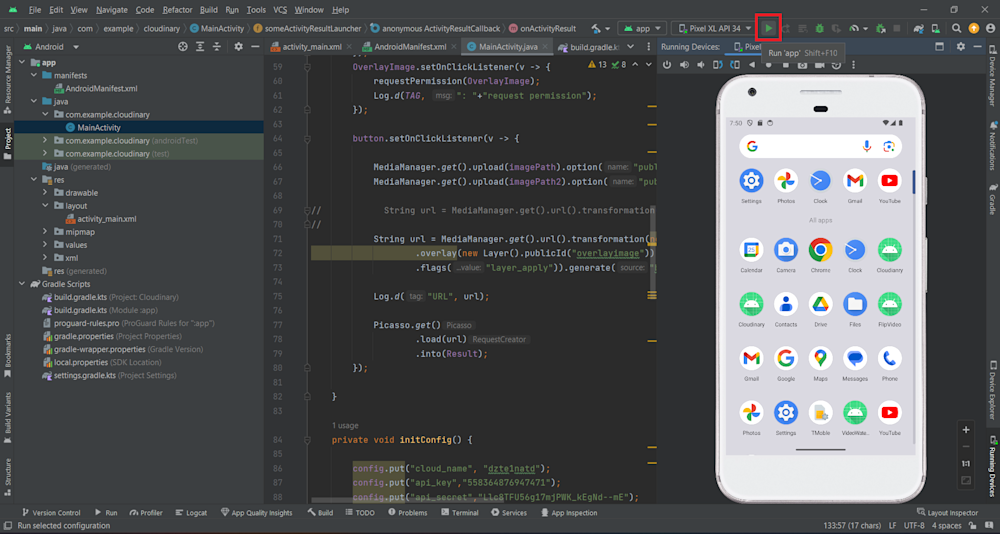
Here is what our app looks like:

Now, let’s select our images. Click on one of the image icons. This will prompt a permission request, which you need to accept for the app to function properly. Once accepted, you can select the images in your phone gallery or storage. Here, we select bike and cloudinary-icon, which we downloaded from the Cloudinary cloud.

Finally, click on the transform button to see your resultant image.

Here is what our image looks like:

Final Thoughts
In the ever-evolving landscape of Android development, mastering image overlays can significantly enhance the user experience of our apps. Android overlays add a layer of interactivity and provide a dynamic way to present information.
Using Cloudinary API in this context offers a whole new world of possibilities for app development and functionality. It simplifies creating, managing, and delivering overlay in Android, making it an invaluable tool for developers. With its robust features and easy-to-use interface, Cloudinary can help us create more engaging and visually appealing Android applications.
Remember, the Android development landscape is vast and constantly changing. Staying ahead means continuously learning and adapting. So, why wait? Sign up for Cloudinary today and start exploring the endless possibilities it offers.
More from Cloudinary:

