
Resizing means making an image smaller or larger without cropping or cutting out parts of the image. Resizing alters an image’s dimensions, typically affecting its file size and quality.
There are many reasons to resize an image. The most common is to reduce the image file size, making large images easier to email or share online. For developers, usually it’s done to ensure the images render properly on various devices and screen sizes when building a responsive website or web application.
In this article, we will walk through how to resize an image with React, a JavaScript library for building user interfaces. This article will use React packages that contain the image transformation features of a platform called Cloudinary to consistently deliver images to the browser at the requested size.
Cloudinary is a visual media platform used to upload, store, manage, transform, and deliver images and videos for websites and applications. The platform also offers a vast collection of SDKs for frontend frameworks and libraries. With Cloudinary, you can organize your media assets and automatically generate optimized assets through unique links.
In this article:
- Sandbox
- Using the Cloudinary React packages
- Configuring Cloudinary in our React application
- Uploading images to Cloudinary
- Resize an image with React using Cloudinary
Sandbox
This project was completed in a CodeSandbox. Fork and run it to quickly resize an image with React.
<CodeSandbox id="summer-leaf-14y5pp" title="How to resize image with React" />
View the codebase on GitHub here.
Using the Cloudinary React packages
To get started and resize an image with React:
- Create a free Cloudinary account — it’s free forever!
- Configure the React packages for the application.
- Upload the image to resize.
- Resize the image using the Cloudinary resize modes.
Configuring Cloudinary in our React application
After creating a Cloudinary account:
1. Create a React application by navigating to a directory and running the below command in a terminal:
npx create-react-app resize_image && cd resize_image
The above command creates a React application called resize_image and navigates to the project directory.
2. Install the @cloudinary/url-gen and @cloudinary/react packages with:
npm i @cloudinary/url-gen @cloudinary/react
The @cloudinary/url-gen package includes all the functionalities needed to create delivery urls for the images.
The @cloudinary/react package includes the React components for rendering, configuring, and transforming the images.
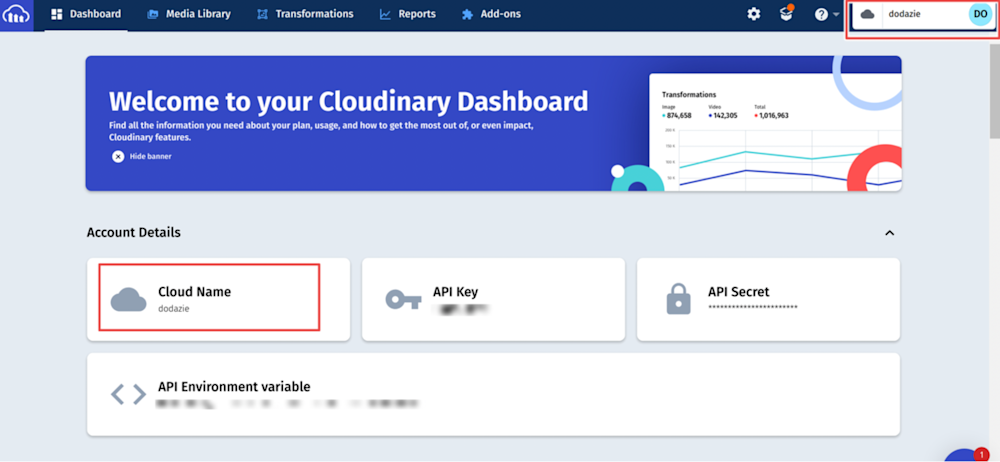
3. Create a .env file in the root directory. Include the cloud name given during sign-up as an environment variable in order to use the Cloudinary components. Get the cloud name by logging into the Cloudinary console and viewing any of the highlighted sections as shown below:
In the file, add the variable below:
REACT_APP_CLOUDINARY_CLOUD_NAME=/*YOUR CLOUD NAME HERE/*
Now that we have finished the configuration process, it’s time to upload and resize an image with React.
Uploading images to Cloudinary
There are multiple ways we can upload images to Cloudinary. In this article, we will use the Upload widget. To upload an image using the Upload widget, click on Media Library and then click Upload:

In the popup, select the Web Address option to upload the image via a url:
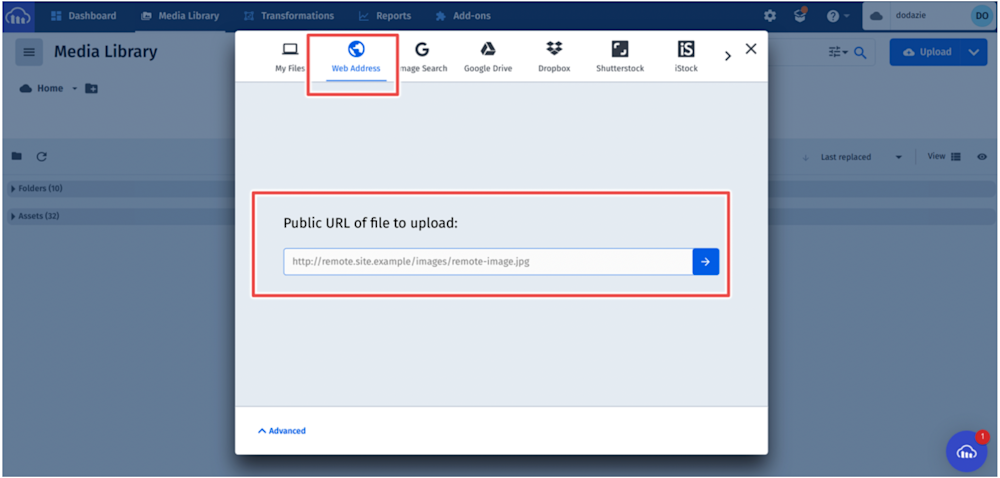
Copy the url below and paste to upload it:
4. After uploading the image, get the image Public ID (the unique identifier for an asset stored in Cloudinary), as highlighted below. This is the ID we will use and resize:

Resize the image using one of Cloudinary’s resizing modes.
Pro Tip!Consider Cloudinary’s Digital Asset Management
Looking for a centralized location to manage all your media assets? Cloudinary’s Media Library makes it easy to upload, store, manage, and deliver images and videos efficiently.
Resize an image with React using Cloudinary
Cloudinary provides eight resizing modes. You can view all of the modes in the Cloudinary Documentation.
For this post, we will use the scale resizing mode.
Using scale resizing mode
To use the scale resizing mode to resize an image with React, we must first import the Cloudinary packages, the Cloudinary AdvancedImage component, and the required scale action.
In the src/App.js file of the React application, add:
    import { Cloudinary } from "@cloudinary/url-gen";
    import { AdvancedImage } from "@cloudinary/react";
    // Import required action.
    import {scale} from "@cloudinary/url-gen/actions/resize";
The AdvancedImage component creates an image by passing the generated Cloudinary image url.
Instantiate Cloudinary and pass a cloud name to use the Cloudinary packages and components.
Then, in the App.js file, add:
    const App = () => {
      const cld = new Cloudinary({
        cloud: {
          cloudName: process.env.REACT_APP_CLOUDINARY_CLOUD_NAME
        }
      });
      return (
      );
    }
    export default App;
Create a variable that will use the cld instance with the image Public ID to generate the image url:
const imageToResizeToSpecifiedDimension = cld.image("<image_publicId>");
Use scale to resize the image:
imageToResizeToSpecifiedDimension.resize(scale().width(300))
In the return (); function, add the JSX to display the image on the browser using the Cloudinary AdvancedImage component.
    return (
      <div>
        <AdvancedImage cldImg={imageToResizeToSpecifiedDimension} />
      </div>
    );
Resizing results
The uploaded image at 870 width x 580 height before resizing:

The uploaded image resized at 300 width x 200 height:

Conclusion
This article explained how to resize an image with React using Cloudinary’s scale resizing mode. Cloudinary also offers advanced media functionality like filtering, cropping, retouching, etc. To learn more, see the Cloudinary Documentation. And be sure to try it out (it’s free forever!) to unleash the full potential of your digital media.
More from Cloudinary:


