Did you know that Flutter is the most popular cross-platform mobile framework? According to Stack Overflow’s Developer Survey, it was the most popular mobile development framework, showing its growing importance in app development.
In this article, we will learn about overlays in Flutter. Overlays are a powerful tool that allows developers to create visual elements on top of other widgets, enabling the creation of dynamic and interactive user interfaces. Cloudinary allows you to create overlays smoothly in Flutter and several other languages. We will walk you through creating an app allowing you to select images and overlay one on another using Cloudinary.
In this article:
Common Use Cases for Image Overlays with Flutter
Flutter, with its flexible and efficient design system, is an ideal platform for creating sophisticated image overlays catering to a wide range of applications. This feature is not just about slapping one picture on top of another; it’s about enhancing user engagement, adding depth to visual storytelling, and improving the app’s functionality. Here are a few scenarios where image overlays shine:
- Photo Editing Apps – Enabling users to add frames, stickers, or text to photos, thereby personalizing their images in fun and creative ways.
- Watermarking – Automatically overlaying a semi-transparent logo or text on images to protect copyright without detracting from the image itself.
- Maps and Geolocation Services – Displaying information overlays on maps, such as points of interest, navigation paths, or other annotations, to provide users with helpful context.
- Augmented Reality (AR) Experiences – Overlaying digital information on live camera feeds, enhancing the real world with computer-generated perceptual information.
- Educational Content – Illustrating concepts by overlaying diagrams or notes on top of educational videos or images, making complex information easier to understand.
- Adding Subtitles – Using an overlay can also be used to add text to images or videos. This could be anything from adding subtitles or captions to videos, making your content more accessible, to adding annotations or other relevant information directly onto an image.
- Product Customization – Overlay transformations can enable users to customize products in an e-commerce application. For example, users could add their own text or images to a product.
- Personalized User Content – These can be used to create personalized user content. For example, you could overlay a user’s name on an image to create a customized greeting card.
By leveraging Flutter’s capabilities for image overlaying, developers can create more interactive, informative, and engaging experiences that meet the demands of today’s app users. Whether adding a layer of interactivity to an educational app or enhancing user-generated content with creative flourishes, the applications are as broad as they are impactful.

How to Create an Image Overlay in Flutter
For this tutorial, we will require Flutter. If you don’t have it installed, download the latest version from the official Flutter website and follow the guide to complete your installation process. Once installed, run the following command to see if Flutter was installed successfully.
flutter --version
Once you’ve installed Flutter, you will need to install Android Studio. In case you don’t have it installed, you can download the latest version from the Android Studio website.
We need to install some plugins to help us create Flutter apps on Android Studio. To do this, open up and head to the Plugins tab. Here, search for the Flutter plugin. When you find it, click on Install to install the plugin:
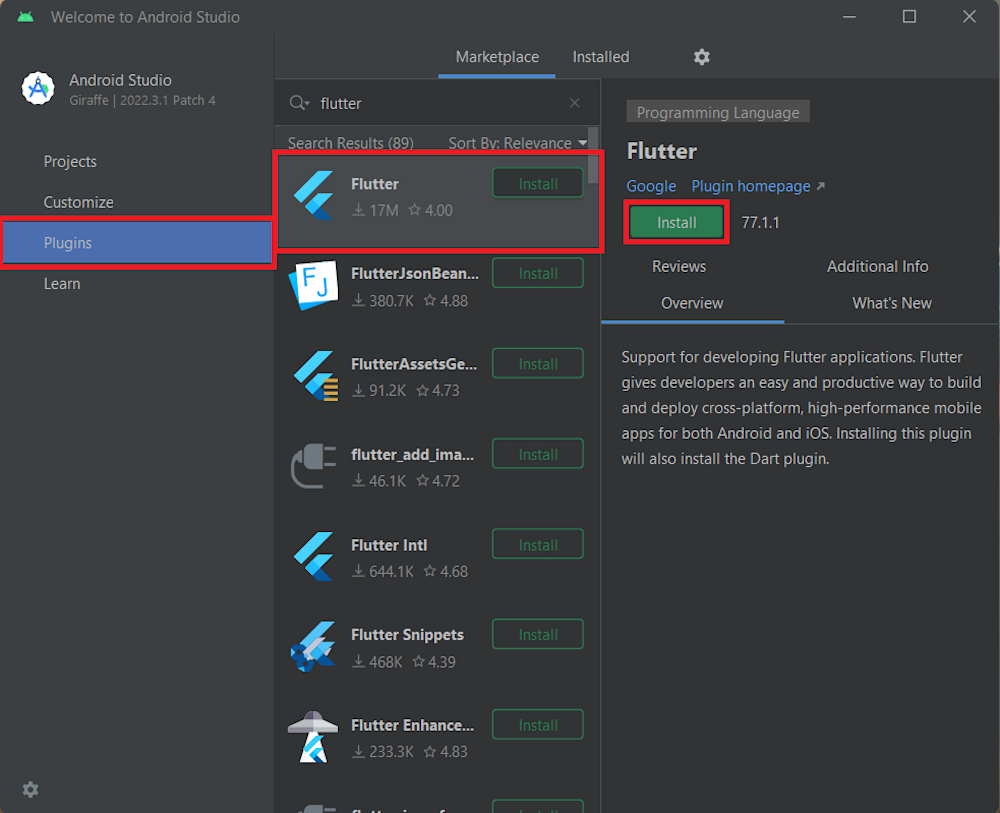
Restart Android Studio when your plugin finishes installing.
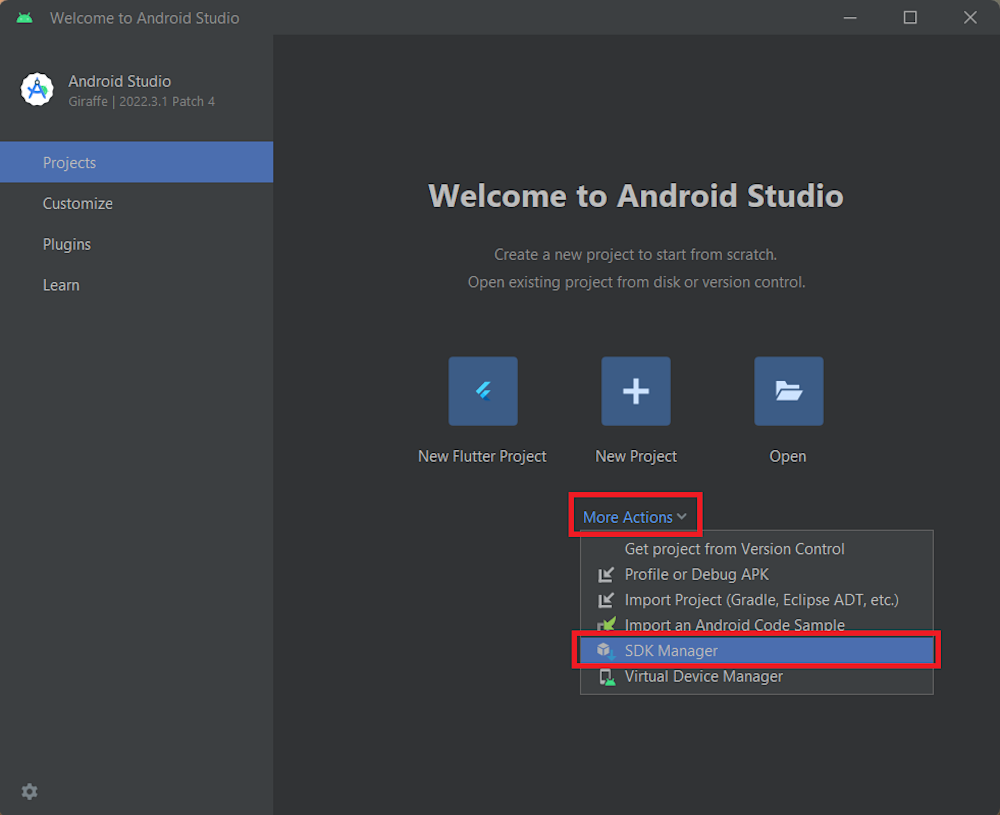
Now head over to the Projects tab and open up the SDK Manager:
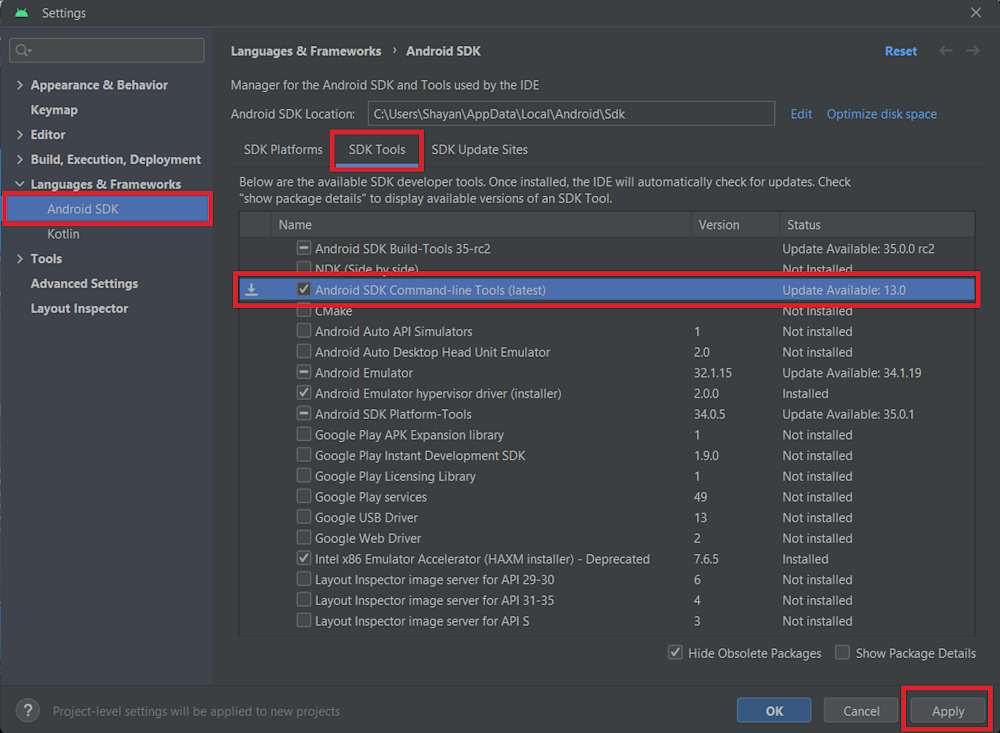
Next, open the Android SDK page and navigate to the SDK Tools tab. Scroll down until you find Android SDK Command-line tools, tick the checkbox, and click on Apply to start installing:
With this, we can begin creating our Flutter project.
Setting up the Flutter project
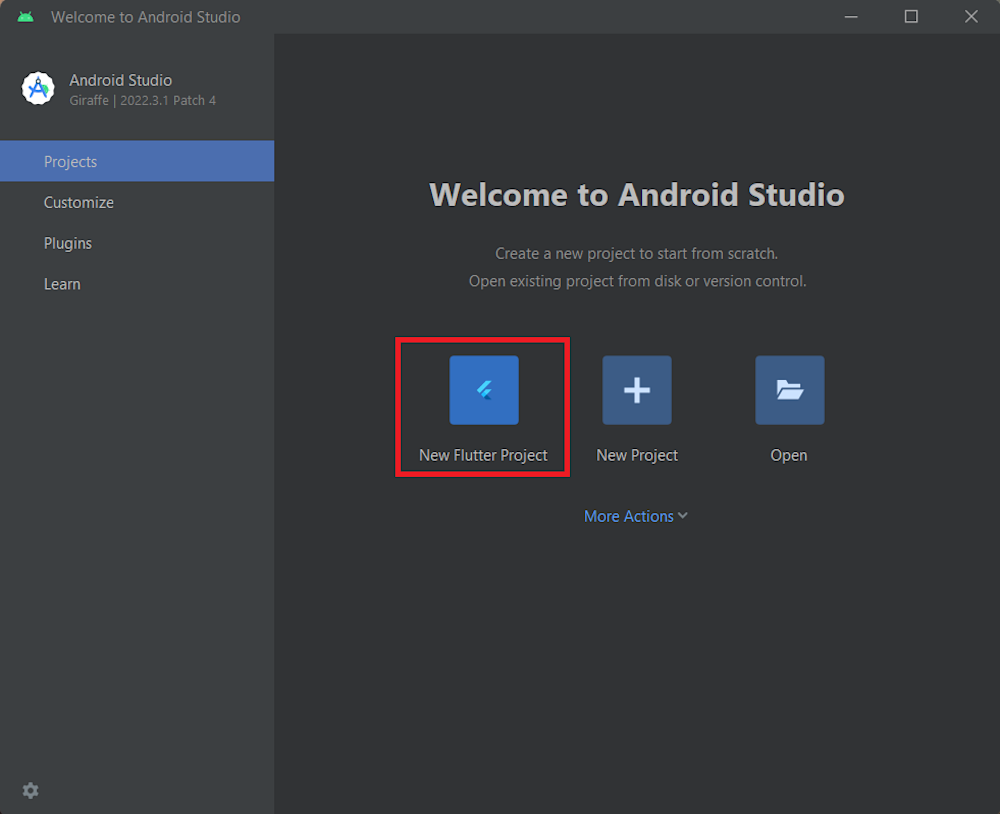
Now open up Android Studio, where you will see a new option called New Flutter Project. Select this option to head to the next window:
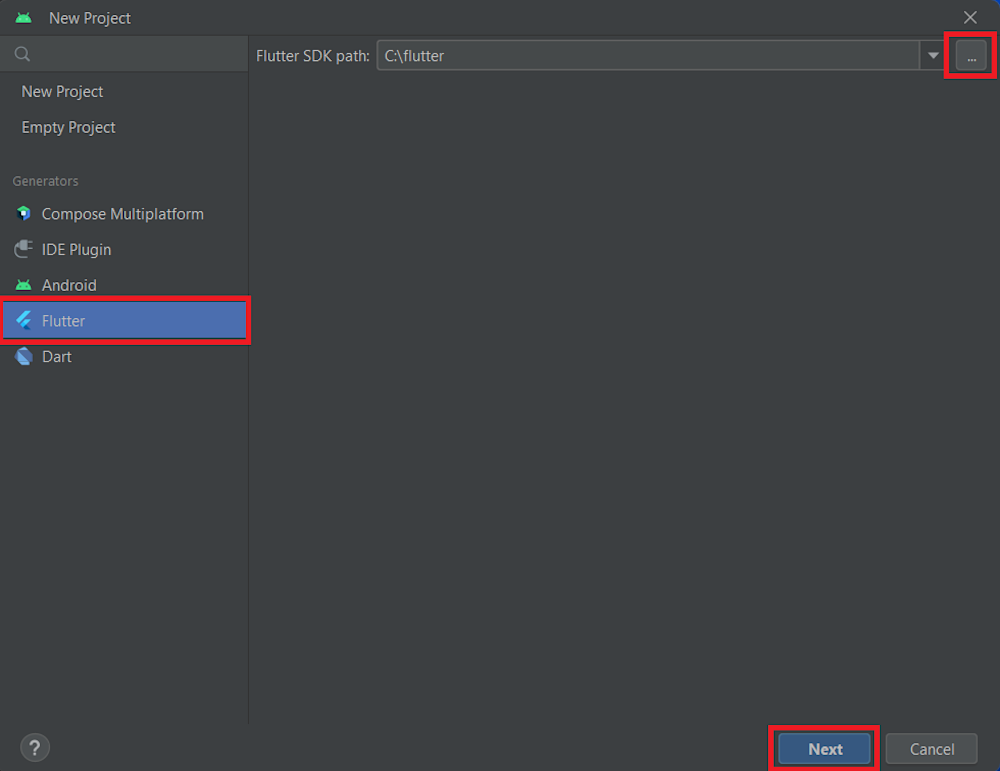
Next, select the open up the Flutter page and click on the … button to configure your Flutter SDK path. Click on Next when finished:
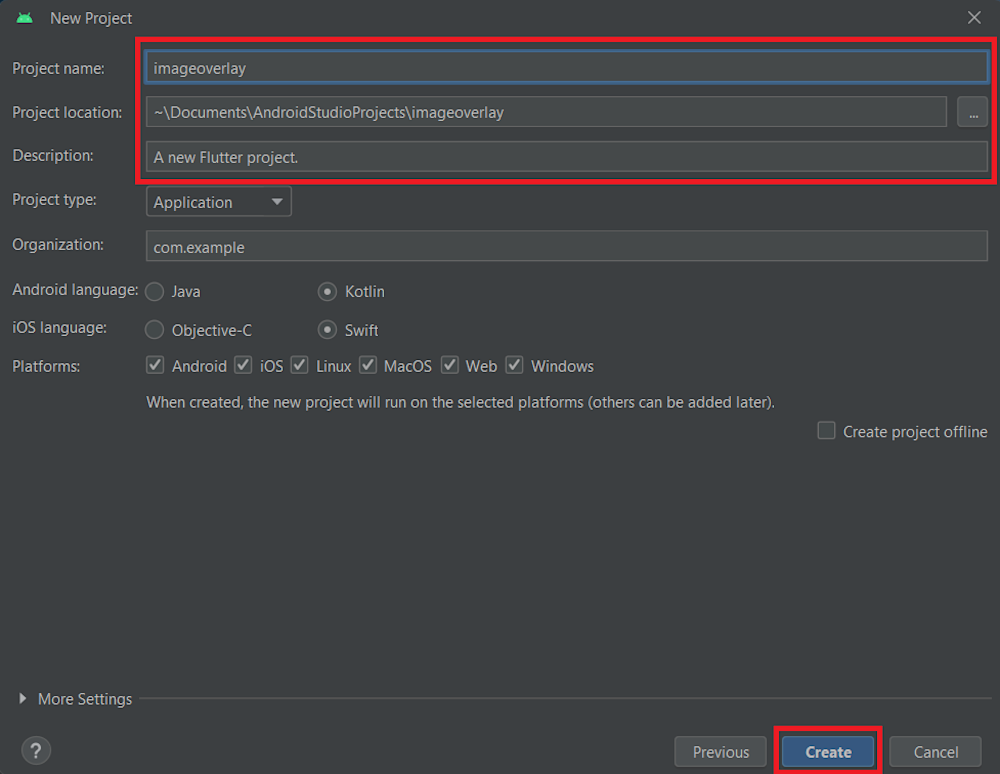
Now, we will define our project. Here, we have named our project imageoverlay and provided a small description of what we are going to do. Your project name must be a valid Dart package name, i.e., it should not have any spaces or capital letters. Additionally, we have defined a project path by clicking on the … button. Finally, click on Create to create a blank Flutter project.
Finally, for this tutorial, we will use Cloudinary to overlay images. So head over to your pubspec.yaml file and add in the Cloudinary Flutter SDK as a dependency:
image_picker: ^0.8.4+5
http: ^0.13.5
cloudinary_flutter: ^0.9.0
cloudinary_url_gen: ^0.9.0
Here, we are also adding the cloudinary_url_gen package, which will help us generate URLs for our images, as well as http, which will help us upload our images to the Cloudinary cloud. Lastly, the image_picker package will help us display our images.
This is what our pubspec.yaml file looks like:
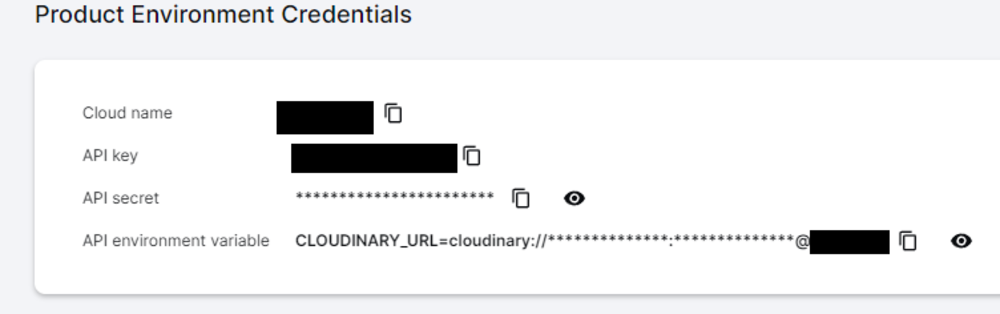
Finally, we will need our API credentials as well as an unsigned upload preset that will allow us to upload our images to the Cloudinary cloud. Let’s first retrieve our Cloudinary API credentials. To do this, sign in to your Cloudinary account.
Next, click Programmable Media to navigate to the Programmable Media Dashboard. There, you’ll find details such as your Cloud Name, API Key, and API Secret. Copy these to your clipboard, as we’ll use them later in the tutorial.
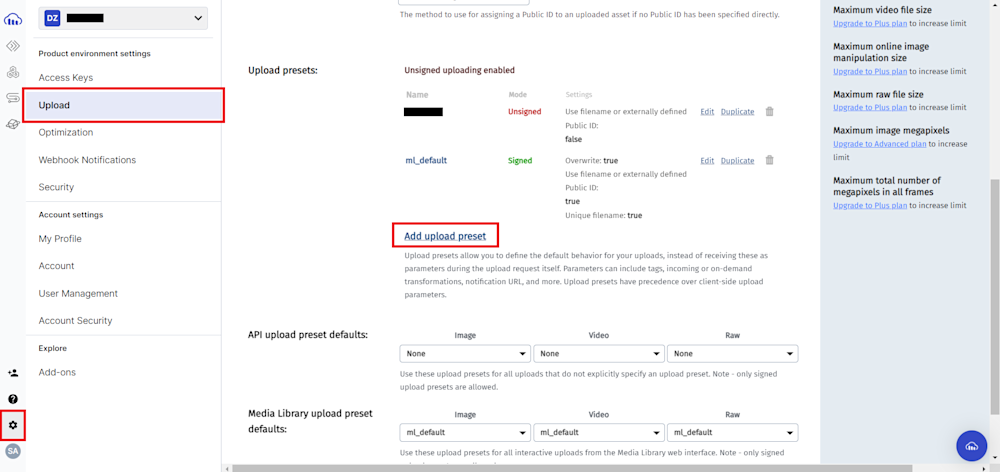
Next, we need to create an upload preset. Open your account settings by clicking on the gear button shown below. Navigate to the Upload tab and scroll down to find the Upload Presets. Now click on Add upload preset.
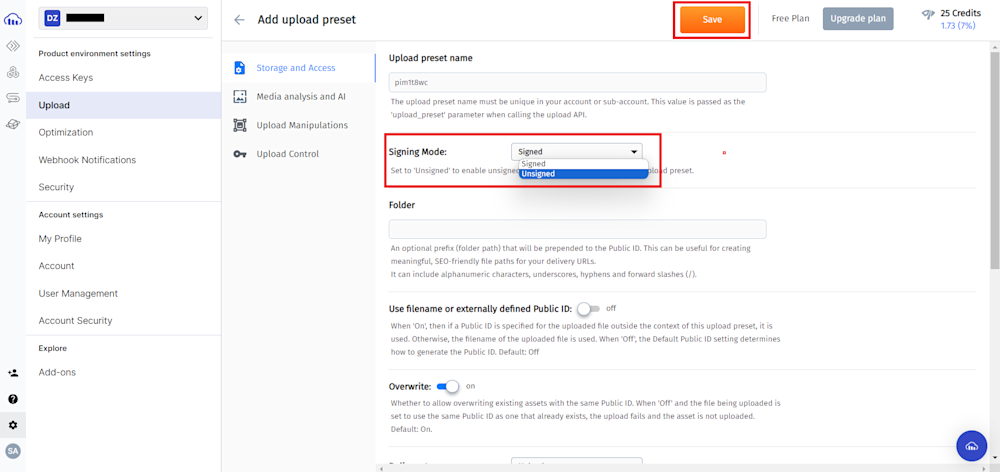
Here, change the signing mode to unsigned and click Save to save your account settings. Remember to copy your upload preset name, as we will use it later.
With this, we are now ready to begin coding our Flutter app.
Coding the Overlay in Flutter
Let’s start by opening the main.dart file, located in the lib directory of our project, and adding our imports:
// Import necessary packages
import 'dart:io';
import 'package:flutter/material.dart';
import 'package:image_picker/image_picker.dart';
import 'package:http/http.dart' as http;
import 'dart:convert';
import 'package:cloudinary_url_gen/cloudinary.dart';
import 'package:cloudinary_url_gen/transformation/transformation.dart';
Next, let’s define define our MyApp class.
class MyApp extends StatelessWidget {
 // This widget is the root of your application.
 @override
 Widget build(BuildContext context) {
   return MaterialApp(
     home: ImagePickerWidget(),
   );
 }
}
Here, the MyApp class is a stateless widget that acts as the root of the application’s widget tree. It renders a MaterialApp container for a material design interface and defines the home screen as ImagePickerWidget.
Next, we will define our ImagePickerWidget:
class ImagePickerWidget extends StatefulWidget {
 @override
 _ImagePickerWidgetState createState() => _ImagePickerWidgetState();
}
The ImagePickerWidget class is a StatefulWidget, meaning it’s designed to maintain and manage state changes over time. When instantiated, it creates its state through the _ImagePickerWidgetState class. It contains all the stateful logic and UI elements that may change during the widget’s lifecycle, such as user interactions or data updates.
Now that our ImagePickerWidget is complete, we need to define our _ImagePickerWidgetState class. This class contains the state variables and methods for selecting images from the gallery, uploading images to Cloudinary, and building the UI.
To begin, let’s start by creating our state variables:
class _ImagePickerWidgetState extends State<ImagePickerWidget> {
 File? _baseImage; // File to hold the base image
 File? _overlayImage; // File to hold the overlay image
 String? _finalImageUrl; // String to hold the final image URL
 final picker = ImagePicker(); // Image picker
Here, we have created 3 new variables: _baseImage, _overlayImage, and _finalImageUrl. The _baseImage and _overlayImage are File variables that will hold our image files, whereas the _finalImageUrl will contain a string that is essentially the URL of our final image. We also define a variable called picker, which instantiates an ImagerPicker object. This will help us get our files from the phone.
Next, we need to define functions to help us get our base and overlay from our gallery. To do this, we create two new functions inside our _ImagePickerWidgetState class: getBaseImage() and getOverlayImage(). These functions call our picker variable and retrieve our image files. Then, it uses the setState() hook to add these files to our File variables.
Following is the complete function:
// Function to get the base image from gallery
Future getBaseImage() async {
 final pickedFile = await picker.getImage(source: ImageSource.gallery);

 setState(() {
   if (pickedFile != null) {
     _baseImage = File(pickedFile.path);
   } else {
     print('No base image selected.');
   }
 });
}

// Function to get the overlay image from gallery
Future getOverlayImage() async {
 final pickedFile = await picker.getImage(source: ImageSource.gallery);

 setState(() {
   if (pickedFile != null) {
     _overlayImage = File(pickedFile.path);
   } else {
     print('No overlay image selected.');
   }
 });
}
Next, we need to define a function that will upload our files to the cloud. Since Flutter is a front-end framework, we will have to use an API call to upload our image to Cloudinary. To do this, we will begin by creating a function called uploadImage inside our _ImagePickerWidgetState class:
// Function to upload an image to Cloudinary
Future<String> uploadImage(File imageFile) async {
 var url = Uri.parse('https://api.cloudinary.com/v1_1/cloud_name/image/upload');
 var request = http.MultipartRequest('POST', url);
Here, we define our Cloudinary upload URL and use the http package to define a POST request.
Next, we add our image file using request.files.add and configure our Cloudinary API before finally using request.send() to upload our images. We then use the API result to extract the URL of our image before finally returning it as a String.
Here is what our uploadImage() function looks like:
// Function to upload an image to Cloudinary
Future<String> uploadImage(File imageFile) async {
 var url = Uri.parse('https://api.cloudinary.com/v1_1/your_cloud_name/image/upload');
 var request = http.MultipartRequest('POST', url);
 request.files.add(await http.MultipartFile.fromPath('file', imageFile.path));
 request.fields['upload_preset'] = 'your_unsigned_upload_prest';
 request.fields['api_key'] = 'your_api_key';
 var res = await request.send();
 var resStr = await res.stream.bytesToString();
 var decodedJson = jsonDecode(resStr);
 return decodedJson['url'];
}
Note: Make sure to replace your_cloud_name, your_api_key, and your_unsigned_upload_preset with your actual Cloudinary configuration.
Finally, we can build the UI for our app. We will create a Widget inside our _ImagePickerWidgetState class to do this. Begin by creating a Scaffold widget that provides a basic structure for the app’s layout and includes functionality like app bars, drawers, and floating action buttons. We will also add an AppBar widget to create a customizable app bar with a title at the top of the screen.
@override
Widget build(BuildContext context) {
  return Scaffold(
    appBar: AppBar(
      title: Text('Image Overlay'),
    ),
    // Other widgets will be added here
  );
}
Next, we will use the body property of the Scaffold to hold the main content of the app. We use a Center widget to align its child widget at the center of the screen. Inside it, we wrap the content with a SingleChildScrollView to allow scrolling when it overflows. Then, we use a Column widget to arrange the child widgets vertically.
@override
Widget build(BuildContext context) {
 return Scaffold(
   appBar: AppBar(
     title: Text('Image Overlay'),
   ),
   body: Center(
     child: SingleChildScrollView(
       child: Column(
         mainAxisAlignment: MainAxisAlignment.center,
         children: <Widget>[
           // Other widgets will be added here
         ],
       ),
     ),
   ),
 );
}
Now, for our base and overlay image selection we will create a row with text and a floating action button for selecting the base image. The onPressed property of the button is set to the getBaseImage function, which will allow you to pick an image from the gallery when the button is pressed:
...
             children: <Widget>[
               Text('Base Image'),
               Padding(
                 padding: const EdgeInsets.all(8.0),
                 child: SizedBox(
                   height: 30.0, width: 30.0,
                   child: FloatingActionButton(
                     onPressed: getBaseImage,
                     tooltip: 'Pick Base Image',
                     child: Icon(Icons.add_photo_alternate, size: 18.0),
                   ),
                 ),
               ),
             ],
           ),
           _baseImage == null
               ? Text('No base image selected.')
               : Container(
             width: 250.0, height: 150.0,
             child: Image.file(_baseImage!, fit: BoxFit.contain),
           ),
           SizedBox(height: 20),
           Row(
             mainAxisAlignment: MainAxisAlignment.center,
             children: <Widget>[
               Text('Overlay Image'),
               Padding(
                 padding: const EdgeInsets.all(8.0),
                 child: SizedBox(
                   height: 30.0, width: 30.0,
                   child: FloatingActionButton(
                     onPressed: getOverlayImage,
                     tooltip: 'Pick Overlay Image',
                     child: Icon(Icons.add_photo_alternate, size: 18.0),
                   ),
                 ),
               ),
             ],
           ),
...
If _finalImageUrl is null for our overlay image, we display a text indicating no final image is available. Otherwise, we display the final image using its URL.
...
_overlayImage == null
   ? Text('No overlay image selected.')
   : Container(
 width: 250.0, height: 150.0,
 child: Image.file(_overlayImage!, fit: BoxFit.contain),
),
SizedBox(height: 20),
Text('Final Image'),
_finalImageUrl == null
   ? Text('No final image available.')
   : Image.network(_finalImageUrl!),
...
Finally, we will add a floating action button. The floating action button triggers the upload process when pressed. It checks if both base and overlay images are selected, uploads them to Cloudinary, overlays them, and updates the UI with the final image.
This is the complete main.dart code:
// Import necessary packages
import 'dart:io';
import 'package:flutter/material.dart';
import 'package:image_picker/image_picker.dart';
import 'package:http/http.dart' as http;
import 'dart:convert';
import 'package:cloudinary_url_gen/cloudinary.dart';
import 'package:cloudinary_url_gen/transformation/transformation.dart';

void main() {
 runApp(MyApp());
}

class MyApp extends StatelessWidget {
 // This widget is the root of your application.
 @override
 Widget build(BuildContext context) {
   return MaterialApp(
     home: ImagePickerWidget(),
   );
 }
}

class ImagePickerWidget extends StatefulWidget {
 @override
 _ImagePickerWidgetState createState() => _ImagePickerWidgetState();
}

class _ImagePickerWidgetState extends State<ImagePickerWidget> {
 File? _baseImage; // File to hold the base image
 File? _overlayImage; // File to hold the overlay image
 String? _finalImageUrl; // String to hold the final image URL
 final picker = ImagePicker(); // Image picker

 // Function to get the base image from gallery
 Future getBaseImage() async {
   final pickedFile = await picker.getImage(source: ImageSource.gallery);

   setState(() {
     if (pickedFile != null) {
       _baseImage = File(pickedFile.path);
     } else {
       print('No base image selected.');
     }
   });
 }

 // Function to get the overlay image from gallery
 Future getOverlayImage() async {
   final pickedFile = await picker.getImage(source: ImageSource.gallery);

   setState(() {
     if (pickedFile != null) {
       _overlayImage = File(pickedFile.path);
     } else {
       print('No overlay image selected.');
     }
   });
 }

 // Function to upload an image to Cloudinary
 Future<String> uploadImage(File imageFile) async {
   var url = Uri.parse('https://api.cloudinary.com/v1_1/cloud_name/image/upload');
   var request = http.MultipartRequest('POST', url);
   request.files.add(await http.MultipartFile.fromPath('file', imageFile.path));
   request.fields['upload_preset'] = 'upload_preset';
   request.fields['api_key'] = 'api_key';
   var res = await request.send();
   var resStr = await res.stream.bytesToString();
   var decodedJson = jsonDecode(resStr);
   return decodedJson['url'];
 }

 @override
 Widget build(BuildContext context) {
   return Scaffold(
     appBar: AppBar(
       title: Text('Image Overlay'),
     ),
     body: Center(
       child: SingleChildScrollView(
         child: Column(
           mainAxisAlignment: MainAxisAlignment.center,
           children: <Widget>[
             Row(
               mainAxisAlignment: MainAxisAlignment.center,
               children: <Widget>[
                 Text('Base Image'),
                 Padding(
                   padding: const EdgeInsets.all(8.0),
                   child: SizedBox(
                     height: 30.0, width: 30.0,
                     child: FloatingActionButton(
                       onPressed: getBaseImage,
                       tooltip: 'Pick Base Image',
                       child: Icon(Icons.add_photo_alternate, size: 18.0),
                     ),
                   ),
                 ),
               ],
             ),
             _baseImage == null
                 ? Text('No base image selected.')
                 : Container(
               width: 250.0, height: 150.0,
               child: Image.file(_baseImage!, fit: BoxFit.contain),
             ),
             SizedBox(height: 20),
             Row(
               mainAxisAlignment: MainAxisAlignment.center,
               children: <Widget>[
                 Text('Overlay Image'),
                 Padding(
                   padding: const EdgeInsets.all(8.0),
                   child: SizedBox(
                     height: 30.0, width: 30.0,
                     child: FloatingActionButton(
                       onPressed: getOverlayImage,
                       tooltip: 'Pick Overlay Image',
                       child: Icon(Icons.add_photo_alternate, size: 18.0),
                     ),
                   ),
                 ),
               ],
             ),
             _overlayImage == null
                 ? Text('No overlay image selected.')
                 : Container(
               width: 250.0, height: 150.0,
               child: Image.file(_overlayImage!, fit: BoxFit.contain),
             ),
             SizedBox(height: 20),
             Text('Final Image'),
             _finalImageUrl == null
                 ? Text('No final image available.')
                 : Image.network(_finalImageUrl!),
           ],
         ),
       ),
     ),
     floatingActionButton: FloatingActionButton(
       onPressed: () async {
         if (_baseImage != null && _overlayImage != null) {
           var baseImageUrl = await uploadImage(_baseImage!);
           var overlayImageUrl = await uploadImage(_overlayImage!);
           var overlayImagePublicId = overlayImageUrl.split('/').last.split('.').first;
           var baseImagePublicId = baseImageUrl.split('/').last.split('.').first;

           var cloudinary = Cloudinary.fromCloudName(cloudName: "drkbps78i");
           var transformedImage = cloudinary.image(baseImagePublicId)
               .transformation(Transformation()
               .generic("l_$overlayImagePublicId")
               .generic('fl_layer_apply,g_center')).toString();

           print(transformedImage);

           setState(() {
             _finalImageUrl = transformedImage;
           });
         }
       },
       tooltip: 'Upload Images',
       child: Icon(Icons.cloud_upload),
     ),
   );
 }
}
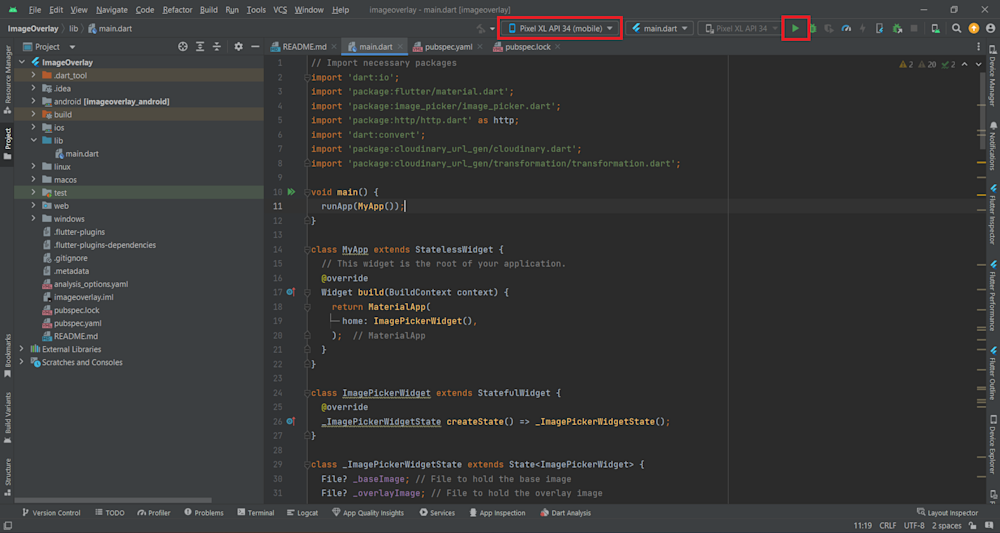
Now, all we need to do is run our app. To do this, select your Android device in the Flutter Device Selection drop-down and click the Play button at the top-right corner of your screen. This will launch your mobile emulator and run your Flutter image overlay app.
Here’s the final app:

Click the button next to the Base Image text to select a base image. Similarly, click the button next to the Overlay Image text to select an image you want to overlay on top of your base image. Finally, click the cloud upload button on the bottom left of your app to see your result image.
Let’s see our app in action:

Final Thoughts
In this article, we’ve explored the concept of image overlays, a technique that involves superimposing one image on top of another. When used effectively, this can add depth and complexity to your visuals, enhancing the overall user experience.
We’ve demonstrated how to implement this technique in a Flutter app using Cloudinary, a powerful media management platform. With Cloudinary, you can easily manipulate images, including creating overlays, and deliver them optimally to your users. The combination of Flutter, a rapidly growing mobile app SDK, and Cloudinary, with its robust media management capabilities, opens up several possibilities for app development. Whether overlaying images, transforming videos, or performing other media-related tasks, Cloudinary is a versatile tool that pairs well with Flutter.
As the popularity of Flutter continues to rise, integrating it with a dynamic platform like Cloudinary can significantly enhance your app’s media handling capabilities. So, why wait? Create a Cloudinary account today, and take your app development skills to the next level.
More from Cloudinary:

