
Managing file uploads from your web applications doesn’t have to feel overwhelming. We can get the job done quite simply and also add a smooth user experience. jQuery is an excellent solution that makes file selection and validation with preview functionality easy. Cloudinary will handle our storage and optimization while delivering at scale. When we combine these solutions together, we get jQuery image uploads that don’t need backend logic.
In this article:
- Why Use jQuery?
- How to Upload Images using jQuery
- Improving User Experience When Uploading Images using jQuery
- Streamline Image Uploads with Cloudinary
- Uploading Images to Cloudinary with jQuery
Why Use jQuery?
jQuery is still one of the most popular JavaScript libraries because it simplifies DOM manipulation and event handling. This makes it perfect for image upload use cases where we need to get quick user interaction quickly and reliably.
jQuery’s small footprint gives us a chance to add powerful features without bogging down our application. Query deals with file inputs and makes it easy to capture file selection events and validate file types while staying snappy and responsive. jQuery works with every browser, so it’s universally compatible.
It has tons of plugins and community solutions that have been developed over the years thanks to its widespread adoption. This means that if you want to implement a feature, there’s a good chance that someone has already done it for you. jQuery has a vast ecosystem with tools and documentation that make it a reliable choice for web-based projects.
How to Upload Images using jQuery
Let’s start with the basics of jQuery image upload implementation. We’ll build a foundation that can handle all the parts that we need; file selection, validation, and preview functionality.
Handling File Input with jQuery
The first step in any jQuery image upload feature is that we need to capture the file selection event. We need to listen for when users choose files from their device and get that file data for processing. This gives us a chance to validate files before we try any upload operations.
Here’s how we set up basic file input handling with proper validation:
<input type="file" id="imageUpload" accept="image/*">
<button id="uploadBtn">Upload Image</button>
<div id="status"></div>
$(document).ready(function() {
    let selectedFile = null;


    $('#imageUpload').on('change', function(e) {
        selectedFile = e.target.files[0];


        if (selectedFile) {
            // Validate our file type only accepts images
            if (!selectedFile.type.match('image.*')) {
                $('#status').text('Please select an image file');
                return;
            }


            // Validate our file size with a 5MB limit
            if (selectedFile.size > 5 * 1024 * 1024) {
                $('#status').text('Image must be smaller than 5MB');
                return;
            }


            $('#status').text('Image ready: ' + selectedFile.name);
        }
    });
});
This code shows us some important concepts for handling inputs with jQuery. We store the selected file in a variable so that we can access it when the user clicks on the upload button. The change event fires whenever someone selects a new file, so we can validate before we do anything else.
We’re checking two important things in the scenario: file size and file type. The file.type.match('image.*') check makes sure that users are only uploading image files, and the size stops massive image files from being uploaded, which could affect the upload process if it’s excessively large. The great part is that it gives the user instant feedback, so they will see why the upload isn’t allowing them to proceed.
It is important to note that client-side validation is not a security feature, and more of a user experience tweak. Malicious users can easily bypass jQuey validations, so whichever backend solution you are uploading to will need to perform its own set of validations.
How to Preview Images with jQuery
Users need to see what they’re uploading before they commit the image. It’s also great for checking that you haven’t already uploaded the same image because you can check each image before you upload, so let’s add a preview functionality.
In this code, we’ll create a temporary URL that points to the file because it’s quite memory efficient (instead of caching a base64 value, for instance).
<input type="file" id="imageUpload" accept="image/*">
<div id="preview-container">
    <img id="preview" style="max-width: 300px; display: none;">
</div>
<button id="uploadBtn">Upload Image</button>
<div id="status"></div>
$(document).ready(function() {
    let selectedFile = null;
    let previewUrl = null;


    $('#imageUpload').on('change', function(e) {
        selectedFile = e.target.files[0];


        if (selectedFile && selectedFile.type.match('image.*')) {
            // Clean up the previous preview URL if it exists
            if (previewUrl) {
                URL.revokeObjectURL(previewUrl);
            }


            // Create a temporary URL for the file
            previewUrl = URL.createObjectURL(selectedFile);
            $('#preview').attr('src', previewUrl).show();
            $('#status').text('Image ready: ' + selectedFile.name);
        }
    });
});
The URL.createObjectURL() method creates a temporary reference file that we display right away for the user. As we mentioned earlier, this is far more efficient than converting the image to base64 using FileReader. The preview shows up instantly when users select a file and makes it feel smooth and seamless.
Next, we have to clean up the temporary URLs with URL.revokeObjectURL() when we’re finished so that it frees up memory. It’s really important if users upload multiple images in the same session because each createObjectURL allocates memory that needs to be manually released.
Improving User Experience When Uploading Images using jQuery
Simple file selection works just fine, but as we all know, users expect more functionality than that. So, let’s make some improvements and make the user experience feel more intuitive and polished. For this we’ll add Bootstrap styling along with jQuery’s capabilities.
Using jQuery with Bootstrap for a Better Interface
Bootstrap gives us components that are already made for us, and they work great with jQuery. We can make interfaces like the upload section without too much effort, giving us an attractive feature that uses the power of jQuery. It also spares us the time and effort of crafting CSS components to give us the visual boost that we’re after.
Here’s a basic Bootstrap styled upload component with all the elements we need:
<link href="https://cdn.jsdelivr.net/npm/bootstrap@5.3.0/dist/css/bootstrap.min.css" rel="stylesheet">
<script src="https://code.jquery.com/jquery-3.6.0.min.js"></script>

<div class="container mt-5">
    <div class="card shadow-sm">
        <div class="card-body">
            <h4 class="card-title text-center mb-4">Upload Image to Cloudinary</h4>


            <!-- Drag and Drop Zone -->
            <div id="drop-zone" class="border border-2 border-primary rounded p-5 text-center mb-4"
                 style="border-style: dashed !important; cursor: pointer;">
                <p class="mb-0">Drag and drop your image here or click to browse</p>
            </div>

            <input type="file" id="imageUpload" style="display: none;" accept="image/*">


            <!-- Preview Area -->
            <div id="preview-container" class="mb-3 text-center" style="display: none;">
                <img id="preview" class="img-thumbnail" style="max-width: 100%; max-height: 300px;">
            </div>


            <!-- Progress Bar -->
            <div class="progress mb-3" style="display: none; height: 20px;">
                <div class="progress-bar progress-bar-striped progress-bar-animated"
                     role="progressbar" style="width: 0%">0%</div>
            </div>


            <button id="uploadBtn" class="btn btn-primary w-100">Upload to Cloudinary</button>
            <div id="status" class="alert mt-3" style="display: none;"></div>
        </div>
    </div>
</div>
$(document).ready(function() {
    let selectedFile = null;
    let previewUrl = null;


    $('#imageUpload').on('change', function(e) {
        selectedFile = e.target.files[0];


        if (selectedFile && selectedFile.type.match('image.*')) {
            if (previewUrl) {
                URL.revokeObjectURL(previewUrl);
            }
            previewUrl = URL.createObjectURL(selectedFile);
            $('#preview').attr('src', previewUrl);
            $('#preview-container').fadeIn();
        }
    });
});
Bootstrap’s form controls and cards with its utility classes give us something that looks great right out of the gates. The card component has a nice structure and even has shadow effects that make the interface feel like it’s floating slightly above the rest of the page.
The styling makes our upload look and feel like a production ready application instead of a basic form that we cobbled together. Users love apps that have a polished feel to them, and Bootstrap does that for us without needing us to spend a lot of time on design or CSS work.
Drag and Drop Functionality in jQuery Image Upload
Drag and drop is something that no self respecting uploader can be without, so let’s look at that code next. Users don’t all want to click through file dialogs, most people prefer dragging their preferred image right over into the app and watching it generate a preview. It feels natural, and if we don’t have that in our app then it will not go unnoticed by our users.
The implementation with jQuery uses a few different browser events to create the smooth interaction that we are looking for:
$(document).ready(function() {
    let $dropZone = $('#drop-zone');
    let selectedFile = null;
    let previewUrl = null;


    // We will make the drop zone clickable as fallback
    $dropZone.on('click', function() {
        $('#imageUpload').click();
    });


    // Stop the default drag behaviors
    $dropZone.on('dragover dragenter', function(e) {
        e.preventDefault();
        e.stopPropagation();
        $dropZone.addClass('bg-light');
    });


    $dropZone.on('dragleave dragend', function(e) {
        e.preventDefault();
        e.stopPropagation();
        $dropZone.removeClass('bg-light');
    });


    // We handle the drop here
    $dropZone.on('drop', function(e) {
        e.preventDefault();
        e.stopPropagation();
        $dropZone.removeClass('bg-light');


        let files = e.originalEvent.dataTransfer.files;
        if (files.length > 0) {
            handleFile(files[0]);
        }
    });


    // This handles regular file inputs
    $('#imageUpload').on('change', function(e) {
        if (e.target.files.length > 0) {
            handleFile(e.target.files[0]);
        }
    });


    function handleFile(file) {
        if (!file.type.match('image.*')) {
            $('#status').removeClass('alert-success').addClass('alert-danger')
                       .text('Please select a valid image file').show();
            return;
        }


        selectedFile = file;


        // Keep it tidy and clean up the previous preview
        if (previewUrl) {
            URL.revokeObjectURL(previewUrl);
        }


        // Let's show the preview
        previewUrl = URL.createObjectURL(file);
        $('#preview').attr('src', previewUrl);
        $('#preview-container').fadeIn();
        $('#status').hide();
    }
});
The secret ingredient to smooth drag and drop features is preventing the browser’s default behavior from kicking in. Without preventDefault(), the browser will try to open dropped files instead of letting us work our magic with them. We add some visual feedback for our eager users by changing the background color when users drag files over the drop zone so that they know it’s safe to let go of their mouse click.
You might have noticed that we’re accessing e.originalEvent.dataTransfer, and that’s because jQuery wraps the standard Event object, but we need that original event to access our newly dropped files. This is a common pattern that you’ll see when you work with newer browser APIs with jQuery.
The handleFile function lumps all of our file processing logic together and makes it easy to handle files from drag and drop or traditional file selection.
Streamline Image Uploads with Cloudinary
Now we have a polished interface that handles all the things we need; file selection, validation and previews! The next step is the uploading of image files somewhere they can be stored. We want to use Cloudinary in our example because it handles storage, transformation and delivery all in one scalable platform.
Finally, we can upload directly to Cloudinary’s API using unsigned upload presets and get back optimized, CDN-delivered URLs right away.
Setting Up Cloudinary
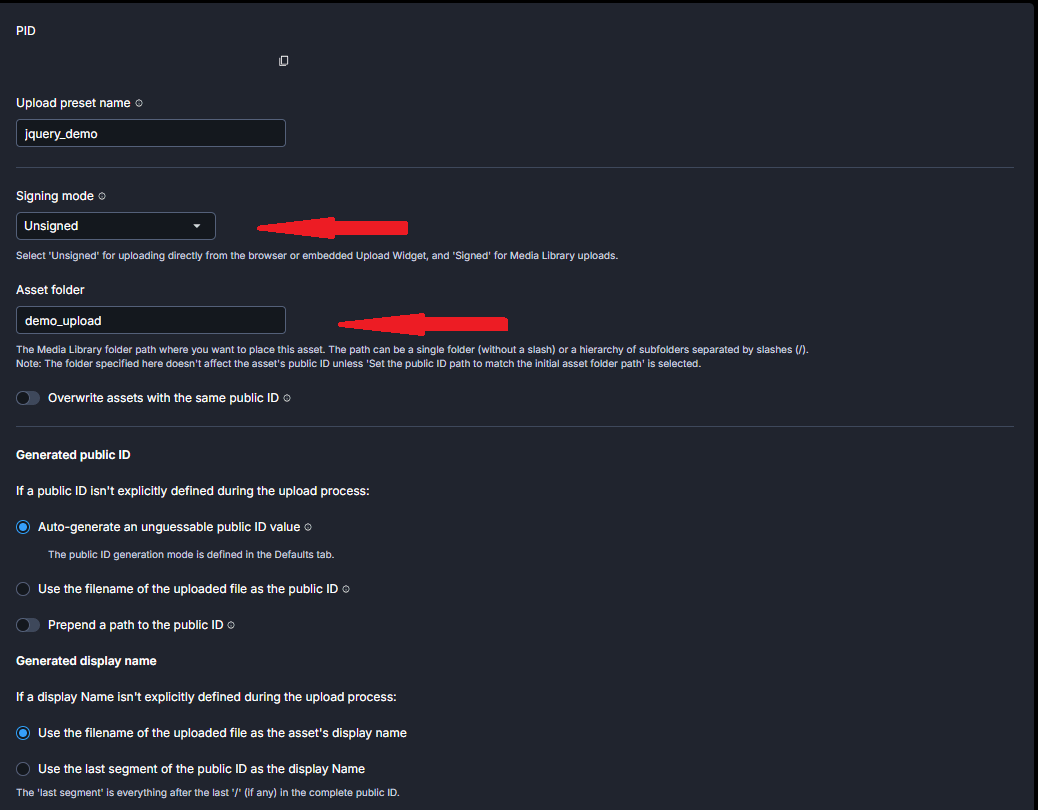
Before we move along and upload our images, we need to make a Cloudinary account and create an upload preset. Sign up for a free Cloudinary account, then we create an unsigned upload preset in our dashboard under Settings > Upload > Upload Presets.
This guide uses unsigned uploads, which means we give browsers direct access to our Cloudinary account without handling any backend validations. This is great for handling public facing features in your app like profile pictures or community galleries where simplicity is all we need.
Remember that unsigned uploads don’t require backend authentication, so we have to set a few parameters in our Cloudinary dashboard and not just in the jQuery code to keep things under control. We do this when we create our upload preset like this:
In the General tab, set:
- Signing Mode: Choose “Unsigned” to allow client-side uploads.
- Asset Folder Location: Choose a dedicated folder for these uploads to keep them organized and separated from other assets.
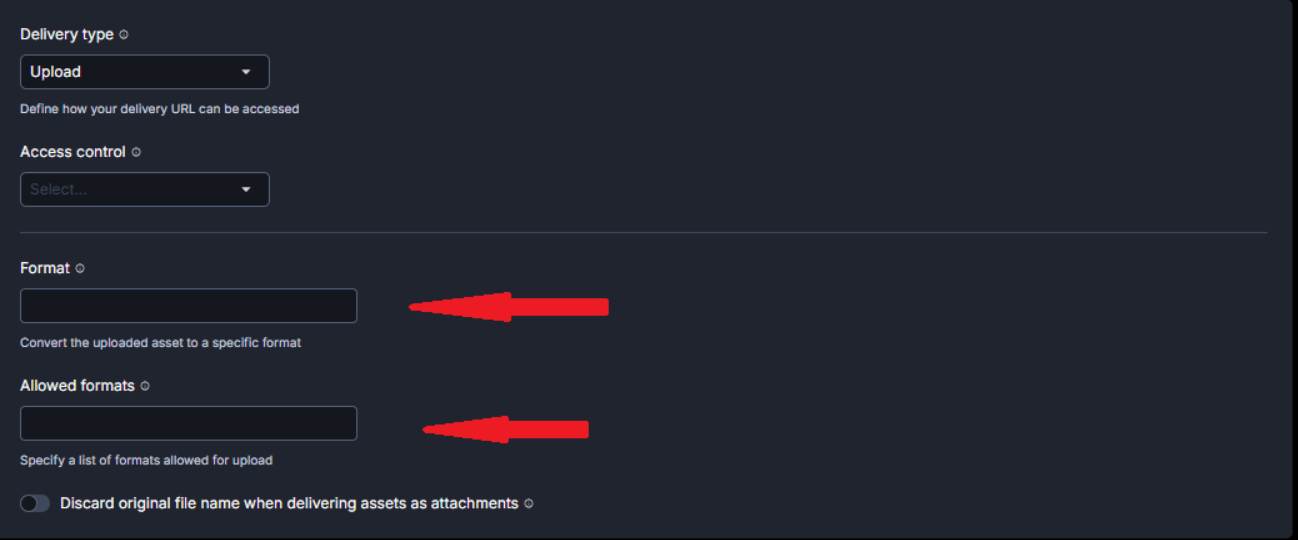
In the Optimize and Deliver tab, we configure:
- Allowed Formats: Specify which image formats can be uploaded. This stops users from uploading unwanted formats.
- Format: Optionally force conversion to a specific format (like converting all uploads to JPG for example).
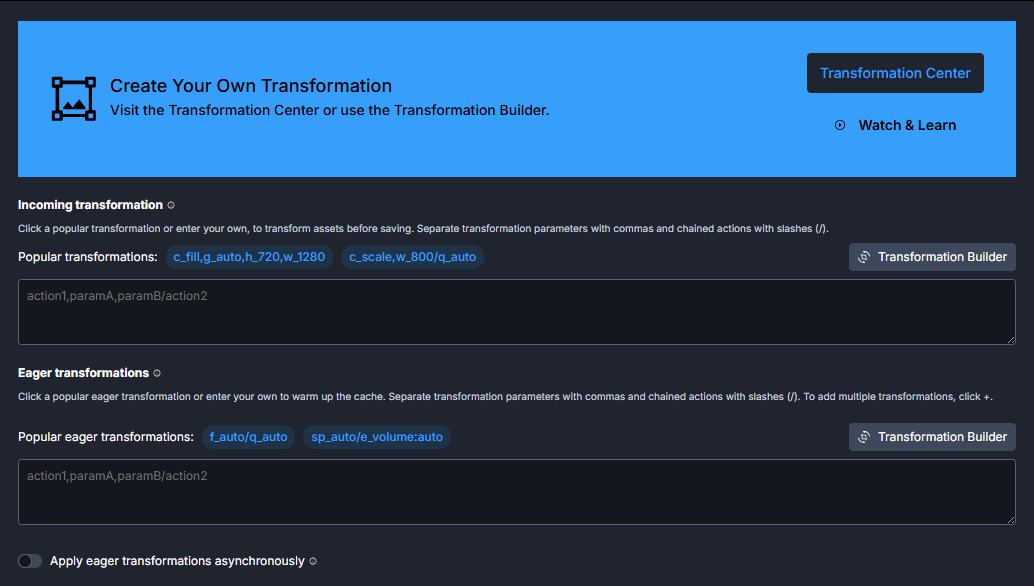
 In the Transform tab, we can use incoming transformations to control file dimensions and their quality:
- Add an incoming transformation like
w_2000,h_2000,c_limit,q_autoto make sure that uploaded images won’t go over 2000×2000 pixels. - This has a bonus in that it controls file size by limiting the dimensions and applying automatic quality optimization for us.
 These dashboard settings also stop malicious users from bypassing our client-side jQuery validation. The upload preset acts as your security boundary for unsigned uploads, which enforce restrictions that can’t be overridden from client-side.If you’re building a more complex application that needs to be able to overwrite specific files, or handle sensitive documents, then you should implement signed uploads instead. Signed uploads need a backend server running Node.js, Python, or PHP to generate secure signatures using our API secret. This ensures that only authenticated users can upload.
Uploading Images to Cloudinary with jQuery
Once we have our cloud name and upload preset all configured, we can integrate Cloudinary into our custom jQuery interface!
$(document).ready(function() {
    // Your Cloudinary configuration info goes here
    const CLOUD_NAME = 'your-cloud-name';
    const UPLOAD_PRESET = 'your-upload-preset'; // This must be unsigned


    let selectedFile = null;
    let previewUrl = null;


    $('#imageUpload').on('change', function(e) {
        selectedFile = e.target.files[0];


        if (selectedFile && selectedFile.type.match('image.*')) {
            if (previewUrl) {
                URL.revokeObjectURL(previewUrl);
            }
            previewUrl = URL.createObjectURL(selectedFile);
            $('#preview').attr('src', previewUrl);
            $('#preview-container').fadeIn();
        }
    });


    $('#uploadBtn').on('click', function() {
        if (!selectedFile) {
            $('#status').removeClass('alert-success').addClass('alert-danger')
                       .text('Please select an image first').show();
            return;
        }


        // We prepare upload data here
        let formData = new FormData();
        formData.append('file', selectedFile);
        formData.append('upload_preset', UPLOAD_PRESET);


        $('.progress').show();
        $('#status').removeClass('alert-danger').addClass('alert-info')
                   .text('Uploading...').show();
        $('#uploadBtn').prop('disabled', true);


        // Let's upload to Cloudinary
        $.ajax({
            url: `https://api.cloudinary.com/v1_1/${CLOUD_NAME}/image/upload`,
            type: 'POST',
            data: formData,
            processData: false, // Required for FormData
            contentType: false, // Required for FormData
            xhr: function() {
                let xhr = new window.XMLHttpRequest();
                xhr.upload.addEventListener('progress', function(e) {
                    if (e.lengthComputable) {
                        let percent = Math.round((e.loaded / e.total) * 100);
                        $('.progress-bar').css('width', percent + '%').text(percent + '%');
                    }
                }, false);
                return xhr;
            },
            success: function(response) {
                $('#uploadBtn').prop('disabled', false);
                $('.progress').hide();
                $('#status').removeClass('alert-info').addClass('alert-success')
                           .text('Upload successful!');


                // Replace preview with Cloudinary-hosted image
                $('#preview').attr('src', response.secure_url);
                console.log('Uploaded URL:', response.secure_url);
            },
            error: function(xhr) {
                $('#uploadBtn').prop('disabled', false);
                $('.progress').hide();


                let errorMsg = 'Upload failed.';
                if (xhr.status === 401) errorMsg = 'Invalid Cloud Name';
                if (xhr.status === 400) errorMsg = 'Invalid Upload Preset (ensure it is Unsigned)';


                $('#status').removeClass('alert-info').addClass('alert-danger')
                           .text(errorMsg);
                console.error('Error:', xhr.responseText);
            }
        });
    });
});
This code uploads the selected files directly to Cloudinary’s servers. The FormData object packages our file along with the upload preset and jQuery’s AJAX method sends it to Cloudinary’s API endpoint. When the upload is successful, we get back a response with the image URL and some metadata about the uploaded file.
The processData: false and contentType: false settings are important because they stop jQuery from trying to process our FormData object. This lets the browser set the right content type automatically, which we need for file uploads.
The progress tracking hooks into the XMLHttpRequest progress event to update our Bootstrap progress bar in real-time, which is what our users need to see when they are using the application. The progress percentage calculation uses e.loaded and e.total to give us our accurate progress during the upload.
Wrapping Up
There we have it! We’ve built our very own jQuery image upload solution with great features like drag and drop, instant previews, and uploads to Cloudinary. jQuery has simplified our client side logic and Cloudinary does all the heavy lifting with storage, optimization and access to our uploads through its CDN.
If you’re handling ten uploads or ten thousand uploads, Cloudinary scales automatically without you needing to manage servers or write your own image processing code. Sign up for a free Cloudinary account and start uploading with automatic optimization and transformation capabilities built in from day one.
Frequently Asked Questions
How do I validate image file types with jQuery?
The easiest way is to check the file type using file.type.match('image.*') to make sure that users only upload images. This validation happens immediately before any upload starts, and gives instant feedback to our users. Remember that while client-side validation improves user experience, it doesn’t replace server-side security checks.
Can jQuery handle multiple image uploads at once?
Yes it can. All you need to do is set the multiple attribute on the file input and then loop through the files array. You can upload images sequentially or in parallel using multiple AJAX requests. Cloudinary’s API supports batch uploads very well, which makes it easy to handle multiple files.
What’s the difference between unsigned and signed uploads?
Unsigned uploads allow direct browser-to-Cloudinary transfers without a backend server, which is perfect for public-facing features inside your app. Security is controlled through upload preset restrictions in our Cloudinary dashboard (file formats, folders, incoming transformations). Signed uploads need a backend server to create cryptographic signatures using your API secret. This provides stricter access control and advanced features like file overwriting.