Images are an essential part of mobile app design. They enhance aesthetics, improve usability, and help communicate information visually. However, large or unoptimized images can significantly affect your app’s performance, leading to slower loading times and increased bandwidth. And in some cases, users may also need to resize images for specific purposes, for instance in image editors or social media apps that support image uploads.
This article explores different methods for resizing images in Flutter, from using built-in widgets to external libraries and cloud-based media management platforms like Cloudinary, to resize and optimize images dynamically for an improved user experience.
In this article:
- Ways to Resize Images in Flutter
- Using the Image Widget with BoxFit
- Using Dart Image Library
- Using Cloudinary and Flutter to Resize Images
Set up a Flutter App
This tutorial assumes you’ve already set up a Flutter application. If you haven’t, install Flutter by following the official installation guide for your operating system. Alternatively, you can bootstrap a new Flutter app quickly using Firebase Studio, which is what we’ll be using in this tutorial.
Ways to Resize Images in Flutter
Before diving into methods for resizing images in Flutter, let’s first understand what image resizing means because it’s sometimes confused with other image editing techniques like cropping.
Image resizing (also known as scaling) means changing the width and height of an image while keeping the entire image content intact. In other words, the image is either scaled up or scaled down to fit a desired size, but no parts of the image are removed. When resizing, you typically want to optimize performance by reducing image file size, preserve visual consistency across devices with different resolutions or fit images within a specific layout or screen size.
Image cropping on the other hand, involves removing unwanted parts of an image to focus on a specific area or subject. Instead of resizing the entire image, cropping changes which portion of the image is visible.

In Flutter, there are multiple approaches to resize images, each suited to different use cases. Below, we explore three most commonly used methods.
1. Using the Image Widget with BoxFit
This is perhaps the simplest way to resize images in Flutter. This method works by adjusting how an image fits within a given space or container without altering the original file.
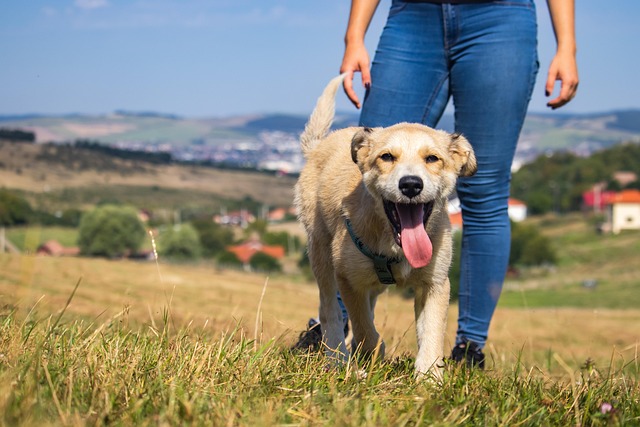
In this demo, we’ll be using this image with an original dimension of 640×427. To add the image to your project, create an assets folder in the root directory and copy the demo image into the folder, then add the following snippet under the flutter: section in pubspec.yaml (assuming you saved the image as dog.jpg):
flutter:
  assets:
    - assets/dog.jpg
Open your main.dart file and paste the following code to reduce the size of the image to a dimension of 300×250:
import 'package:flutter/material.dart';

void main() {
  runApp(const MyApp());
}

class MyApp extends StatelessWidget {
  const MyApp({super.key});

  @override
  Widget build(BuildContext context) {
    return MaterialApp(
      title: 'Image Resizing in Flutter',
      theme: ThemeData(primarySwatch: Colors.blue),
      home: const SimpleResizeExample(),
      debugShowCheckedModeBanner: false,
    );
  }
}

class SimpleResizeExample extends StatelessWidget {
  const SimpleResizeExample({super.key});

  @override
  Widget build(BuildContext context) {
    return Scaffold(
      appBar: AppBar(title: const Text('Resizing Images with Image Widget')),
      body: Center(
        child: Image.asset(
          'dog.jpg',
          width: 300, // Resize width
          height: 250, // Resize height
          fit: BoxFit.cover, // Maintains aspect ratio while covering the box
        ),
      ),
    );
  }
}
You can see the image looks smaller than the original as shown below:

If you’re looking for a quick and easy method to scale an image and maintain its aspect ratio, this method works pretty well. However, this method doesn’t reduce the original file size (the original image is loaded as-is), but only controls how the image is rendered in the UI.
2. Using Dart Image Library
The Dart Image Library package allows you to load, transform, and save images programmatically in a variety of image formats. It supports operations like resizing, cropping, and compression, making it a good choice for preprocessing images in Flutter applications.
To install the package, and path_provider (for filesystem access), add the following under the dependencies: section in pubspec.yaml:
dependencies:
  flutter:
    sdk: flutter
  image: ^1.0.0
  path_provider: ^2.1.0
Then paste the following code in main.dart:
import 'dart:io';
import 'package:flutter/material.dart';
import 'package:flutter/services.dart' show rootBundle;
import 'package:image/image.dart' as img;
import 'package:path_provider/path_provider.dart';

void main() {
  runApp(const MyApp());
}

class MyApp extends StatelessWidget {
  const MyApp({super.key});

  @override
  Widget build(BuildContext context) {
    return const MaterialApp(
      title: 'Dart Image Resize Demo',
      home: ImageResizeScreen(),
      debugShowCheckedModeBanner: false,
    );
  }
}

class ImageResizeScreen extends StatefulWidget {
  const ImageResizeScreen({super.key});

  @override
  ImageResizeScreenState createState() => ImageResizeScreenState();
}

class ImageResizeScreenState extends State<ImageResizeScreen> {
  File? resizedFile;

  Future<void> resizeImage() async {
    // 1. Load image bytes from assets
    final byteData = await rootBundle.load('assets/dog.jpg');
    final bytes = byteData.buffer.asUint8List();

    // 2. Decode to Image object
    final originalImage = img.decodeImage(bytes);

    // 3. Resize
    final resized = img.copyResize(
      originalImage!,
      width: 200,
      height: 200,
    );

    // 4. Save the resized file in temp folder
    final tempDir = await getTemporaryDirectory();
    final filePath = '${tempDir.path}/resized_sample.jpg';
    final file = File(filePath)..writeAsBytesSync(img.encodeJpg(resized));

    setState(() {
      resizedFile = file;
    });
  }

  @override
  Widget build(BuildContext context) {
    return Scaffold(
      appBar: AppBar(title: const Text("Resizing Images Using Dart Image Library")),
      body: Center(
        child: Column(
          mainAxisAlignment: MainAxisAlignment.center,
          children: [
            resizedFile != null
                ? Image.file(resizedFile!, width: 200, height: 200)
                : const Text("Press button to resize image"),
            const SizedBox(height: 20),
            ElevatedButton(
              onPressed: resizeImage,
              child: const Text("Resize Image"),
            ),
          ],
        ),
      ),
    );
  }
}
In the above code, the copyResize function returns a resized copy of the input image passed to it. According to the docs:
- If width is set but not height, height will be calculated to maintain the aspect ratio of src.
- If height is set but not width, width will be calculated to maintain the aspect ratio of
src. - If both width and height are set:
- If
maintainAspect(a boolean value) is not set or is false, src will be stretched. - If
maintainAspectis true,srcwill fill the new resolution without changing the aspect ratio, usingbackgroundColoras the padding color.
- If
This method works for both static images (as in our example) and dynamic images uploaded by users to your client application.
Here’s the resized image from example above:

While the Dart Image Library is powerful and can meet most of your needs for image resizing, it has some limitations that might affect the performance of your application. Because it’s a pure Dart implementation, it lacks native GPU acceleration, and it decodes the full image into memory. This high RAM usage can lead to UI lag and poor performance, especially when handling large images.
Using Cloudinary and Flutter to Resize Images
So far, we have explored two different methods for resizing images in Flutter apps, with each having its own strengths and limitations. For large scale apps or scenarios where you need to resize images dynamically, a cloud-based media management and delivery platform like Cloudinary is a more efficient solution. Cloudinary automates tasks like uploading, storage, manipulation (including resizing), optimization, and delivery of media assets, using programmable APIs, SDKs and URL-based transformations.
To set up Cloudinary in your Flutter app, you need to sign up for a Cloudinary account and then retrieve your product environment credentials from your dashboard. Uploading assets to Cloudinary can be done in a variety of ways. In a client application, we can use the Upload API to upload media assets to your Cloudinary product environment.
Add the following dependencies to pubspec.yaml:
dependencies:
  image_picker: ^1.0.0
  http: ^1.5.0
image_picker: A Flutter plugin for iOS and Android for picking images from the image library, and taking new pictures with the camera.http: A package for making HTTP requests.
A typical image resizing workflow with Cloudinary and Flutter looks like this:
- Upload the image asset to your Cloudinary product environment and note its
public_id. - Then apply transformations to the image using its
public_id.
Let’s see how this works in code.
Paste the following code in main.dart (the image used in this example has an original dimension of 853×1280):
import 'dart:convert';
import 'dart:io';

import 'package:flutter/material.dart';
import 'package:image_picker/image_picker.dart';
import 'package:http/http.dart' as http;

void main() {
  runApp(
    MaterialApp(
      home: CloudinaryUploadResizeDemo(),
      debugShowCheckedModeBanner: false,
    ),
  );
}

class CloudinaryUploadResizeDemo extends StatefulWidget {
  @override
  _CloudinaryUploadResizeDemoState createState() =>
      _CloudinaryUploadResizeDemoState();
}

class _CloudinaryUploadResizeDemoState
    extends State<CloudinaryUploadResizeDemo> {
  String? uploadedImageUrl;
  bool uploading = false;

  final cloudName = "your_cloud_name"; // Change to your Cloud name
  final uploadPreset = "your_preset"; // Change to your unsigned upload preset

  Future<void> uploadToCloudinary(File file) async {
    setState(() => uploading = true);

    try {
      print("Uploading to Cloudinary...");

      final url = Uri.parse(
        'https://api.cloudinary.com/v1_1/$cloudName/upload',
      );

      final request = http.MultipartRequest('POST', url)
        ..fields['upload_preset'] = uploadPreset
        ..files.add(await http.MultipartFile.fromPath('file', file.path));

      final response = await request.send();

      if (response.statusCode == 200) {
        final responseData = await response.stream.toBytes();
        final responseString = String.fromCharCodes(responseData);
        final json = jsonDecode(responseString);

        setState(() {
          uploadedImageUrl = json['secure_url'];
          uploading = false;
        });

        print("Uploaded URL: $uploadedImageUrl");
      } else {
        print("Upload failed. Status: ${response.statusCode}");
        setState(() => uploading = false);
      }
    } catch (e) {
      print("Upload error: $e");
      setState(() => uploading = false);
    }
  }

  Future<void> pickAndUpload() async {
    final picked = await ImagePicker().pickImage(source: ImageSource.gallery);
    if (picked != null) {
      await uploadToCloudinary(File(picked.path));
    }
  }

  @override
  Widget build(BuildContext context) {
    final resizedImageUrl = uploadedImageUrl != null
        ? uploadedImageUrl!.replaceFirst(
            "/upload/",
            "/upload/w_400,h_850,c_pad/",
          ) // Resize here
        : null;
   print("Resized URL: $resizedImageUrl");


    return Scaffold(
      appBar: AppBar(title: Text("Cloudinary Image Upload and Resizing")),
      body: Center(
        child: uploading
            ? CircularProgressIndicator()
            : uploadedImageUrl == null
            ? Text("No image uploaded yet")
            : Column(
                mainAxisAlignment: MainAxisAlignment.center,
                children: [
                  Text("Uploaded and Resized Image"),
                  SizedBox(height: 10),
                  Padding(
                    padding: const EdgeInsets.symmetric(horizontal: 16.0),
                    child: Image.network(
                      uploadedImageUrl!,
                      fit: BoxFit.contain,
                    ),
                  ),
                ],
              ),
      ),
      floatingActionButton: FloatingActionButton(
        onPressed: pickAndUpload,
        child: Icon(Icons.upload),
      ),
    );
  }
}
Above, the uploadToCloudinary function asynchronously uploads the specified file to Cloudinary using http’s POST request, updates the UI to show the uploading status, and stores the received secure image URL upon successful completion. In build(BuildContext context), we recalculate the resizedImageUrl by taking the original uploadedImageUrl and inserting a Cloudinary transformation string (/w_400,h_850,c_fill/) into the URL path, which resizes the image for display.
Here’s the resulting transformed URL:
https://res.cloudinary.com/cloudinarymich/image/upload/w_400,h_850,c_pad/v1762419401/f1gt0oalwg4ble8m67ml.jpg

As you can see, choosing Cloudinary for image resizing in Flutter offers several advantages. For instance, it eliminates the need for you to manage your own image storage infrastructure. You gain the ability to perform dynamic resizing on-the-fly based on user input, and easily upscale or downscale images as required. You can read more about resizing images in the Cloudinary docs.
Wrapping Up
Resizing images in Flutter can be approached in multiple ways, each with unique advantages. The Image widget with BoxFit is often sufficient for quick UI adjustments and a perfect fit for responsive layouts. For use cases requiring actual file size reduction, Dart Image Library gives you fine-grained control over dimensions, quality, and format. For scalable and complex applications, Cloudinary’s dynamic URL transformations offload the heavy lifting to the cloud, ensuring fast load times and adaptive delivery across devices.
Transform your videos instantly with Cloudinary’s powerful API tools. Sign up for a Cloudinary account today and see how easy video transformation can be.
Frequently Asked Questions
How do I maintain quality when resizing images?
To maintain visual quality when resizing images, try to maintain the original aspect ratio. Also, scaling up an image beyond its original dimensions will likely reduce the image quality and cause blurred or pixelated outputs.
Does resizing an image reduce its file size?
Resizing an image can reduce its file size if you’re actually changing the pixel dimensions or compressing it, but simply changing the display size in Flutter using the Image widget for example, does not reduce the original file size. In Cloudinary, you can resize an image and compress its size at the same time using chained transformations.
What is the best tool for resizing images in Flutter?
The best tool for resizing images depends on your specific use case. For dynamic resizing and complex projects, external services like Cloudinary will make a good choice. While for local processing or static resizing, the Image widget or Dart Image Library works well.

